


maven简介
- Maven 是一个项目管理工具
- 项目对象模型 (Project Object Model)
一个maven工程都有一个pom.xml文件,用来定义项目的坐标、项目依赖、项目信息、插件目标等。
maven项目中不直接将jar包导入到工程中,
而是通过在 pom.xml 文件中添加所需jar包的坐标。
项目运行时,通过读取坐标到一个专门用于“存放jar包仓库"(Maven仓库)找到相应的jar包。
-
依赖管理系统(Dependency Management System)
通过maven的依赖管理对项目所依赖的jar包进行统一管理。 -
一个项目生命周期(Project Lifecycle)
使用maven完成项目的构建,项目构建包括:清理、编译、测试、部署等过程
maven将这些过程规范称为一个生命周期。
1. Clean Lifecycle
		在进行真正的构建之前进行一些清理工作。
		clean
2. Default Lifecycle
		构建的核心部分,编译,测试,打包,部署等等。
		compile test package install deploy
3. Site Lifecycle
		生成项目报告,站点。
		site 几乎不用
install>package>test>compile
1. clean
		maven工程的清理命令,执行clean会删除target目录及内容。
		以后大家拿到别人的maven的项目的时候,第一个操作
2. compile
		maven工程的编译命令,主要作用是将 src/main/java 下的文件编译为class文件输出到target目录下。
		也会将src/main/resources下的配置文件复制到target目录下
3. test
		maven工程的测试命令,作用是执行 src/test/java 下单元测试类,并编译为class文件,且运行所有的测试类。
		还执行了compile命令
4. package
		maven工程的打包命令,对于java工程执行package打成jar包,对于web工程打成war包。
        还会执行test命令
5. install
		maven工程的安装命令,执行install将mave工程打成jar包或war包,并发布到本地仓库。
        还会执行package命令
-
一组标准集合
maven将整个项目管理过程定义一组标准
比如:通过maven构建工程有标准的目录结构,有标准的生命周期阶段、依赖管理有标准的坐标定义等。 -
插件(plugin)目标
maven管理项目生命周期过程都是基于插件(jar)完成的。
maven常用插件
maven工程标准架构
| 目录 | 备注 |
|---|---|
| ${basedir} | 存放 pom.xml和所有的子目录 |
| ${basedir}/src/main/resources | 项目的资源,如spring配置文件,properties资源文件等 |
| ${basedir}/src/main/webapps web | 项目特有 |
| ${basedir}/src/test/java | 项目的测试类,比如说 JUnit代码、TestNg代码 |
| ${basedir}/src/test/resources | 测试代码使用的资源 |
maven-resources-plugin(资源插件)
- Maven 在打包时默认只将 src/main/resources和src/main/java 里的配置文件打包到jar,
像mybatis的mapper.xml这种需要打包到类路径下的配文就需要特殊处理,
要么把XxxMapper.xml放到resources中,要么指定打包目录。
虽然有插件,但不用plugin,用resources/resource标签就行了
<build>
    <resources>
        <resource>
            <directory>src/main/java</directory>
            <includes>
                <include>**/*.xml</include>
            </includes>
        </resource>
        <resource>
            <directory>src/main/resources</directory>
            <includes>
                <include>**/*.xml</include>
                <include>**/*.properties</include>
            </includes>
        </resource>
    </resources>
</build>
- 我们可以在资源文件里用使用占位符{propertyName},然后开启对资源文件的过滤,
pom.xml里再统一设置所有{propertyName}对应的值,
就可以在构建过程中将值替换掉资源文件中对应的${propertyName}
<buid>
		<!--  过滤器资源      -->
		<filters>
			<filter>filter-values.properties</filter>
		</filters>
		<sourceDirectory>src/main/java</sourceDirectory>
        <resources>
            <resource>
                <directory>src/main/resources</directory>
                <!--  如果资源文件中存在变量引用,是否替换资源中的变量
                	变量的来源:
                		1、<properties>标签中定义的变量
                		2、<build> 中定义的过滤器资源
                     -->
                <filtering>true</filtering>
                <!--  需要包含的文件资源      -->
                <includes>
                    <include>**/**</include>
                </includes>
                <!--  需要排除的文件资源      -->
                <excludes>
                    <exclude>**/*.jpg</exclude>
                </excludes>
            </resource>
        </resources>
        <testSourceDirectory>src/test/java</testSourceDirectory>
        <testResources>
            <testResource>
                <directory>src/test/resources</directory>
                <filtering>true</filtering>
                <includes>
                    <include>**/**</include>
                </includes>
                <excludes>
                    <exclude>**/*.pdf</exclude>
                </excludes>
            </testResource>
        </testResources>
</build>
maven-compiler-plugin(编译插件)
1.设置插件
<plugin>
    <!-- 指定maven编译的jdk版本,如果不指定,maven3默认用jdk 1.5 maven2默认用jdk1.3 -->
    <groupId>org.apache.maven.plugins</groupId>
    <artifactId>maven-compiler-plugin</artifactId>
    <version>3.1</version>
    <configuration>
        <!--
	        一般而言,target与source是一致的,
	        但有时为了让程序能在其他版本的jdk中运行(对于低版本目标jdk,源代码中不能使用低版本jdk中不支持的语法),
	        会存在target不同于source的情况
        -->
        <source>1.8</source> <!-- 源代码使用的JDK版本 -->
        <target>1.8</target> <!-- 需要生成的目标class文件的编译版本 -->
        <encoding>UTF-8</encoding><!-- 字符集编码 -->
        <skipTests>true</skipTests><!-- 跳过测试 -->
        <verbose>true</verbose>
        <showWarnings>true</showWarnings>
        <fork>true</fork>
        <!-- 要使compilerVersion标签生效,还需要将fork设为true,用于明确表示编译版本配置的可用 -->
        <executable><!-- path-to-javac --></executable>
        <!-- 使用指定的javac命令,例如:<executable>${JAVA_1_4_HOME}/bin/javac</executable> -->
        <compilerVersion>1.3</compilerVersion>
        <!-- 指定插件将使用的编译器的版本 -->
        <meminitial>128m</meminitial>
        <!-- 编译器使用的初始内存 -->
        <maxmem>512m</maxmem>
        <!-- 编译器使用的最大内存 -->
        <compilerArgument>-verbose -bootclasspath ${java.home}\lib\rt.jar</compilerArgument>
        <!-- 这个选项用来传递编译器自身不包含但是却支持的参数选项 -->
    </configuration>
</plugin>
2.除了在build中设置plugin,还可以直接在properties中设置
<properties>
    <!-- maven-compiler-plugin 将会使用指定的 JDK 版本对源代码进行编译(针对编译运行环境) -->
    <maven.compiler.source>1.8</maven.compiler.source>
	<!-- maven-compiler-plugin 将会使用指定的 JDK 版本将 java 文件编译为 class 文件(针对编译运行环境) -->
    <maven.compiler.target>1.8</maven.compiler.target>
    <java.version>1.8</java.version>
<properties>
3.SpringBoot项目可以通过java.version接在properties中设置
<properties>
	<java.version>1.8</java.version>
</properties>
4.全局设置
上面的3种设置只会对pom所在项目和子项目生效,如想全局设置。要改setting.xml
<profile>
    <!-- 定义的编译器插件 ID,全局唯一 -->
    <id>jdk-1.8</id>
    <!-- 插件标记, activeByDefault 是否为默认编译器, jdk 提供编译器版本 -->
    <activation>
        <activeByDefault>true</activeByDefault>
        <jdk>1.8</jdk>
    </activation>
    <!-- 配置信息 source-源信息, target-字节码信息, compilerVersion-编译过程版本 -->
    <properties>
        <maven.compiler.source>1.8</maven.compiler.source>
        <maven.compiler.target>1.8</maven.compiler.target>
        <maven.compiler.compilerVersion>1.8</maven.compiler.compilerVersion>
    </properties>
</profile>
maven-source-plugin(默认会在target下自动生成source的jar)
<plugin>
    <groupId>org.apache.maven.plugins</groupId>
    <artifactId>maven-source-plugin</artifactId>
    <version>3.0.1</version>
    <executions>
        <execution>
            <id>attach-sources</id>
            <goals>
                <goal>jar</goal>
            </goals>
        </execution>
    </executions>
</plugin>
maven-dependency-plugin
用来把项目的依赖复制到指定目录,${project.build.directory}表示jar的类路径。一般用于打全量包或者在线转离线环境。
<!-- 将项目依赖包复制到<outputDirectory>指定的目录下 -->
<plugin>
    <groupId>org.apache.maven.plugins</groupId>
    <artifactId>maven-dependency-plugin</artifactId>
    <executions>
        <execution>
            <id>copy-dependencies</id>
            <phase>package</phase>
            <goals>
                <goal>copy-dependencies</goal>
            </goals>
            <configuration>
                <outputDirectory>
                    ${project.build.directory}/lib
                </outputDirectory>
            </configuration>
        </execution>
    </executions>
</plugin>
maven-jar-plugin
当我们将项目模块化后,有一些通用的资源文件基本上大多数模块都会用到,比如log4j.properties,jdbc.properties等,模块中有了这些资源文件,我们才能单独对该模块进行开发、调试。默认情况下maven-jar-plugin会将这些资源文件全部package成一个jar包进行发布,如果这样的jar包集成到一个主应用中部署,运行,很可能导致主应用的配置不生效,我称之为配置混乱,为了解决这个问题,可以开启maven-jar-plugin的排除功能,在执行mvn package之前排除指定的资源文件。
<plugin>
    <groupId>org.apache.maven.plugins</groupId>
    <artifactId>maven-jar-plugin</artifactId>
    <configuration>
        <excludes>
            <exclude>applicationContext.xml</exclude>
            <exclude>properties/**</exclude>
            <exclude>log4j.properties</exclude>
        </excludes>
    </configuration>
</plugin>
springboot打jar包
<packaging>pom</packaging>
<!--将应用打包成可执行的jar包-->
    <build>
        <plugins>
            <plugin>
                <groupId>org.springframework.boot</groupId>
                <artifactId>spring-boot-maven-plugin</artifactId>
            </plugin>
        </plugins>
    </build>
maven-war-plugin
项目如果是web主应用,我们可以使用maven-war-plugin来对webapps下各类文件进行过滤。用法参考maven-resources-plugin
<plugin>
    <groupId>org.apache.maven.plugins</groupId>
    <artifactId>maven-war-plugin</artifactId>
    <configuration>
        <warName>demo-Rest</warName>
        <webResources>
            <resource>
                <directory>src/main/webapp/WEB-INF</directory>
                <filtering>true</filtering>
                <targetPath>WEB-INF</targetPath>
                <includes>
                    <include>web.xml</include>
                </includes>
            </resource>
        </webResources>
    </configuration>
</plugin>
springboot打war包
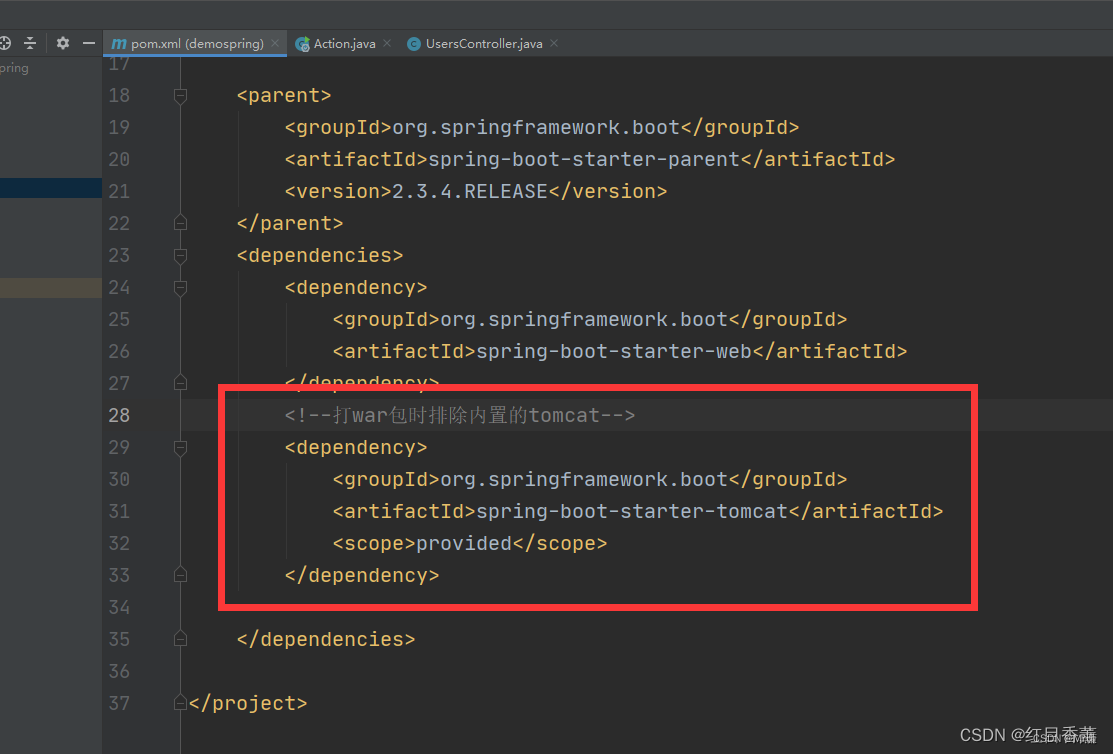
package com.item;

import org.springframework.boot.SpringApplication;
import org.springframework.boot.autoconfigure.SpringBootApplication;
import org.springframework.boot.builder.SpringApplicationBuilder;
import org.springframework.boot.web.servlet.support.SpringBootServletInitializer;

@SpringBootApplication
public class Action extends SpringBootServletInitializer {
    @Override
    protected SpringApplicationBuilder configure(SpringApplicationBuilder application) {
        return application.sources(Action.class);
    }
    public static void main(String[] args) {
        SpringApplication.run(Action.class,args);//一定是被@SpringBootApplication标记的类
    }
}
maven 仓库
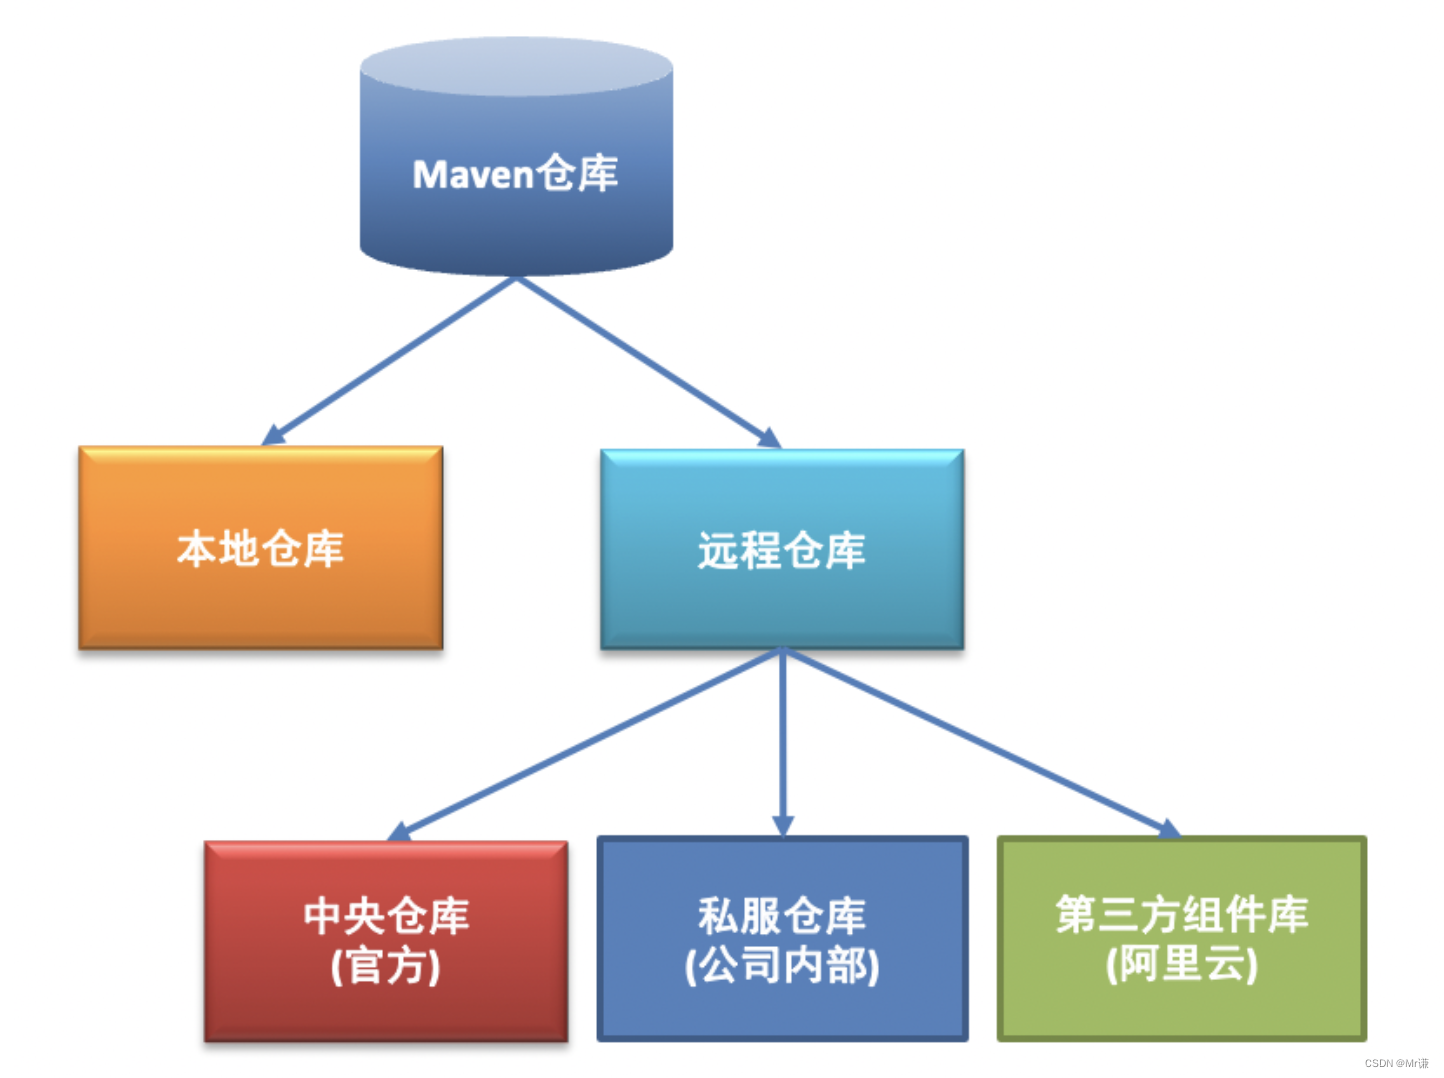
- 中央仓库
目前来说: https://repo1.maven.org/maven2/是真正的Maven中央仓库的地址,该地址内置在Maven的源码中其他的都是镜像。 - 仓库镜像
如果仓库x(阿里云仓库)可以提供仓库Y(中央参数)存储的所有内容,那么就可以认为X是Y的一个镜像,使用镜像可以提高项目构建效率。 - 仓库的索引
中央仓库带有索引文件以方便用户对其进行搜索,索引每周更新一次,中央仓库的索引有几十M。 - 黑名单
如果某个IP地址恶意的下载中央仓库内容,例如全公司100台机器使用同一个IP反复下载,这个IP(甚至是IP段)会进入黑名单,因此稍有规模的使用Maven时,应该用Nexus架设私服。 - 私服
有些公司不提供外网给项目组人员,因此就不能使用maven访问远程的仓库地址,所以很有必要在局域网里找一台有外网权限的机器,搭建nexus私服,然后开发人员连到这台私服上,这样的话就可以通过这台搭建了nexus私服的电脑访问maven的远程仓库。


 1827
1827


 被折叠的 条评论
为什么被折叠?
被折叠的 条评论
为什么被折叠?
 到【灌水乐园】发言


