3、整合myBatis选择启动器: 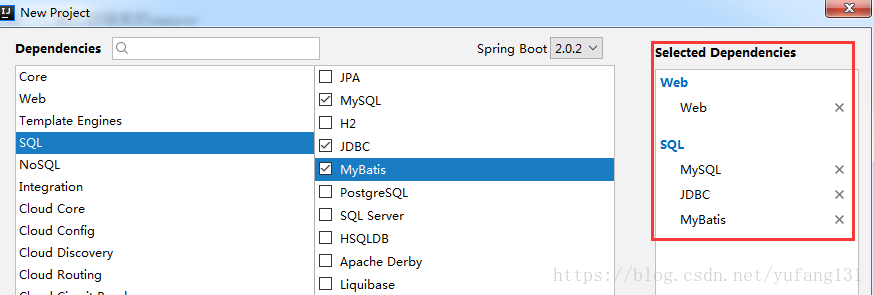
application.yml配置和Druid类代码同上: ------------------------------------------------------------------------------------------------------------------------------------ 对数据进行操作(增删改查) 方式一:通过 注解 方式 mapper层(dao层) import com.yy.springbootmybatis.entity.Department;
import org.apache.ibatis.annotations.*;
import java.util.List;
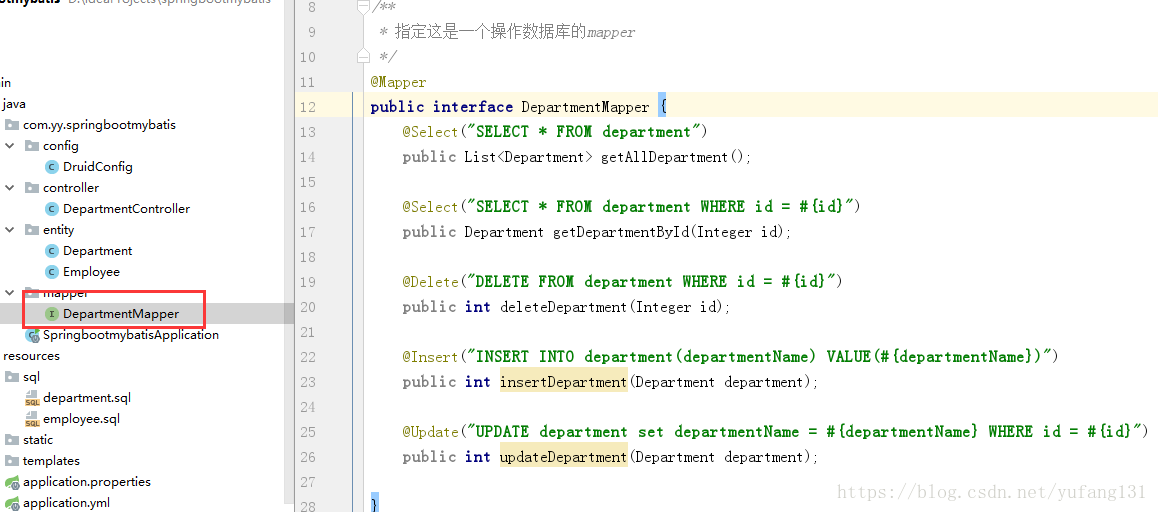
/**
* 指定这是一个操作数据库的mapper
*/
@Mapper
public interface DepartmentMapper {
@Select("SELECT * FROM department")
public List<Department> getAllDepartment();
@Select("SELECT * FROM department WHERE id = #{id}")
public Department getDepartmentById(Integer id);
@Delete("DELETE FROM department WHERE id = #{id}")
public int deleteDepartment(Integer id);
@Insert("INSERT INTO department(departmentName) VALUE(#{departmentName})")
public int insertDepartment(Department department);
@Update("UPDATE department set departmentName = #{departmentName} WHERE id = #{id}")
public int updateDepartment(Department department);
}
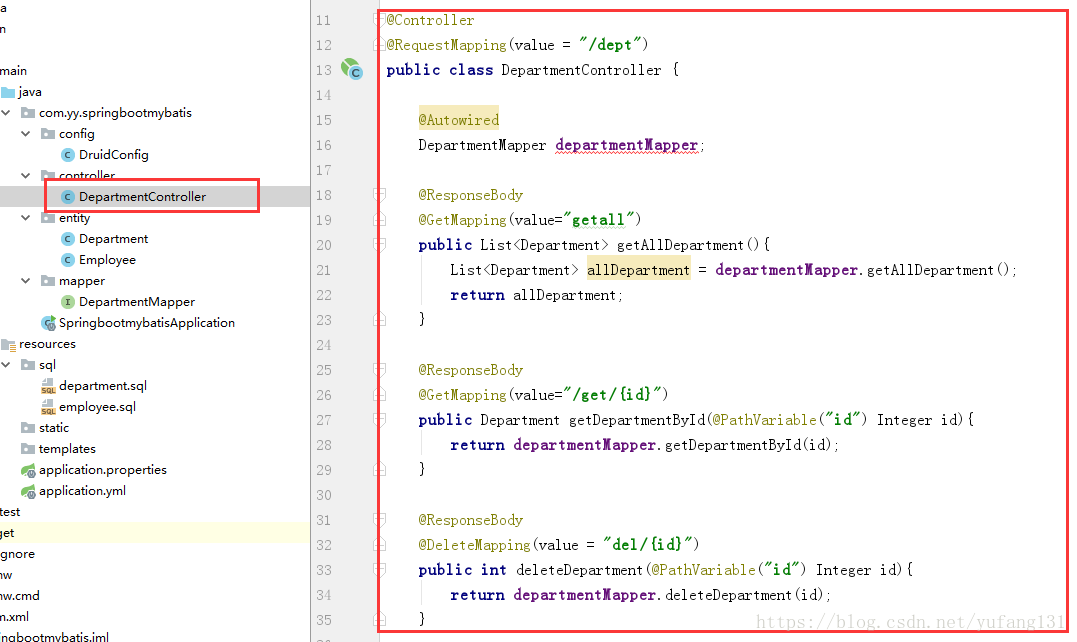
为了方便测试,直接写controller层,service层没有写: import com.yy.springbootmybatis.entity.Department;
import com.yy.springbootmybatis.mapper.DepartmentMapper;
import org.springframework.beans.factory.annotation.Autowired;
import org.springframework.stereotype.Controller;
import org.springframework.web.bind.annotation.*;
import java.util.List;
@Controller
@RequestMapping(value = "/dept")
public class DepartmentController {
@Autowired
DepartmentMapper departmentMapper;
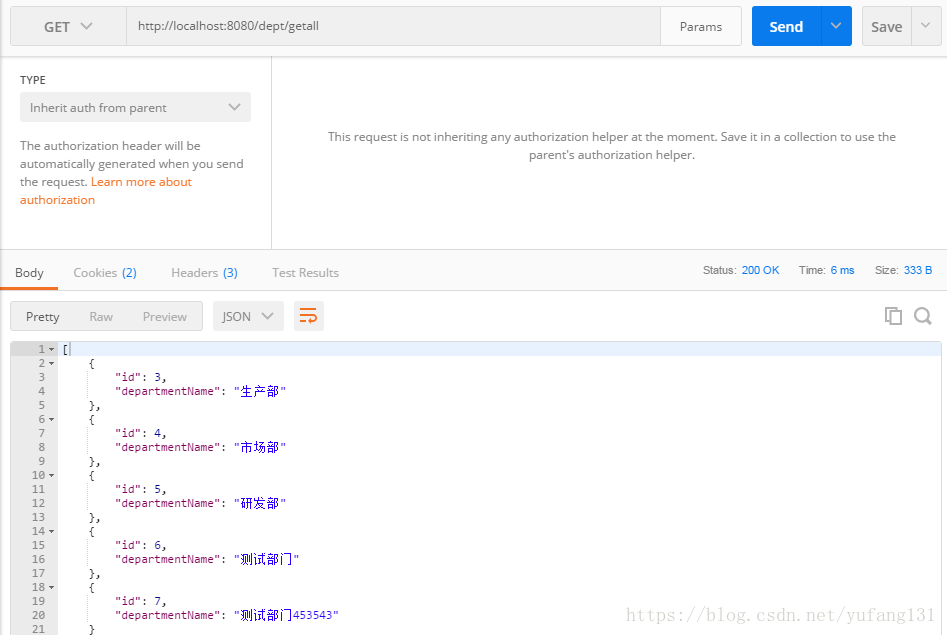
@ResponseBody
@GetMapping(value="getall")
public List<Department> getAllDepartment(){
List<Department> allDepartment = departmentMapper.getAllDepartment();
return allDepartment;
}
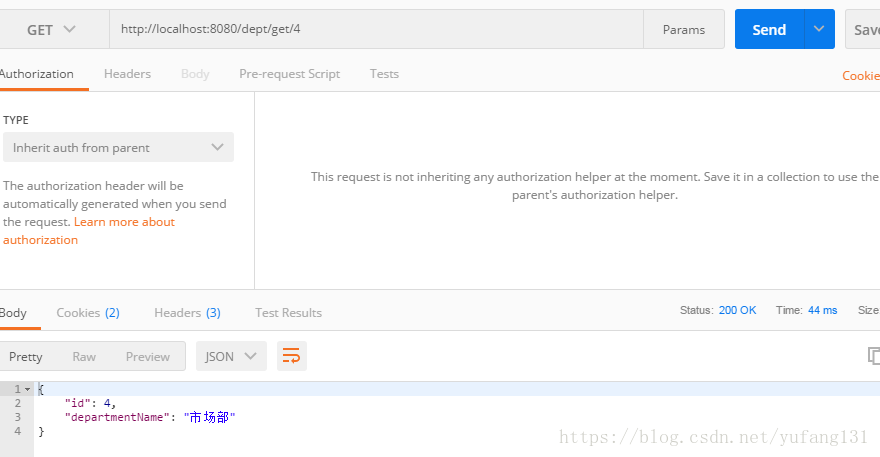
@ResponseBody
@GetMapping(value="/get/{id}")
public Department getDepartmentById(@PathVariable("id") Integer id){
return departmentMapper.getDepartmentById(id);
}
@ResponseBody
@DeleteMapping(value = "del/{id}")
public int deleteDepartment(@PathVariable("id") Integer id){
return departmentMapper.deleteDepartment(id);
}
@ResponseBody
@PutMapping(value = "add")
public Department insertDepartment(Department department){
departmentMapper.insertDepartment(department);
return department;
}
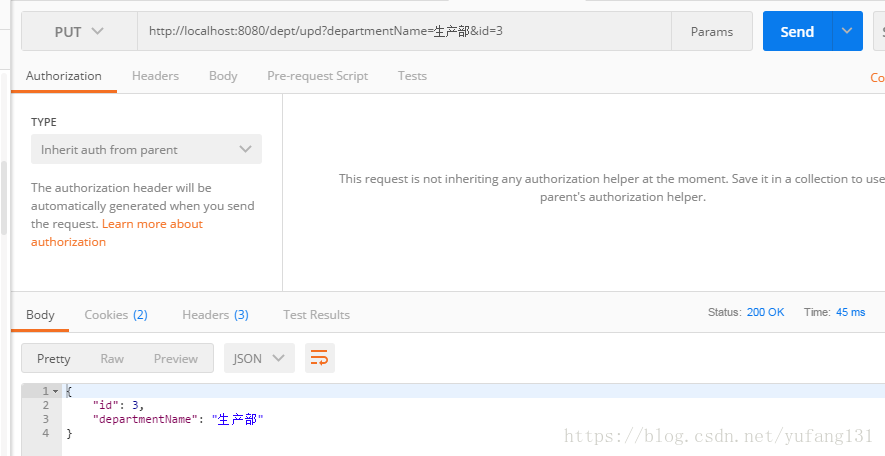
@ResponseBody
@PutMapping(value="upd")
public Department updateDepartment(Department department){
departmentMapper.updateDepartment(department);
return department;
}
}
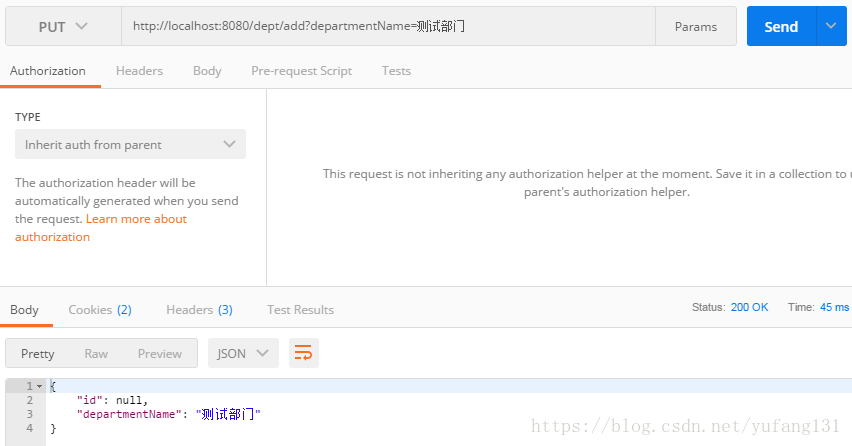
在执行添加数据操作时,返回的对象中的id为null,我们不想返回null,而是返回真实id,怎么解决呢?
这里需要在执行添加的方法上加一个注解: /**
* @Options注解中默认设置的主键对应的字段名为id,且为自增
* 意思就是,从id这个字段里面把数据放到传入对象的d成员变量里面。这样添加后返回对象的id就不再是null了
* @param department
* @return
*/
@Options(useGeneratedKeys = true, keyProperty = "id")
@Insert("INSERT INTO department(departmentName) VALUE(#{departmentName})")
public int insertDepartment(Department department);
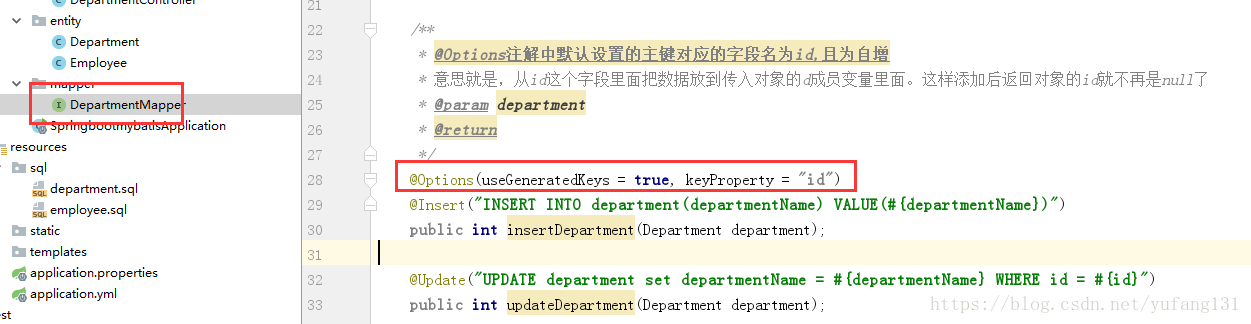
再次执行添加操作,id则不会出现null: 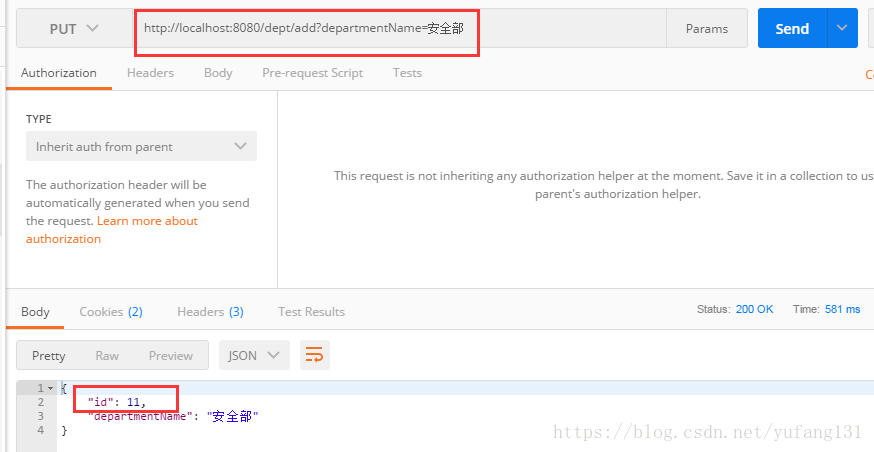
-------------------------------------------------------------------------------------------------------------------
小小的扩展: 扩展1、如果把 department 表中的 departmentName 列的名字修改成 department_name, 
再次查询: 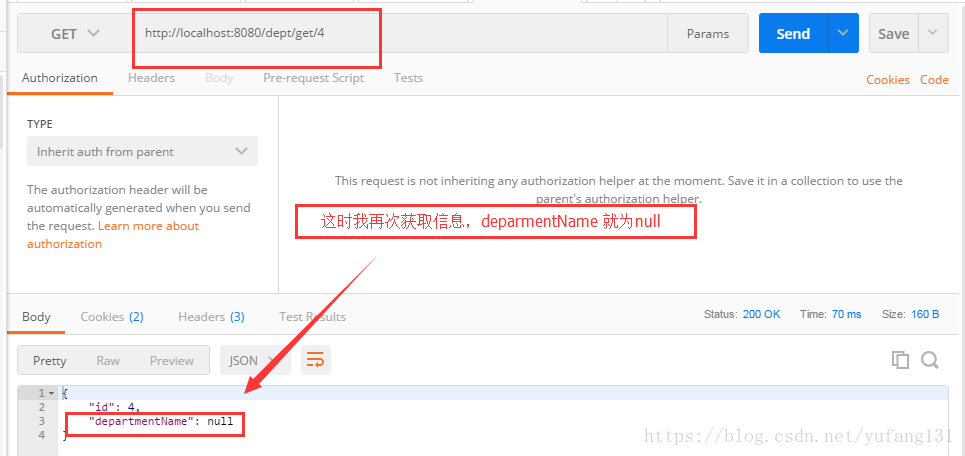
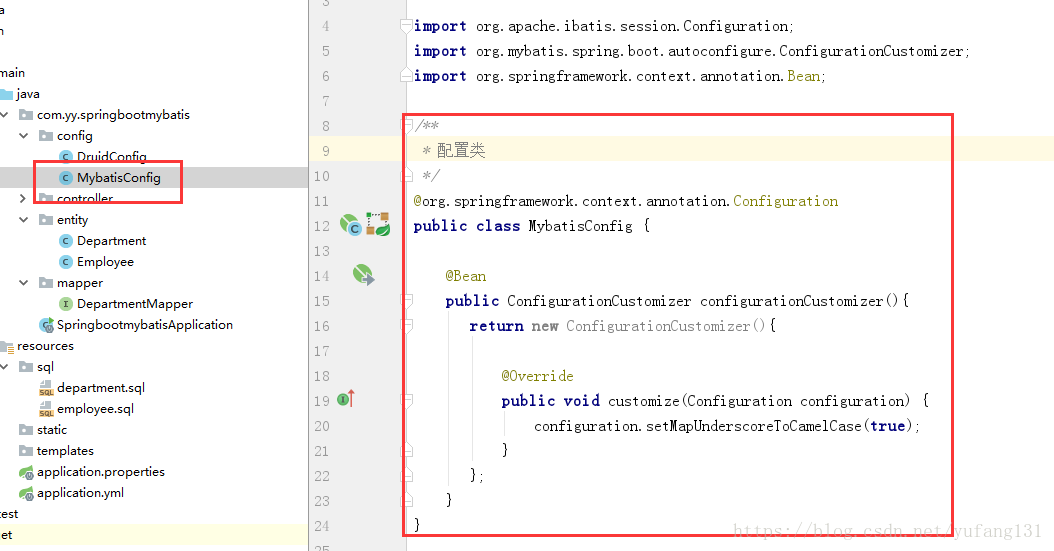
这时我们发现 departmentName 属性没有值 ,数据没有被封装上,实体类中是departmentName 而表中则是department_name。如果有配置文件,我们可以配置开启驼峰命名法,而现在再不写配置文件的情况下怎么解决,可以这样做:自定义一个MyBatis的配置类,给容器中添加一个ConfigurationCustomizer import org.apache.ibatis.session.Configuration;
import org.mybatis.spring.boot.autoconfigure.ConfigurationCustomizer;
import org.springframework.context.annotation.Bean;
/**
* 配置类
*/
@org.springframework.context.annotation.Configuration
public class MybatisConfig {
@Bean
public ConfigurationCustomizer configurationCustomizer(){
return new ConfigurationCustomizer(){
@Override
public void customize(Configuration configuration) {
configuration.setMapUnderscoreToCamelCase(true);
}
};
}
}
测试一下成功: 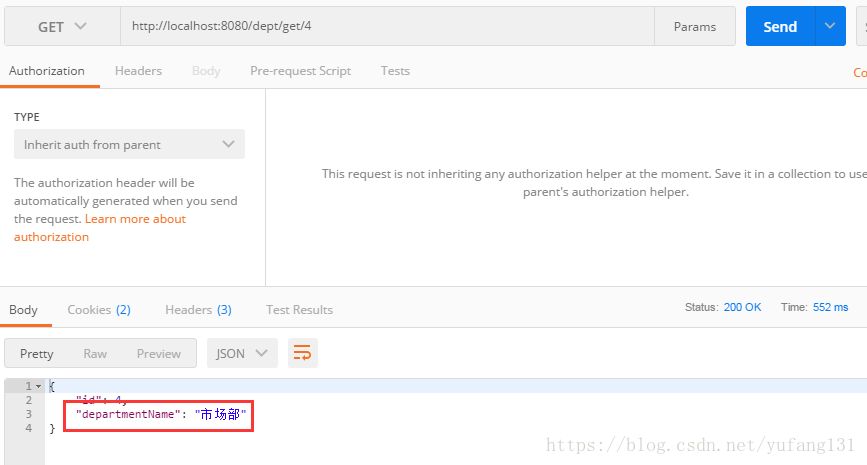
扩展2、如果mapper特别多的情况下,需要在每个mapper都加上@Mapper注解,就太麻烦,但是又不能去掉@Mapper注解:

如果不加上@Mapper注解,启动项目时报错。可以用@MapperScan注解对mapper进行扫描,可以在SpringBoot的主配置上或Mybatis的配置文件上加,这里我在Mybatis的配置文件上加: 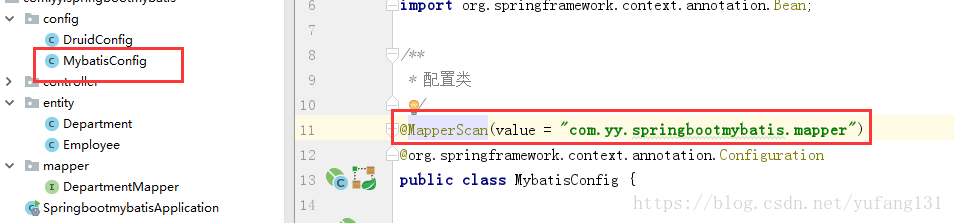
以下在SpringBoot主程序加,两种方法任意选择: 
-------------------------------------------------------------------------------------------------------------------------------- 对数据进行操作(增删改查) 方式二:通过 配置文件 方式 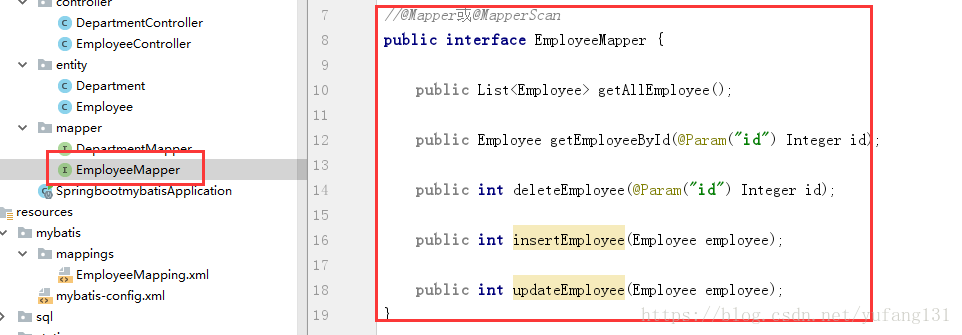
import com.yy.springbootmybatis.entity.Employee;
import org.apache.ibatis.annotations.Param;

import java.util.List;
//@Mapper或@MapperScan
public interface EmployeeMapper {

    public List<Employee> getAllEmployee();

    public Employee getEmployeeById(@Param("id") Integer id);

    public int deleteEmployee(@Param("id") Integer id);

    public int insertEmployee(Employee employee);

    public int updateEmployee(Employee employee);
}
sql映射文件代码: <?xml version="1.0" encoding="UTF-8" ?>
<!DOCTYPE mapper
PUBLIC "-//mybatis.org//DTD Mapper 3.0//EN"
"http://mybatis.org/dtd/mybatis-3-mapper.dtd">
<mapper namespace="com.yy.springbootmybatis.mapper.EmployeeMapper">
<sql id="employeeColumns">
a.id AS "id",
a.lastName AS "lastName",
a.email AS "email",
a.gender AS "gender",
a.d_id AS "dId"
</sql>
<sql id="employeeJoins"></sql>
<!--public List<Employee> getAllEmployee();-->
<select id="getAllEmployee" resultType="com.yy.springbootmybatis.entity.Employee">
SELECT
<include refid="employeeColumns" />
FROM employee a
</select>
<!--public EmployeeMapper getEmployeeById(Integer id);-->
<select id="getEmployeeById" resultType="com.yy.springbootmybatis.entity.Employee">
SELECT
<include refid="employeeColumns" />
FROM employee a
<include refid="employeeJoins" />
<where>
<if test="id != null and id != ''">
a.id = #{id}
</if>
</where>
</select>
<!--public int deleteEmployee(Integer id);-->
<delete id="deleteEmployee">
DELETE FROM employee
<where>
<if test="id != null and id != ''">
id = #{id}
</if>
</where>
</delete>
<!--public int insertEmployee(Employee employee);-->
<insert id="insertEmployee">
INSERT INTO employee (
lastName,
email,
gender,
d_id
) VALUES (
#{lastName},
#{email},
#{gender},
#{dId}
)
</insert>
<!--public int updateEmployee(Employee employee);-->
<update id="updateEmployee">
UPDATE employee SET
lastName = #{lastName},
email = #{email},
gender = #{gender},
d_id = #{dId}
WHERE id = #{id}
</update>
</mapper>
mybatis全局配置文件: 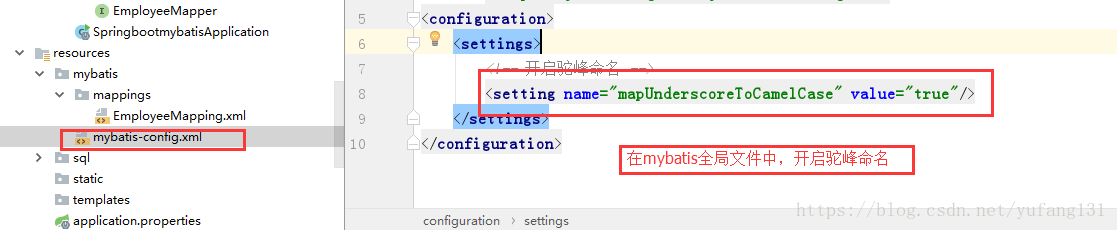
<?xml version="1.0" encoding="UTF-8" ?>
<!DOCTYPE configuration
        PUBLIC "-//mybatis.org//DTD Config 3.0//EN"
        "http://mybatis.org/dtd/mybatis-3-config.dtd">
<configuration>
    <settings>
        <!-- 开启驼峰命名 -->
        <setting name="mapUnderscoreToCamelCase" value="true"/>
    </settings>
</configuration>
配置mybatis文件信息: 
application.yml配置信息: #数据库连接信息
spring:
datasource:
username: root
password: 123456
url: jdbc:mysql://192.168.1.168:3306/springboot_db?useUnicode=true&characterEncoding=utf-8&useSSL=false
driver-class-name: com.mysql.jdbc.Driver
type: com.alibaba.druid.pool.DruidDataSource
#数据源其他配置
initialSize: 5
minIdle: 5
maxActive: 20
maxWait: 60000
timeBetweenEvictionRunsMillis: 60000
minEvictableIdleTimeMillis: 300000
validationQuery: SELECT 1 FROM DUAL
testWhileIdle: true
testOnBorrow: false
testOnReturn: false
poolPreparedStatements: true
#配置监控统计拦截的filters,去掉后监控界面sql无法统计,'wall'用于防火墙
#filters: stat,wall,log4j
filters: stat,wall
maxPoolPreparedStatementPerConnectionSize: 20
useGlobalDataSourceStat: true
connectionProperties: druid.stat.mergeSql=true;druid.stat.slowSqlMillis=500
hikari:
schema:
- classpath:sql/department.sql
- classpath:sql/employee.sql
sql-script-encoding: utf-8
mybatis:
#指定mybatis全局配置文件
config-location: classpath:mybatis/mybatis-config.xml
#指定sql映射文件
mapper-locations: classpath:mybatis/mappings/*.xml
控制层代码: 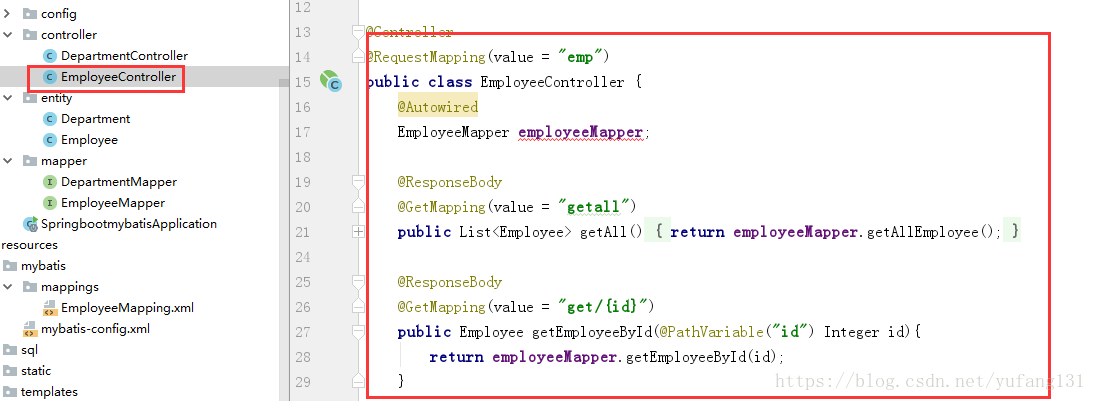
import com.yy.springbootmybatis.entity.Employee;
import com.yy.springbootmybatis.mapper.EmployeeMapper;
import org.springframework.beans.factory.annotation.Autowired;
import org.springframework.beans.factory.annotation.Value;
import org.springframework.stereotype.Controller;
import org.springframework.web.bind.annotation.*;
import javax.management.ValueExp;
import java.util.List;
@Controller
@RequestMapping(value = "emp")
public class EmployeeController {
@Autowired
EmployeeMapper employeeMapper;
@ResponseBody
@GetMapping(value = "getall")
public List<Employee> getAll(){
return employeeMapper.getAllEmployee();
}
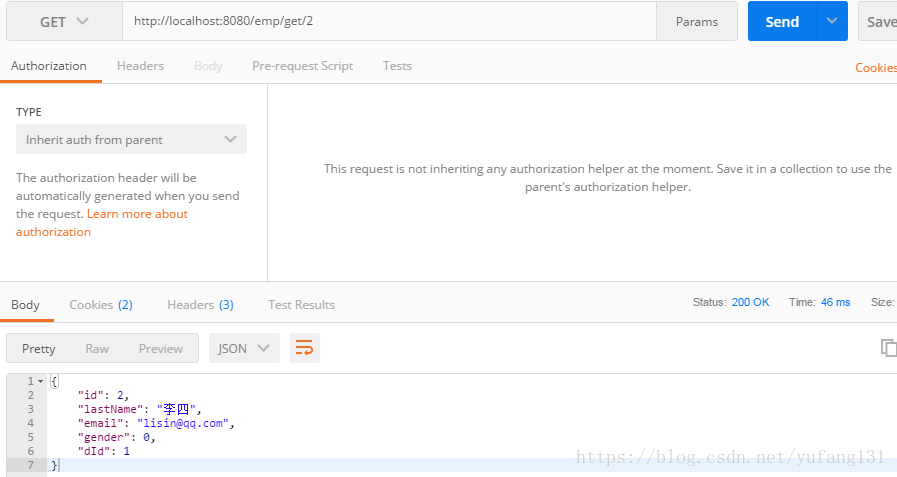
@ResponseBody
@GetMapping(value = "get/{id}")
public Employee getEmployeeById(@PathVariable("id") Integer id){
return employeeMapper.getEmployeeById(id);
}
@ResponseBody
@DeleteMapping(value = "del/{id}")
public int deleteEmployee(@PathVariable("id") Integer id){
return employeeMapper.deleteEmployee(id);
}
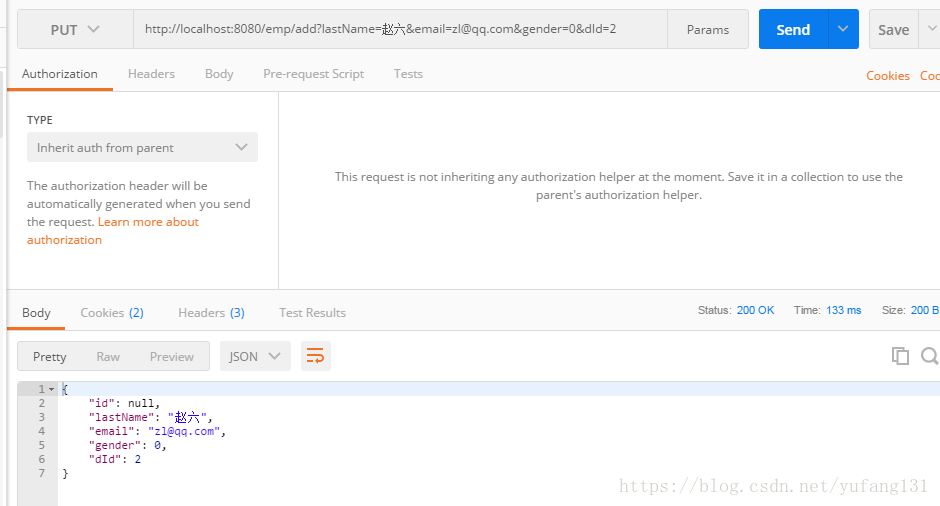
@ResponseBody
@PutMapping(value = "add")
public Employee insertEmployee(Employee employee){
employeeMapper.insertEmployee(employee);
return employee;
}
@ResponseBody
@PutMapping(value = "upd")
public Employee updateEmployee(Employee employee){
Employee employeeById = employeeMapper.getEmployeeById(employee.getId());
employeeById = employee;
employeeMapper.updateEmployee(employeeById);
return employeeById;
}
}
测试一下: 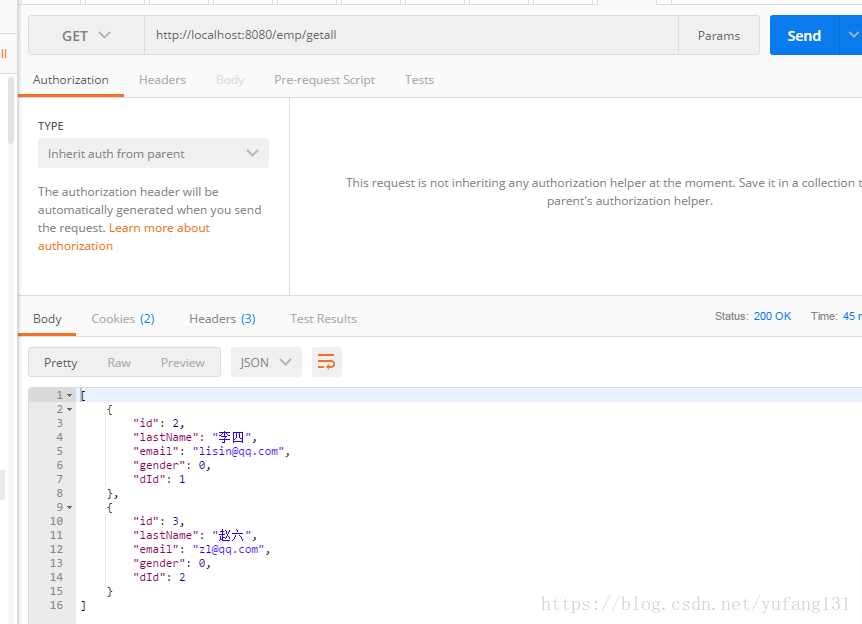
| 


 667
667

 被折叠的 条评论
为什么被折叠?
被折叠的 条评论
为什么被折叠?
 到【灌水乐园】发言


