


转:https://blog.csdn.net/qq_18603599/article/details/80810566
前面几个章节算是从头到尾把和netty的相关知识进行了详细的介绍,也做了相关的总结,但是关于netty如何在实践中去使用还没有提及到,今天就谈一下这方面的内容,netty大家都知道被适用于网络通信这块,所以很多RPC框架都有他的身影,而实际中使用netty都需要用到的是'长连接技术',所谓长连接技术,就是客户端和服务端要一直保持联系,而不是发送完请求,就断开了,而之前演示的例子都是基于netty的'短连接',所以如果要在生成环境真正使用netty的话,就必须要掌握如何实现基于netty的长连接.其实如果熟悉dubbo源码的人,就会发现dubbo底层的通信是支持netty的,所以他也很好的实现Netty的长连接,主要是在DefaultFuture这个类里面,下面的代码也是基于这个类的思想来实现的,OK 首先分析一下实现大概思路
1 每个客户端的请求创建一个唯一的标志且是自增的,这个可以使用原子技术
2 请求和响应与自身上下文进行绑定
3 设置处理请求超时的处理线程
4 检查请求超时的请求机制
整体项目代码结构
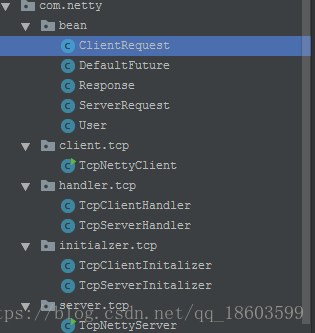
下面详细介绍代码,实现过程:首先定义两个请求的保存实体,分别是客户端请求和服务端请求(如果不分开的话,可能会出现重复或者请求标志对不上):
package com.netty.bean;

import java.util.concurrent.atomic.AtomicLong;

/**
 * Created by jack on 2018/5/5.
 * 封装客户端的请求
 */
public class ClientRequest {
    //请求命令
    private String command="test";
    //请求参数
    private Object content;

    private final long id;
    //使用原子技术
    private static final AtomicLong al = new AtomicLong(0);

    public ClientRequest(){
        //请求唯一标识id 每次都会自增加1
        id = al.incrementAndGet();
    }

    public String getCommand() {
        return command;
    }

    public void setCommand(String command) {
        this.command = command;
    }

    public Object getContent() {
        return content;
    }

    public void setContent(Object content) {
        this.content = content;
    }

    public long getId() {
        return id;
    }
}
封装服务端的请求:
package com.netty.bean;

/**
 * Created by jack on 2018/5/5.
 * 封装服务端的请求
 */
public class ServerRequest {
    private String command;

    private Object content;

    private  long id;

    public long getId() {
        return id;
    }

    public void setId(long id) {
        this.id = id;
    }

    public Object getContent() {

        return content;
    }

    public void setContent(Object content) {
        this.content = content;
    }

    public String getCommand() {
        return command;
    }

    public void setCommand(String command) {
        this.command = command;
    }

    @Override
    public String toString() {
        System.out.println("command:"+command+","+"id:"+id+","+"content:"+content);
        return super.toString();
    }
}
有请求必然有响应:
package com.netty.bean;

/**
 * Created by jack on 2018/5/5.
 * 封装响应
 */
public class Response {
    private long id;//请求ID
    private int status;//响应状态
    private Object content;//响应内容
    private String msg;//请求返回信息

    public long getId() {
        return id;
    }

    public void setId(long id) {
        this.id = id;
    }

    public int getStatus() {
        return status;
    }

    public void setStatus(int status) {
        this.status = status;
    }

    public Object getContent() {
        return content;
    }

    public void setContent(Object content) {
        this.content = content;
    }

    public String getMsg() {
        return msg;
    }

    public void setMsg(String msg) {
        this.msg = msg;
    }
}
接下来这个类很重要,它就是用来处理请求和响应之间的绑定关系:有三个核心功能
& 根据请求ID获取请求对应的响应结果
& 存储客户端请求对应的响应结果信息
& 设置后台线程处理部分客户端的超时请求
接下来看完整的代码:
package com.netty.bean;

import java.util.Map;
import java.util.concurrent.ConcurrentHashMap;
import java.util.concurrent.TimeUnit;
import java.util.concurrent.locks.Condition;
import java.util.concurrent.locks.Lock;
import java.util.concurrent.locks.ReentrantLock;

/**
 * Created by jack on 2018/5/5.
 * 管理请求和响应的关系
 * 主要是通过唯一的请求标识id
 */
public class DefaultFuture {

    //请求id
    private long id;

    //请求id对应的响应结果
    private volatile Response response;

    //存储响应结果和自身绑定在一起
    public final static Map<Long,DefaultFuture> FUTURES= new ConcurrentHashMap<Long,DefaultFuture>();

    //超时时间
    private long timeout;

    private final long start=System.currentTimeMillis();

    //获取锁
    private volatile Lock lock = new ReentrantLock();

    //线程通知条件
    private volatile Condition condition = lock.newCondition();


    public DefaultFuture(ClientRequest request){
        id=request.getId();//获取对应的请求ID
        FUTURES.put(id, this);//存储当前的请求ID对应的上下文信息
    }


    /**
     * 根据请求id获取响应结果
     * @param timeout
     * @return
     */
    public Response get(long timeout){
        long start = System.currentTimeMillis();
        lock.lock();//先锁
        while(!hasDone()){
            try {
                condition.await(timeout, TimeUnit.SECONDS);
                if(System.currentTimeMillis()-start>=timeout){
                    break;
                }
            } catch (InterruptedException e) {
                e.printStackTrace();
            }finally{
                lock.unlock();//释放锁
            }
        }
        return response;
    }

    /**
     * 存储服务器端的响应
     * @param res
     */
    public static void recive(Response res){
        //找到res相对应的DefaultFuture
        DefaultFuture future = FUTURES.remove(res.getId());
        if(future==null){
            return ;
        }
        Lock lock= future.getLock();
        lock.lock();
        try{
            //设置响应
            future.setResponse(res);
            Condition condition =  future.getCondition();
            if(condition!=null){
                //通知
                condition.signal();
            }

        }catch(Exception e){
            e.printStackTrace();
        }finally{
            lock.unlock();
        }
    }


    private boolean hasDone() {
        return response !=null? true:false;
    }

    public long getId() {
        return id;
    }


    public void setResponse(Response response) {
        this.response = response;
    }

    public Lock getLock() {
        return lock;
    }

    public Condition getCondition() {
        return condition;
    }


    public long getTimeout() {
        return timeout;
    }


    public long getStart() {
        return start;
    }


    /**
     * 处理请求超时的线程
     */
    static class FutureTimeOutThread extends Thread{

        @Override
        public void run() {

            while(true){
                for(long futureId : FUTURES.keySet()){
                    DefaultFuture f = FUTURES.get(futureId);
                    if(f==null){
                        FUTURES.remove(futureId);//为空的话 代表请求结果已经处理完毕了
                        continue;
                    }
                    if(f.getTimeout()>0){
                        if((System.currentTimeMillis()-f.getStart())>f.getTimeout()){
                            Response res = new Response();
                            res.setContent(null);
                            res.setMsg("请求超时!");
                            res.setStatus(1);//响应异常处理
                               res.setId(f.getId());
                            DefaultFuture.recive(res);//存储服务端的响应结果信息
                        }
                    }


                }


            }
        }

    }

    /**
     * 设置为后台线程
     */
    static{
        FutureTimeOutThread timeOutThread = new FutureTimeOutThread();
        timeOutThread.setDaemon(true);
        timeOutThread.start();

    }


}
OK 接下来看客户端的业务线程:
这里和以前我们演示相关功能的时候不太一样,之前发送数据都是通过channelActive这个方法来发送数据,但实际生产环境中不是这样使用的,都是通过在客户端直接发送数据并且获取到响应结果:所以接下来的handler功能更加简单
& 读取服务端返回来的数据,并且转换成对应的response
& 把该response和请求响应上下文绑定在一起
package com.netty.handler.tcp;

import com.alibaba.fastjson.JSONObject;
import com.netty.bean.DefaultFuture;
import com.netty.bean.Response;
import io.netty.channel.ChannelHandlerContext;
import io.netty.channel.ChannelInboundHandlerAdapter;
import io.netty.handler.timeout.IdleState;
import io.netty.handler.timeout.IdleStateEvent;
import io.netty.util.AttributeKey;

/**
 * Created by jack on 2018/5/5.
 */
public class TcpClientHandler extends ChannelInboundHandlerAdapter {

    @Override
    public void channelRead(ChannelHandlerContext ctx, Object msg) throws Exception {
        //判断服务端和客户端是在能够正常通信的情况下
        if(msg.toString().equals("ping")){
            ctx.channel().writeAndFlush("ping\r\n");
            return ;
        }
        System.out.println("客户端获取到服务端响应数据:"+msg.toString());

        String str = getJSONObject(msg.toString()).toString();
        //读取服务端的响应结果
        Response res = JSONObject.parseObject(str, Response.class);
        //存储响应结果
        DefaultFuture.recive(res);
    }

    private JSONObject getJSONObject(String str){
        JSONObject json = JSONObject.parseObject(str);
        json.remove("content");
        json.put("msg","保存用户信息成功");
        return json;
    }
}
初始化客户端的channel:
package com.netty.initialzer.tcp;

import com.netty.handler.tcp.TcpClientHandler;
import io.netty.channel.ChannelInitializer;
import io.netty.channel.socket.SocketChannel;
import io.netty.handler.codec.DelimiterBasedFrameDecoder;
import io.netty.handler.codec.Delimiters;
import io.netty.handler.codec.string.StringDecoder;
import io.netty.handler.codec.string.StringEncoder;

/**
 * Created by jack on 2018/5/5.
 */
public class TcpClientInitalizer extends ChannelInitializer<SocketChannel> {
    @Override
    protected void initChannel(SocketChannel ch) throws Exception {
        //按照\r\n进行解码
        ch.pipeline().addLast(new DelimiterBasedFrameDecoder(Integer.MAX_VALUE, Delimiters.lineDelimiter()[0]));
        ch.pipeline().addLast(new StringDecoder());
        ch.pipeline().addLast(new TcpClientHandler());
        ch.pipeline().addLast(new StringEncoder());
    }
}
客户端通过多线程模拟发送并发请求:
package com.netty.client.tcp;

import com.alibaba.fastjson.JSONObject;
import com.netty.bean.ClientRequest;
import com.netty.bean.DefaultFuture;
import com.netty.bean.Response;
import com.netty.bean.User;
import com.netty.initialzer.tcp.TcpClientInitalizer;
import io.netty.bootstrap.Bootstrap;
import io.netty.channel.ChannelFuture;
import io.netty.channel.ChannelOption;
import io.netty.channel.EventLoopGroup;
import io.netty.channel.nio.NioEventLoopGroup;
import io.netty.channel.socket.nio.NioSocketChannel;

import java.util.Random;

/**
 * Created by jack on 2018/5/5.
 */
public class TcpNettyClient  {
    static EventLoopGroup group =null;
    static Bootstrap client =null;
    public static ChannelFuture future=null;
    static {
        group = new NioEventLoopGroup();
        client = new Bootstrap();
        client.group(group);
        client.channel(NioSocketChannel.class);
        client.option(ChannelOption.SO_KEEPALIVE,true);
        client.handler(new TcpClientInitalizer());
        try {
            future = client.connect("localhost", 8080).sync();
        } catch (InterruptedException e) {
            e.printStackTrace();
        }
    }
    //发送数据的方法
    public static Object send(ClientRequest request){
        try{
            System.out.println("客户端向服务端发送请求数据:"+JSONObject.toJSONString(request));
            //客户端直接发送请求数据到服务端
            future.channel().writeAndFlush(JSONObject.toJSONString(request));
            //根据\r\n进行换行
            future.channel().writeAndFlush("\r\n");
            //通过请求实例化请求和响应之间的关系
            DefaultFuture defaultFuture = new DefaultFuture(request);
            //通过请求ID,获取对应的响应处理结果
            Response response = defaultFuture.get(10);
            return response;
        }catch(Exception e){
            e.printStackTrace();
        }
        return null;
    }

    public static void main(String[] args) {
        for(int i=0;i<20;i++){
            new Thread(new UserRequestThread(i)).start();//模拟多线程并发请求
        }
    }

    /**
     * 模拟用户并发请求
     */
    static  class UserRequestThread implements Runnable{
        private int requestId;
        public UserRequestThread(int requestId){
            this.requestId = requestId;
        }

        public void run() {
           synchronized (UserRequestThread.class){
               ClientRequest request = new ClientRequest();
               request.setCommand("saveUser");
               User user = new User();
               user.setAge(new Random().nextInt(4)*requestId);
               user.setId(requestId);
               user.setName("jiahp"+requestId);
               request.setContent(user);
                //拿到请求的结果
               Object result = TcpNettyClient.send(request);
               System.out.println("客户端长连接测试返回结果:"+JSONObject.toJSONString(result));
               System.out.println("        ");
           }
        }
    }

}
看一下服务端的handler:
& 获取客户端的request
& 解析完成成之后实例化对应的response
& 写入reponse到客户端并加上\r\n
package com.netty.handler.tcp;

import com.alibaba.fastjson.JSONObject;
import com.netty.Media;
import com.netty.bean.Response;
import com.netty.bean.ServerRequest;
import com.netty.bean.User;
import io.netty.buffer.ByteBuf;
import io.netty.channel.ChannelHandlerContext;
import io.netty.channel.ChannelInboundHandlerAdapter;
import io.netty.handler.timeout.IdleState;
import io.netty.handler.timeout.IdleStateEvent;

import java.nio.charset.Charset;

/**
 * Created by jack on 2018/5/5.
 */
public class TcpServerHandler extends ChannelInboundHandlerAdapter {

    @Override
    public void channelRead(ChannelHandlerContext ctx, Object msg) throws Exception {

        if(msg instanceof ByteBuf){
            ByteBuf req = (ByteBuf)msg;
            String content = req.toString(Charset.defaultCharset());
            System.out.println("服务端开始读取客户端的请求数据:"+content);
            //获取客户端的请求信息
             ServerRequest request = JSONObject.parseObject(content,ServerRequest.class);
            JSONObject user = (JSONObject) request.getContent();
            user.put("success","ok");
            //写入解析请求之后结果对应的响应信息
             Response res = new Response();
            res.setId(request.getId());
            res.setContent(user);
            //先写入
            ctx.channel().write(JSONObject.toJSONString(res));
            //再一起刷新
            ctx.channel().writeAndFlush("\r\n");
            System.out.println("      ");
        }
    }


    @Override
    public void userEventTriggered(ChannelHandlerContext ctx, Object evt)
            throws Exception {

        if(evt instanceof IdleStateEvent){
            IdleStateEvent event = (IdleStateEvent)evt;
            if(event.equals(IdleState.READER_IDLE)){
                System.out.println("读空闲====");
                ctx.close();
            }else if(event.equals(IdleState.WRITER_IDLE)){
                System.out.println("写空闲====");
            }else if(event.equals(IdleState.WRITER_IDLE)){
                System.out.println("读写空闲====");
                ctx.channel().writeAndFlush("ping\r\n");
            }

        }

        super.userEventTriggered(ctx, evt);
    }
}
对应的初始化channel:这里和之前演示的基本功能不一样,因为客户端和服务端要一致保持联系,所以需要增加一个客户端和服务端之间的心跳检查机制handler,netty中已经为我们实现好了,可以直接拿过来使用:
package com.netty.initialzer.tcp;

import com.netty.handler.tcp.TcpServerHandler;
import io.netty.channel.ChannelInitializer;
import io.netty.channel.socket.SocketChannel;
import io.netty.handler.codec.DelimiterBasedFrameDecoder;
import io.netty.handler.codec.Delimiters;
import io.netty.handler.codec.string.StringEncoder;
import io.netty.handler.timeout.IdleStateHandler;

import java.util.concurrent.TimeUnit;

/**
 * Created by jack on 2018/5/5.
 */
public class TcpServerInitalizer extends ChannelInitializer<SocketChannel> {
    @Override
    protected void initChannel(SocketChannel ch) throws Exception {
        ch.pipeline().addLast(new DelimiterBasedFrameDecoder(Integer.MAX_VALUE, Delimiters.lineDelimiter()[0]));
        //添加客户端和服务端之间的心跳检查状态
        ch.pipeline().addLast(new IdleStateHandler(6, 2, 1, TimeUnit.SECONDS));
        ch.pipeline().addLast(new TcpServerHandler());
        ch.pipeline().addLast(new StringEncoder());
    }
}
最后服务端代码:
package com.netty.server.tcp;

import com.netty.initialzer.tcp.TcpServerInitalizer;
import io.netty.bootstrap.ServerBootstrap;
import io.netty.buffer.PooledByteBufAllocator;
import io.netty.channel.ChannelFuture;
import io.netty.channel.ChannelOption;
import io.netty.channel.EventLoopGroup;
import io.netty.channel.nio.NioEventLoopGroup;
import io.netty.channel.socket.nio.NioServerSocketChannel;

import java.net.InetSocketAddress;

/**
 * Created by jack on 2018/5/5.
 */
public class TcpNettyServer {
    static EventLoopGroup bossLoopGroup;
    static EventLoopGroup workLoopGroup;
    static ServerBootstrap server;
    static {
        bossLoopGroup = new NioEventLoopGroup();
        workLoopGroup = new NioEventLoopGroup();
        server = new ServerBootstrap();
        server.group(bossLoopGroup,workLoopGroup);
        server.channel(NioServerSocketChannel.class);
        server.option(ChannelOption.SO_BACKLOG,128);
        server.option(ChannelOption.ALLOCATOR, PooledByteBufAllocator.DEFAULT);
        server.option(ChannelOption.SO_KEEPALIVE,true);
        //注意服务端这里一定要用childHandler 不能用handler 否则会报错
        server.childHandler(new TcpServerInitalizer());

    }

    public static void run(int port){
        try {
            ChannelFuture future = server.bind(new InetSocketAddress(port)).sync();
            future.channel().closeFuture().sync();
        } catch (InterruptedException e) {
            e.printStackTrace();
        } finally {
            bossLoopGroup.shutdownGracefully();
            workLoopGroup.shutdownGracefully();
        }
    }

    public static void main(String[] args) {
        run(8080);
    }
}
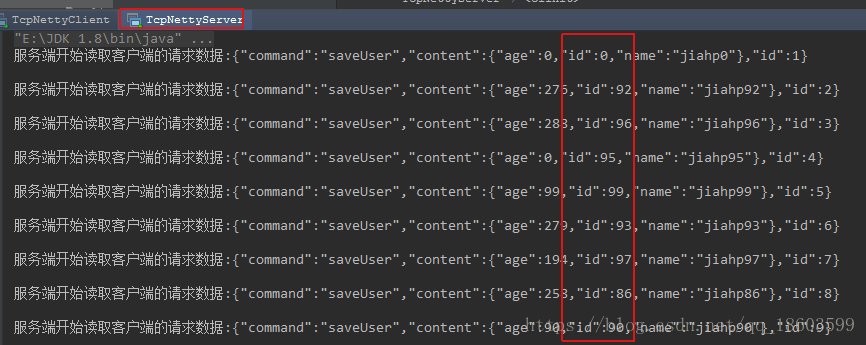
OK 整体代码就分析完了,看一下效果:
服务端接受到客户端的请求,因为是多线程的,所以ID是乱序的
客户端获取到服务端的响应结果:
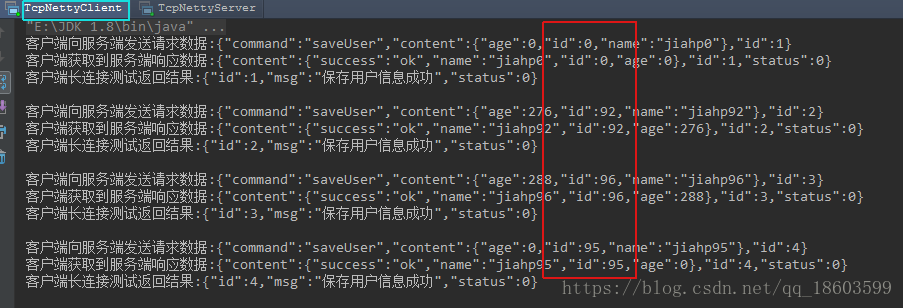
当然服务端和客户端的连接仍然是保持连接状态的;
这样就实现了基于netty的长连接功能,稍加功能就可以在生成环境中使用.


 572
572


 被折叠的 条评论
为什么被折叠?
被折叠的 条评论
为什么被折叠?
 到【灌水乐园】发言


