


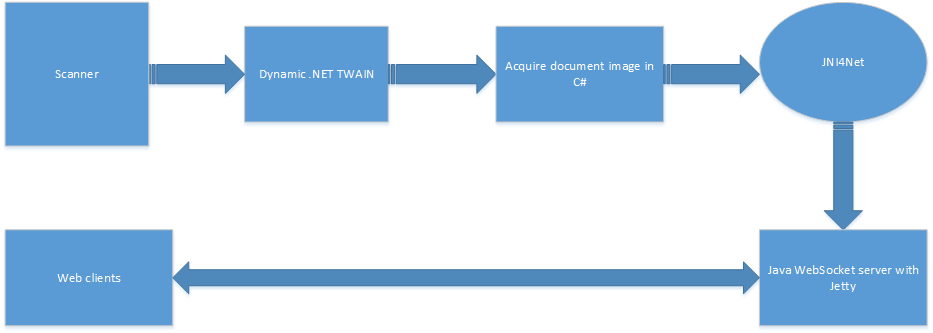
网页TWAIN扫描是通过多种技术结合实现的,看下流程图:
准备工作
阅读:
如何运行
-
在Eclipse中运行Java Application,选择UIMain
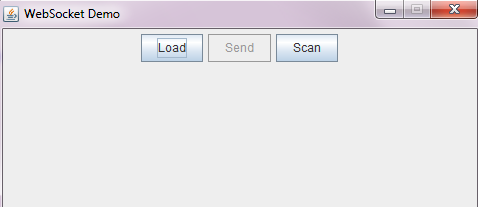
当这个窗口启动的时候,Websocket Server已经初始化完成。-
Load:加载本地图片
-
Send:把图片推送到网页客户端
-
Scan:通过扫描仪扫描文件,把图像自动发送到网页客户端
-
-
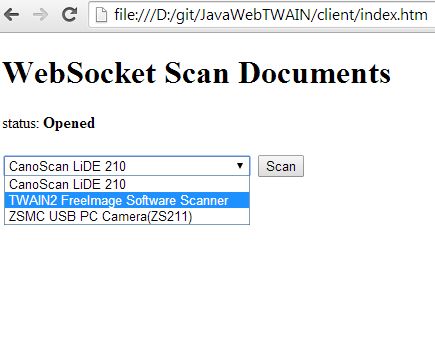
在Chrome中选择一个扫描仪源
-
显示TWAIN扫描文件图像

TWAIN网页扫描流程解析
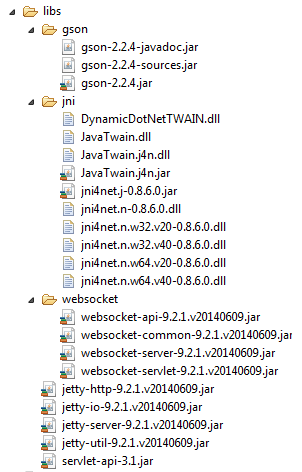
首先把所有相关的库(DLL & Jar)导入到Eclipse工程中:
结合准备工作中两篇文章的代码,创建一个类SourceManager:
|
1
2
3
4
5
6
7
8
9
10
11
12
13
14
15
16
17
18
19
20
21
22
23
24
25
26
27
28
29
30
31
32
33
34
35
36
37
38
39
40
41
42
43
44
45
46
47
48
49
50
51
52
53
54
55
56
57
58
59
60
61
62
63
64
65
66
67
68
69
70
71
72
73
74
75
76
77
78
79
80
81
82
83
84
85
86
87
88
89
90
91
92
93
94
95
96
|
package
com.data;
import
java.awt.event.ActionEvent;
import
java.awt.event.ActionListener;
import
java.io.File;
import
java.util.ArrayList;
import
javatwain.DotNetScanner;
import
javatwain.IJavaProxy;
import
javatwain.INativeProxy;
import
javax.swing.Timer;
import
com.server.WSHandler;
import
com.util.ImageUtil;
import
net.sf.jni4net.Bridge;
public
class
SourceManager
implements
INativeProxy {
private
IJavaProxy mScanner;
private
String[] mSources;
private
ScanAction mScanAction;
public
SourceManager() {
initTWAIN();
mScanAction =
new
ScanAction();
}
private
void
initTWAIN() {
try
{
Bridge.init();
Bridge.LoadAndRegisterAssemblyFrom(
new
java.io.File(
"libs\\jni\\JavaTwain.j4n.dll"
));
}
catch
(Exception e) {
e.printStackTrace();
}
mScanner =
new
DotNetScanner();
mScanner.RegisterListener(
this
);
mSources = mScanner.GetSources();
}
public
String[] getSources() {
return
mSources;
}
public
synchronized
void
acquireImage(
int
index) {
mScanAction.setIndex(index);
mScanAction.start();
}
@Override
public
boolean
Notify(String message, String value) {
ArrayList<WSHandler> sessions = WSHandler.getAllSessions();
for
(WSHandler session : sessions) {
session.sendImage(ImageUtil.getImageBytes(
new
File(value)));
}
return
true
;
}
public
class
ScanAction {
private
int
mIndex;
private
int
mDelay =
1
;
private
Timer mTimer;
public
ScanAction() {
mTimer =
new
Timer(mDelay, mTaskPerformer);
mTimer.setRepeats(
false
);
}
private
ActionListener mTaskPerformer =
new
ActionListener() {
@Override
public
void
actionPerformed(ActionEvent evt) {
mScanner.AcquireImage(mIndex);
ActionListener taskPerformer =
new
ActionListener() {
@Override
public
void
actionPerformed(ActionEvent evt) {
mScanner.CloseSource();
}
};
int
delay =
1
;
Timer timer =
new
Timer(delay, taskPerformer);
timer.setRepeats(
false
);
timer.start();
}
};
public
void
setIndex(
int
index) {
mIndex = index;
}
public
void
start() {
mTimer.start();
}
}
}
|
Java Websocket server和JavaScript client之间通过JSON通讯。
使用Java创建发送JSON数据:
|
1
2
3
4
5
6
7
8
9
10
11
12
13
14
15
16
17
18
19
20
|
JsonObject jsonObj =
new
JsonObject();
JsonArray jsonArray =
new
JsonArray();
String[] sources = mSourceManager.getSources();
if
(sources !=
null
) {
for
(String source : sources) {
jsonArray.add(
new
JsonPrimitive(source));
}
}
jsonObj.add(Msg.MSG_SOURCES, jsonArray);
String s = jsonObj.toString();
try
{
session.getRemote().sendString(s);
}
catch
(IOException e) {
// TODO Auto-generated catch block
e.printStackTrace();
}
|
使用Java分析解析JSON数据:
|
1
2
3
4
5
6
7
8
9
10
11
12
13
14
15
16
17
18
19
20
21
22
23
24
25
26
27
|
public
void
onMessage(String message) {
JsonParser parser =
new
JsonParser();
boolean
isJSON =
true
;
JsonElement element =
null
;
try
{
element = parser.parse(message);
}
catch
(JsonParseException e) {
System.out.println(
"exception: "
+ e);
isJSON =
false
;
}
if
(isJSON && element !=
null
) {
JsonObject obj = element.getAsJsonObject();
element = obj.get(Msg.MSG_MESSAGE);
if
(element !=
null
) {
switch
(element.getAsString()) {
case
Msg.MSG_SOURCE:
int
index = obj.get(Msg.MSG_INDEX).getAsInt();
mSourceManager.acquireImage(index);
break
;
}
}
}
System.out.println(
"Message: "
+ message);
}
|
使用JavaScript创建发送JSON数据:
|
1
2
3
4
5
|
var
json = {};
json.Message = MSG_SOURCE;
json.Index = i;
var
msg = JSON.stringify(json);
ws.send(msg);
|
使用JavaScript分析解析JSON数据:
|
1
2
3
4
5
6
|
ws.onmessage =
function
(evt) {
var
data = evt.data;
var
json = JSON.parse(data);
var
value = json[MSG_SOURCES];
showSources(value);
}
|
创建一个类ScanAction,在其中创建一个运行在UI线程中的Timer,用于处理扫描事件:
|
1
2
3
4
5
6
7
8
9
10
11
12
13
14
15
16
17
18
19
20
21
22
23
24
25
26
27
28
29
30
31
32
33
34
35
|
public
class
ScanAction {
private
int
mIndex;
private
int
mDelay =
1
;
private
Timer mTimer;
public
ScanAction() {
mTimer =
new
Timer(mDelay, mTaskPerformer);
mTimer.setRepeats(
false
);
}
private
ActionListener mTaskPerformer =
new
ActionListener() {
@Override
public
void
actionPerformed(ActionEvent evt) {
mScanner.AcquireImage(mIndex);
ActionListener taskPerformer =
new
ActionListener() {
@Override
public
void
actionPerformed(ActionEvent evt) {
mScanner.CloseSource();
}
};
int
delay =
1
;
Timer timer =
new
Timer(delay, taskPerformer);
timer.setRepeats(
false
);
timer.start();
}
};
public
void
setIndex(
int
index) {
mIndex = index;
}
public
void
start() {
mTimer.start();
}
}
|
数据扫描完成之后,就可以发送到Web页面中了:
|
1
2
3
4
5
6
7
8
|
public boolean Notify(String message, String value) {
ArrayList<WSHandler> sessions = WSHandler.getAllSessions();
for
(WSHandler session : sessions) {
session.sendImage(ImageUtil.getImageBytes(
new
File(value)));
}
return
true
;
}
|


 被折叠的 条评论
为什么被折叠?
被折叠的 条评论
为什么被折叠?
 到【灌水乐园】发言


