


前言
上一篇文章已对rollup具体使用做了详细的介绍,这篇文章学习下rollup原理。由于篇幅有限,拉取了rollup最初版本的代码(0.3.0版本)。我的目的是学习 rollup 怎么打包的,怎么做 tree-shaking 的。而初版源码已经实现了这两个功能(半成品),所以看初版源码已经足够了。
前置知识
rollup 使用了 acorn 和 magic-string 两个库。为了更好的阅读 rollup 源码,必须对它们有所了解。
"dependencies": {
  "acorn": "^1.1.0",
  "magic-string": "^0.5.1",
  "sander": "^0.3.3"
},
magic-string
magic-string是一个操作字符串和生成source-map的工具。magic-string 是 rollup 作者写的一个关于字符串操作的库。下面是 github 上的示例:
var MagicString = require('magic-string');
var magicString = new MagicString('export var name = "beijing"');
//类似于截取字符串
console.log(magicString.snip(0,6).toString()); // export
//从开始到结束删除字符串(索引永远是基于原始的字符串,而非改变后的)
console.log(magicString.remove(0,7).toString()); // var name = "beijing"

//很多模块,把它们打包在一个文件里,需要把很多文件的源代码合并在一起
let bundleString = new MagicString.Bundle();
bundleString.addSource({
    content:'var a = 1;',
    separator:'\n'
});
bundleString.addSource({
    content:'var b = 2;',
    separator:'\n'
});
/* let str = '';
str += 'var a = 1;\n'
str += 'var b = 2;\n'
console.log(str); */
console.log(bundleString.toString());
// var a = 1;
//var b = 2;
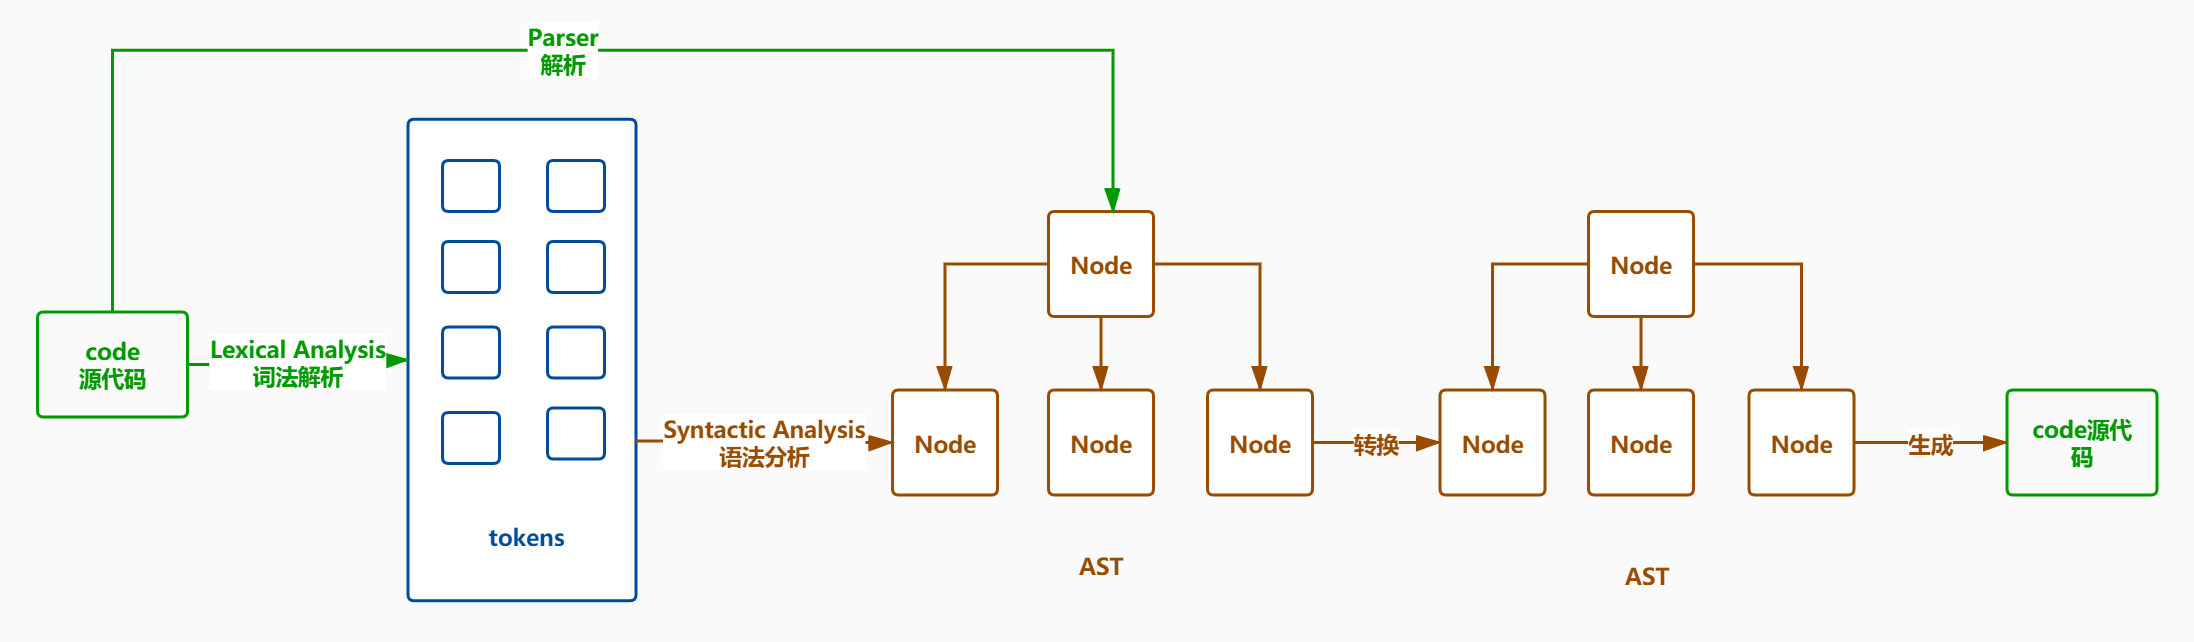
AST
通过JavaScript Parser可以把代码转化为一颗抽象语法树AST,这颗树定义了代码的结构,通过操纵这颗树,我们可以精准的定位到声明语句、赋值语句、运算语句等等,实现对代码的分析、优化、变更等操作

AST工作流
- Parse(解析) 将源代码转换成抽象语法树,树上有很多的estree节点
- Transform(转换) 对抽象语法树进行转换
- Generate(代码生成) 将上一步经过转换过的抽象语法树生成新的代码
acorn
-
astexplorer可以把代码转成语法树
-
acorn 解析结果符合The Estree Spec规范
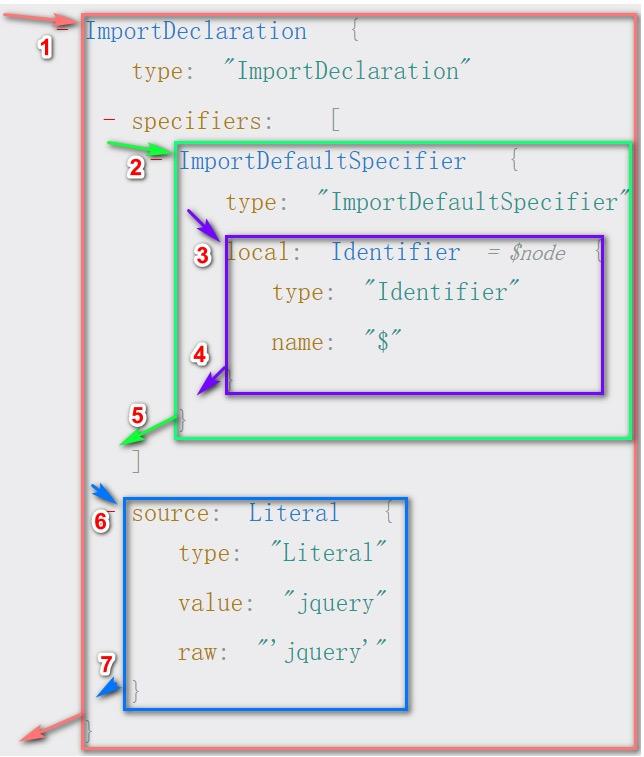
import $ from 'jquery 的 ast 如下图
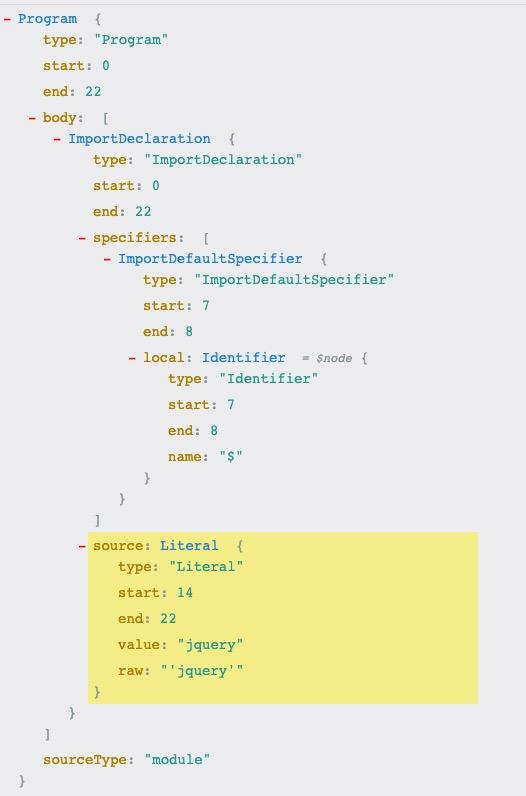
可以看到这个 AST 的类型为 program,表明这是一个程序。body 则包含了这个程序下面所有语句对应的 AST 子节点。
每个节点都有一个 type 类型,例如 Identifier,说明这个节点是一个标识符;
如果想了解更多详情 AST 节点的信息可以看一下这篇文章《使用 Acorn 来解析 JavaScript》。
rollup如何打包的
还是先来简单使用下,分析下打包结果
目录结构如下:
rollup-demo
├── package.json
├── README.MD
├── rollup.config.js
├── src
│   ├── main.js
│   └── modules
│       └── myModule.js
安装rollup并配置执行脚本语句
npm install rollup -S -D
package.json
{
  "name": "rollup-demo",
  "version": "1.0.0",
  "description": "",
  "main": "index.js",
  "scripts": {
    "build": "rollup --config"
  },

  "keywords": [],
  "author": "",
  "devDependencies": {
    "rollup": "^2.46.0"
  }
}
rollup.config.js
export default {
  input: './src/main.js',//入口文件
  output: {
    file: './dist/bundle.js',//打包后的存放文件
    format: 'cjs',//输出格式 amd es6 iife umd cjs
    name: 'bundleName'//如果iife,umd需要指定一个全局变量
  }
}
src/mian.js
import { name, age } from './modules/myModule'

function say() {
  console.log(`my name is ${name}`);
}

console.log(age);
say();
modules/myModule.js
export const name = 'jiahang'
export const age = 18
export const height = 180
执行 npm run build, 打开dist目录,看到bundle.js文件打包内容如下:
'use strict';

const name = 'jiahang';
const age = 18;

function say() {
  console.log(`my name is ${name}`);
}

console.log(age);
say();
可以看到,rollup打包出来的代码非常之简洁,没有用到的变量以及方法都不会被打包进来,所以一般开发库之类的一般都会采用rollup来减小代码体积。
在 rollup 中,一个文件就是一个模块。每一个模块都会根据文件的代码生成一个 AST 语法抽象树,rollup 需要对每一个 AST 节点进行分析。分析 AST 节点,就是看看这个节点有没有调用函数或方法。如果有,就查看所调用的函数或方法是否在当前作用域,如果不在就往上找,直到找到模块顶级作用域为止。如果本模块都没找到,说明这个函数、方法依赖于其他模块,需要从其他模块引入。
简易版rollup实现
简易版目前不考虑模块的依赖以及变量作用域
main.js入口文件
console.log('hello');
console.log('world');
lib/rollup.js
let Bundle = require('./bundle');
function rollup(entry,outputFileName){
    //Bundle就代表打包对象,里面会包含所有的模块信息
    const bundle = new Bundle({entry});
    //调用build方法开始进行编译
    bundle.build(outputFileName);
}
module.exports = rollup;
这个是rollup打包工作的入口,接受入口路径和打包后的名字,接着是实例化一个Bundle,调用实例的build方法,那么其核心逻辑就是Bundle类。
const fs = require('fs');
const MagicString = require('magic-string');
const Module = require('./module');

class Bundle {
  constructor(options) {
    //入口文件的绝对路径,包括后缀
    this.entryPath = options.entry.replace(/\.js$/, '') + '.js';
    this.modules = {};//存放着所有模块 入口文件和它依赖的模块
  }

  build(outputFileName) {
    //从入口文件的绝对路径出发找到它的模块定义
    let entryModule = this.fetchModule(this.entryPath);
    //把这个入口模块所有的语句进行展开,返回所有的语句组成的数组
    this.statements = entryModule.expandAllStatements();
    const { code } = this.generate();
    fs.writeFileSync(outputFileName, code, 'utf8');
  }

  //获取模块信息
  fetchModule(importee) {
    let route = importee;//入口文件的绝对路径
    if (route) {
      //从硬盘上读出此模块的源代码
      let code = fs.readFileSync(route, 'utf8');
      let module = new Module({
        code,//模块的源代码
        path: route,//模块的绝对路径
        bundle: this//属于哪个Bundle
      });
      return module;
    }
  }

  //把this.statements生成代码
  generate() {
    let magicString = new MagicString.Bundle();
    this.statements.forEach(statement => {
      const source = statement._source;
      magicString.addSource({
        content: source,
        separator: '\n'
      });
    });
    return { code: magicString.toString() };
  }
}

module.exports = Bundle;
Bundle的实例在build的时候,会从入口出发,每一个文件会生成一个module实例,包含模块的源代码,模块的路径,模块的抽象语法树ast,然后将语法树语句进行展开,返回所有的语句组成的数组,最后调用generate生成最终的代码。
Module类
let MagicString = require('magic-string');
const { parse } = require('acorn');
const analyse = require('./ast/analyse');

/**
 * 每个文件都是一个模块,每个模块都会对应一个Module实例
 */
class Module {
  constructor({ code, path, bundle }) {
    this.code = new MagicString(code, { filename: path });
    this.path = path;//模块的路径
    this.bundle = bundle;//属于哪个bundle的实例
    this.ast = parse(code, {//把源代码转成抽象语法树
      ecmaVersion: 7,
      sourceType: 'module'
    });
    this.analyse();
  }

  analyse() {
    analyse(this.ast, this.code, this);
  }

  //展开这个模块里的语句,把些语句中定义的变量的语句都放到结果里
  expandAllStatements() {
    let allStatements = [];
    this.ast.body.forEach(statement => {
      let statements = this.expandStatement(statement);
      allStatements.push(...statements);
    });
    return allStatements;
  }

  //展开一个节点
  //找到当前节点依赖的变量,它访问的变量,找到这些变量的声明语句。
  //这些语句可能是在当前模块声明的,也也可能是在导入的模块的声明的
  expandStatement(statement) {
    let result = [];
    if (!statement._included) {
      statement._included = true;//表示这个节点已经确定被纳入结果 里了,以后就不需要重复添加了
      //tree shaking核心在此处
      result.push(statement);
    }

    return result;
  }
}

module.exports = Module;
ast/analyse.js
function analyse(ast, magicString, module) {
  ast.body.forEach(statement => {//body下面的顶级节点
    Object.defineProperties(statement, {
      //start指的是此节点在源代码中的起始索引,end就是结束索引
      //magicString.snip返回的还是magicString 实例clone
      _source: { value: magicString.snip(statement.start, statement.end) }
    });
  });
}

module.exports = analyse;
现在来测试一下该简易版的
debugger.js
const path = require('path');
const rollup = require('./lib/rollup');
//入口文件的绝对路径
let entry = path.resolve(__dirname,'src/main.js');
rollup(entry,'bundle.js');
打包出来的结果
console.log('hello');
console.log('world');
可以看到可以完整的输出打包结果。
完整版rollup实现
简易版本的rollup只是原封不动的将代码copy到了一起,并未对模块的变量方法做处理,接下来对这部分处理。
从打包入口流程来看,在实例化build之后就调用了Bundle实例的build方法,而bundle.build(outputFileName)中最开始调用的就是该实例的fetchModule方法,那我们就从这个方法去一步步去做调整,先看下这个方法做了上面操作。
fetchModule(importee) {
  let route = importee;//入口文件的绝对路径
  if (route) {
    //从硬盘上读出此模块的源代码
    let code = fs.readFileSync(route, 'utf8');
    let module = new Module({
      code,//模块的源代码
      path: route,//模块的绝对路径
      bundle: this//属于哪个Bundle
    });
    return module;
  }
}
就是从入口文件出发,每一个文件就生成一个Module实例,在实例化的时候就会去分析代码,这个时候是去分析的是ast树了,分析的时候就先找这个模块的导入和导出。
1.ast导入和导出的处理
import {age} from './title';
age++;
export {
    age
};
先来看下这个代码的ast长的什么样

Module类的方法就可以完善analyse方法了
analyse() {
  this.imports = {};//存放着当前模块所有的导入
  this.exports = {};//存放着当前模块所有的导出
  this.ast.body.forEach(node => {
    if (node.type === 'ImportDeclaration') {//说明这是一个导入语句
      let source = node.source.value;//./msg 从哪个模块进行的导入
      let specifiers = node.specifiers;
      specifiers.forEach(specifier => {
        const name = specifier.imported.name;//name
        const localName = specifier.local.name;//name
        //本地的哪个变量,是从哪个模块的的哪个变量导出的
        //this.imports.age = {name:'age',localName:"age",source:'./msg'};
        this.imports[localName] = { name, localName, source }
      });
    } else if (node.type === 'ExportNamedDeclaration') {
      let declaration = node.declaration;//VariableDeclaration
      if (declaration.type === 'VariableDeclaration') {
        let name = declaration.declarations[0].id.name;//age
        //记录一下当前模块的导出 这个age通过哪个表达式创建的
        //this.exports['age']={node,localName:age,expression}
        this.exports[name] = {
          node, localName: name, expression: declaration
        }
      }
    }
  });
  analyse(this.ast, this.code, this);
}
经过这样的一番处理后,每一个文件模块的导入导出都在imports和exports中了。
2.作用域Scope类
分析每个 AST 节点间的作用域,找出每个 AST 节点定义的变量,每遍历到一个 AST 节点,都会为它生成一个 Scope 实例。
作用域链是由当前执行环境与上层执行环境的一系列变量对象组成的,它保证了当前执行环境对符合访问权限的变量和函数的有序访问,tree-shaking原理的核心就是基于这样的一个scope chain。
class Scope {
  constructor(options = {}) {
    this.name = options.name;//作用域起个名字,没有什么用,只是帮助 大家认识的
    this.parent = options.parent;//父作用域
    this.depth = this.parent ? this.parent.depth + 1 : 0 // 作用域层级
    this.names = options.params || [];//此作用内有哪些变量
  }

  add(name, isBlockDeclaration) {
		if (!isBlockDeclaration && this.isBlockScope) {
			this.parent.add(name, isBlockDeclaration)
		} else {
			this.names.push(name)
		}
	}

  findDefiningScope(name) {
    if (this.names.includes(name)) {
      return this;
    }
    if (this.parent) {
      return this.parent.findDefiningScope(name);
    }
    return null;
  }
}

module.exports = Scope;
来简单测试下,
let Scope = require('./scope');
let a = 1;

function one() {
  let b = 2;

  function two(age) {
    let c = 3;
    console.log(a, b, c, age);
  }

  two();
}

one();
let globalScope = new Scope({
  name: 'globalScope', params: [], parent: null
});
globalScope.add('a');
let oneScope = new Scope({
  name: 'oneScope', params: [], parent: globalScope
});
oneScope.add('b');
let twoScope = new Scope({
  name: 'twoScope', params: ['age'], parent: oneScope
});
twoScope.add('c');

let aScope = twoScope.findDefiningScope('a');
console.log(aScope.name);

let bScope = twoScope.findDefiningScope('b');
console.log(bScope.name);

let cScope = twoScope.findDefiningScope('c');
console.log(cScope.name);

let ageScope = twoScope.findDefiningScope('age');
console.log(ageScope.name);

let xxxScope = twoScope.findDefiningScope('xxx');
console.log(xxxScope);
打印结果如下:
// 1 2 3 undefined
// globalScope
// oneScope
// twoScope
// twoScope
// null
Scope 的作用很简单,它有一个 names 属性数组,用于保存这个 AST 节点内的变量。rollup根据这个Scope链构建出变量的作用域。
3.walk方法的实现
/**
 *
 * @param {*} ast 要遍历的语法树
 * @param {*} param1 配置对象
 */
function walk(ast, { enter, leave }) {
  visit(ast, null, enter, leave);
}

/**
 * 访问此node节点
 * @param {*} node
 * @param {*} parent
 * @param {*} enter
 * @param {*} leave
 */
function visit(node, parent, enter, leave) {
  if (enter) {//先执行此节点的enter方法
    enter(node, parent);//不关心this就可以这么写
    //enter.call(null,node,parent);//如果你想指定enter中的this
  }
  //再遍历子节点 找出那些是对象的子节点
  let childKeys = Object.keys(node).filter(key => typeof node[key] === 'object');
  childKeys.forEach(childKey => {//childKey=specifiers value=[]
    let value = node[childKey];
    if (Array.isArray(value)) {
      value.forEach((val) => visit(val, node, enter, leave));
    } else {
      visit(value, node, enter, leave)
    }
  });
  //再执行离开方法
  if (leave) {
    leave(node, parent);
  }
}

module.exports = walk;
测试下walk方法的使用
let acorn = require('acorn');
let walk = require('./walk');
//parse方法把源代码转成一个抽象语法树
let astTree = acorn.parse(`import $ from 'jquery';`, {
  locations: true, ranges: true, sourceType: 'module', ecmaVersion: 8
});
let ident = 0;
const padding = () => ' '.repeat(ident);
//console.log(astTree.body);
//遍历语法树中每一条语句
astTree.body.forEach(statement => {
  //每一条语句传递给walk方法,由walk遍历这条语句子元素
  //采用是深度优先的方法进行遍历
  walk(statement, {
    enter(node) {
      if (node.type) {
        console.log(padding() + node.type + '进入');
        ident += 2;
      }
    },
    leave(node) {
      if (node.type) {
        ident -= 2;
        console.log(padding() + node.type + '离开');
      }
    }
  });
});
使用的是深度遍历,如图
打印结果如下
ImportDeclaration进入
  ImportDefaultSpecifier进入
    Identifier进入
    Identifier离开
  ImportDefaultSpecifier离开
  Literal进入
  Literal离开
ImportDeclaration离开
4.分析标识符,并找出它们的依赖项
什么是标识符?如变量名,函数名,属性名,都归为标识符。当解析到一个标识符时,rollup 会遍历它当前的作用域,看看有没这个标识符。如果没有找到,就往它的父级作用域找。如果一直找到模块顶级作用域都没找到,就说明这个函数、方法依赖于其它模块,需要从其他模块引入。如果一个函数、方法需要被引入,就将它添加到
Module的_dependsOn对象里。这就是 rollup 的 tree-shaking 原理,rollup 不看你引入了什么函数,而是看你调用了什么函数。如果调用的函数不在此模块中,就从其它模块引入。换句话说,如果你手动在模块顶部引入函数,但又没调用。
在Module实例化的时候,我们已经收集到了每个模块的导入和导出,执行了analyse(this.ast, this.code, this)。如此,在analyse我们就要去通过walk和scope去分析标识符,并找出它们的依赖项。
let Scope = require('./scope');
let walk = require('./walk');

/**
 * 找出当前模块使用到了哪些变量
 * 还要知道哪些变量时当前模块声明的,哪些变量是导入别的模块的变量
 * @param {*} ast 语法树
 * @param {*} magicString 源代码
 * @param {*} module  属于哪个模块的
 */
function analyse(ast, magicString, module) {
  let scope = new Scope();//先创建一个模块内的全局作用域
  //遍历当前的所有的语法树的所有的顶级节点
  ast.body.forEach(statement => {
    //给作用域添加变量 var function const let 变量声明
    function addToScope(declaration) {
      var name = declaration.id.name;//获得这个声明的变量
      scope.add(name);//把say这个变量添加到当前的全局作用域
      if (!scope.parent) {//如果当前是全局作用域的话
        statement._defines[name] = true;//在全局作用域下声明一个全局的变量say
      }
    }

    Object.defineProperties(statement, {
      _defines: { value: {} },//存放当前模块定义的所有的全局变量
      _dependsOn: { value: {} },//当前模块没有定义但是使用到的变量,也就是依赖的外部变量
      _included: { value: false, writable: true },//此语句是否已经 被包含到打包结果中了
      //start指的是此节点在源代码中的起始索引,end就是结束索引
      //magicString.snip返回的还是magicString 实例clone
      _source: { value: magicString.snip(statement.start, statement.end) }
    });
    //这一步在构建我们的作用域链
    walk(statement, {
      enter(node) {
        let newScope;
        switch (node.type) {
          case 'FunctionDeclaration':
            const params = node.params.map(x => x.name);
            if (node.type === 'FunctionDeclaration') {
              addToScope(node);
            }
            //如果遍历到的是一个函数声明,我会创建一个新的作用域对象
            newScope = new Scope({
              parent: scope,//父作用域就是当前的作用域
              params
            });
            break;
          case 'VariableDeclaration': //并不会生成一个新的作用域
            node.declarations.forEach(addToScope);
            break;
        }
        if (newScope) {//当前节点声明一个新的作用域
          //如果此节点生成一个新的作用域,那么会在这个节点放一个_scope,指向新的作用域
          Object.defineProperty(node, '_scope', { value: newScope });
          scope = newScope;
        }
      },
      leave(node) {
        if (node._scope) {//如果此节点产出了一个新的作用域,那等离开这个节点,scope回到父作用法域
          scope = scope.parent;
        }
      }
    });
  });
  console.log('第一次遍历', scope);
  ast._scope = scope;
  //找出外部依赖_dependsOn
  ast.body.forEach(statement => {
    walk(statement, {
      enter(node) {
        if (node._scope) {
          scope = node._scope;
        } //如果这个节点放有一个scope属笥,说明这个节点产生了一个新的作用域
        if (node.type === 'Identifier') {
          //从当前的作用域向上递归,找这个变量在哪个作用域中定义
          const definingScope = scope.findDefiningScope(node.name);
          if (!definingScope) {
            statement._dependsOn[node.name] = true;//表示这是一个外部依赖的变量
          }
        }

      },
      leave(node) {
        if (node._scope) {
          scope = scope.parent;
        }

      }
    });
  });

}

module.exports = analyse;
分析完之后,还需要找出全局变量定义的语句
this.definitions = {};//存放着所有的全局变量的定义语句
this.ast.body.forEach(statement => {
  Object.keys(statement._defines).forEach(name => {
    //key是全局变量名,值是定义这个全局变量的语句
    this.definitions[name] = statement;
  });
});
完整的analyse方法如下:
analyse() {
  this.imports = {};//存放着当前模块所有的导入
  this.exports = {};//存放着当前模块所有的导出
  this.ast.body.forEach(node => {
    if (node.type === 'ImportDeclaration') {//说明这是一个导入语句
      let source = node.source.value;//./msg 从哪个模块进行的导入
      let specifiers = node.specifiers;
      specifiers.forEach(specifier => {
        const name = specifier.imported.name;//name
        const localName = specifier.local.name;//name
        //本地的哪个变量,是从哪个模块的的哪个变量导出的
        //this.imports.age = {name:'age',localName:"age",source:'./msg'};
        this.imports[localName] = { name, localName, source }
      });
      //}else if(/^Export/.test(node.type)){
    } else if (node.type === 'ExportNamedDeclaration') {
      let declaration = node.declaration;//VariableDeclaration
      if (declaration.type === 'VariableDeclaration') {
        let name = declaration.declarations[0].id.name;//age
        //记录一下当前模块的导出 这个age通过哪个表达式创建的
        //this.exports['age']={node,localName:age,expression}
        this.exports[name] = {
          node, localName: name, expression: declaration
        }
      }
    }
  });
  analyse(this.ast, this.code, this);//找到了_defines 和 _dependsOn
  this.definitions = {};//存放着所有的全局变量的定义语句
  this.ast.body.forEach(statement => {
    Object.keys(statement._defines).forEach(name => {
      //key是全局变量名,值是定义这个全局变量的语句
      this.definitions[name] = statement;
    });
  });

}
5.优化其他方法
//展开这个模块里的语句,把些语句中定义的变量的语句都放到结果里
expandAllStatements() {
  let allStatements = [];
  this.ast.body.forEach(statement => {
    if (statement.type === 'ImportDeclaration') {return}
    let statements = this.expandStatement(statement);
    allStatements.push(...statements);
  });
  return allStatements;
}

//展开一个节点
//找到当前节点依赖的变量,它访问的变量,找到这些变量的声明语句。
//这些语句可能是在当前模块声明的,也也可能是在导入的模块的声明的
expandStatement(statement) {
  let result = [];
  const dependencies = Object.keys(statement._dependsOn);//外部依赖 [name]
  dependencies.forEach(name => {
    //找到定义这个变量的声明节点,这个节点可以有在当前模块内,也可能在依赖的模块里
    let definition = this.define(name);
    result.push(...definition);
  });
  if (!statement._included) {
    statement._included = true;//表示这个节点已经确定被纳入结果 里了,以后就不需要重复添加了
    result.push(statement);
  }
  return result;
}

define(name) {
  //查找一下导入变量里有没有name
  if (hasOwnProperty(this.imports, name)) {
    //this.imports.age = {name:'age',localName:"age",source:'./msg'};
    const importData = this.imports[name];
    //获取msg模块 exports imports msg模块
    const module = this.bundle.fetchModule(importData.source, this.path);
    //this.exports['age']={node,localName:age,expression}
    const exportData = module.exports[importData.name];
    //调用msg模块的define方法,参数是msg模块的本地变量名age,目的是为了返回定义age变量的语句
    return module.define(exportData.localName);
  } else {
    //definitions是对象,key当前模块的变量名,值是定义这个变量的语句
    let statement = this.definitions[name];
    if (statement && !statement._included) {
      return this.expandStatement(statement);
    } else {
      return [];
    }
  }
}
6.生成代码
这时需要调用 Bundle 的 generate() 方法生成代码。同时,在打包过程中,还需要对引入的函数做一些额外的操作,
- 移除额外代码
例如从 foo.js 中引入的 foo1() 函数代码是这样的:export function foo1() {}。rollup 会移除掉 export,变成 function foo1() {}。因为它们就要打包在一起了,所以就不需要 export 了。
- 重命名
例如两个模块中都有一个同名函数 foo(),打包到一起时,会对其中一个函数重命名,变成 _foo(),以避免冲突。
//获取模块信息
fetchModule(importee, importer) {
  let route;
  if (!importer) {//如果没有模块导入此模块,说是这就是入口模块
    route = importee;
  } else {
    if (path.isAbsolute(importee)) {//如果是绝对路径
      route = importee;
    } else if (importee[0] == '.') {//如果相对路径
      route = path.resolve(path.dirname(importer), importee.replace(/\.js$/, '') + '.js');
    }
  }
  if (route) {
    //从硬盘上读出此模块的源代码
    let code = fs.readFileSync(route, 'utf8');
    let module = new Module({
      code,//模块的源代码
      path: route,//模块的绝对路径
      bundle: this//属于哪个Bundle
    });
    return module;
  }
}

//把this.statements生成代码
generate() {
  let magicString = new MagicString.Bundle();
  this.statements.forEach(statement => {
    const source = statement._source;
    if (statement.type === 'ExportNamedDeclaration') {
      source.remove(statement.start, statement.declaration.start);
    }
    magicString.addSource({
      content: source,
      separator: '\n'
    });
  });
  return { code: magicString.toString() };
}
完整代码
module.js
const fs = require('fs');
const path = require('path');
const MagicString = require('magic-string');
const Module = require('./module');

class Bundle {
  constructor(options) {
    //入口文件的绝对路径,包括后缀
    this.entryPath = options.entry.replace(/\.js$/, '') + '.js';
    this.modules = {};//存放着所有模块 入口文件和它依赖的模块
  }

  build(outputFileName) {
    //从入口文件的绝对路径出发找到它的模块定义
    let entryModule = this.fetchModule(this.entryPath);
    //把这个入口模块所有的语句进行展开,返回所有的语句组成的数组
    this.statements = entryModule.expandAllStatements();
    const { code } = this.generate();
    fs.writeFileSync(outputFileName, code, 'utf8');
  }

  //获取模块信息
  fetchModule(importee, importer) {
    let route;
    if (!importer) {//如果没有模块导入此模块,说是这就是入口模块
      route = importee;
    } else {
      if (path.isAbsolute(importee)) {//如果是绝对路径
        route = importee;
      } else if (importee[0] == '.') {//如果相对路径
        route = path.resolve(path.dirname(importer), importee.replace(/\.js$/, '') + '.js');
      }
    }
    if (route) {
      //从硬盘上读出此模块的源代码
      let code = fs.readFileSync(route, 'utf8');
      let module = new Module({
        code,//模块的源代码
        path: route,//模块的绝对路径
        bundle: this//属于哪个Bundle
      });
      return module;
    }
  }

  //把this.statements生成代码
  generate() {
    let magicString = new MagicString.Bundle();
    this.statements.forEach(statement => {
      const source = statement._source;
      if (statement.type === 'ExportNamedDeclaration') {
        source.remove(statement.start, statement.declaration.start);
      }
      magicString.addSource({
        content: source,
        separator: '\n'
      });
    });
    return { code: magicString.toString() };
  }
}

module.exports = Bundle;
bundle.js
let MagicString = require('magic-string');
const { parse } = require('acorn');
const analyse = require('./ast/analyse');

//判断一下obj对象上是否有prop属性
function hasOwnProperty(obj, prop) {
  return Object.prototype.hasOwnProperty.call(obj, prop);
}

/**
 * 每个文件都是一个模块,每个模块都会对应一个Module实例
 */
class Module {
  constructor({ code, path, bundle }) {
    this.code = new MagicString(code, { filename: path });
    this.path = path;//模块的路径
    this.bundle = bundle;//属于哪个bundle的实例
    this.ast = parse(code, {//把源代码转成抽象语法树
      ecmaVersion: 7,
      sourceType: 'module'
    });
    this.analyse();
  }

  analyse() {
    this.imports = {};//存放着当前模块所有的导入
    this.exports = {};//存放着当前模块所有的导出
    this.ast.body.forEach(node => {
      if (node.type === 'ImportDeclaration') {//说明这是一个导入语句
        let source = node.source.value;//./msg 从哪个模块进行的导入
        let specifiers = node.specifiers;
        specifiers.forEach(specifier => {
          const name = specifier.imported.name;//name
          const localName = specifier.local.name;//name
          //本地的哪个变量,是从哪个模块的的哪个变量导出的
          //this.imports.age = {name:'age',localName:"age",source:'./msg'};
          this.imports[localName] = { name, localName, source }
        });
        //}else if(/^Export/.test(node.type)){
      } else if (node.type === 'ExportNamedDeclaration') {
        let declaration = node.declaration;//VariableDeclaration
        if (declaration.type === 'VariableDeclaration') {
          let name = declaration.declarations[0].id.name;//age
          //记录一下当前模块的导出 这个age通过哪个表达式创建的
          //this.exports['age']={node,localName:age,expression}
          this.exports[name] = {
            node, localName: name, expression: declaration
          }
        }
      }
    });
    analyse(this.ast, this.code, this);//找到了_defines 和 _dependsOn
    this.definitions = {};//存放着所有的全局变量的定义语句
    this.ast.body.forEach(statement => {
      Object.keys(statement._defines).forEach(name => {
        //key是全局变量名,值是定义这个全局变量的语句
        this.definitions[name] = statement;
      });
    });

  }

  //展开这个模块里的语句,把些语句中定义的变量的语句都放到结果里
  expandAllStatements() {
    let allStatements = [];
    this.ast.body.forEach(statement => {
      if (statement.type === 'ImportDeclaration') {return}
      let statements = this.expandStatement(statement);
      allStatements.push(...statements);
    });
    return allStatements;
  }

  //展开一个节点
  //找到当前节点依赖的变量,它访问的变量,找到这些变量的声明语句。
  //这些语句可能是在当前模块声明的,也也可能是在导入的模块的声明的
  expandStatement(statement) {
    let result = [];
    const dependencies = Object.keys(statement._dependsOn);//外部依赖 [name]
    dependencies.forEach(name => {
      //找到定义这个变量的声明节点,这个节点可以有在当前模块内,也可能在依赖的模块里
      let definition = this.define(name);
      result.push(...definition);
    });
    if (!statement._included) {
      statement._included = true;//表示这个节点已经确定被纳入结果 里了,以后就不需要重复添加了
      result.push(statement);
    }
    return result;
  }

  define(name) {
    //查找一下导入变量里有没有name
    if (hasOwnProperty(this.imports, name)) {
      //this.imports.age = {name:'age',localName:"age",source:'./msg'};
      const importData = this.imports[name];
      //获取msg模块 exports imports msg模块
      const module = this.bundle.fetchModule(importData.source, this.path);
      //this.exports['age']={node,localName:age,expression}
      const exportData = module.exports[importData.name];
      //调用msg模块的define方法,参数是msg模块的本地变量名age,目的是为了返回定义age变量的语句
      return module.define(exportData.localName);
    } else {
      //definitions是对象,key当前模块的变量名,值是定义这个变量的语句
      let statement = this.definitions[name];
      if (statement && !statement._included) {
        return this.expandStatement(statement);
      } else {
        return [];
      }
    }
  }
}

module.exports = Module;
annlyse.js
let Scope = require('./scope');
let walk = require('./walk');

/**
 * 找出当前模块使用到了哪些变量
 * 还要知道哪些变量时当前模块声明的,哪些变量是导入别的模块的变量
 * @param {*} ast 语法树
 * @param {*} magicString 源代码
 * @param {*} module  属于哪个模块的
 */
function analyse(ast, magicString, module) {
  let scope = new Scope();//先创建一个模块内的全局作用域
  //遍历当前的所有的语法树的所有的顶级节点
  ast.body.forEach(statement => {
    //给作用域添加变量 var function const let 变量声明
    function addToScope(declaration) {
      var name = declaration.id.name;//获得这个声明的变量
      scope.add(name);//把say这个变量添加到当前的全局作用域
      if (!scope.parent) {//如果当前是全局作用域的话
        statement._defines[name] = true;//在全局作用域下声明一个全局的变量say
      }
    }

    Object.defineProperties(statement, {
      _defines: { value: {} },//存放当前模块定义的所有的全局变量
      _dependsOn: { value: {} },//当前模块没有定义但是使用到的变量,也就是依赖的外部变量
      _included: { value: false, writable: true },//此语句是否已经 被包含到打包结果中了
      //start指的是此节点在源代码中的起始索引,end就是结束索引
      //magicString.snip返回的还是magicString 实例clone
      _source: { value: magicString.snip(statement.start, statement.end) }
    });
    //这一步在构建我们的作用域链
    walk(statement, {
      enter(node) {
        let newScope;
        switch (node.type) {
          case 'FunctionDeclaration':
            const params = node.params.map(x => x.name);
            if (node.type === 'FunctionDeclaration') {
              addToScope(node);
            }
            //如果遍历到的是一个函数声明,我会创建一个新的作用域对象
            newScope = new Scope({
              parent: scope,//父作用域就是当前的作用域
              params
            });
            break;
          case 'VariableDeclaration': //并不会生成一个新的作用域
            node.declarations.forEach(addToScope);
            break;
        }
        if (newScope) {//当前节点声明一个新的作用域
          //如果此节点生成一个新的作用域,那么会在这个节点放一个_scope,指向新的作用域
          Object.defineProperty(node, '_scope', { value: newScope });
          scope = newScope;
        }
      },
      leave(node) {
        if (node._scope) {//如果此节点产出了一个新的作用域,那等离开这个节点,scope回到父作用法域
          scope = scope.parent;
        }
      }
    });
  });
  console.log('第一次遍历', scope);
  ast._scope = scope;
  //找出外部依赖_dependsOn
  ast.body.forEach(statement => {
    walk(statement, {
      enter(node) {
        if (node._scope) {
          scope = node._scope;
        } //如果这个节点放有一个scope属笥,说明这个节点产生了一个新的作用域
        if (node.type === 'Identifier') {
          //从当前的作用域向上递归,找这个变量在哪个作用域中定义
          const definingScope = scope.findDefiningScope(node.name);
          if (!definingScope) {
            statement._dependsOn[node.name] = true;//表示这是一个外部依赖的变量
          }
        }

      },
      leave(node) {
        if (node._scope) {
          scope = scope.parent;
        }

      }
    });
  });

}

module.exports = analyse;
rollup.js
let Bundle = require('./bundle');

function rollup(entry, outputFileName) {
  //Bundle就代表打包对象,里面会包含所有的模块信息
  const bundle = new Bundle({ entry });
  //调用build方法开始进行编译
  bundle.build(outputFileName);
}

module.exports = rollup;
其他文件代码已有,就不再贴出了。
总结
本文只是从rollup如何打包和tree-shaking原理出发,可以知道rollup是如何工作的,有些细节并未处理,比如作用域那块,rollup命令行使用,rollup的watch使用,这些有兴趣的可以去看下rollup源码。


 1万+
1万+


 被折叠的 条评论
为什么被折叠?
被折叠的 条评论
为什么被折叠?
 到【灌水乐园】发言


