


Spring集成
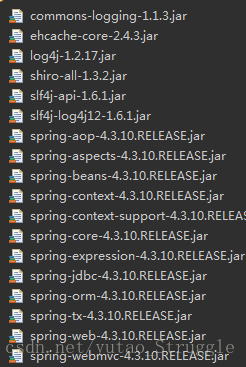
spring整合所需的jar包:
(1)web.xml配置如下:
 <!-- ==================================================================
         spring配置
     ================================================================== -->
  <context-param>
    <param-name>contextConfigLocation</param-name>
    <param-value>classpath:applicationContext.xml</param-value>
  </context-param>

  <listener>
    <listener-class>org.springframework.web.context.ContextLoaderListener</listener-class>
  </listener>
  <!-- ==================================================================
         springmvc配置
         ================================================================== -->
  <servlet>
    <servlet-name>springmvc</servlet-name>
    <servlet-class>org.springframework.web.servlet.DispatcherServlet</servlet-class>
    <load-on-startup>1</load-on-startup>
    <init-param>
        <param-name>contextConfigLocation</param-name>
        <param-value>classpath:springmvc.xml</param-value>
    </init-param>
  </servlet>
  <servlet-mapping>
    <servlet-name>springmvc</servlet-name>
    <url-pattern>/*</url-pattern>
  </servlet-mapping>
   <!-- ==================================================================
       shiro Filter 配置
         ================================================================== -->
    <!-- Shiro Filter is defined in the spring application context: -->
  <filter>
    <filter-name>shiroFilter</filter-name>
    <filter-class>org.springframework.web.filter.DelegatingFilterProxy</filter-class>
    <init-param>
      <param-name>targetFilterLifecycle</param-name>
      <param-value>true</param-value>
    </init-param>
    <!--不配置默认为shiroFilter-->
    <init-param>
        <param-name>targetBeanName</param-name>
        <param-value>shiroFilter</param-value>
    </init-param>
  </filter>
  <filter-mapping>
    <filter-name>shiroFilter</filter-name>
    <url-pattern>/*</url-pattern>
  </filter-mapping>
DelegatingFilterProxy作用是自动到Spring容器查找名字为shiroFilter(filter-name)的bean并把所有的Filter的操作委托给它。
(2)springmvc配置 springmvc.xml(src目录下):
<?xml version="1.0" encoding="UTF-8"?>
<beans xmlns="http://www.springframework.org/schema/beans"
    xmlns:xsi="http://www.w3.org/2001/XMLSchema-instance"
    xmlns:mvc="http://www.springframework.org/schema/mvc"
    xmlns:context="http://www.springframework.org/schema/context"
    xsi:schemaLocation="http://www.springframework.org/schema/mvc http://www.springframework.org/schema/mvc/spring-mvc-4.3.xsd
        http://www.springframework.org/schema/beans http://www.springframework.org/schema/beans/spring-beans.xsd
        http://www.springframework.org/schema/context http://www.springframework.org/schema/context/spring-context-4.3.xsd">

    <context:component-scan base-package="com.shiro.controller" />
    <mvc:annotation-driven></mvc:annotation-driven>
    <mvc:default-servlet-handler/>
    <bean class="org.springframework.web.servlet.view.InternalResourceViewResolver">
        <property name="prefix" value="/"></property>
        <property name="suffix" value=".jsp"></property>
    </bean>

</beans>
(3)spring配置 applicationContext.xml(src目录下):
<?xml version="1.0" encoding="UTF-8"?>
<beans xmlns="http://www.springframework.org/schema/beans"
       xmlns:xsi="http://www.w3.org/2001/XMLSchema-instance"
       xsi:schemaLocation="http://www.springframework.org/schema/beans http://www.springframework.org/schema/beans/spring-beans.xsd">

    <!-- 数据库连接池 -->
    <bean id="dataSource" class="com.alibaba.druid.pool.DruidDataSource">
        <property name="driverClassName" value="com.mysql.jdbc.Driver"/>
        <property name="url" value="jdbc:mysql://localhost:3306/shiro"/>
        <property name="username" value="root"/>
        <property name="password" value=""/>
    </bean>

    <!-- 缓存管理器 使用Ehcache实现 -->
    <bean id="cacheManager" class="org.apache.shiro.cache.ehcache.EhCacheManager">
        <property name="cacheManagerConfigFile" value="classpath:ehcache.xml"/>
    </bean>

    <!-- 凭证匹配器 -->
    <bean id="credentialsMatcher" class="org.apache.shiro.authc.credential.HashedCredentialsMatcher">
        <constructor-arg ref="cacheManager"/>
        <property name="hashAlgorithmName" value="md5"/>
        <property name="hashIterations" value="2"/>
        <property name="storedCredentialsHexEncoded" value="true"/>
    </bean>

    <!-- Realm实现 -->
    <bean id="userRealm" class="com.shiro.realm.UserRealm">
        <property name="credentialsMatcher" ref="credentialsMatcher"/>
        <property name="cachingEnabled" value="true"/>
        <property name="authenticationCachingEnabled" value="true"/>
        <property name="authenticationCacheName" value="authenticationCache"/>
        <property name="authorizationCachingEnabled" value="true"/>
        <property name="authorizationCacheName" value="authorizationCache"/>
    </bean>

    <!-- 会话ID生成器 -->
    <bean id="sessionIdGenerator" class="org.apache.shiro.session.mgt.eis.JavaUuidSessionIdGenerator"/>
    <!-- 会话Cookie模板 -->
    <bean id="sessionIdCookie" class="org.apache.shiro.web.servlet.SimpleCookie">
        <constructor-arg value="sid"/>
        <property name="httpOnly" value="true"/>
        <property name="maxAge" value="180000"/>
    </bean>
    <!-- 会话DAO -->
    <bean id="sessionDAO" class="org.apache.shiro.session.mgt.eis.EnterpriseCacheSessionDAO">
        <property name="activeSessionsCacheName" value="shiro-activeSessionCache"/>
        <property name="sessionIdGenerator" ref="sessionIdGenerator"/>
    </bean>
    <!-- 会话验证调度器 -->
    <bean id="sessionValidationScheduler" class="org.apache.shiro.session.mgt.quartz.QuartzSessionValidationScheduler">
        <property name="sessionValidationInterval" value="1800000"/>
        <property name="sessionManager" ref="sessionManager"/>
    </bean>
    <!-- 会话管理器 单Realm可以用realm属性-->
    <bean id="sessionManager" class="org.apache.shiro.web.session.mgt.DefaultWebSessionManager">
        <property name="globalSessionTimeout" value="1800000"/>
        <property name="deleteInvalidSessions" value="true"/>
        <property name="sessionValidationSchedulerEnabled" value="true"/>
        <property name="sessionValidationScheduler" ref="sessionValidationScheduler"/>
        <property name="sessionDAO" ref="sessionDAO"/>
        <property name="sessionIdCookieEnabled" value="true"/>
        <property name="sessionIdCookie" ref="sessionIdCookie"/>
    </bean>
    <!-- 安全管理器 -->
    <bean id="securityManager" class="org.apache.shiro.mgt.DefaultSecurityManager">
        <property name="realms">
            <list>
                <ref bean="userRealm"/>
            </list>
        </property>
        <property name="sessionManager" ref="sessionManager"/>
        <property name="cacheManager" ref="cacheManager"/>
    </bean>
    <!-- 相当于调用SecurityUtils.setSecurityManager(securityManager) -->
    <bean class="org.springframework.beans.factory.config.MethodInvokingFactoryBean">
        <property name="staticMethod" value="org.apache.shiro.SecurityUtils.setSecurityManager"/>
        <property name="arguments" ref="securityManager"/>
    </bean>
     <!-- 基于Form表单的身份验证过滤器 -->
    <bean id="formAuthenticationFilter" class="org.apache.shiro.web.filter.authc.FormAuthenticationFilter">
        <property name="usernameParam" value="username"/>
        <property name="passwordParam" value="password"/>
        <property name="loginUrl" value="/login.jsp"/>
    </bean>

 <!-- Shiro的Web过滤器 -->
    <bean id="shiroFilter" class="org.apache.shiro.spring.web.ShiroFilterFactoryBean">
        <property name="securityManager" ref="securityManager"/>
        <property name="loginUrl" value="/login.jsp"/>
        <property name="unauthorizedUrl" value="/unauthorized.jsp"/>
        <property name="filters">
            <util:map>
                <entry key="authc" value-ref="formAuthenticationFilter"/>
            </util:map>
        </property>
        <property name="filterChainDefinitions">
            <value>
                /index.jsp = anon
                /unauthorized.jsp = anon
                /login.jsp = authc
                /logout = logout
                /** = user
            </value>
        </property>
    </bean>
    <!-- Shiro生命周期处理器-->
    <bean id="lifecycleBeanPostProcessor" class="org.apache.shiro.spring.LifecycleBeanPostProcessor"/>

</beans>
(4)ehcache配置ehcache.xml(src目录下,暂时不用管它具体配置):
<ehcache name="shirocache">

    <diskStore path="java.io.tmpdir"/>
    <cache name="authorizationCache"
           maxEntriesLocalHeap="2000"
           eternal="false"
           timeToIdleSeconds="3600"
           timeToLiveSeconds="0"
           overflowToDisk="false"
           statistics="true">
    </cache>

    <cache name="authenticationCache"
           maxEntriesLocalHeap="2000"
           eternal="false"
           timeToIdleSeconds="3600"
           timeToLiveSeconds="0"
           overflowToDisk="false"
           statistics="true">
    </cache>

    <cache name="shiro-activeSessionCache"
           maxEntriesLocalHeap="2000"
           eternal="false"
           timeToIdleSeconds="3600"
           timeToLiveSeconds="0"
           overflowToDisk="false"
           statistics="true">
    </cache>
</ehcache>
(5)配置文件基本完成,认证思路分析:
1.获取当前Subject
2.测试当前用户是否已经被认证
3.若没有被认证,则把用户名和密码封装为UsernamePasswordToken对象
1).创建一个表单
2).把请求提交到SpringMVC的handler
3).获取用户名和密码
4.执行登录,调用Subject的login方法,委托给SecurityManager的login方法
5.自定义Realm的方法,从数据库获取用户名和密码,返回给shiro
1).继承org.apache.shiro.realm.AuthenticationRealm
2).实现doGetAuthenticationInfo
(6)创建login.jsp、index.jsp、unauthorized.jsp用于测试:
<h1>Login Page</h1>
    <form action="shiro/login" method="post">
        username:<input type="text" name="username"/><br/><br/>
        password:<input type="password" name="password"/><br/><br/>
        <input type="submit"/>
</form><h1>Index Page</h1>
<a href="shiro/logout">logout</a>(7)Handler页面:
package com.shiro.controller;

@Controller
@RequestMapping("/shiro")
public class ShiroHandler {
    private Logger log = LoggerFactory.getLogger(ShiroHandler.class);
    @RequestMapping("/login")
    public String login(@RequestParam("username") String username,@RequestParam("password") String password){
        Subject subject = SecurityUtils.getSubject();

        if(!subject.isAuthenticated()){
            UsernamePasswordToken token = new UsernamePasswordToken(username,password);
            token.setRememberMe(true);
            try{
                subject.login(token);
            }catch(AuthenticationException ae){
                System.out.println("登录失败:"+ae.getMessage());
            }
        }
        return "redirect:/list.jsp";
    }
}
(8)编写ShiroRealm类,继承AuthorizingRealm不仅提供认证的方法,也提供授权
package com.shiro.realm;Shiro 权限注解
Shiro 提供了相应的注解用于权限控制,如果使用这些注解就需要使用 AOP 的功能来进行判断,如 Spring AOP;Shiro 提供了 Spring AOP 集成用于权限注解的解析和验证。
在 spring-mvc.xml 配置文件添加 Shiro Spring AOP 权限注解的支持:
<aop:config proxy-target-class="true"></aop:config>
<bean class="
org.apache.shiro.spring.security.interceptor.AuthorizationAttributeSourceAdvisor">
    <property name="securityManager" ref="securityManager"/>
</bean>
如上配置用于开启 Shiro Spring AOP 权限注解的支持; 表示代理类。
权限注解
@RequiresAuthentication
表示当前 Subject 已经通过 login 进行了身份验证;即 Subject.isAuthenticated() 返回 true。
@RequiresUser
表示当前 Subject 已经身份验证或者通过记住我登录的。
@RequiresGuest
表示当前 Subject 没有身份验证或通过记住我登录过,即是游客身份。
@RequiresRoles(value={“admin”, “user”}, logical= Logical.AND)
表示当前 Subject 需要角色 admin 和 user。
@RequiresPermissions (value={“user:a”, “user:b”}, logical= Logical.OR)
表示当前 Subject 需要权限 user:a 或 user:b。
SSL
对于SSL的支持,Shiro只是判断当前url是否需要SSL登录,如果需要自动重定向到 https 进行访问。
首先生成数字证书,生成证书到D:/localhost.keystore
使用JDK的keytool命令,生成证书(包含证书/公钥/私钥)到D:/localhost.keystore:
keytool -genkey -keystore "D:\localhost.keystore" -alias localhost -keyalg RSA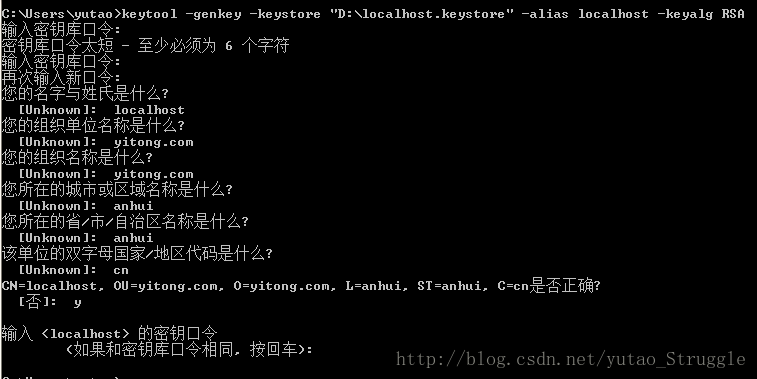
然后设置tomcat下的server.xml
此处使用了apache-tomcat-7.0.62版本,打开conf/server.xml,找到:
 <!--
    <Connector port="8443" protocol="org.apache.coyote.http11.Http11Protocol"
               maxThreads="150" SSLEnabled="true" scheme="https" secure="true"
               clientAuth="false" sslProtocol="TLS" />
    -->
替换为
<Connector port="8443" protocol="org.apache.coyote.http11.Http11Protocol"
               maxThreads="150" SSLEnabled="true" scheme="https" secure="true"
               clientAuth="false" sslProtocol="TLS"
               keystoreFile="D:\localhost.keystore" keystorePass="yt1994"/>
               <!--keystorePass 就是生成 keystore 时设置的密码。-->
添加SSL到配置文件(spring-shiro.xml)
 <!-- SSL 默认端口是443,此处使用了8443-->
    <bean id="sslFilter" class="org.apache.shiro.web.filter.authz.SslFilter">
        <property name="port" value="8443"></property>
    </bean>
Maven Jetty 插件,可以使用如下配置:
<plugin>
   <groupId>org.mortbay.jetty</groupId>
   <artifactId>jetty-maven-plugin</artifactId>
   <version>8.1.8.v20121106</version>
   <configuration>
     <webAppConfig>
       <contextPath>/${project.build.finalName}</contextPath>
     </webAppConfig>
     <connectors>
     <connector implementation="org.eclipse.jetty.server.nio.SelectChannelConnector">
       <port>8080</port>
     </connector>
     <connector implementation="org.eclipse.jetty.server.ssl.SslSocketConnector">
       <port>8443</port>
       <keystore>${project.basedir}/localhost.keystore</keystore>
       <password>yt1994</password>
       <keyPassword>yt1994</keyPassword>
     </connector>
     </connectors>
   </configuration>
</plugin>


 1万+
1万+

 被折叠的 条评论
为什么被折叠?
被折叠的 条评论
为什么被折叠?
 到【灌水乐园】发言


