


我参考了一个博客来建项目,网址是:http://limingnihao.iteye.com/blog/830409。按照这个博客的流程创建了项目,但是由于实际情况的不同,中间还是有一些不一样的。
下面我把我用到的相关软件版本列一下,虽然我不知道这些有什么关系,但是,还是列一下吧, 哈哈哈~~
哈哈哈~~
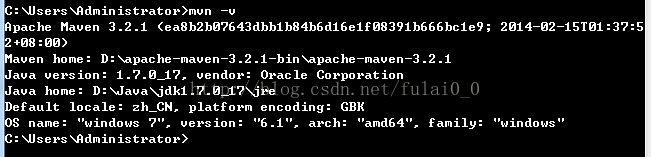
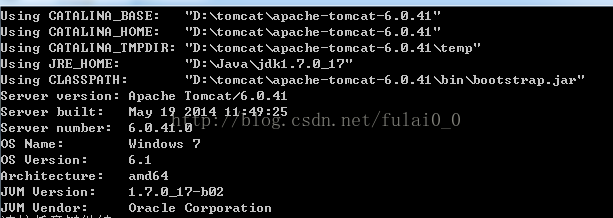
因为不知道列哪些,所以就把这些都截了个图,只知道要用jdk,maven,tomcat,和java编译器(如eclipse)
现在开始建项目
1、创建一个maven项目
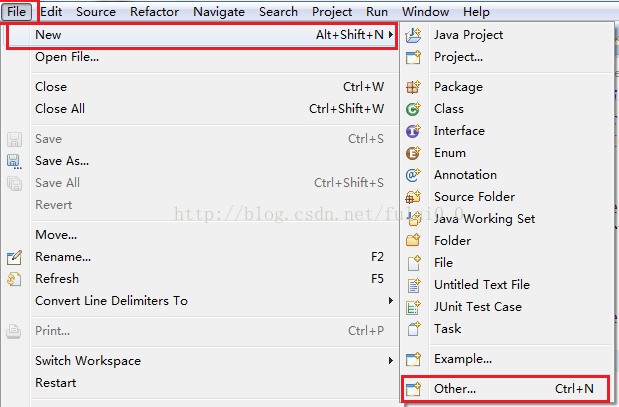
图1
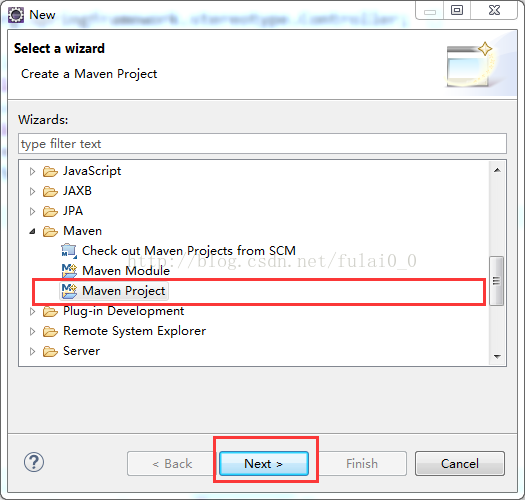
图2

图3(第一个复选框一定要框,反正我这里不选就是错~)
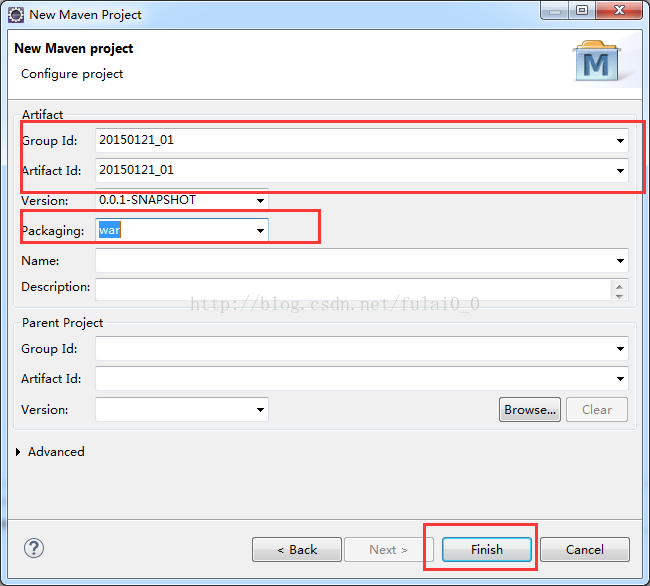
图4(Packaging选择war。反正我之前选jar就有问题了)
图5(红框中显示的不是我想要的,需要修改,右击它,选择“Build Path” ==>“ConfigureBuild Path”)
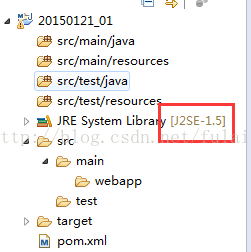
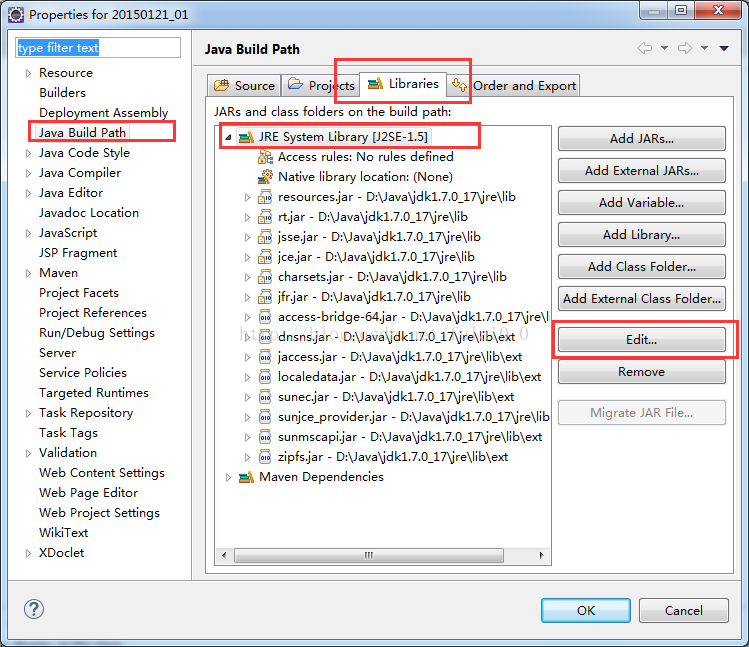
图6
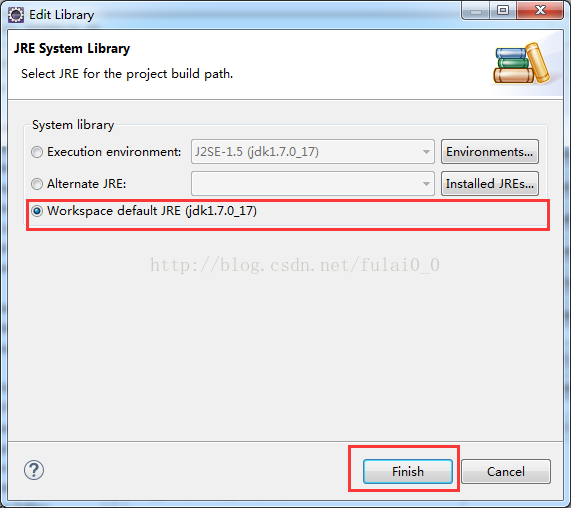
图7(不知道为什么选这个,只是之前看同事选了这个。)
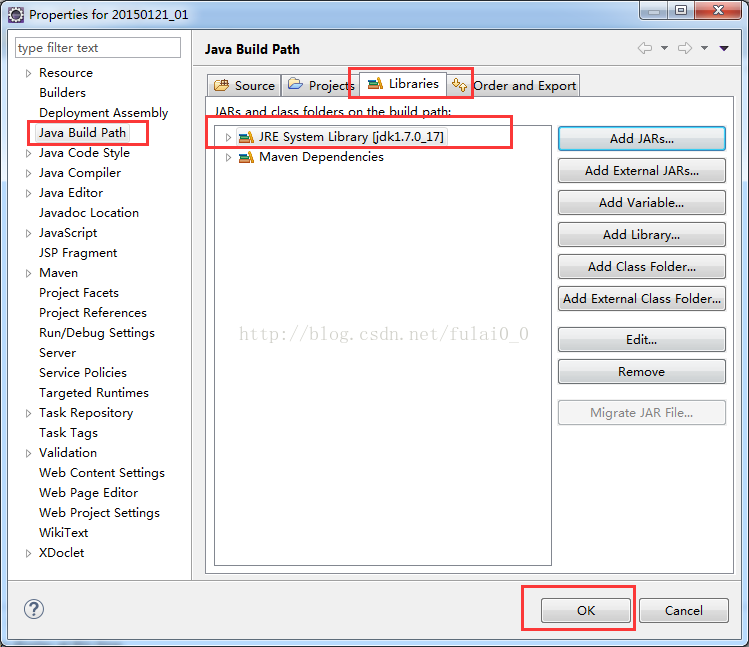
图8
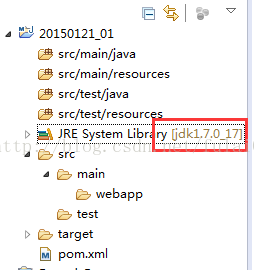
图9
到这一步,已经算是建好了一个mave项目。我们现在来配置一些东西。
2、配置pom.xml(可以直接添加到pom.xml里面,配置一些七七八八的东西。junit、jstl、 spring包)
- <dependencies>
- <!-- junit -->
- <dependency>
- <groupId>junit</groupId>
- <artifactId>junit</artifactId>
- <version>4.12-beta-3</version>
- <scope>test</scope>
- </dependency>
- <!-- log4j -->
- <dependency>
- <groupId>log4j</groupId>
- <artifactId>log4j</artifactId>
- <version>1.2.17</version>
- </dependency>
- <dependency>
- <groupId>jstl</groupId>
- <artifactId>jstl</artifactId>
- <version>1.2</version>
- </dependency>
- <!-- spring 的基本依赖 开始 -->
- <dependency>
- <groupId>org.springframework</groupId>
- <artifactId>spring-core</artifactId>
- <version>4.1.2.RELEASE</version>
- </dependency>
- <dependency>
- <groupId>org.springframework</groupId>
- <artifactId>spring-expression</artifactId>
- <version>4.1.2.RELEASE</version>
- </dependency>
- <dependency>
- <groupId>org.springframework</groupId>
- <artifactId>spring-beans</artifactId>
- <version>4.1.2.RELEASE</version>
- </dependency>
- <dependency>
- <groupId>org.springframework</groupId>
- <artifactId>spring-aop</artifactId>
- <version>4.1.2.RELEASE</version>
- </dependency>
- <dependency>
- <groupId>org.springframework</groupId>
- <artifactId>spring-context</artifactId>
- <version>4.1.2.RELEASE</version>
- </dependency>
- <dependency>
- <groupId>org.springframework</groupId>
- <artifactId>spring-context-support</artifactId>
- <version>4.1.2.RELEASE</version>
- </dependency>
- <dependency>
- <groupId>org.springframework</groupId>
- <artifactId>spring-tx</artifactId>
- <version>4.1.2.RELEASE</version>
- </dependency>
- <dependency>
- <groupId>org.springframework</groupId>
- <artifactId>spring-web</artifactId>
- <version>4.1.2.RELEASE</version>
- </dependency>
- <dependency>
- <groupId>org.springframework</groupId>
- <artifactId>spring-jdbc</artifactId>
- <version>4.1.2.RELEASE</version>
- </dependency>
- <dependency>
- <groupId>org.springframework</groupId>
- <artifactId>spring-webmvc</artifactId>
- <version>4.1.2.RELEASE</version>
- </dependency>
- <dependency>
- <groupId>org.springframework</groupId>
- <artifactId>spring-aspects</artifactId>
- <version>4.1.2.RELEASE</version>
- </dependency>
- <dependency>
- <groupId>org.springframework</groupId>
- <artifactId>spring-test</artifactId>
- <version>4.1.2.RELEASE</version>
- </dependency>
- <!-- spring 的基本依赖 结束 -->
- </dependencies>
3、在webapp下添加一个文件夹“WEB-INF”,在文件夹下添加一个文件“web.xml”(下面的内容可以全部复制过去)
- <?xml version="1.0" encoding="UTF-8"?>
- <web-app xmlns="http://java.sun.com/xml/ns/javaee" xmlns:xsi="http://www.w3.org/2001/XMLSchema-instance"
- xsi:schemaLocation="http://java.sun.com/xml/ns/javaee http://java.sun.com/xml/ns/javaee/web-app_2_5.xsd"
- version="2.5">
- <!-- 区分项目名称,防止默认重名 -->
- <context-param>
- <param-name>webAppRootKey</param-name>
- <param-value>maven.example.root</param-value>
- </context-param>
- <!-- Spring的log4j监听器 -->
- <listener>
- <listener-class>org.springframework.web.util.Log4jConfigListener</listener-class>
- </listener>
- <!-- 字符集 过滤器 -->
- <filter>
- <filter-name>CharacterEncodingFilter</filter-name>
- <filter-class>org.springframework.web.filter.CharacterEncodingFilter</filter-class>
- <init-param>
- <param-name>encoding</param-name>
- <param-value>UTF-8</param-value>
- </init-param>
- <init-param>
- <param-name>forceEncoding</param-name>
- <param-value>true</param-value>
- </init-param>
- </filter>
- <filter-mapping>
- <filter-name>CharacterEncodingFilter</filter-name>
- <url-pattern>/*</url-pattern>
- </filter-mapping>
- <!-- Spring view分发器 -->
- <servlet>
- <servlet-name>dispatcher0121</servlet-name>
- <servlet-class>org.springframework.web.servlet.DispatcherServlet</servlet-class>
- <init-param>
- <param-name>contextConfigLocation</param-name>
- <param-value>/WEB-INF/dispatcher0121-servlet.xml</param-value>
- </init-param>
- <load-on-startup>1</load-on-startup>
- </servlet>
- <servlet-mapping>
- <servlet-name>dispatcher0121</servlet-name>
- <url-pattern>*.do</url-pattern>
- </servlet-mapping>
- </web-app>
4、在“webapp/WEB-INF/”下再添加一个文件“dispatcher0121-servlet.xml”,这个文件就是上面说的东西(可以全部复制到新建的文件中)
- <?xml version="1.0" encoding="UTF-8"?>
- <beans xmlns="http://www.springframework.org/schema/beans"
- xmlns:aop="http://www.springframework.org/schema/aop"
- xmlns:context="http://www.springframework.org/schema/context"
- xmlns:mvc="http://www.springframework.org/schema/mvc"
- xmlns:tx="http://www.springframework.org/schema/tx"
- xmlns:xsi="http://www.w3.org/2001/XMLSchema-instance"
- xsi:schemaLocation="http://www.springframework.org/schema/aop
- http://www.springframework.org/schema/aop/spring-aop-3.0.xsd
- http://www.springframework.org/schema/beans
- http://www.springframework.org/schema/beans/spring-beans-3.0.xsd
- http://www.springframework.org/schema/context
- http://www.springframework.org/schema/context/spring-context-3.0.xsd
- http://www.springframework.org/schema/mvc
- http://www.springframework.org/schema/mvc/spring-mvc-3.0.xsd
- http://www.springframework.org/schema/tx
- http://www.springframework.org/schema/tx/spring-tx-3.0.xsd">
- <mvc:annotation-driven />
- <context:component-scan base-package="example0121" />
- <bean class="org.springframework.web.servlet.view.InternalResourceViewResolver">
- <property name="prefix" value="/WEB-INF/views/" />
- <property name="suffix" value=".jsp" />
- </bean>
- </beans>
dispatcher0121-servlet.xml文件中也有要注意的地方,"example0121"这个是接下来会用的包,名字可以随意,但是不能全部是数字。我不想说,我就是偷懒用数字,导致之前建的项目一直有问题。
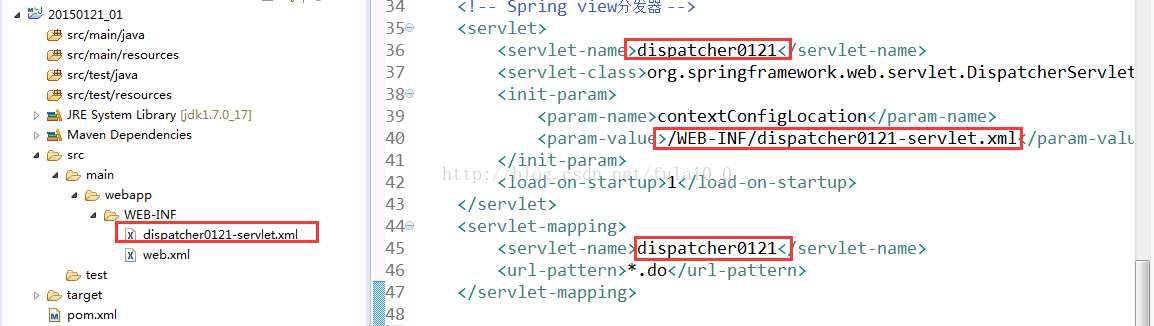
图10
5、创建一个Controller层测试类(这个是什么东西,我也不知道。只知道怎么操作)
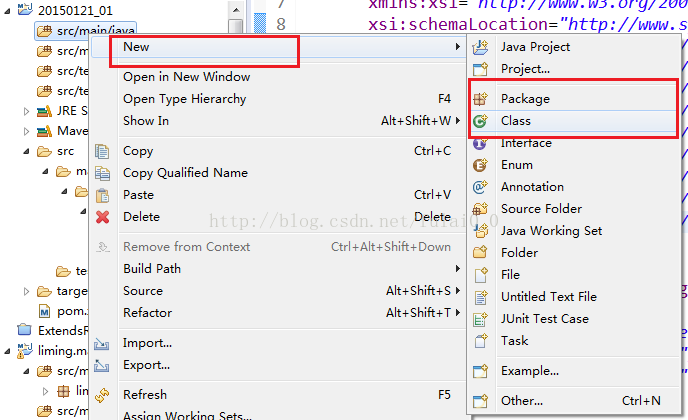
图11
按照这个操作,可以添加包也可以添加类,先添加类,要是发现在包那里没有写“example0121”,那就取消,然后添加一个包,包的名字是“example0121”。然后再创建一个叫“GeneralController”的类。
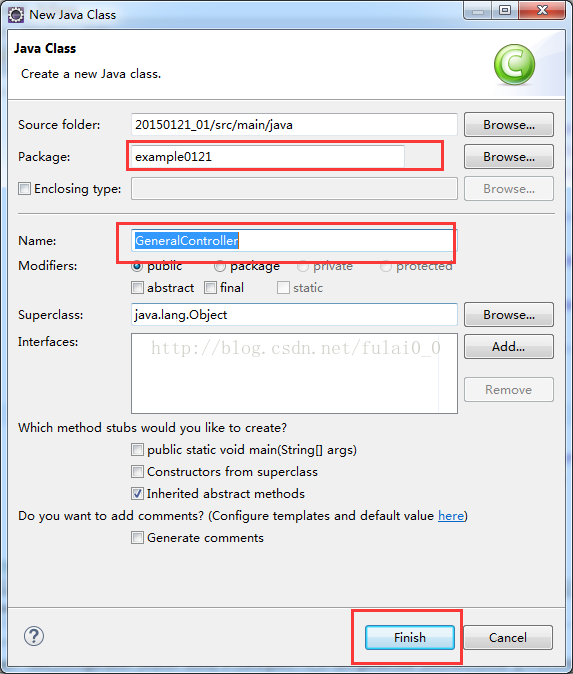
图12
然后将代码写好,像下面一样
- package example0121;
- import org.springframework.stereotype.Controller;
- import org.springframework.ui.Model;
- import org.springframework.web.bind.annotation.RequestMapping;
- @Controller
- public class GeneralController {
- @RequestMapping(value="index.do")
- public void index_jsp(Model model){
- model.addAttribute("str0121", "Hellow world");
- System.out.println("index.jsp");
- }
- }
6、编写jsp页面。在“webapp/WEB-INF/”下添加一个文件夹“views”,再添加一个文件“index.jsp”。这个路径是在“dispatcher0121-servlet.xml”里面定下来的。
- <%@ page language="java" contentType="text/html; charset=UTF-8" pageEncoding="UTF-8"%>
- <%@ taglib prefix="c" uri="http://java.sun.com/jsp/jstl/core"%>
- <!DOCTYPE html PUBLIC "-//W3C//DTD HTML 4.01 Transitional//EN" "http://www.w3.org/TR/html4/loose.dtd">
- <html>
- <head>
- <meta http-equiv="Content-Type" content="text/html; charset=UTF-8">
- <title>Insert title here</title>
- </head>
- <body>
- <c:out value="${str0121}"></c:out>
- </body>
- </html>

图13
7、运行
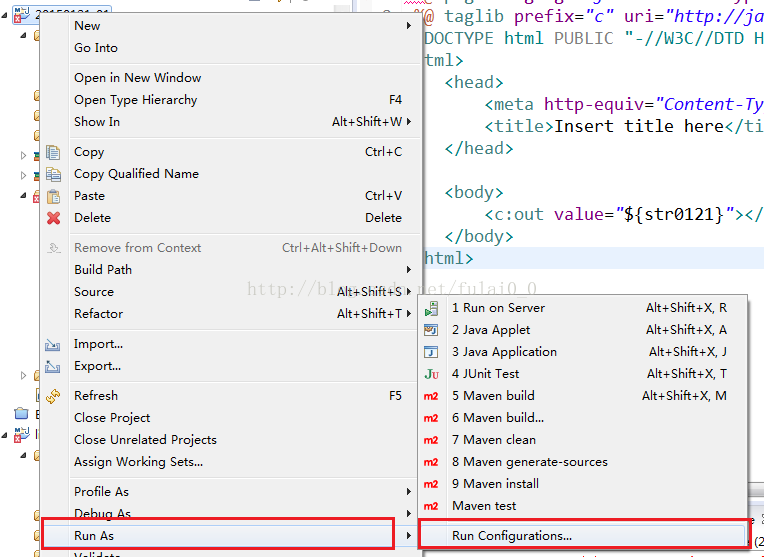
图14
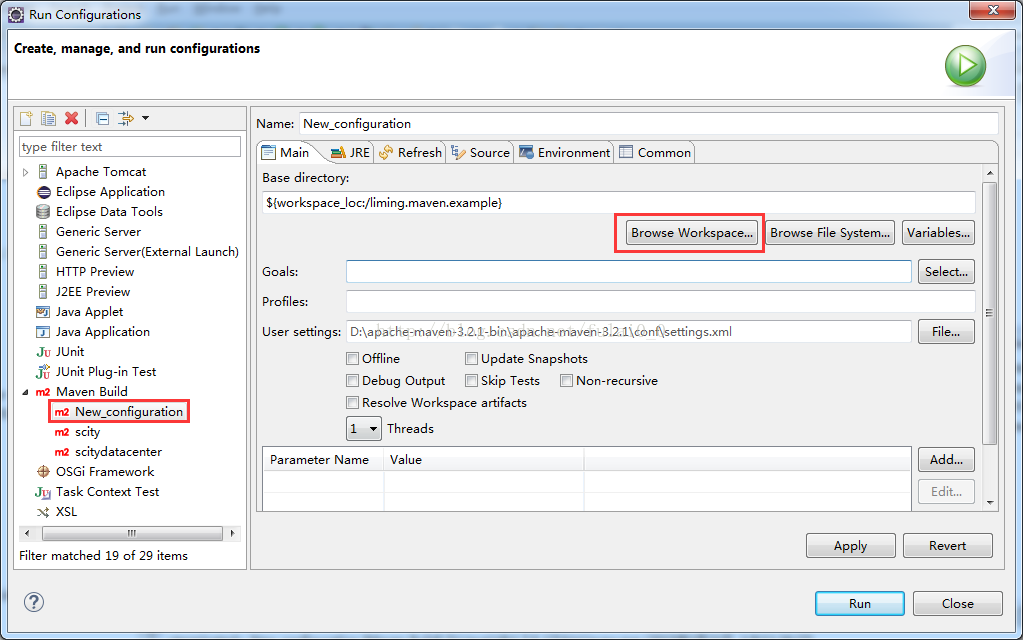
图15
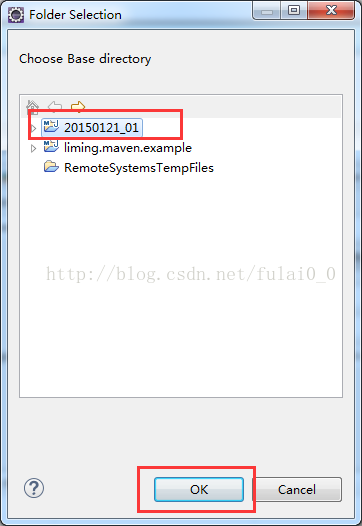
图16
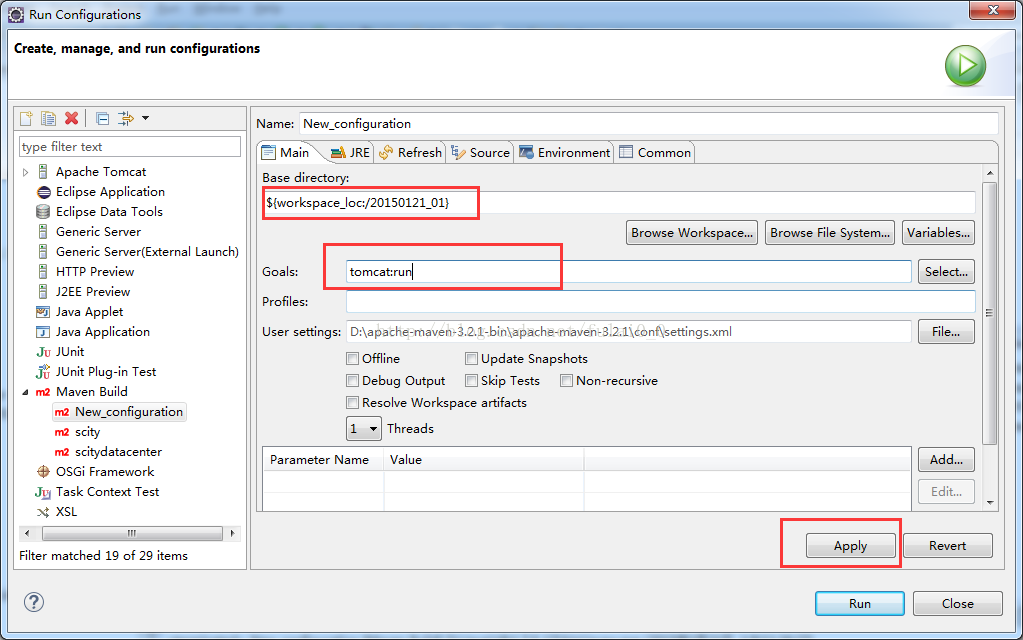
图17
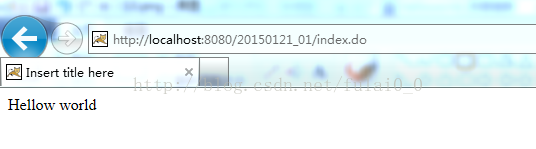
图18


 1740
1740


 被折叠的 条评论
为什么被折叠?
被折叠的 条评论
为什么被折叠?
 到【灌水乐园】发言


