


http://www.macbreaker.com/2014/05/os-x-mavericks-in-virtualbox-with-niresh.html
We've previously shown you how to install OS X Mountain Lion on a virtual machine by using iAtkos ML2, which is great practice for installing Mac OS X on your actual computer. And now that Apple has released OS X Mavericks, it's only fitting that we show you how to install Mavericks in a virtual machine as well. Unlike in previous versions of this guide, we'll be using the newly-popular "Niresh" distro of Mavericks instead the old iAtkos distro (which is no longer publicly available for free). While we've already shown you how to install Mavericks on your actual computer with Niresh, it also works great with virtual machines.
In essence, this method will let you run Mac OS X from inside a program window in Windows. As always, we're going to use
Virtualbox for this. It's important to note that Windows virtualization programs do not "officially" support Mac OS X, so you will not be able to enable full graphics support. This tutorial should only be taken as a proof of concept.
Computer Requirements
You need a computer with Windows to run Mac OS X on Windows (of course). The "System Type" of your copy of Windows needs to be 64-bit, because OS X Mavericks is a 64-bit operating system. If you have a 32-bit copy of Windows, you can only
install Mac OS X Snow Leopard on Virtualbox. You will need at least 4 GB of RAM and a dual-core (two core) processor or better. Personally, the computer I was using for this had a 4-core processor and 12 GB RAM, which is way more than enough. You also need about 10 GB of unused hard drive space.
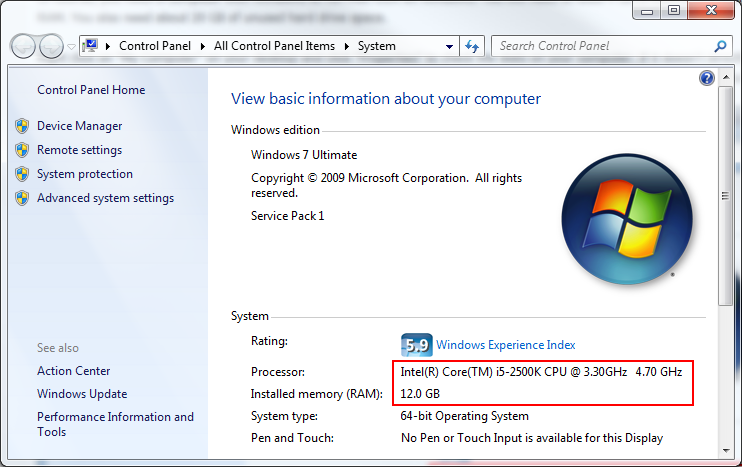
Right click on "My Computer" on your desktop and click "Properties" to check the stats on your computer. If it doesn't directly tell you how many cores your processor has, look up your processor model on Wikipedia or Google. You also want to find out whether your processor is made by "Intel" or "AMD". While Niresh technically works with both types of processors, if you have an AMD processor, you'll have to perform a few extra steps during the installation (and the final result may not work as well, either).
General Requirements
- Virtualbox : This virtualization suite is free, and though it doesn't offer official support for Mac OS X, it works well enough.
- Niresh Mavericks: Unfortunately, the standard "Unibeast" method for installing OS X Mavericks on PCs (which uses an official copy of the Mavericks installer) doesn't work with Virtualbox. Instead, you'll have to pirated "distros" of Mac OS X such as Niresh, which is now the most popular distro for Mavericks.
You will need to use a bittorrent client to download the disk image file, which is a little less than 6 GB in size. On the Niresh website, you'll be given an option to either download the "ISO Version" or the "USB version" of "Niresh - 10.9 - Mavericks". Download the ISO version-- the USB version (which is an Apple DMG file) doesn't appear to work in Virtualbox.
Step 1: Prep
Download
Virtualbox, install it, and open it up. Also, if you want to be able to view USB devices from your Mac OS X virtual machine, download the
Virtualbox Extension Pack and run it
before going to Step 2.
Step 2: Create a new virtual machine.
Virtualbox lets you run Mac OS X within Windows by creating a virtual machine, which is a program that simulates a normal computer. To create a virtual machine, open up Virtualbox and click "New" on the upper left. Give your new virtual machine a name, and choose "Mac OS X" for the OS Type.
If your version of Virtualbox asks you to choose between 64-bit and 32-bit, be sure to choose 64-bit. Choosing 32-bit will result in a critical "Guru Meditation" error later on.
 I recommend assigning 4 GB of RAM to the virtual machine, but you can assign as little as 2 GB of RAM. Every time you turn on Mac OS X, that RAM that you assign here will be used to run the virtual machine. The RAM will be given back to your normal computer after you turn Virtualbox off.
If your version of Virtualbox asks you to choose between 64-bit and 32-bit, be sure to choose 64-bit. Choosing 32-bit will result in a critical "Guru Meditation" error later on.
You'll need to create a new hard disk for the virtual machine. Virtualbox will ask you what type of disk you want to create: VDI, VDMK, or VHD. VDI is the original format for Virtualbox, while VDMK is the format used by VMWare. If you're considering getting a copy of VMWare, you might want to choose VDMK. Otherwise, just choose VDI. I recommend creating a dynamically expanding disk; the only other option, fixed-size storage, will eat up your hard drive.
Step 3: Give your new virtual machine an operating system.
Your virtual machine will now be created. But don't stop now--you still need to change a few settings before your machine will actually work. Your new virtual machine will show up on the left column of the Virtualbox start page. Select your Mac OS X virtual machine (single-click) from the main page of Virtualbox, and open up the virtual machine settings. Once the settings open up, go to "System" and
uncheck the "Enable EFI" box. This is by far the most important single setting that you will need to change.
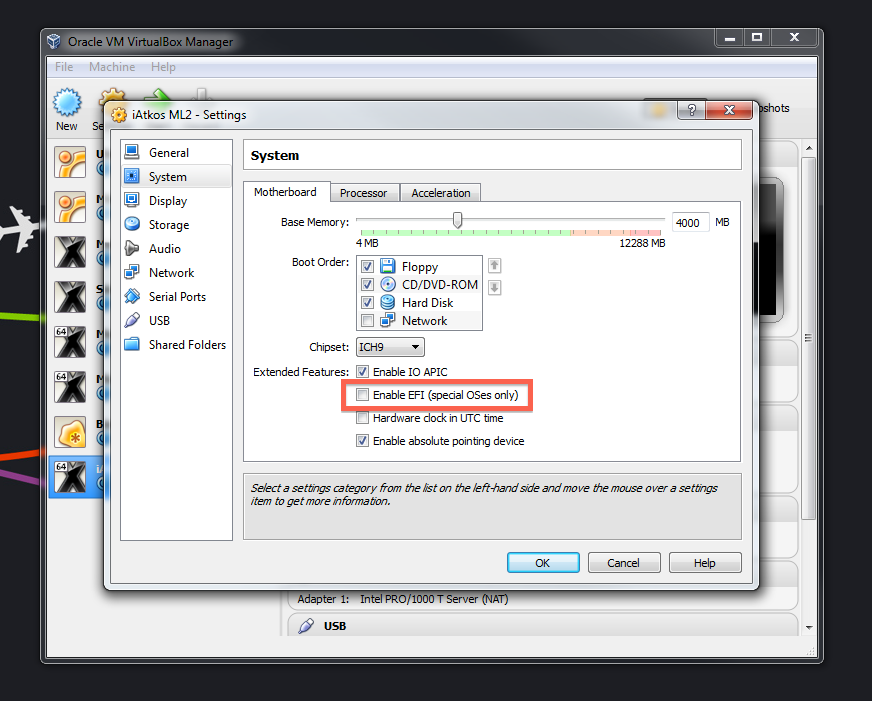
EFI, which stands for Extended Firmware Interface, is a feature that helps operating systems start up. Unfortunately, Mac OSX requires "special" EFI, so the EFI that Virtualbox uses doesn't work.
Once you're done with that, go to the settings for "Storage". In the storage tree box, you'll see a CD icon labeled "Empty". Click on it and click "Choose a virtual CD/DVD disk file". In the window that pops up, choose the .iso file for Niresh; this file will probably be named "OSX-Mavericks.iso".
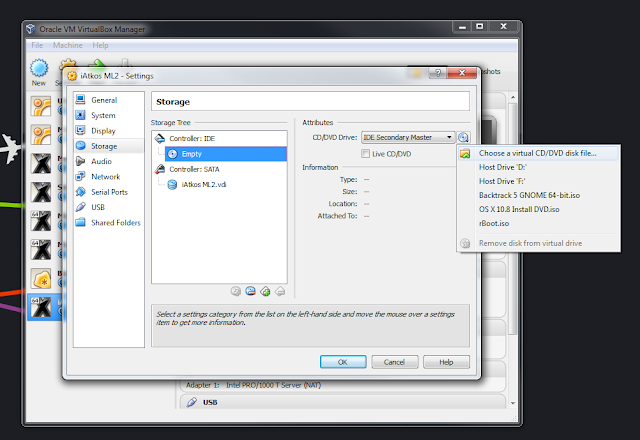

This way, when your virtual machine starts for the first time, it will boot into Niresh.
Step 4: Install OS X Mavericks
Start up your virtual machine. You will come up to the Niresh boot screen, with one option to select: OSX-Mavericks. Press the "Enter" key on your keyboard.
NOTE 1: If your computer uses an AMD processor, you will have to type the boot flag "amd" or "amd64" (without quotation marks)-- which flag you need depends on your specific processor, so test one flag at a time. Type the boot flag "amdfx" (also without quotation marks) if your AMD processor has "FX" in its model name.
NOTE 2: Virtualbox may have problems booting Mac OS X if your computer uses an Intel Haswell processor (i.e. if your computer was built/bought in 2013 or later). If this is this case, you will have to trick Virtualbox into thinking that your processor is actually an older model. To do this, open the Command Prompt in Windows (make sure you are logged into an Administrator account on Windows). You can do this by opening the Start Menu, and typing "command prompt" into the Start Menu search bar. Then, type the following command into the Command Prompt.
cd "C:\Program Files\Oracle\Virtualbox"
This command will change the focus of the Command Prompt to the program folder for Virtualbox (if you installed Virtualbox somewhere different, then change the command to wherever you installed it). Next, type in this command:
VBoxManage modifyvm <Name of virtual machine> --cpuidset 00000001 000306a9 00020800 80000201 178bfbff
This command activates "vboxmanage", a command-line program included with Virtualbox that allows you to edit the properties of your virtual machine, including its built-in resolutions. Replace "Name of virtual machine" with the name of your virtual machine (no quotation marks)-- you can find the name of your virtual machine in the left pane of the Virtualbox main window. This command should do the trick. - Source
 After you press the "enter" key, wait a few seconds, and the virtual machine will automatically start the Mac OS X installer. (This startup process may take a few minutes.) Eventually, you will reach the welcome page of the installer.
 Continue, and you will come up to a page that asks you for a "destination" for your Mac install. Oh no, the page is blank! We'll have to fix that. To do this, start up Disk Utility (located under the Utilities menu).
NOTE 1: If your computer uses an AMD processor, you will have to type the boot flag "amd" or "amd64" (without quotation marks)-- which flag you need depends on your specific processor, so test one flag at a time. Type the boot flag "amdfx" (also without quotation marks) if your AMD processor has "FX" in its model name.
NOTE 2: Virtualbox may have problems booting Mac OS X if your computer uses an Intel Haswell processor (i.e. if your computer was built/bought in 2013 or later). If this is this case, you will have to trick Virtualbox into thinking that your processor is actually an older model. To do this, open the Command Prompt in Windows (make sure you are logged into an Administrator account on Windows). You can do this by opening the Start Menu, and typing "command prompt" into the Start Menu search bar. Then, type the following command into the Command Prompt.
cd "C:\Program Files\Oracle\Virtualbox"
This command will change the focus of the Command Prompt to the program folder for Virtualbox (if you installed Virtualbox somewhere different, then change the command to wherever you installed it). Next, type in this command:
VBoxManage modifyvm <Name of virtual machine> --cpuidset 00000001 000306a9 00020800 80000201 178bfbff
This command activates "vboxmanage", a command-line program included with Virtualbox that allows you to edit the properties of your virtual machine, including its built-in resolutions. Replace "Name of virtual machine" with the name of your virtual machine (no quotation marks)-- you can find the name of your virtual machine in the left pane of the Virtualbox main window. This command should do the trick. - Source


- Uncheck Install Network Drivers (Kexts). This option is checked by default. Normally, it will allow Niresh to automatically detect your computer's ethernet controller and install the appropriate ethernet kext, so that your internet will work immediately in Mac OS X. However, this feature doesn't really work in Virtualbox. All it does is break the internet in your virtual machine.
- Uncheck Graphics -> GraphicsEnabler=Yes. This option is also checked by default. Normally, it allows Mac OS X to work better with your computer's graphics card. However, Virtualbox doesn't support Mac OS X graphics anyways, so this option is essentially pointless for virtual machines. All it does is decrease the default screen size of your virtual machine from 1280x1024 to 1024x768.

Step 5: Boot it up
Restart your virtual machine, and eject Niresh from your virtual DVD drive. To eject Niresh, right-click on the CD icon at the bottom right of the Virtualbox window, and un-check the Niresh file (probably named "OSX-Mavericks.iso"). Your mouse cursor will probably be trapped inside the virtual machine. Press the right "Ctrl" key on your keyboard to allow your mouse to escape.


NOTE: One common issue with Niresh is that it tends to lag out of the account creation process, and skip straight to the Mac OS X login screen before you can make your own account. If this happens, simply log into Mac OS X with the following credentials:
Username: root
Password: niresh
This will log you into the "root" account of Mac OS X. From here, open the System Preferences app, go to "Users & Groups", and create your own account. (We don't recommend that you use the root account permanently, because it is insecure.)
Step 6: Make the screen bigger
Though this step is optional, I still recommend you do it anyways. Anyways, when you first use your virtual machine, you'll probably notice one thing: your screen resolution is 1280x1024 (or 1024x768 if you forgot to turn off GraphicsEnabler=Yes). Since Virtualbox doesn't "technically" support Mac OS X, there's no official way to change this. But here's how you can change it anyways.
First, you need to access org.Chameleon.boot.plist, the settings file for your virtual machine's Mac OS X bootloader. You can do this from Finder, the file browser built into Mac OS X. However, Finder hides your hard drives in Mavericks by default. To unhide them, open Finder, and click on File -> Preferences in the menu bar at the top of Mac OS X. Under the "Sidebar" settings, check "Hard disks", so that Finder will display your virtual machine's hard disks in the sidebar.

Once that's done, access your virtual machine's main hard drive through Finder, and go to the folder "Extra". Open the file org.Chameleon.boot.plist. Between <dict> and </dict> in the file, insert the following line.
<key>Graphics Mode</key>
<string>1920x1080x32</string>

You can change "1920x1080x32" to whatever resolution best fits your monitor. For instance, if you want to use the 1600x900 resolution, type in "1600x900x32". Once you've saved it, turn off the virtual machine.
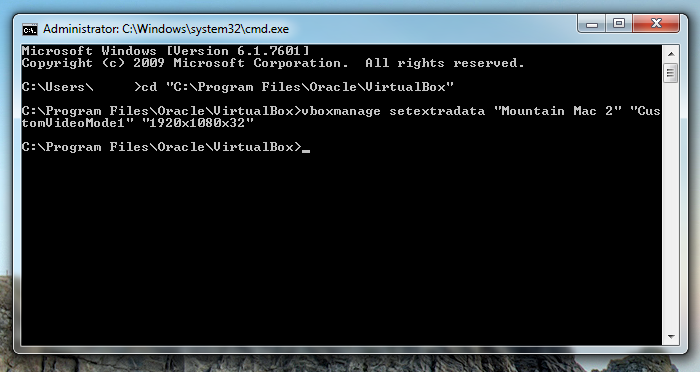
Next, turn off your virtual machine. Open the Command Prompt in Windows (make sure you are logged into an Administrator account on Windows). You can do this by opening the Start Menu, and typing "command prompt" into the Start Menu search bar. Then, type the following command into the Command Prompt.
cd "C:\Program Files\Oracle\Virtualbox"
This command will change the focus of the Command Prompt to the program folder for Virtualbox (if you installed Virtualbox somewhere different, then change the command to wherever you installed it). Next, type in this command:
vboxmanage setextradata "Name of virtual machine" "CustomVideoMode1" "1920x1080x32"
This command activates "vboxmanage", a command-line program included with Virtualbox that allows you to edit the properties of your virtual machine, including its built-in resolutions. Replace "Name of virtual machine" with the name of your virtual machine-- you can find the name of your virtual machine in the left pane of the Virtualbox main window (in the screenshot below, my virtual machine is named "Mountain Mac 2"). Replace "1920x1080x32" with whatever resolution you're using.
Recap
I'll just repeat what I said in my other two Virtualbox guides. Installing Mac OS X on a virtual machine is excellent practice for the real thing: installing Mac OS X on your actual computer. Don't get too comfortable, though. Compared to most computers, Virtualbox virtual machines are very "vanilla", meaning that they're very compatible with Mac OS X in the first place. You can't count on being that lucky with a real PC.
And even if you don't plan on doing this for real, with a Hackintosh, it's still a really cool thing to try out over the weekend.


 1272
1272

 被折叠的 条评论
为什么被折叠?
被折叠的 条评论
为什么被折叠?
 到【灌水乐园】发言


