


在本文中,为了获取有关安装系统和服务器正在运行所在硬件的信息以及配置诸如系统更新、网络,root权限,配置ssh,管理服务以及其它的特定系统任务,在安装没有图形环境的最小化的服务器后,你首先需要使用的基本步骤。
第一步:更新系统软件
[root@localhost blctrl]# dnf check-update
[root@localhost blctrl]# dnf update
一旦软件升级过程结束,为了释放磁盘空间,你通过运行以下命令能够删除所有用所有缓存仓库下载的软件包。
[root@localhost blctrl]# dnf clean all
27 files removed
第二部:安装系统工具
以下这些系统工具对于每天的系统管理任务非常有用:nano, vim编辑器,wegt和curl(用于通过网络下载包), net-tools(用于管理本地网络), lsof(用于查找被进程打开的文件的列表)以及bash-completion(命令行自动补全)。
[root@localhost blctrl]# dnf install nano vim wget curl net-tools lsof bash-completion -y第三步: 设置主机名和网络
在基于基于RHEL 8的Linux发行版,在仓库中包含了范围很广的工具,它们用于配置和管理网络,从手动更改网络配置到使用诸如ifconfig, ip, nmcli和nmtui的命令。
一个新手能够使用来配置和管理网络配置(诸如设置网络主机名配合配置静态IP地址)的最简单工具是nmtui图形命令行工具。
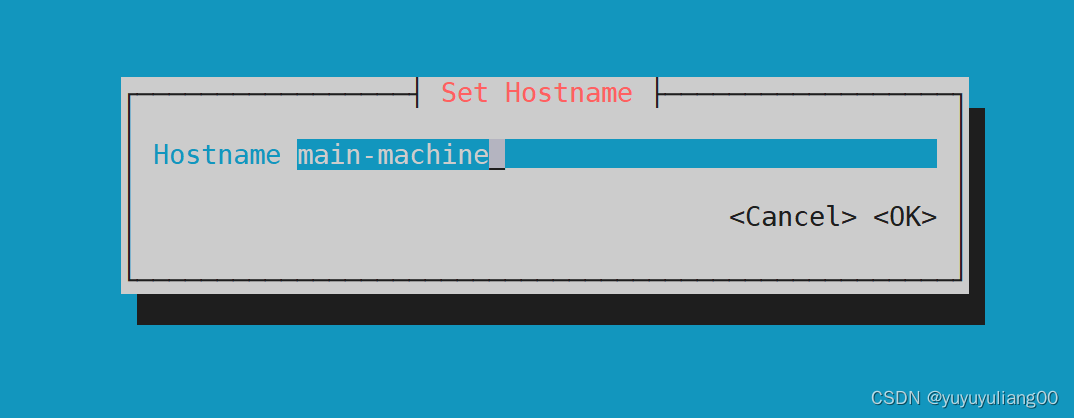
在于基于RHEL 8的Linux发行版中设置主机名
为了设置或更高系统主机名,运行以下nmtui-hostname命令,它将提示你输入你机器的主机名并且按OK来结束:
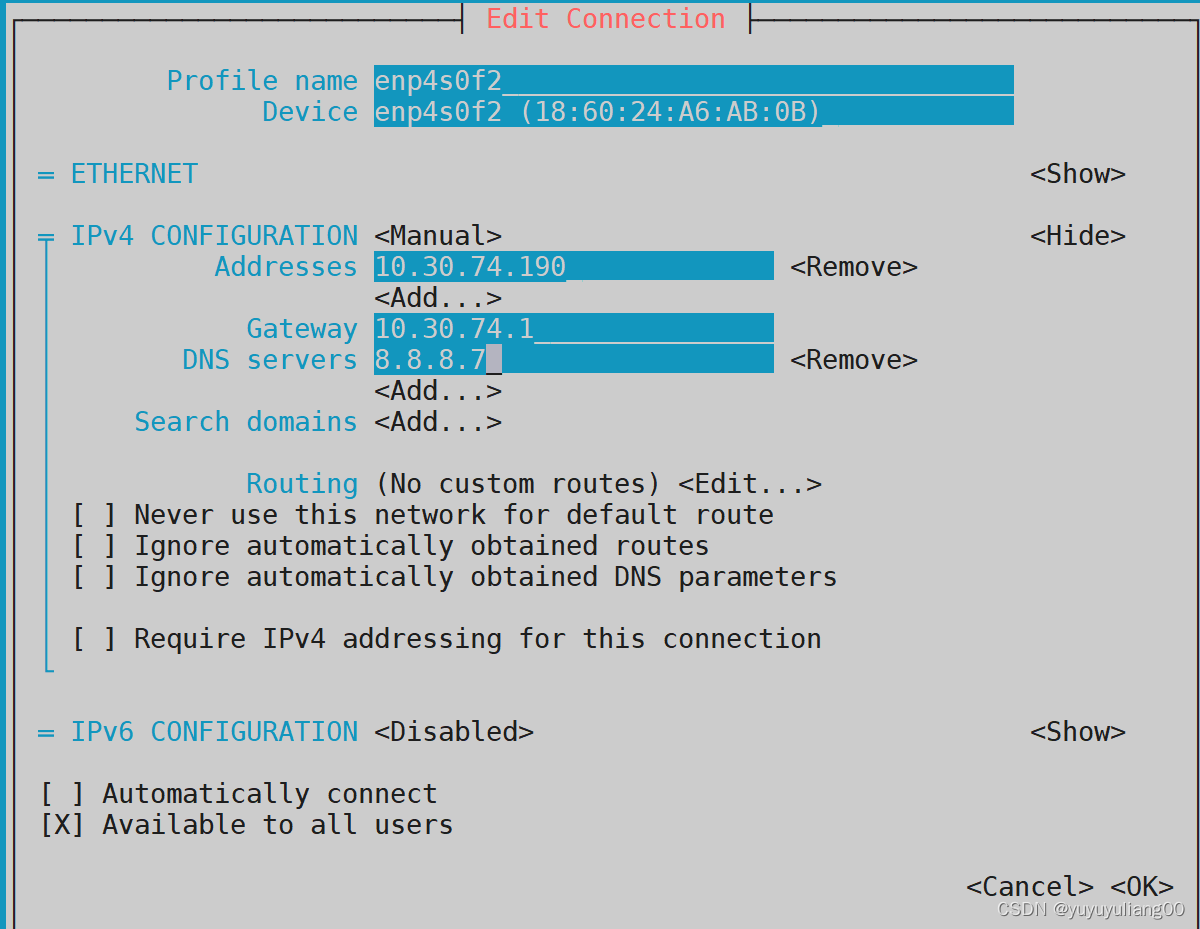
设置静态IP地址
要配置一个网络接口,运行以下nmtui-edit命令,它将提示你选择你想要从菜单配置的接口:
[root@localhost blctrl]# nmtui-edit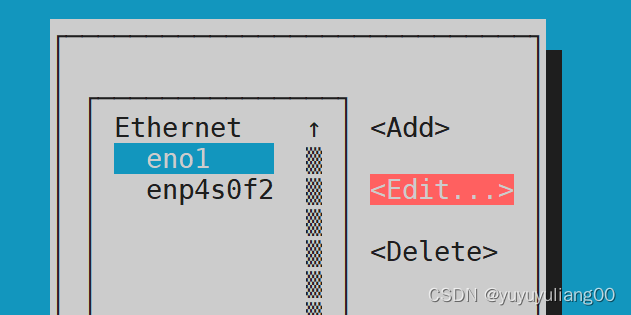
一旦你点击Edit,它将提示你设置一个网卡IP设置。当你结束时,用[tab]导航到OK来保存配置并且退出。
如果你完成了网络配置,你需要通过选择你想要管理的接口运行以下命令来使用新的网络设置并且点击Deactivate/Active选项来停止使用和用IP设置使这个接口工作:
[root@localhost blctrl]# nmtui-connect
为了证实网络配置设置,你可以检查接口文件的内容或者你可以发出以下命令:
[root@localhost blctrl]# ifconfig eno1
eno1: flags=4163<UP,BROADCAST,RUNNING,MULTICAST>  mtu 1500
        inet 192.168.50.180  netmask 255.255.255.0  broadcast 192.168.50.255
        inet6 fe80::1a60:24ff:fea6:ab08  prefixlen 64  scopeid 0x20<link>
        ether 18:60:24:a6:ab:08  txqueuelen 1000  (Ethernet)
        RX packets 169615  bytes 249723503 (238.1 MiB)
        RX errors 0  dropped 6  overruns 0  frame 0
        TX packets 38681  bytes 3155419 (3.0 MiB)
        TX errors 0  dropped 0 overruns 0  carrier 0  collisions 0
        device interrupt 16  memory 0x93b80000-93ba0000
你也可以使用诸如ethool和mii-tool的其它有用网络工具检查网卡速度,网络链接状态并且获取有关机器网卡的信息。
[root@localhost blctrl]# ethtool eno1
Settings for eno1:
        Supported ports: [ TP ]
        Supported link modes:   10baseT/Half 10baseT/Full
                                100baseT/Half 100baseT/Full
                                1000baseT/Full
        Supported pause frame use: No
        Supports auto-negotiation: Yes
        Supported FEC modes: Not reported
        Advertised link modes:  10baseT/Half 10baseT/Full
                                100baseT/Half 100baseT/Full
                                1000baseT/Full
        Advertised pause frame use: No
        Advertised auto-negotiation: Yes
        Advertised FEC modes: Not reported
        Speed: 1000Mb/s
        Duplex: Full
        Auto-negotiation: on
        Port: Twisted Pair
        PHYAD: 1
        Transceiver: internal
        MDI-X: on (auto)
        Supports Wake-on: pumbg
        Wake-on: g
        Current message level: 0x00000007 (7)
                               drv probe link
        Link detected: yes

[root@localhost blctrl]# mii-tool eno1
eno1: negotiated 1000baseT-FD flow-control, link ok
你机器网络的一个重要方面,为了检测什么服务正监听在什么端口上、已建立网络连接的状态是什么以及列出被进程打开的所有文件,列出所有打开的网络套接字是重要的。
[root@localhost blctrl]# netstat -tulpn
Active Internet connections (only servers)
Proto Recv-Q Send-Q Local Address           Foreign Address         State       PID/Program name
tcp        0      0 0.0.0.0:22              0.0.0.0:*               LISTEN      1493/sshd
tcp6       0      0 :::22                   :::*                    LISTEN      1493/sshd

[root@localhost blctrl]# ss -tulpn
Netid       State        Recv-Q       Send-Q             Local Address:Port               Peer Address:Port       Process
tcp         LISTEN       0            128                      0.0.0.0:22                      0.0.0.0:*           users:(("sshd",pid=1493,fd=5))
tcp         LISTEN       0            128                         [::]:22                         [::]:*           users:(("sshd",pid=1493,fd=7))

[root@localhost blctrl]# lsof -i4
COMMAND    PID   USER   FD   TYPE DEVICE SIZE/OFF NODE NAME
NetworkMa 1485   root   27u  IPv4  20379      0t0  UDP main-machine:bootpc->RT-AC68U-9750:bootps
sshd      1493   root    5u  IPv4   2679      0t0  TCP *:ssh (LISTEN)
sshd      7987   root    5u  IPv4  68815      0t0  TCP main-machine:ssh->LAPTOP-NE29DR6I:49483 (ESTABLISHED)
sshd      7992   root    5u  IPv4  68819      0t0  TCP main-machine:ssh->LAPTOP-NE29DR6I:49484 (ESTABLISHED)
sshd      8009 blctrl    5u  IPv4  68815      0t0  TCP main-machine:ssh->LAPTOP-NE29DR6I:49483 (ESTABLISHED)
sshd      8013 blctrl    5u  IPv4  68819      0t0  TCP main-machine:ssh->LAPTOP-NE29DR6I:49484 (ESTABLISHED)
第四步:创建一个新用户账号
总是建议有一个具有root权限的一般用户,在需要时,进行管理任务。为了分配root特权给一个一般用户,首先用useradd命令创建一个用户,设置密码并且添加它到管理wheel组。
[root@localhost blctrl]# useradd ylg
[root@localhost blctrl]# passwd ylg
Changing password for user ylg.
New password:
BAD PASSWORD: The password is shorter than 8 characters
Retype new password:
passwd: all authentication tokens updated successfully.
[root@localhost blctrl]# usermod -aG wheel ylg
要验证新用户有root特权,用这个用户身份登录系统并且用sudo权限运行dnf命令。
[root@localhost blctrl]# su - ylg
Last login: Wed Jul 13 19:54:43 CST 2022 on pts/0
[ylg@main-machine ~]$ pwd
/home/ylg
[ylg@main-machine ~]$ sudo dnf update

We trust you have received the usual lecture from the local System
Administrator. It usually boils down to these three things:

    #1) Respect the privacy of others.
    #2) Think before you type.
    #3) With great power comes great responsibility.

[sudo] password for ylg:
Last metadata expiration check: 0:38:52 ago on Wed 13 Jul 2022 07:16:35 PM CST.
Dependencies resolved.
Nothing to do.
Complete!
第五步:设置SSH免密登录
为了增强你服务器安全,通过产生一对SSH key,其包含一个公钥和私钥,为你新用户产生免密授权,你需要创建一对。通过请求SSH私钥连接系统,这增强了你服务器的安全。
[ylg@main-machine ~]$ ssh-keygen  -t rsa
Generating public/private rsa key pair.
Enter file in which to save the key (/home/ylg/.ssh/id_rsa):
Created directory '/home/ylg/.ssh'.
Enter passphrase (empty for no passphrase):
Enter same passphrase again:
Your identification has been saved in /home/ylg/.ssh/id_rsa.
Your public key has been saved in /home/ylg/.ssh/id_rsa.pub.
The key fingerprint is:
SHA256:PT2xPltvahWxJOW3j1dbBuFHEvYFaHykn01P6Ho0pVg ylg@main-machine
The key's randomart image is:
+---[RSA 3072]----+
|           . oO+o|
|            +=oO.|
|           .o.E.X|
|         . . B %+|
|        S o = B.B|
|           o + +*|
|            + +oo|
|             =.o.|
|            ...o.|
+----[SHA256]-----+
一旦产生了这个key,为了保护这个私钥,它将请求你输入密码。你可以输入一个强密码或者如果你想要通过SSH服务器自动化管理任务,选择把密码留空。
一旦产生了SSH key,你需要通过用远程服务器的用户名和IP地址运行ssh-copy-id命令复制产生的公钥对到一个远程主机。
[ylg@main-machine ~]$ ssh-copy-id blctrl@192.168.50.150
/usr/bin/ssh-copy-id: INFO: Source of key(s) to be installed: "/home/ylg/.ssh/id_rsa.pub"
The authenticity of host '192.168.50.150 (192.168.50.150)' can't be established.
ECDSA key fingerprint is SHA256:iA7/nRdDeBQdFFV3e9o130fVtI5a5ttK63jQX/U+NRc.
Are you sure you want to continue connecting (yes/no/[fingerprint])?
/usr/bin/ssh-copy-id: INFO: attempting to log in with the new key(s), to filter out any that are already installed
The authenticity of host '192.168.50.150 (192.168.50.150)' can't be established.
ECDSA key fingerprint is SHA256:iA7/nRdDeBQdFFV3e9o130fVtI5a5ttK63jQX/U+NRc.
Are you sure you want to continue connecting (yes/no/[fingerprint])? yes
/usr/bin/ssh-copy-id: INFO: 1 key(s) remain to be installed -- if you are prompted now it is to install the new keys
blctrl@192.168.50.150's password:

Number of key(s) added: 1

Now try logging into the machine, with:   "ssh 'blctrl@192.168.50.150'"
and check to make sure that only the key(s) you wanted were added.
一旦复制了SSH key,现在你能够使用私钥作为验证方法尝试登录到你远程的Linux服务器。你应该能够自动登录,而没有服务器请求密码。
[ylg@main-machine ~]$ ssh blctrl@192.168.50.150
Activate the web console with: systemctl enable --now cockpit.socket

Last login: Wed Jul 13 07:28:55 2022 from 192.168.50.19
[blctrl@areadetector ~]$
第六步:保护远程登录
通过在SSH配置文件中禁用远程SSH访问root账户,我们将更好地保护我们的服务器。
[root@main-machine blctrl]# vim /etc/ssh/sshd_conf找到内容为"# PermitRootLogin Yes"的行,删除这行开头的#取消注释这行并且修改其为。
PermitRootLogin no之后,重启SSH服务器来应用最新的更改。
[root@main-machine blctrl]# systemctl restart sshd现在通过尝试以root账号登录来确认这个配置,你将得到访问SSH Permission Denied错误。
[blctrl@areadetector ~]$ ssh root@192.168.50.180
The authenticity of host '192.168.50.180 (192.168.50.180)' can't be established.
ECDSA key fingerprint is SHA256:89GIoQ/3MbFYtuL/vghVIcnMswZP+H2Z6IJmtAoNyWg.
Are you sure you want to continue connecting (yes/no/[fingerprint])? yes
Warning: Permanently added '192.168.50.180' (ECDSA) to the list of known hosts.
root@192.168.50.180's password:
Permission denied, please try again.
有这样的场景:你可能想要在一段不活动时期之后,自动断开到你服务器的所有远程SSH连接。
第七步:配置防火墙
在基于RHEL 8的Linux发行版中,默认防火墙是Firewalld,它被用于在服务器上管理iptables规则。要在服务器上使能和启动firewalld,运行以下命令。
[root@main-machine blctrl]# systemctl enable firewalld
[root@main-machine blctrl]# systemctl start firewalld
[root@main-machine blctrl]# systemctl status firewalld
● firewalld.service - firewalld - dynamic firewall daemon
   Loaded: loaded (/usr/lib/systemd/system/firewalld.service; enabled; vendor preset: enabled)
   Active: active (running) since Tue 2022-07-12 21:24:59 CST; 1 day 18h ago
     Docs: man:firewalld(1)
 Main PID: 1426 (firewalld)
    Tasks: 3 (limit: 821235)
   Memory: 33.2M
   CGroup: /system.slice/firewalld.service
           └─1426 /usr/libexec/platform-python -s /usr/sbin/firewalld --nofork --nopid
要开放一个对指定服务(SSH)的进入连接,首先,你需要确认此服务出现在firewalld规则,并且接着通过添加--permanent为这个服务添加规则。
# firewall-cmd --add-service=[tab]  # 列出服务
# firewall-cmd --add-service=ssh
# firewall-cmd --add-service=ssh --permanent
[root@main-machine blctrl]# firewall-cmd --add-service=ssh
Warning: ALREADY_ENABLED: 'ssh' already in 'public'
success
firewall-cmd: error: unrecognized arguments: --perament
[root@main-machine blctrl]# firewall-cmd --add-service=ssh --permanent
Warning: ALREADY_ENABLED: ssh
success
如果你想要开放到诸如HTTP或SMTP的其它服务的进入连接,通过指定服务名称添加规则。
# firewall-cmd --permanent --add-service=http
# firewall-cmd --permanent --add-service=https
# firewall-cmd --permanent --add-service=smtp
要查看在这个服务器上所有firewall规则,运行以下命令。
[root@main-machine blctrl]# firewall-cmd --permanent --list-all
public
  target: default
  icmp-block-inversion: no
  interfaces:
  sources:
  services: cockpit dhcpv6-client ssh
  ports:
  protocols:
  forward: no
  masquerade: no
  forward-ports:
  source-ports:
  icmp-blocks:
  rich rules:
第八步 移除不想要的服务
强烈推荐你在安装一个新的RHEL 8服务器后,你需要移除和禁用在服务器上默认运行的不想要服务来减少对服务器的攻击。‘
要列出在服务器上包括TCP和UDP的所有运行的网络服务,按以下示例说明运行ss命令或netstat命令。
[root@main-machine blctrl]# ss -tulpn
Netid       State        Recv-Q       Send-Q             Local Address:Port             Peer Address:Port      Process
tcp         LISTEN       0            128                      0.0.0.0:22                    0.0.0.0:*          users:(("sshd",pid=47358,fd=4))
tcp         LISTEN       0            100                    127.0.0.1:25                    0.0.0.0:*          users:(("master",pid=48659,fd=16))
tcp         LISTEN       0            128                         [::]:22                       [::]:*          users:(("sshd",pid=47358,fd=6))
tcp         LISTEN       0            100                        [::1]:25                       [::]:*          users:(("master",pid=48659,fd=17))
[root@main-machine blctrl]# netstat -tulpn
Active Internet connections (only servers)
Proto Recv-Q Send-Q Local Address           Foreign Address         State       PID/Program name
tcp        0      0 0.0.0.0:22              0.0.0.0:*               LISTEN      47358/sshd
tcp        0      0 127.0.0.1:25            0.0.0.0:*               LISTEN      48659/master
tcp6       0      0 :::22                   :::*                    LISTEN      47358/sshd
tcp6       0      0 ::1:25                  :::*                    LISTEN      48659/master
以上命令将列出在服务器上默认正在运行的服务,诸如Postfix邮件服务器。如果你不打算在这个服务器上托管邮件系统,你必须停止并且从系统移除它。
[root@main-machine blctrl]# systemctl stop postfix
[root@main-machine blctrl]# systemctl disable postfix
[root@main-machine blctrl]# dnf remove postfix
Dependencies resolved.
========================================================================================================================================================
...
Removed:
  postfix-2:3.5.8-4.el8.x86_64

Complete!
除了ss命令和netstat命令外,你还能够运行ps, top或ptree命令发现和识别所有不想要的服务并且从系统移除它们。
[root@main-machine blctrl]# dnf install psmisc
[root@main-machine blctrl]# pstree
systemd─┬─NetworkManager───2*[{NetworkManager}]
        ├─atd
        ├─auditd───{auditd}
        ├─crond
        ├─dbus-daemon───{dbus-daemon}
        ├─firewalld───2*[{firewalld}]
        ├─irqbalance───{irqbalance}
        ├─login───bash
        ├─lsmd
        ├─mcelog
        ├─polkitd───11*[{polkitd}]
        ├─smartd
        ├─sshd───sshd───bash───su───bash───pstree
        ├─sshd───sshd───sftp-server
        ├─sshd
        ├─sssd─┬─sssd_be
        │      └─sssd_nss
        ├─2*[systemd───(sd-pam)]
        ├─systemd-journal
        ├─systemd-logind
        ├─systemd-udevd
        └─tuned───4*[{tuned}]
第九步: 管理服务
在基于RHEL 8的Linux发行版中,通过systemctl命令管理所有服务和守护进程,你能够使用这个命令列出所有活动的,正在运行的,退出的或出错的服务。
[root@main-machine blctrl]# systemctl list-units
UNIT                                                                                           LOAD   ACTIVE SUB       DESCRIPTION
proc-sys-fs-binfmt_misc.automount                                                              loaded active waiting   Arbitrary Executable File Format>
sys-devices-pci0000:00-0000:00:11.5-ata1-host0-target0:0:0-0:0:0:0-block-sda-sda1.device       loaded active plugged   WDC_WDS100T2B0A 1
sys-devices-pci0000:00-0000:00:11.5-ata1-host0-target0:0:0-0:0:0:0-block-sda-sda2.device       loaded active plugged   WDC_WDS100T2B0A 2
sys-devices-pci0000:00-0000:00:11.5-ata1-host0-target0:0:0-0:0:0:0-block-sda.device            loaded active plugged   WDC_WDS100T2B0A
...
要检测一个守护进程或服务在系统启动过程中是否自动被使能,发出以下命令。
[root@main-machine blctrl]# systemctl list-unit-files -t service
UNIT FILE                                  STATE
arp-ethers.service                         disabled
atd.service                                enabled
auditd.service                             enabled
autovt@.service                            enabled
blk-availability.service                   disabled
bolt.service                               static
chrony-dnssrv@.service                     static
chrony-wait.service                        disabled
chronyd.service                            disabled
...


 819
819


 被折叠的 条评论
为什么被折叠?
被折叠的 条评论
为什么被折叠?
 到【灌水乐园】发言


