


前一段时间,由于业务需求,我学习了一些React Native相关的知识。作为一名Android开发者,对React Native项目的组织和构建流程有了初步的了解。也对如何更合理地搭建RN混合开发项目有了一些思考。特此总结出来,希望能抛砖引玉,与大家共同探讨
RN环境搭建
RN文档提供了两种搭建RN环境的方式
- 搭建开发环境 创建纯RN项目
- 把RN集成到已有项目
文档写的也比较清晰,按照步骤做就可以。
默认项目结构分析
按照文档 https://reactnative.cn/docs/environment-setup 创建好项目后,我们来分析下目录结构

根目录就是一个标准的RN项目,其中有一个node_modules目录,该目录是项目的依赖包。
根项目目录下有一个android目录和一个ios目录,分别是Android和iOS的原生代码目录,也就是说,android和ios项目是作为RN项目的子项目存在的。
来看下android目录中的代码,这个目录下的代码是一个标准的Android项目,直接使用Android Studio打开即可。
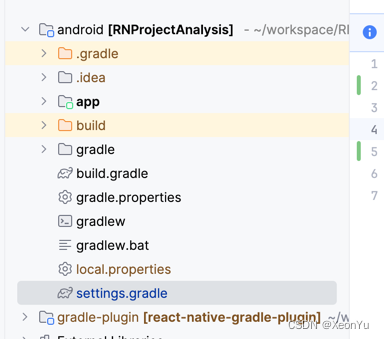
可以看到,除了一个标准的Android项目外,还有一个gradle-plugin的。
下面是 settings.gradle 文件的内容

在settings.gradle 中,应用了一个叫做 native_modules.gradle 的脚本
apply from: file("../node_modules/@react-native-community/cli-platform-android/native_modules.gradle"); applyNativeModulesSettingsGradle(settings)
还通过includeBuild引入了一个RN插件
includeBuild('../node_modules/@react-native/gradle-plugin')
再来接着看看根目录下build.gradle文件中的内容
buildscript {

    ext {

        buildToolsVersion = "34.0.0"
        minSdkVersion = 21
        compileSdkVersion = 34
        targetSdkVersion = 34
        ndkVersion = "25.1.8937393"
        kotlinVersion = "1.8.0"
    }
    repositories {

        google()
        mavenCentral()
    }
    dependencies {

        classpath("com.android.tools.build:gradle")
        //RN插件
        classpath("com.facebook.react:react-native-gradle-plugin")
        classpath("org.jetbrains.kotlin:kotlin-gradle-plugin")
    }
}
//应用了一个叫做com.facebook.react.rootproject的插件
apply plugin: "com.facebook.react.rootproject"
接着看下app目录下的build.gradle文件
apply plugin: "com.android.application"
apply plugin: "org.jetbrains.kotlin.android"
//应用了一个叫做com.facebook.react的插件
apply plugin: "com.facebook.react"

/**
 * This is the configuration block to customize your React Native Android app.
 * By default you don't need to apply any configuration, just uncomment the lines you need.
 */
react {

    /* Folders */
    //   The root of your project, i.e. where "package.json" lives. Default is '..'
    // root = file("../")
    //   The folder where the react-native NPM package is. Default is ../node_modules/react-native
    // reactNativeDir = file("../node_modules/react-native")
    //   The folder where the react-native Codegen package is. Default is ../node_modules/@react-native/codegen
    // codegenDir = file("../node_modules/@react-native/codegen")
    //   The cli.js file which is the React Native CLI entrypoint. Default is ../node_modules/react-native/cli.js
    // cliFile = file("../node_modules/react-native/cli.js")

    /* Variants */
    //   The list of variants to that are debuggable. For those we're going to
    //   skip the bundling of the JS bundle and the assets. By default is just 'debug'.
    //   If you add flavors like lite, prod, etc. you'll have to list your debuggableVariants.
    // debuggableVariants = ["liteDebug", "prodDebug"]

    /* Bundling */
    //   A list containing the node command and its flags. Default is just 'node'.
    // nodeExecutableAndArgs = ["node"]
    //
    //   The command to run when bundling. By default is 'bundle'
    // bundleCommand = "ram-bundle"
    //
    //   The path to the CLI configuration file. Default is empty.
    // bundleConfig = file(../rn-cli.config.js)
    //
    //   The name of the generated asset file containing your JS bundle
    // bundleAssetName = "MyApplication.android.bundle"
    //
    //   The entry file for bundle generation. Default is 'index.android.js' or 'index.js'
    // entryFile = file("../js/MyApplication.android.js")
    //
    //   A list of extra flags to pass to the 'bundle' commands.
    //   See https://github.com/react-native-community/cli/blob/main/docs/commands.md#bundle
    // extraPackagerArgs = []

    /* Hermes Commands */
    //   The hermes compiler command to run. By default it is 'hermesc'
    // hermesCommand = "$rootDir/my-custom-hermesc/bin/hermesc"
    //
    //   The list of flags to pass to the Hermes compiler. By default is "-O", "-output-source-map"
    // hermesFlags = ["-O", "-output-source-map"]
}

/**
 * Set this to true to Run Proguard on Release builds to minify the Java bytecode.
 */
def enableProguardInReleaseBuilds = false

/**
 * The preferred build flavor of JavaScriptCore (JSC)
 *
 * For example, to use the international variant, you can use:
 * `def jscFlavor = 'org.webkit:android-jsc-intl:+'`
 *
 * The international variant includes ICU i18n library and necessary data
 * allowing to use e.g. `Date.toLocaleString` and `String.localeCompare` that
 * give correct results when using with locales other than en-US. Note that
 * this variant is about 6MiB larger per architecture than default.
 */
def jscFlavor = 'org.webkit:android-jsc:+'

android {

    ndkVersion rootProject.ext.ndkVersion
    compileSdk rootProject.ext.compileSdkVersion

    namespace "com.yzq.rn_project_analysis"
    defaultConfig {

        applicationId "com.yzq.rn_project_analysis"
        minSdkVersion rootProject.ext.minSdkVersion
        targetSdkVersion rootProject.ext.targetSdkVersion
        versionCode 1
        versionName "1.0"
    }
    signingConfigs {

        debug {

            storeFile file('debug.keystore')
            storePassword 'android'
            keyAlias 'androiddebugkey'
            keyPassword 'android'
        }
    }
    buildTypes {

        debug {

            signingConfig signingConfigs.debug
        }
        release {

            // Caution! In production, you need to generate your own keystore file.
            // see https://reactnative.dev/docs/signed-apk-android.
            signingConfig signingConfigs.debug
            minifyEnabled enableProguardInReleaseBuilds
            proguardFiles getDefaultProguardFile("proguard-android.txt"), "proguard-rules.pro"
        }
    }
}

dependencies {

    // The version of react-native is set by the React Native Gradle Plugin
    implementation("com.facebook.react:react-android")
    implementation("com.facebook.react:flipper-integration")

    if (hermesEnabled.toBoolean()) {

        implementation("com.facebook.react:hermes-android")
    } else {

        implementation jscFlavor
    }
}
//应用了一个脚本文件
apply from: file("../../node_modules/@react-native-community/cli-platform-android/native_modules.gradle"); applyNativeModulesAppBuildGradle(project)
可以看到,工程的依赖配置也比较的清晰,主要是配置了一些Android的基本配置,然后应用了RN的插件和脚本。
三方库使用
三方库在RN中有着非常重要的地位,因为RN本身的功能是有限的,所以需要依赖一些三方库来实现一些功能。
三方库一般提供了跨平台的支持,对前端开发同学来讲是非常友好的,不需要去了解原生的开发技术,就可以实现一些原生的功能。
三方库的使用方式非常简单,按照使用三方库文档来就可以了。
下面随便去 https://reactnative.directory/ 找一个三方库来简单使用一下看看。
就以 react-native-device-info 为例吧
在项目根目录下执行下面命令安装即可
yarn add react-native-device-info
安装完成后会发现,项目根目录下的package.json文件中多了一条依赖

然后在RN项目中使用一下
import DeviceInfo from "react-native-device-info";

<Button title={"deviceInfo"} onPress={() => {
    DeviceInfo.getAndroidId().then((id) => {
        console.log(id);
    })

}}/>
然后重新运行项目, 点击按钮,就可以看到控制台输出了设备的id
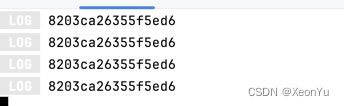
使用起来非常简单,可以看到,这里实际上完全不需要关心native端的代码,就可以实现一些原生的功能。
那作为 native 端开发的同学,这里不免就会好奇一个问题:
正常来讲如果我们在原生项目中使用三方库,是需要引入三方库的jar包或者aar包的,大部分sdk还需要进行初始化操作,然后才能调用相关的方法,
只需要一个yarn add react-native-device-info就能让RN项目使用原生的功能,这是怎么做到的呢?
带着这个问题,先来看看Android项目有什么变化。
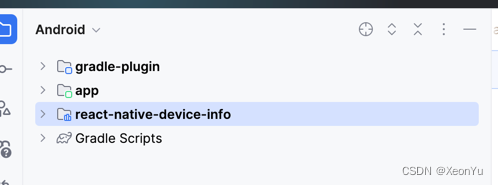
这个module是怎么引入的呢?正常来讲在Android中我们想要引入一个本地的module,需要在settings.gradle中include进来,然后在build.gradle中引入依赖。
但是,再次去看看settings.gradle和build.gradle文件,发现并没有类似的代码,那这个module是怎么引入的呢?
还记得上面在分析项目结构的时候,我们提到的一个脚本和一个插件吗?
- apply from: file(“…/node_modules/@react-native-community/cli-platform-android/native_modules.gradle”);
- includeBuild(‘…/node_modules/@react-native/gradle-plugin’)
实际上,这两个东西就是管理RN Android项目的配置和依赖的,是非常重要的角色。
react-native-gradle-plugin 分析
我们先来分析一下react-native-gradle-plugin这个插件,这个插件是RN项目的核心插件,它的作用是管理RN项目的依赖和配置。
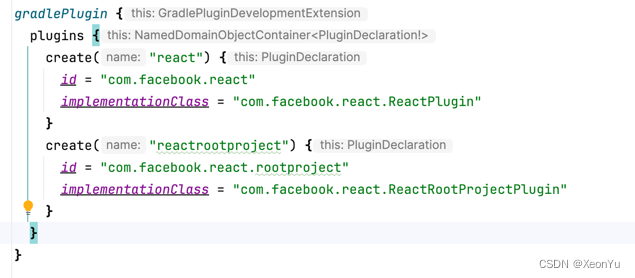
通过源码配置可以看到,一共提供了两个插件
- com.facebook.react
- com.facebook.react.rootproject
com.facebook.react.rootproject
我们先来看看 com.facebook.react.rootproject
该插件在项目的根目录下的build.gradle文件中被应用了
/**
 * 该插件应用于`android/build.gradle`文件。
 * 该插件的作用是确保app项目在库项目之前被配置,以便在库项目被配置时可以使用app项目的配置
 *
 * @constructor
 */
class ReactRootProjectPlugin : Plugin<Project> {

    override fun apply(project: Project) {

        project.subprojects {

            // As the :app project (i.e. ReactPlugin) configures both namespaces and JVM toolchains
            // for libraries, its evaluation must happen before the libraries' evaluation.
            // Eventually the configuration of namespace/JVM toolchain can be moved inside this plugin.
            if (it.path != ":app") {

                it.evaluationDependsOn(":app")
            }
        }
    }
}
代码非常少,其作用就是是确保app项目在库项目之前被配置,以便在库项目被配置时可以使用app项目的配置。
简单说就是app中会有一些rn相关的配置,一些三方库中也会用到这些配置,此时需要确保app项目的配置在库项目之前被配置,以确保其他模块能够正常使用。
com.facebook.react
该插件是在app项目的build.gradle文件中被应用了
这个插件的代码相对多一些,我们来一点一点的分析
    override fun apply(project: Project) {

        //检查JVM版本,不能低于17
        checkJvmVersion(project)
        //创建react配置
        val extension = project.extensions.create("react", ReactExtension::class.java, project)

        // We register a private extension on the rootProject so that project wide configs
        // like codegen config can be propagated from app project to libraries.
        /**
         * 在根项目创建一个私有的配置项 privateReact,如果已经存在则获取
         * 用于在app项目和库项目之间共享配置
         */
        val rootExtension =
            project.rootProject.extensions.findByType(PrivateReactExtension::class.java)
                ?: project.rootProject.extensions.create(
                    "privateReact", PrivateReactExtension::class.java, project
                )

        // App Only Configuration
        /**
         * 如果项目中使用了com.android.application插件,也就是app模块中会执行以下代码
         */
        project.pluginManager.withPlugin("com.android.application") {

            // We wire the root extension with the values coming from the app (either user populated or
            // defaults).

            /**
             * 下面代码实际上就是把用户自定义的配置赋值给rootExtension,就是把用户自定义的配置传递给上面创建好的一个私有配置项 privateReact
             */
            rootExtension.root.set(extension.root)
            rootExtension.reactNativeDir.set(extension.reactNativeDir)
            rootExtension.codegenDir.set(extension.codegenDir)
            rootExtension.nodeExecutableAndArgs.set(extension.nodeExecutableAndArgs)

            println("rootExtension root: ${
     rootExtension.root.get()}")
            println("rootExtension reactNativeDir: ${
     rootExtension.reactNativeDir.get()}")
            println("rootExtension codegenDir: ${
     rootExtension.codegenDir.get()}")
            println("rootExtension n
最低0.47元/天 解锁文章


 1812
1812

 被折叠的 条评论
为什么被折叠?
被折叠的 条评论
为什么被折叠?
 到【灌水乐园】发言


