我的视频课程:《FFmpeg打造Android万能音频播放器》
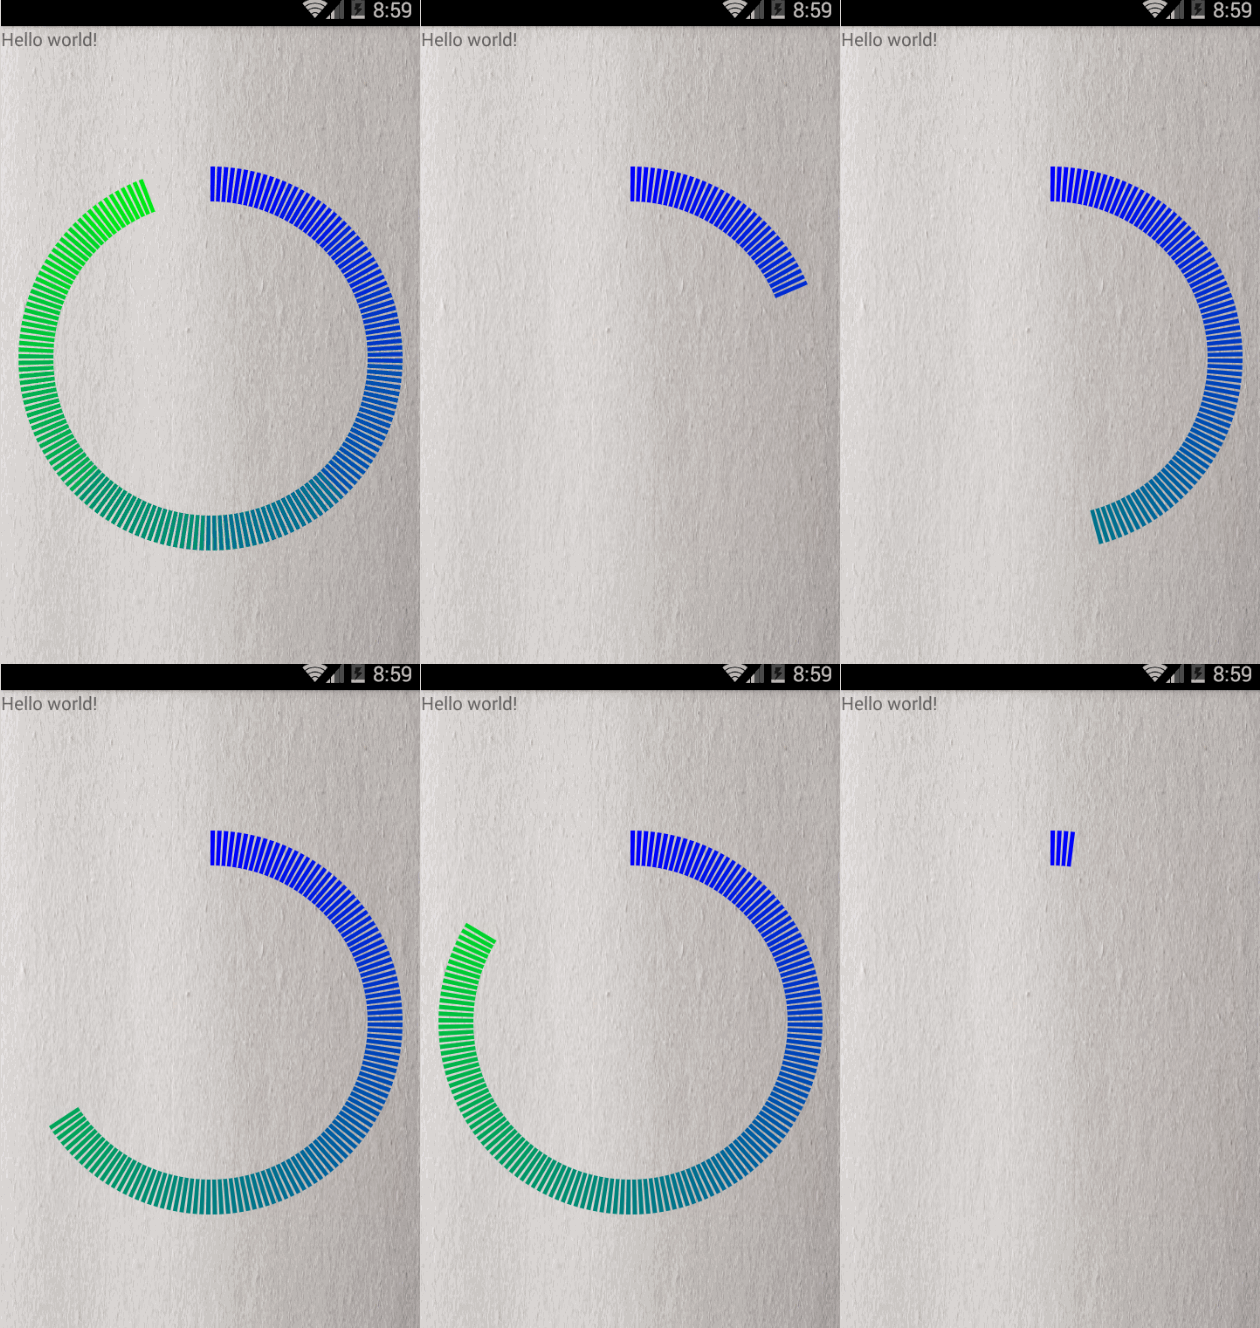
距离上次写博客又过了许久的了,懒起来还真是莫法,废话就不说多了,哈哈。今天要讲的就是一种常见的“环形颜色渐变的圆环进度条”,先看看效果就知道是怎样的了,后面也有免积分Demo下载地址。
录制得不是很好,所以看着有点卡顿,不过没事,效果已经看得出来了。
首先说说实现的思路吧:
刚开始想做这个的时候还真没什么思路,后来通过分析可以看出,这个其实就是一个大的圆环,只是中间有空隙而已。android绘制圆环很简单,用canvas.drawArc(...)函数就可以;然后就是中间的间隙,其实也简单,绘制的时候控制相应的度数不绘制就可以了(比如:奇数度数不绘制偶数度数就绘制就可以的),这样基本雏形就成功了;然后再是渐变的颜色,使用ArgbEvaluator这个类就可以实现颜色的渐变(最低level 11,现在大多数手机都是4.0以上的了),本列中颜色只分了两段,实际项目中可以根据需求,把颜色多分几段,然后看着就会很平滑的。通过以上的思路就可以实现图中的效果了。当然这个效果也是一个自定义控件。
思路有了 我们就来实现它:
我们还是分步骤把代码贴出来:
一:继承View类,并重写构造方法:
public class CircleView extends View {public CircleView(Context context) {
this(context, null, 0);
}
public CircleView(Context context, AttributeSet attrs) {
this(context, attrs, 0);
}
public CircleView(Context context, AttributeSet attrs, int defStyleAttr) {
super(context, attrs, defStyleAttr);
}
}private Paint paint;//画笔
private RectF oval; // RectF对象(圆环)
private int currentDegree = 0;//当前度数(除360可求百分比)
@SuppressLint("NewApi")
private ArgbEvaluator argbEvaluator = new ArgbEvaluator();//颜色渐变插值器
private int height;//控件高
private int width;//控件宽
private int circleWidth;//圆环宽
private final static int strokeWidth = 40;//画笔大小
private boolean isGradual = true;//是否显示渐变色public CircleView(Context context, AttributeSet attrs, int defStyleAttr) {
super(context, attrs, defStyleAttr);
// TODO Auto-generated constructor stub
//初始化画笔
paint = new Paint();
paint.setAntiAlias(true);
paint.setColor(Color.RED);
oval = new RectF();
paint.setStrokeWidth(strokeWidth); // 线宽
paint.setStyle(Paint.Style.STROKE);
}//重写onMeasure方法</span>@Override
protected void onMeasure(int widthMeasureSpec, int heightMeasureSpec) {
// TODO Auto-generated method stub
//计算最小宽度
height = View.MeasureSpec.getSize(heightMeasureSpec);
width = View.MeasureSpec.getSize(widthMeasureSpec);
if(width >= height)
{
circleWidth = height;
}
else
{
circleWidth = width;
}
setMeasuredDimension(circleWidth,circleWidth);
oval.left = strokeWidth / 2; // 左边
oval.top = strokeWidth / 2; // 上边
oval.right = circleWidth - strokeWidth / 2; // 右边
oval.bottom = circleWidth - strokeWidth / 2; // 下边
// 自动旋转
handler.postDelayed(runnable, 500);
}@SuppressLint("NewApi")
@Override
protected void onDraw(Canvas canvas) {
// TODO Auto-generated method stub
super.onDraw(canvas);
// canvas.drawArc(oval,-90 + currentDegree, 1.3f , false, paint); //绘制圆弧
for (int i = 0; i < currentDegree; i++) {
if (!isGradual) {
if (i < 180) {
paint.setColor(Color.BLUE);//右半边颜色
} else {
paint.setColor(Color.GREEN);//所半边颜色
}
} else {
Integer color = (Integer) argbEvaluator.evaluate(i / 360f, Color.BLUE, Color.GREEN);//颜色插值器(level 11以上才可以用)
paint.setColor(color);
}
if (i % 2 == 0) {
canvas.drawArc(oval, -90 + i, 1.35f, false, paint); // 绘制圆弧 1.35f是每个色块宽度
}
}
//绘制白色的底部背景
// if(currentDegree < 360)
// {
// paint.setColor(Color.WHITE);//右半边颜色
// for(int j = currentDegree; j < 360; j++)
// {
// if (j % 2 == 0)
// {
// canvas.drawArc(oval, -90 + j, 1.35f, false, paint); // 绘制圆弧 1.35f是每个色块宽度
// }
// }
// }
}五:设置当前进度(百分比)和是否渐变开关
<span style="white-space:pre"> </span>/**
* 根据百分比设置颜色范围
* @param pDegree
*/
public void setCurrentDegree(float pDegree)
{
this.currentDegree = (int)(360f * pDegree);
}<span style="white-space:pre"> </span>/**
* 颜色是否渐变
* @param gradual
*/
public void setGradual(boolean gradual)
{
this.isGradual = gradual;
}<span style="white-space:pre"> </span>Handler handler = new Handler();
Runnable runnable = new Runnable() {
@Override
public void run() {
// TODO Auto-generated method stub
if (currentDegree > 360)
currentDegree = 0;
invalidate();
handler.postDelayed(runnable, 6);//6毫秒绘制一次(可以根据需要更改)
currentDegree++;
}
};这是全部代码(CircleVIew.java):
package com.ywl5320.circledemo;
import android.animation.ArgbEvaluator;
import android.annotation.SuppressLint;
import android.content.Context;
import android.graphics.Canvas;
import android.graphics.Color;
import android.graphics.Paint;
import android.graphics.RectF;
import android.os.Handler;
import android.util.AttributeSet;
import android.view.View;
public class CircleView extends View {
private Paint paint;//画笔
	private RectF oval; // RectF对象(圆环)
	private int currentDegree = 0;//当前度数(除360可求百分比)
	@SuppressLint("NewApi")
	private ArgbEvaluator argbEvaluator = new ArgbEvaluator();//颜色渐变插值器
	private int height;//控件高
	private int width;//控件宽
	private int circleWidth;//圆环宽

	private final static int strokeWidth = 40;//画笔大小

	private boolean isGradual = true;//是否显示渐变色
public CircleView(Context context) {
this(context, null, 0);
}
public CircleView(Context context, AttributeSet attrs) {
this(context, attrs, 0);
}
public CircleView(Context context, AttributeSet attrs, int defStyleAttr) {
		super(context, attrs, defStyleAttr);
		// TODO Auto-generated constructor stub
		//初始化画笔
		paint = new Paint();
		paint.setAntiAlias(true);
		paint.setColor(Color.RED);
		oval = new RectF();
		paint.setStrokeWidth(strokeWidth); // 线宽
		paint.setStyle(Paint.Style.STROKE);

	}
@Override
protected void onMeasure(int widthMeasureSpec, int heightMeasureSpec) {
// TODO Auto-generated method stub
//计算最小宽度
height = View.MeasureSpec.getSize(heightMeasureSpec);
width = View.MeasureSpec.getSize(widthMeasureSpec);
if(width >= height)
{
circleWidth = height;
}
else
{
circleWidth = width;
}
setMeasuredDimension(circleWidth,circleWidth);
oval.left = strokeWidth / 2; // 左边
oval.top = strokeWidth / 2; // 上边
oval.right = circleWidth - strokeWidth / 2; // 右边
oval.bottom = circleWidth - strokeWidth / 2; // 下边
//自动旋转
// handler.postDelayed(runnable, 500);
}
@SuppressLint("NewApi")
	@Override
	protected void onDraw(Canvas canvas) {
		// TODO Auto-generated method stub
		super.onDraw(canvas);
		// canvas.drawArc(oval,-90 + currentDegree, 1.3f , false, paint); //绘制圆弧
			for (int i = 0; i < currentDegree; i++) {
				if (!isGradual) {
					if (i < 180) {
						paint.setColor(Color.BLUE);//右半边颜色
					} else {
						paint.setColor(Color.GREEN);//所半边颜色
					}
				} else {
					Integer color = (Integer) argbEvaluator.evaluate(i / 360f, Color.BLUE, Color.GREEN);//颜色插值器(level 11以上才可以用)
					paint.setColor(color);
				}
				if (i % 2 == 0) {
					canvas.drawArc(oval, -90 + i, 1.35f, false, paint); // 绘制圆弧 1.35f是每个色块宽度
				}
			}
			//绘制白色的底部背景
//			if(currentDegree < 360)
//			{
//				paint.setColor(Color.WHITE);//右半边颜色
//				for(int j = currentDegree; j < 360; j++)
//				{
//					if (j % 2 == 0)
//					{
//					canvas.drawArc(oval, -90 + j, 1.35f, false, paint); // 绘制圆弧 1.35f是每个色块宽度
//					}
//				}
//			}
	}
/**
* 根据百分比设置颜色范围
* @param pDegree
*/
public void setCurrentDegree(float pDegree)
{
this.currentDegree = (int)(360f * pDegree);
}
/**
* 颜色是否渐变
* @param gradual
*/
public void setGradual(boolean gradual)
{
this.isGradual = gradual;
}
Handler handler = new Handler();
Runnable runnable = new Runnable() {
@Override
public void run() {
// TODO Auto-generated method stub
if (currentDegree > 360)
currentDegree = 0;
invalidate();
handler.postDelayed(runnable, 6);//6毫秒绘制一次(可以根据需要更改)
currentDegree++;
}
};
}
最后是在activity中调用:
布局文件(activity_main.xml):
<RelativeLayout xmlns:android="http://schemas.android.com/apk/res/android"
    xmlns:tools="http://schemas.android.com/tools"
    android:layout_width="match_parent"
    android:layout_height="match_parent"
     >

    <com.ywl5320.circleviewdemo.CircleView
        android:layout_width="match_parent"
        android:layout_height="match_parent" />

</RelativeLayout>
Activity代码什么都没变:
package com.ywl5320.circleviewdemo;

import android.os.Bundle;
import android.support.v7.app.ActionBarActivity;

public class MainActivity extends ActionBarActivity {

	@Override
	protected void onCreate(Bundle savedInstanceState) {
		super.onCreate(savedInstanceState);
		setContentView(R.layout.activity_main);
	}
}


 337
337

 被折叠的 条评论
为什么被折叠?


