


Eclipse-新建一个Dynamic Web Project,目录结构如下:

包结构功能说明:
(1)entity包:放置项目中的实体类(一个表一个类)
(2)util工具包:各种工具类(StringHelper类)
----------M层-----------
(3)dao接口包:各种操作接口类(ICRM_UserDao)
(4)dao.impl 实现接口包:各种实现操作接口的实现类(CRM_UserDaoImpl)
(5)service接口包:业务实现的接口(ICRM_UserService)
(6)service.impl实现业务接口的实现类(CRM_UserServiceImpl)
(7)controller包:控制器实现类(CRM_UserController)(C层)
架构项目包之间的引用关系:
用户请求-->controller-->service包-->dao包-->db
搭建ssh框架
1.下载SpringMVC和Hibernate框架:Spring框架和SpringMVC框架,他们是天然集成。
springmvc官网http://projects.spring.io/spring-framework/改版后不可以直接下载,可利用maven下载,或者去csdn或github上下载
hibernate下载地址:http://hibernate.org/orm/downloads/
在线安装SpringMVC插件
http://dist.springsource.com/release/TOOLS/update/e4.4/
在线安装Hibernate Tools插件
http://download.jboss.org/jbosstools/neon/stable/updates/
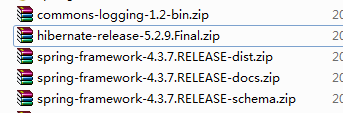
2.导入SSH框架整合的jar包(在WebContent\WEB-INF\lib目录下)
2.1导入SpringMVC的jar包;
2.2导入Hibernate的jar包
2.3导入三方依赖的jar包 commons-logging-1.2.jar
2.4导入mysql驱动包 mysql-connector-java-6.0.5.jar
3.配置web.xml(在WebContent\WEB-INF\web.xml目录下)
3.1配置Spring IOC容器
<!-- 配置Spring IOC容器 -->
<context-param>
<param-name>contextConfigLocation</param-name>
<param-value>classpath:applicationContext.xml</param-value>
</context-param>
<listener>
<listener-class>org.springframework.web.context.ContextLoaderListener</listener-class>
</listener>
同时在项目根目录右击新建Spring Bean Configuration File文件名为config,新增applicationContext.xml文件

3.2配置Springmvc的控制器DispatcherServlet
<!-- 配置Springmvc的DispatcherServlet -->
<servlet>
<servlet-name>dispatcherServlet</servlet-name>
<servlet-class>org.springframework.web.servlet.DispatcherServlet</servlet-class>
<init-param>
<param-name>contextConfigLocation</param-name>
<param-value>classpath:springmvc.xml</param-value>
</init-param>
<load-on-startup>1</load-on-startup>
</servlet>
<servlet-mapping>
<servlet-name>dispatcherServlet</servlet-name>
<url-pattern>*.action</url-pattern>
</servlet-mapping>
同时在config目录下新建springmvc.xml
3.3配置编码方式 过滤器
<!-- 配置编码方式 过滤器 ,注意要配置所有的过滤器,最前面 -->
<filter>
<filter-name>characterEncodingFilter</filter-name>
<filter-class>org.springframework.web.filter.CharacterEncodingFilter</filter-class>
<init-param>
<param-name>encoding</param-name>
<param-value>UTF-8</param-value>
</init-param>
</filter>
<filter-mapping>
<filter-name>characterEncodingFilter</filter-name>
<url-pattern>*.action</url-pattern>
</filter-mapping>
3.4配置HiddenHttpMethodFilter(为了实现REST full)
<!-- 为了使用SpringMVC框架实现REST,需配置HiddenHttpMethodFilter -->
<filter>
<filter-name>hiddenHttpMethodFilter</filter-name>
<filter-class>org.springframework.web.filter.HiddenHttpMethodFilter</filter-class>
</filter>
<filter-mapping>
<filter-name>hiddenHttpMethodFilter</filter-name>
<url-pattern>*.action</url-pattern>
</filter-mapping>
4.配置SpringMVC配置(config\springmvc.xml)
4.1导入命名空间
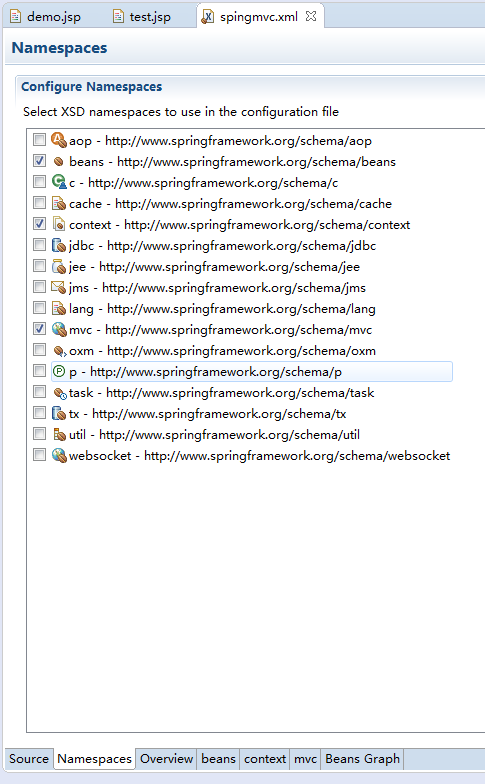
4.2配置扫描的包(config\springmvc.xml)
<?xml version="1.0" encoding="UTF-8"?>
<beans xmlns="http://www.springframework.org/schema/beans"
xmlns:xsi="http://www.w3.org/2001/XMLSchema-instance" xmlns:mvc="http://www.springframework.org/schema/mvc"
xmlns:context="http://www.springframework.org/schema/context"
xsi:schemaLocation="http://www.springframework.org/schema/mvc http://www.springframework.org/schema/mvc/spring-mvc-4.3.xsd
http://www.springframework.org/schema/beans http://www.springframework.org/schema/beans/spring-beans.xsd
http://www.springframework.org/schema/context http://www.springframework.org/schema/context/spring-context-4.3.xsd">
<!-- 配置自动扫描的包 -->
<context:component-scan base-package="com.myFlows"
use-default-filters="false">
<context:include-filter type="annotation"
expression="org.springframework.stereotype.Controller" />
<context:include-filter type="annotation"
expression="org.springframework.web.bind.annotation.ControllerAdvice" />
</context:component-scan>
</beans>
4.3配置视图解析器
<!-- 配置视图解析器 -->
<bean
class="org.springframework.web.servlet.view.InternalResourceViewResolver">
<property name="prefix" value="/"></property>
<property name="suffix" value=".jsp"></property>
</bean>
4.4配置静态资源
<!-- 配置静态资源 -->
<mvc:default-servlet-handler/>
4.5 注释
<!-- 注释 -->
<mvc:annotation-driven />
5.配置Spring(config\applicationContext.xml)
5.1导入命名空间
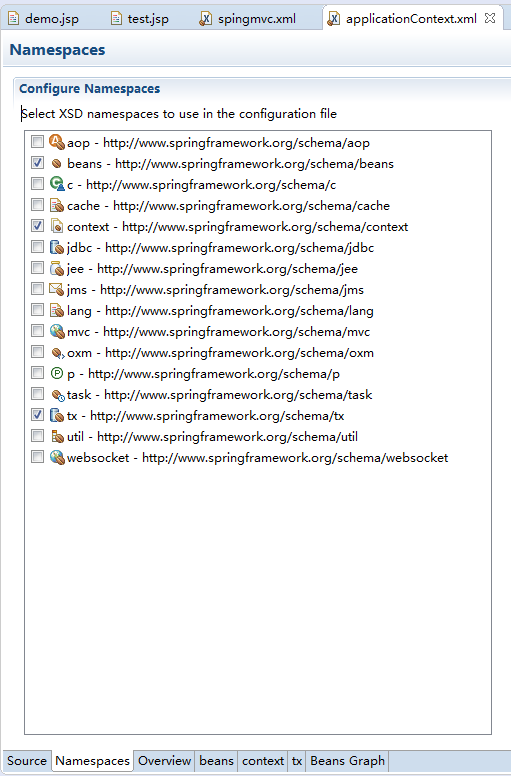
5.2配置自动扫描包
<!-- 配置自动扫描的包 -->
<context:component-scan base-package="com.myFlows" use-default-filters="false">
<context:exclude-filter type="annotation" expression="org.springframework.stereotype.Controller"/>
<context:exclude-filter type="annotation" expression="org.springframework.web.bind.annotation.ControllerAdvice"/>
</context:component-scan>
5.3配置数据源
<!-- 配置数据源 -->
<context:property-placeholder location="classpath:db.properties"/>
config目录下新建文件db.properties 添加如下内容:
jdbc.user=root
jdbc.password=root
jdbc.driverClass=com.mysql.jdbc.Driver
jdbc.jdbcUrl=jdbc:mysql://localhost:3306/myflow
5.4配置datasource
在WEB-INF\lib下导入C3p0的jar包(hibernate-release-5.2.9.Final\hibernate-release-5.2.9.Final\lib\optional\c3p0)
<!-- 配置datasource -->
<bean class="com.mchange.v2.c3p0.ComboPooledDataSource" id="dataSource">
<property name="user" value="${jdbc.user}"></property>
<property name="password" value="${jdbc.password}"></property>
<property name="driverClass" value="${jdbc.driverClass}"></property>
<property name="jdbcUrl" value="${jdbc.jdbcUrl}"></property>
</bean>
5.5整合Hibernate
5.5.1配置SessionFactory
<!-- 配置 SessionFactory -->
<bean class="org.springframework.orm.hibernate4.LocalSessionFactoryBean"
id="sessionFactory">
<!-- 配置数据源 -->
<property name="dataSource" ref="dataSource"></property>
<!-- 扫描的实体包(pojo) -->
<property name="namingStrategy">
<bean class="org.hibernate.cfg.ImprovedNamingStrategy"></bean>
</property>
<property name="packagesToScan" value="com.myFlows.entity"></property>
<!-- 配置Hibernate的常用属性 -->
<property name="hibernateProperties">
<props>
<!-- 数据库的方言 -->
<prop key="hibernate.dialect">org.hibernate.dialect.MySQLInnoDBDialect</prop>
<prop key="hibernate.show_sql">true</prop>
<prop key="hibernate.format_sql">true</prop>
<prop key="hibernate.hbm2ddl.auto">update</prop>
</props>
</property>
</bean>
5.5.2配置Hibernate的事务管理器
<!-- 配置Hibernate的事务管理器 -->
<bean id="transactionManager"
class="org.springframework.orm.hibernate4.HibernateTransactionManager">
<property name="sessionFactory" ref="sessionFactory"></property>
</bean>
6.SSH整合测试
6.1新建test测试包

6.2新建一个Junit测试类
(test包右击-new -other-JUnit-JUnit Test Case-TestSSH)
package com.myFlows.test;
import static org.junit.Assert.*;
import org.junit.Test;
import org.springframework.context.ApplicationContext;
import org.springframework.context.support.ClassPathXmlApplicationContext;
public class TestSSH {
@Test
public void test() {
fail("Not yet implemented");
}
private ApplicationContext ctx = null;
@Test
public void testDataSource() {
ctx = new ClassPathXmlApplicationContext("applicationContext.xml");
System.out.println(ctx);
}
}
运行测试一下:
备注1:报错Exception in thread "main" org.springframework.beans.factory.BeanCreationException: Error creating bean with name 'sessionFactory' defined in class path resource [applicationContext.xml]: Invocation of init method failed; nested exception i...
经检查是配置文件applicationContext.xml文件的hibernate 的版本不对,去网上下载了hibernate-release-4.3.11.Final.zip这个版本,把以前5版本的jar包替换成4版本的,解决问题。
备注2:报错java.sql.SQLException: The server time zone value '�й���ʱ��' is unrecognized or represents more than one time zone. You must configure either the server or JDBC driver (via the serverTimezone configuration property) to use a more specifc time zone value if you want to utilize time zone support.
解决方法:db.properties文件中jdbc.jdbcUrl=jdbc:mysql://localhost:3306/myflow改为jdbc.jdbcUrl=jdbc:mysql://localhost:3306/myflow?serverTimezone=UTC ,解决问题
最终正确运行:

6.3测试数据源
@Test
public void testDataSource() {
ctx = new ClassPathXmlApplicationContext("applicationContext.xml");
System.out.println(ctx);
DataSource datasource=ctx.getBean(DataSource.class);
System.out.println(datasource);
try {
System.out.println(datasource.getConnection().toString());
} catch (SQLException e) {
// TODO Auto-generated catch block
e.printStackTrace();
}
}
运行结果:

6.4测试SessionFactory
SessionFactory sessionFactory= ctx.getBean(SessionFactory.class);
System.out.println(sessionFactory);
运行结果:
org.hibernate.internal.SessionFactoryImpl@764faa6
6.5测试操作数据库表(session)
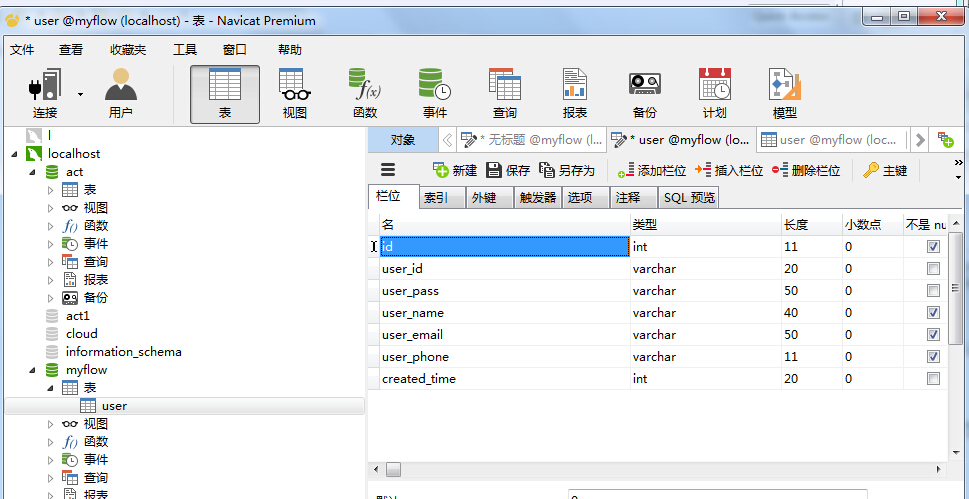
根据数据库表写实体类:(User.java为例)
注:表中属性id为自动生成的,故设置alter table `user` change `id` `id` int auto_increment
其中构造函数可以用点击Source->Generate Constructor using Fields....自动生成
get函数和set函数可以用点击Source->Generate Getters and Setters.....自动生成
package com.myFlows.entity;
import java.io.Serializable;
import javax.persistence.Entity;
import javax.persistence.GeneratedValue;
import javax.persistence.GenerationType;
import javax.persistence.Id;
import javax.persistence.Table;
//注解实体类,数据库表名为user
@Entity
@Table(name="user")
public class User implements Serializable{
//注解id表示自动生成的
@Id
@GeneratedValue(strategy=GenerationType.IDENTITY)
private int id;
private String user_id;
private String user_pass;
private String user_name;
private String user_email;
private String user_phone;
private int created_time;
public User() {
}
public User(String user_id, String user_pass, String user_name, String user_email, String user_phone,
int created_time) {
super();
this.user_id = user_id;
this.user_pass = user_pass;
this.user_name = user_name;
this.user_email = user_email;
this.user_phone = user_phone;
this.created_time = created_time;
}
public int getId() {
return id;
}
public void setId(int id) {
this.id = id;
}
public String getUser_id() {
return user_id;
}
public void setUser_id(String user_id) {
this.user_id = user_id;
}
public String getUser_pass() {
return user_pass;
}
public void setUser_pass(String user_pass) {
this.user_pass = user_pass;
}
public String getUser_name() {
return user_name;
}
public void setUser_name(String user_name) {
this.user_name = user_name;
}
public String getUser_email() {
return user_email;
}
public void setUser_email(String user_email) {
this.user_email = user_email;
}
public String getUser_phone() {
return user_phone;
}
public void setUser_phone(String user_phone) {
this.user_phone = user_phone;
}
public long getCreated_time() {
return created_time;
}
public void setCreated_time(int created_time) {
this.created_time = created_time;
}
}
TestSSH.java中添加数据库测试
Session session= sessionFactory.openSession();
Transaction tx=session.beginTransaction();
//数据库的操作
User user=new User("bbb","123456","zhouge","qqq@qq.com","12344444",121);
session.save(user);
tx.commit();
session.close();
运行结果:

同时查看数据库表:(我多运行了几次)

此时测试操作数据库表成功!!!
附1:TestSSH.java代码:
package com.myFlows.test;
import static org.junit.Assert.fail;
import java.sql.SQLException;
import javax.sql.DataSource;
import org.hibernate.Session;
import org.hibernate.SessionFactory;
import org.hibernate.Transaction;
import org.junit.Test;
import org.springframework.context.ApplicationContext;
import org.springframework.context.support.ClassPathXmlApplicationContext;
import com.myFlows.entity.User;
public class TestSSH {
// @Test
// public void test() {
// fail("Not yet implemented");
// }
private ApplicationContext ctx = null;
@Test
public void testDataSource() {
ctx = new ClassPathXmlApplicationContext("applicationContext.xml");
//System.out.println(ctx);
DataSource datasource=ctx.getBean(DataSource.class);
System.out.println(datasource);
try {
System.out.println(datasource.getConnection().toString());
} catch (SQLException e) {
// TODO Auto-generated catch block
e.printStackTrace();
}
SessionFactory sessionFactory= ctx.getBean(SessionFactory.class);
System.out.println(sessionFactory);
Session session= sessionFactory.openSession();
Transaction tx=session.beginTransaction();
//数据库的操作
User user=new User("bbb","123456","zhouge","qqq@qq.com","12344444",121);
session.save(user);
tx.commit();
session.close();
}
}
附2:web.xml
<?xml version="1.0" encoding="UTF-8"?>
<web-app xmlns:xsi="http://www.w3.org/2001/XMLSchema-instance"
xmlns="http://xmlns.jcp.org/xml/ns/javaee"
xsi:schemaLocation="http://xmlns.jcp.org/xml/ns/javaee http://xmlns.jcp.org/xml/ns/javaee/web-app_3_1.xsd"
id="WebApp_ID" version="3.1">
<display-name>myFlows</display-name>
<welcome-file-list>
<welcome-file>index.html</welcome-file>
<welcome-file>index.htm</welcome-file>
<welcome-file>index.jsp</welcome-file>
<welcome-file>default.html</welcome-file>
<welcome-file>default.htm</welcome-file>
<welcome-file>default.jsp</welcome-file>
</welcome-file-list>
<!-- 配置Spring IOC容器 -->
<context-param>
<param-name>contextConfigLocation</param-name>
<param-value>classpath:applicationContext.xml</param-value>
</context-param>
<listener>
<listener-class>org.springframework.web.context.ContextLoaderListener</listener-class>
</listener>
<!-- 配置Springmvc的DispatcherServlet -->
<servlet>
<servlet-name>dispatcherServlet</servlet-name>
<servlet-class>org.springframework.web.servlet.DispatcherServlet</servlet-class>
<init-param>
<param-name>contextConfigLocation</param-name>
<param-value>classpath*:springmvc*.xml</param-value>
</init-param>
<load-on-startup>1</load-on-startup>
</servlet>
<servlet-mapping>
<servlet-name>dispatcherServlet</servlet-name>
<url-pattern>*.action</url-pattern>
</servlet-mapping>
<!-- 配置编码方式 过滤器 ,注意要配置所有的过滤器,最前面 -->
<filter>
<filter-name>characterEncodingFilter</filter-name>
<filter-class>org.springframework.web.filter.CharacterEncodingFilter</filter-class>
<init-param>
<param-name>encoding</param-name>
<param-value>UTF-8</param-value>
</init-param>
</filter>
<filter-mapping>
<filter-name>characterEncodingFilter</filter-name>
<url-pattern>*.action</url-pattern>
</filter-mapping>
<!-- 为了使用SpringMVC框架实现REST,需配置HiddenHttpMethodFilter -->
<filter>
<filter-name>hiddenHttpMethodFilter</filter-name>
<filter-class>org.springframework.web.filter.HiddenHttpMethodFilter</filter-class>
</filter>
<filter-mapping>
<filter-name>hiddenHttpMethodFilter</filter-name>
<url-pattern>*.action</url-pattern>
</filter-mapping>
</web-app>
附3:
applicationContext.xml
<?xml version="1.0" encoding="UTF-8"?>
<beans xmlns="http://www.springframework.org/schema/beans"
xmlns:xsi="http://www.w3.org/2001/XMLSchema-instance" xmlns:tx="http://www.springframework.org/schema/tx"
xmlns:context="http://www.springframework.org/schema/context"
xsi:schemaLocation="http://www.springframework.org/schema/beans http://www.springframework.org/schema/beans/spring-beans.xsd
http://www.springframework.org/schema/context http://www.springframework.org/schema/context/spring-context-4.3.xsd
http://www.springframework.org/schema/tx http://www.springframework.org/schema/tx/spring-tx-4.3.xsd">
<!-- 配置自动扫描的包 -->
<context:component-scan base-package="com.myFlows"
use-default-filters="false">
<context:exclude-filter type="annotation"
expression="org.springframework.stereotype.Controller" />
<context:exclude-filter type="annotation"
expression="org.springframework.web.bind.annotation.ControllerAdvice" />
</context:component-scan>
<!-- 配置数据源 -->
<context:property-placeholder location="classpath:db.properties" />
<!-- 配置datasource -->
<bean class="com.mchange.v2.c3p0.ComboPooledDataSource" id="dataSource">
<property name="user" value="${jdbc.user}"></property>
<property name="password" value="${jdbc.password}"></property>
<property name="driverClass" value="${jdbc.driverClass}"></property>
<property name="jdbcUrl" value="${jdbc.jdbcUrl}"></property>
</bean>
<!-- 配置 SessionFactory -->
<bean class="org.springframework.orm.hibernate4.LocalSessionFactoryBean"
id="sessionFactory">
<!-- 配置数据源 -->
<property name="dataSource" ref="dataSource"></property>
<!-- 扫描的实体包(pojo) -->
<property name="namingStrategy">
<bean class="org.hibernate.cfg.ImprovedNamingStrategy"></bean>
</property>
<property name="packagesToScan" value="com.myFlows.entity"></property>
<!-- 配置Hibernate的常用属性 -->
<property name="hibernateProperties">
<props>
<!-- 数据库的方言 -->
<prop key="hibernate.dialect">org.hibernate.dialect.MySQLInnoDBDialect</prop>
<prop key="hibernate.show_sql">true</prop>
<prop key="hibernate.format_sql">true</prop>
<prop key="hibernate.hbm2ddl.auto">update</prop>
</props>
</property>
</bean>
<!-- 配置Hibernate的事务管理器 -->
<bean id="transactionManager"
class="org.springframework.orm.hibernate4.HibernateTransactionManager">
<property name="sessionFactory" ref="sessionFactory"></property>
</bean>
</beans>
附4;springmvc.xml
<?xml version="1.0" encoding="UTF-8"?>
<beans xmlns="http://www.springframework.org/schema/beans"
xmlns:xsi="http://www.w3.org/2001/XMLSchema-instance" xmlns:mvc="http://www.springframework.org/schema/mvc"
xmlns:context="http://www.springframework.org/schema/context"
xsi:schemaLocation="http://www.springframework.org/schema/mvc http://www.springframework.org/schema/mvc/spring-mvc-4.3.xsd
http://www.springframework.org/schema/beans http://www.springframework.org/schema/beans/spring-beans.xsd
http://www.springframework.org/schema/context http://www.springframework.org/schema/context/spring-context-4.3.xsd">
<!-- 配置自动扫描的包 -->
<context:component-scan base-package="com.myFlows"
use-default-filters="false">
<context:include-filter type="annotation"
expression="org.springframework.stereotype.Controller" />
<context:include-filter type="annotation"
expression="org.springframework.web.bind.annotation.ControllerAdvice" />
</context:component-scan>
<!-- 配置视图解析器 -->
<bean
class="org.springframework.web.servlet.view.InternalResourceViewResolver">
<property name="prefix" value="/"></property>
<property name="suffix" value=".jsp"></property>
</bean>
<!-- 配置静态资源 -->
<mvc:default-servlet-handler/>
<!-- 注释 -->
<mvc:annotation-driven />
</beans>


 454
454


 被折叠的 条评论
为什么被折叠?
被折叠的 条评论
为什么被折叠?
 到【灌水乐园】发言


