


首先,在php中使用soap 必须获得相关模块支持:
将php.ini中代码 ;extension=php_soap.dll 前的分号(;)去掉。重启apache激活soap扩展。
其次,利用zde生成WSDL。虽然zde为我们提供了自动生成wsdl的功能,但在zend studio10中,与之前版本不一样的是,你需要单独安装wsdl插件,才可以使用,步骤如下:
1、打开zendstudio10,选择help(帮助)->welcome(欢迎
2、在右边的列表中找到WSDL Support,勾选
3、点击Apply changes(应用修改)
见图:
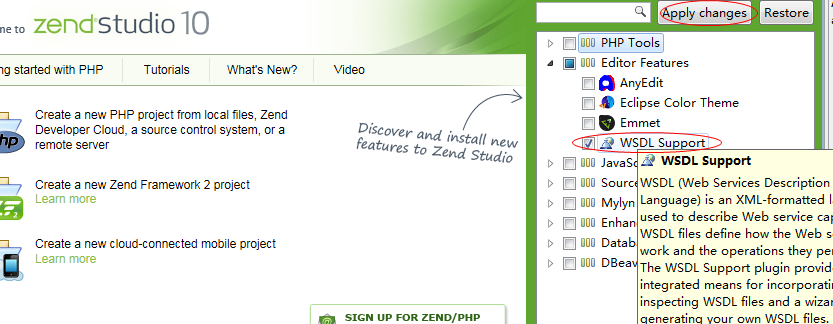
4、zde会自动安装,然后提示要重启,点击restart now(现在重新启动)
然后,进入代码阶段,创建我们的webservice。
1. 建立webservice 服务端:soapserver.php
class service
{
    public function HelloWorld() {
      return  "Hello";
    }
    public  function Add($a,$b) {
      return $a+$b;
    }
}
$server=new SoapServer('TestSoap.wsdl',array('soap_version' => SOAP_1_2));
$server->setClass("service");
$server->handle();
2.建立客户端:soapclient.php
$client=new SoapClient("TestSoap.wsdl");
echo $client->HelloWorld();
echo("<br />");
print_r($client->Add(1,2));
这个时候如果允许客户端代码,肯定会报错,因为还没有生成wsdl。 filepath 是文件目录位置。
错误例如
Warning: SoapClient::SoapClient() [soapclient.soapclient]: I/O warning : failed to load external entity “TestSoap.wsdl” in [filepath] on line 2
Fatal error: Uncaught SoapFault exception: [WSDL] SOAP-ERROR: Parsing WSDL: Couldn’t load from ‘TestSoap.wsdl’ : failed to load external entity。
3.接下来我们用zend studio 10 生成wsdl。
1) File ->New -> Other-> Webservice-> WSDL


2) 选择Next

3) 选择Finish.生成如下图所示的TestSoap.wsdl

TestSoapSoap下面填写php webService 如soapservice.php
NewOperation:添加方法。WebService里需要提供给别人调用的方法名
input :设置输入参数名和类型
output:设置返回值。
Add part:如果在input里添加,就是添加多个参数
set Type / set Element: 设置参数的input/output类型Type包含常见的数据类型(int,string,boolean,float,time…),Element就是自定义元素类型。
4) 根据soapserver的service类两个方法HelloWorld和Add生成的wsdl结构:

如果在soapclient.php调用方法时提示 ‘HelloWorld’ is not a valid method for this service 之类的错误。
1.看下WSDL源代码里面发现wsdl:operation 标签里只有Add 方法,而其他的HelloWorld方法都没有添加,这个时候请更新Bind(Generate Binding Content),重新生成该节点信息。
2. 如果还有,请打开php.ini搜索soap.wsdl_cache_dir将soap.wsdl_cache_dir=”\tmp” 清除tmp目录下的wsdl缓存文件,建议更换一个比较容易找的目录。或者是注释这一行,设置soap.wsdl_cache_enabled=0,禁止wsdl缓存。
; Enables or disables WSDL caching feature.
soap.wsdl_cache_enabled=1
; Sets the directory name where SOAP extension will put cache files.
soap.wsdl_cache_dir=”\tmp”
; (time to live) Sets the number of second while cached file will be used
; instead of original one.
soap.wsdl_cache_ttl=86400
4.访问soapclient.php应该看到结果:
Hello
3
至此,简单的php soap搭建 webservice及wsdl生成完成。
附上TestSoap.wsdl结构树,具体理解可以参考http://www.kushu.net/671.html第五大点:WSDL — Web Services Description Language 来认识一下wsdl。
<?xml version="1.0" encoding="UTF-8"?>
<wsdl:definitions xmlns:soap="http://schemas.xmlsoap.org/wsdl/soap/" xmlns:tns="http://localhost/test/soap" xmlns:wsdl="http://schemas.xmlsoap.org/wsdl/" xmlns:xsd="http://www.w3.org/2001/XMLSchema" name="TestSoap" targetNamespace="http://localhost/test/soap">
  <wsdl:types>
    <xsd:schema targetNamespace="http://localhost/test/soap">
      <xsd:element name="Add">
        <xsd:complexType>
          <xsd:sequence>
            <xsd:element name="in" type="xsd:string"/>
          </xsd:sequence>
        </xsd:complexType>
      </xsd:element>
      <xsd:element name="AddResponse">
        <xsd:complexType>
          <xsd:sequence>
            <xsd:element name="out" type="xsd:string"/>
          </xsd:sequence>
        </xsd:complexType>
      </xsd:element>
      <xsd:element name="HelloWorldResponse">
      	<xsd:complexType>
      		<xsd:sequence>

      			<xsd:element name="out" type="xsd:string"></xsd:element>
      		</xsd:sequence>
      	</xsd:complexType>
      </xsd:element>
    </xsd:schema>
  </wsdl:types>
  <wsdl:message name="AddRequest">
    <wsdl:part name="a" type="xsd:int"/>
    <wsdl:part name="b" type="xsd:int"></wsdl:part>
  </wsdl:message>
  <wsdl:message name="AddResponse">
    <wsdl:part name="AddReturn" type="xsd:int"/>
  </wsdl:message>
  <wsdl:message name="HelloWorldRequest">

  </wsdl:message>
  <wsdl:message name="HelloWorldResponse">
  	<wsdl:part name="HelloWorldReturn" type="xsd:string"></wsdl:part>
  </wsdl:message>
  <wsdl:message name="HelloWorldRequest1">

  </wsdl:message>
  <wsdl:portType name="TestSoap">
    <wsdl:operation name="Add">
      <wsdl:input message="tns:AddRequest"/>
      <wsdl:output message="tns:AddResponse"/>
    </wsdl:operation>
    <wsdl:operation name="HelloWorld">

            <wsdl:input message="tns:HelloWorldRequest"></wsdl:input>
            <wsdl:output message="tns:HelloWorldResponse"></wsdl:output>
    </wsdl:operation>
  </wsdl:portType>
  <wsdl:binding name="TestSoapSOAP" type="tns:TestSoap">
  	<soap:binding style="document"
  		transport="http://schemas.xmlsoap.org/soap/http" />
  	<wsdl:operation name="Add">
  		<soap:operation
  			soapAction="http://localhost/test/soap/NewOperation" />
  		<wsdl:input>
  			<soap:body use="literal" />
  		</wsdl:input>
  		<wsdl:output>
  			<soap:body use="literal" />
  		</wsdl:output>
  	</wsdl:operation>
  	<wsdl:operation name="HelloWorld">
  		<soap:operation
  			soapAction="http://localhost/test/soap/HelloWorld" />
  		<wsdl:input>
  			<soap:body use="literal" />
  		</wsdl:input>
  		<wsdl:output>
  			<soap:body use="literal" />
  		</wsdl:output>
  	</wsdl:operation>
  </wsdl:binding>
  <wsdl:service name="TestSoap">
    <wsdl:port binding="tns:TestSoapSOAP" name="TestSoapSOAP">
      <soap:address location="http://localhost/test/soap/soapserver.php"/>
    </wsdl:port>
  </wsdl:service>
</wsdl:definitions>
最后,我们看看简单的PHP SOAP服务端与客户端调试技巧
try {

     $arrOptions = array(
     'uri'=>'CheckAPItest',
     'location'=>'http://localhost/ManageWebService/Login.php',
                    'trace'=>true);
     $objSoapClient = new SoapClient(null,$arrOptions);
     echo $objSoapClient->actionLogin("yoekey","1234567","mnxf","adfas","dasfas","chinese-utf8");
}
catch (Exception $e)
{
      var_dump($objSoapClient->__getLastResponseHeaders());
      var_dump($objSoapClient->__getLastResponse());
      print_r($e);
}


 1735
1735


 被折叠的 条评论
为什么被折叠?
被折叠的 条评论
为什么被折叠?
 到【灌水乐园】发言


