


Java经典设计模式共有21中,分为三大类:创建型模式(5种)、结构型模式(7种)和行为型模式(11种)。
本文主要讲行为型模式,创建型模式和结构型模式可以看博主的另外两篇文章:Java经典设计模式之五大创建型模式(附实例和详解)、 Java经典设计模式之七大结构型模式(附实例和详解)。
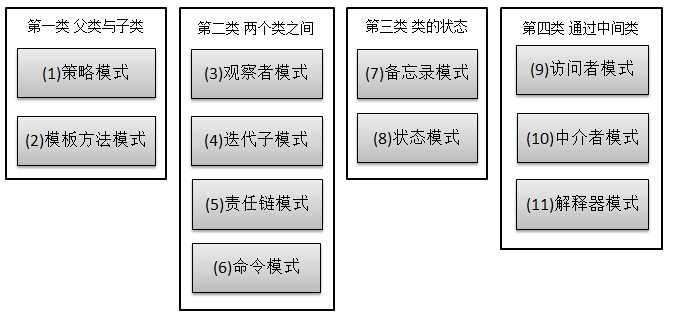
行为型模式细分为如下11种:策略模式、模板方法模式、观察者模式、迭代子模式、责任链模式、命令模式、备忘录模式、状态模式、访问者模式、中介者模式、解释器模式。
接下来对11种行为型模式逐个进行介绍。
一、策略模式
策略模式定义了一系列算法,并将每个算法封装起来,使他们可以相互替换,且算法的变化不会影响到使用算法的客户。需要设计一个接口,为一系列实现类提供统一的方法,多个实现类实现该接口,设计一个抽象类(可有可无,属于辅助类,视实际需求是否添加),提供辅助函数。
首先统一接口:
|
1
2
3
4
5
|
package
com.model.behaviour;
public
interface
ICalculator {
public
int
calculate(String exp);
}
|
辅助类:
|
1
2
3
4
5
6
7
8
9
10
11
12
|
package
com.model.behaviour;
public
abstract
class
AbstractCalculator {
public
int
[] split(String exp, String opt) {
String array[] = exp.split(opt);
int
arrayInt[] =
new
int
[
2
];
arrayInt[
0
] = Integer.parseInt(array[
0
]);
arrayInt[
1
] = Integer.parseInt(array[
1
]);
return
arrayInt;
}
}
|
三个实现类:
|
1
2
3
4
5
6
7
8
9
10
|
package
com.model.behaviour;
public
class
Plus
extends
AbstractCalculator
implements
ICalculator {
@Override
public
int
calculate(String exp) {
int
arrayInt[] = split(exp,
"\\+"
);
return
arrayInt[
0
] + arrayInt[
1
];
}
}
|
|
1
2
3
4
5
6
7
8
9
10
11
|
package
com.model.behaviour;
public
class
Minus
extends
AbstractCalculator
implements
ICalculator {
@Override
public
int
calculate(String exp) {
int
arrayInt[] = split(exp,
"\\-"
);
return
arrayInt[
0
] - arrayInt[
1
];
}
}
|
|
1
2
3
4
5
6
7
8
9
10
|
package
com.model.behaviour;
public
class
Multiply
extends
AbstractCalculator
implements
ICalculator {
@Override
public
int
calculate(String exp) {
int
arrayInt[] = split(exp,
"\\*"
);
return
arrayInt[
0
]*arrayInt[
1
];
}
}
|
测试类:
|
1
2
3
4
5
6
7
8
9
10
11
|
package
com.model.behaviour;
public
class
StrategyTest {
public
static
void
main(String[] args) {
String exp =
"8-2"
;
ICalculator cal =
new
Minus();
int
result = cal.calculate(exp);
System.out.println(exp +
"="
+ result);
}
}
|
策略模式的决定权在用户,系统本身提供不同算法的实现,新增或者删除算法,对各种算法做封装。因此,策略模式多用在算法决策系统中,外部用户只需要决定用哪个算法即可。
二、模板方法模式
解释一下模板方法模式,就是指:一个抽象类中,有一个主方法,再定义1…n个方法,可以是抽象的,也可以是实际的方法,定义一个类,继承该抽象类,重写抽象方法,通过调用抽象类,实现对子类的调用。
就是在AbstractCalculator类中定义一个主方法calculate,calculate()调用spilt()等,Plus和Minus分别继承AbstractCalculator类,通过对AbstractCalculator的调用实现对子类的调用,看下面的例子:
|
1
2
3
4
5
6
7
8
9
10
11
12
13
14
15
16
17
18
19
20
21
|
package
com.model.behaviour;
public
abstract
class
AbstractCalculator {
/*主方法,实现对本类其它方法的调用*/
public final int calculate(String exp,String opt){
int array[] = split(exp,opt);
return calculate(array[0],array[1]);
}
/*被子类重写的方法*/
abstract
public
int
calculate(
int
num1,
int
num2);
public
int
[] split(String exp,String opt){
String array[] = exp.split(opt);
int
arrayInt[] =
new
int
[
2
];
arrayInt[
0
] = Integer.parseInt(array[
0
]);
arrayInt[
1
] = Integer.parseInt(array[
1
]);
return
arrayInt;
}
}
|
|
1
2
3
4
5
6
7
8
9
|
package
com.model.behaviour;
public
class
Plus
extends
AbstractCalculator {
@Override
public
int
calculate(
int
num1,
int
num2) {
return
num1 + num2;
}
}
|
|
1
2
3
4
5
6
7
8
9
10
11
|
package
com.model.behaviour;
public
class
StrategyTest {
public
static
void
main(String[] args) {
String exp =
"8+8"
;
AbstractCalculator cal =
new
Plus();
int
result = cal.calculate(exp,
"\\+"
);
System.out.println(result);
}
}
|
三、观察者模式
包括这个模式在内的接下来的四个模式,都是类和类之间的关系,不涉及到继承。
观察者模式很好理解,类似于邮件订阅和RSS订阅,当我们浏览一些博客或wiki时,经常会看到RSS图标,就这的意思是,当你订阅了该文章,如果后续有更新,会及时通知你。其实,简单来讲就一句话:当一个对象变化时,其它依赖该对象的对象都会收到通知,并且随着变化!对象之间是一种一对多的关系。
|
1
2
3
4
5
|
package
com.model.behaviour;
public
interface
Observer {
public
void
update();
}
|
|
1
2
3
4
5
6
7
8
9
|
package
com.model.behaviour;
public
class
Observer1
implements
Observer {
@Override
public
void
update() {
System.out.println(
"observer1 has received!"
);
}
}
|
|
1
2
3
4
5
6
7
8
9
10
|
package
com.model.behaviour;
public
class
Observer2
implements
Observer {
@Override
public
void
update() {
System.out.println(
"observer2 has received!"
);
}
}
|
|
1
2
3
4
5
6
7
8
9
10
11
12
13
14
15
16
|
package
com.model.behaviour;
public
interface
Subject {
/*增加观察者*/
public void add(Observer observer);
/*删除观察者*/
public void del(Observer observer);
/*通知所有的观察者*/
public void notifyObservers();
/*自身的操作*/
public
void
operation();
}
|
|
1
2
3
4
5
6
7
8
9
10
11
12
13
14
15
16
17
18
19
20
21
22
23
24
25
26
|
package
com.model.behaviour;
import
java.util.Enumeration;
import
java.util.Vector;
public
abstract
class
AbstractSubject
implements
Subject {
private
Vector<Observer> vector =
new
Vector<Observer>();
@Override
public
void
add(Observer observer) {
vector.add(observer);
}
@Override
public
void
del(Observer observer) {
vector.remove(observer);
}
@Override
public
void
notifyObservers() {
Enumeration<Observer> enumo = vector.elements();
while
(enumo.hasMoreElements()){
enumo.nextElement().update();
}
}
}
|
|
1
2
3
4
5
6
7
8
9
10
11
|
package
com.model.behaviour;
public
class
MySubject
extends
AbstractSubject {
@Override
public
void
operation() {
System.out.println(
"update self!"
);
notifyObservers();
}
}
|
|
1
2
3
4
5
6
7
8
9
10
11
12
13
|
package
com.model.behaviour;
public
class
ObserverTest {
public
static
void
main(String[] args) {
Subject sub =
new
MySubject();
sub.add(
new
Observer1());
sub.add(
new
Observer2());
sub.operation();
}
}
|
运行结果:
|
1
2
3
|
update self!
observer1 has received!
observer2 has received!
|
也许看完实例之后还是比较抽象,再将文字描述和代码实例看一两遍吧,然后结合工作中看哪些场景可以使用这种模式以加深理解。
四、迭代子模式
顾名思义,迭代器模式就是顺序访问聚集中的对象,一般来说,集合中非常常见,如果对集合类比较熟悉的话,理解本模式会十分轻松。这句话包含两层意思:一是需要遍历的对象,即聚集对象,二是迭代器对象,用于对聚集对象进行遍历访问。
具体来看看代码实例:
|
1
2
3
4
5
6
7
8
9
10
11
12
|
package
com.model.behaviour;
public
interface
Collection {
public
Iterator iterator();
/* 取得集合元素 */
public Object get(int i);
/* 取得集合大小 */
public
int
size();
}
|
|
1
2
3
4
5
6
7
8
9
10
11
12
13
14
|
package
com.model.behaviour;
public
interface
Iterator {
// 前移
public
Object previous();
// 后移
public
Object next();
public
boolean
hasNext();
// 取得第一个元素
public
Object first();
}
|
|
1
2
3
4
5
6
7
8
9
10
11
12
13
14
15
16
17
18
19
20
21
|
package
com.model.behaviour;
public
class
MyCollection
implements
Collection {
public
String string[] = {
"A"
,
"B"
,
"C"
,
"D"
,
"E"
};
@Override
public
Iterator iterator() {
return
new
MyIterator(
this
);
}
@Override
public
Object get(
int
i) {
return
string[i];
}
@Override
public
int
size() {
return
string.length;
}
}
|
|
1
2
3
4
5
6
7
8
9
10
11
12
13
14
15
16
17
18
19
20
21
22
23
24
25
26
27
28
29
30
31
32
33
34
35
36
37
38
39
40
41
42
43
|
package
com.model.behaviour;
public
class
MyIterator
implements
Iterator {
private
Collection collection;
private
int
pos = -
1
;
public
MyIterator(Collection collection){
this
.collection = collection;
}
@Override
public
Object previous() {
if
(pos >
0
){
pos--;
}
return
collection.get(pos);
}
@Override
public
Object next() {
if
(pos<collection.size()-
1
){
pos++;
}
return
collection.get(pos);
}
@Override
public
boolean
hasNext() {
if
(pos<collection.size()-
1
){
return
true
;
}
else
{
return
false
;
}
}
@Override
public
Object first() {
pos =
0
;
return
collection.get(pos);
}
}
|
|
1
2
3
4
5
6
7
8
9
10
11
12
|
package
com.model.behaviour;
public
class
Test {
public
static
void
main(String[] args) {
Collection collection =
new
MyCollection();
Iterator it = (Iterator) collection.iterator();
while
(it.hasNext()){
System.out.println(it.next());
}
}
}
|
输出结果:
|
1
2
3
4
5
|
A
B
C
D
E
|
此处我们貌似模拟了一个集合类的过程,感觉是不是很爽?其实JDK中各个类也都是这些基本的东西,加一些设计模式,再加一些优化放到一起的,只要我们把这些东西学会了,掌握好了,我们也可以写出自己的集合类,甚至框架!
五、责任链模式
责任链模式,有多个对象,每个对象持有对下一个对象的引用,这样就会形成一条链,请求在这条链上传递,直到某一对象决定处理该请求。但是发出者并不清楚到底最终那个对象会处理该请求,所以,责任链模式可以实现,在隐瞒客户端的情况下,对系统进行动态的调整。
|
1
2
3
4
5
|
package
com.model.behaviour;
public
interface
Handler {
public
void
operator();
}
|
|
1
2
3
4
5
6
7
8
9
10
11
12
13
14
15
|
package
com.model.behaviour;
public
abstract
class
AbstractHandler {
private
Handler handler;
public
Handler getHandler() {
return
handler;
}
public
void
setHandler(Handler handler) {
this
.handler = handler;
}
}
|
|
1
2
3
4
5
6
7
8
9
10
11
12
13
14
15
16
17
18
|
package
com.model.behaviour;
public
class
MyHandler
extends
AbstractHandler
implements
Handler {
private
String name;
public
MyHandler(String name) {
this
.name = name;
}
@Override
public
void
operator() {
System.out.println(name +
"deal!"
);
if
(getHandler() !=
null
) {
getHandler().operator();
}
}
}
|
|
1
2
3
4
5
6
7
8
9
10
11
12
13
14
15
|
package
com.model.behaviour;
public
class
Test {
public
static
void
main(String[] args) {
MyHandler h1 =
new
MyHandler(
"h1"
);
MyHandler h2 =
new
MyHandler(
"h2"
);
MyHandler h3 =
new
MyHandler(
"h3"
);
h1.setHandler(h2);
h2.setHandler(h3);
h1.operator();
}
}
|
运行结果:
|
1
2
3
|
h1deal!
h2deal!
h3deal!
|
此处强调一点就是,链接上的请求可以是一条链,可以是一个树,还可以是一个环,模式本身不约束这个,需要我们自己去实现,同时,在一个时刻,命令只允许由一个对象传给另一个对象,而不允许传给多个对象。
六、命令模式
命令模式很好理解,举个例子,司令员下令让士兵去干件事情,从整个事情的角度来考虑,司令员的作用是,发出口令,口令经过传递,传到了士兵耳朵里,士兵去执行。这个过程好在,三者相互解耦,任何一方都不用去依赖其他人,只需要做好自己的事儿就行,司令员要的是结果,不会去关注到底士兵是怎么实现的。
|
1
2
3
4
5
|
package
com.model.behaviour;
public
interface
Command {
public
void
exe();
}
|
|
1
2
3
4
5
6
7
8
9
10
11
12
13
14
15
|
package
com.model.behaviour;
public
class
MyCommand
implements
Command {
private
Receiver receiver;
public
MyCommand(Receiver receiver) {
this
.receiver = receiver;
}
@Override
public
void
exe() {
receiver.action();
}
}
|
|
1
2
3
4
5
6
7
8
9
10
11
12
13
14
|
package
com.model.behaviour;
public
class
Invoker {
private
Command command;
public
Invoker(Command command) {
this
.command = command;
}
public
void
action() {
command.exe();
}
}
|
|
1
2
3
4
5
6
7
8
9
10
11
|
package
com.model.behaviour;
public
class
Test {
public
static
void
main(String[] args) {
Receiver receiver =
new
Receiver();
Command cmd =
new
MyCommand(receiver);
Invoker invoker =
new
Invoker(cmd);
invoker.action();
}
}
|
命令模式的目的就是达到命令的发出者和执行者之间解耦,实现请求和执行分开,熟悉Struts的同学应该知道,Struts其实就是一种将请求和呈现分离的技术,其中必然涉及命令模式的思想!
七、备忘录模式
主要目的是保存一个对象的某个状态,以便在适当的时候恢复对象,个人觉得叫备份模式更形象些,通俗的讲下:假设有原始类A,A中有各种属性,A可以决定需要备份的属性,备忘录类B是用来存储A的一些内部状态,类C呢,就是一个用来存储备忘录的,且只能存储,不能修改等操作。
|
1
2
3
4
5
6
7
8
9
10
11
12
13
14
15
16
17
18
19
20
21
22
23
24
25
26
|
package
com.model.behaviour;
public
class
Original {
private
String value;
public
String getValue() {
return
value;
}
public
void
setValue(String value) {
this
.value = value;
}
public
Original(String value) {
this
.value = value;
}
public
Memento createMemento(){
return
new
Memento(value);
}
public
void
restoreMemento(Memento memento){
this
.value = memento.getValue();
}
}
|
|
1
2
3
4
5
6
7
8
9
10
11
12
13
14
15
16
17
18
|
package
com.model.behaviour;
public
class
Memento {
private
String value;
public
Memento(String value) {
this
.value = value;
}
public
String getValue() {
return
value;
}
public
void
setValue(String value) {
this
.value = value;
}
}
|
|
1
2
3
4
5
6
7
8
9
10
11
12
13
14
15
16
17
18
|
package
com.model.behaviour;
public
class
Storage {
private
Memento memento;
public
Storage(Memento memento) {
this
.memento = memento;
}
public
Memento getMemento() {
return
memento;
}
public
void
setMemento(Memento memento) {
this
.memento = memento;
}
}
|
|
1
2
3
4
5
6
7
8
9
10
11
12
13
14
15
16
17
18
19
20
21
22
|
package
com.model.behaviour;
public
class
Test {
public
static
void
main(String[] args) {
// 创建原始类
Original origi =
new
Original(
"egg"
);
// 创建备忘录
Storage storage =
new
Storage(origi.createMemento());
// 修改原始类的状态
System.out.println(
"初始化状态为:"
+ origi.getValue());
origi.setValue(
"niu"
);
System.out.println(
"修改后的状态为:"
+ origi.getValue());
// 回复原始类的状态
origi.restoreMemento(storage.getMemento());
System.out.println(
"恢复后的状态为:"
+ origi.getValue());
}
}
|
输出结果:
|
1
2
3
|
初始化状态为:egg
修改后的状态为:niu
恢复后的状态为:egg
|
如果还不能理解,可以给Original类添加一个属性name,然后其他类进行相应的修改试试。
八、状态模式
核心思想就是:当对象的状态改变时,同时改变其行为,很好理解!就拿QQ来说,有几种状态,在线、隐身、忙碌等,每个状态对应不同的操作,而且你的好友也能看到你的状态,所以,状态模式就两点:1、可以通过改变状态来获得不同的行为。2、你的好友能同时看到你的变化。
|
1
2
3
4
5
6
7
8
9
10
11
12
13
14
15
16
17
18
19
20
21
22
|
package
com.model.behaviour;
public
class
State {
private
String value;
public
String getValue() {
return
value;
}
public
void
setValue(String value) {
this
.value = value;
}
public
void
method1(){
System.out.println(
"execute the first opt!"
);
}
public
void
method2(){
System.out.println(
"execute the second opt!"
);
}
}
|
|
1
2
3
4
5
6
7
8
9
10
11
12
13
14
15
16
17
18
19
20
21
22
23
24
25
26
27
|
package
com.model.behaviour;
public
class
Context {
private
State state;
public
Context(State state) {
this
.state = state;
}
public
State getState() {
return
state;
}
public
void
setState(State state) {
this
.state = state;
}
public
void
method() {
System.out.println(
"状态为:"
+ state.getValue());
if
(state.getValue().equals(
"state1"
)) {
state.method1();
}
else
if
(state.getValue().equals(
"state2"
)) {
state.method2();
}
}
}
|
|
1
2
3
4
5
6
7
8
9
10
11
12
13
14
15
16
17
18
|
package
com.model.behaviour;
public
class
Test {
public
static
void
main(String[] args) {
State state =
new
State();
Context context =
new
Context(state);
//设置第一种状态
state.setValue(
"state1"
);
context.method();
//设置第二种状态
state.setValue(
"state2"
);
context.method();
}
}
|
运行结果:
|
1
2
3
4
|
状态为:state1
execute the first opt!
状态为:state2
execute the second opt!
|
根据这个特性,状态模式在日常开发中用的挺多的,尤其是做网站的时候,我们有时希望根据对象的某一属性,区别开他们的一些功能,比如说简单的权限控制等。
九、访问者模式
访问者模式把数据结构和作用于结构上的操作解耦合,使得操作集合可相对自由地演化。访问者模式适用于数据结构相对稳定算法又易变化的系统。因为访问者模式使得算法操作增加变得容易。若系统数据结构对象易于变化,经常有新的数据对象增加进来,则不适合使用访问者模式。访问者模式的优点是增加操作很容易,因为增加操作意味着增加新的访问者。访问者模式将有关行为集中到一个访问者对象中,其改变不影响系统数据结构。其缺点就是增加新的数据结构很困难。
访问者模式算是最复杂也是最难以理解的一种模式了。它表示一个作用于某对象结构中的各元素的操作。它使你可以在不改变各元素类的前提下定义作用于这些元素的新操作。
涉及角色:
1.Visitor 抽象访问者角色,为该对象结构中具体元素角色声明一个访问操作接口。该操作接口的名字和参数标识了发送访问请求给具体访问者的具体元素角色,这样访问者就可以通过该元素角色的特定接口直接访问它。
2.ConcreteVisitor.具体访问者角色,实现Visitor声明的接口。
3.Element 定义一个接受访问操作(accept()),它以一个访问者(Visitor)作为参数。
4.ConcreteElement 具体元素,实现了抽象元素(Element)所定义的接受操作接口。
5.ObjectStructure 结构对象角色,这是使用访问者模式必备的角色。它具备以下特性:能枚举它的元素;可以提供一个高层接口以允许访问者访问它的元素;如有需要,可以设计成一个复合对象或者一个聚集(如一个列表或无序集合)。
|
1
2
3
4
5
|
abstract
class
Element
{
public
abstract
void
accept(IVisitor visitor);
public
abstract
void
doSomething();
}
|
|
1
2
3
4
5
6
7
8
|
class
ConcreteElement1
extends
Element{
public
void
doSomething(){
System.out.println(
"这是元素1"
);
}
public
void
accept(IVisitor visitor){
visitor.visit(
this
);
}
}
|
|
1
2
3
4
5
6
7
8
|
class
ConcreteElement2
extends
Element{
public
void
doSomething(){
System.out.println(
"这是元素2"
);
}
public
void
accept(IVisitor visitor){
visitor.visit(
this
);
}
}
|
|
1
2
3
4
|
interface
IVisitor{
public
void
visit(ConcreteElement1el1);
public
void
visit(ConcreteElement2el2);
}
|
|
1
2
3
4
5
6
7
8
|
class
Visitor
implements
IVisitor{
public
void
visit(ConcreteElement1 el1){
el1.doSomething();
}
public
void
visit(ConcreteElement2 el2){
el2.doSomething();
}
}
|
|
1
2
3
4
5
6
7
8
9
10
11
12
13
14
15
|
class
ObjectStruture{
public
static
List<Element> getList(){
List<Element>list =
new
ArrayList<Element>();
Random ran = newRandom();
for
(
int
i =
0
; i <
10
; i ++){
int
a=ran.nextInt(
100
);
if
(a>
50
){
list.add (newConcreteElement1());
}
else
{
list.add (newConcreteElement2());
}
}
return
list;
}
}
|
|
1
2
3
4
5
6
7
8
|
public
class
Client{
public
static
void
main (String[]args){
List<Element> list = ObjectStruture.getList();
for
(Elemente:list){
e.accept(newVisitor());
}
}
}
|
十、中介者模式
中介者模式(Mediator):用一个中介对象来封装一系列的对象交互。中介者使各对象不需要显式地相互引用,从而使其耦合松散,而且可以独立地改变它们之间的交互。
举例:在一个公司里面,有很多部门、员工(我们统称他们互相为Colleague“同事”),为了完成一定的任务,“同事”之间肯定有许多需要互相配合、交流的过程。如果由各个“同事”频繁地到处去与自己有关的“同事”沟通,这样肯定会形成一个多对多的杂乱的联系网络而造成工作效率低下。
此时就需要一位专门的“中介者”给各个“同事”分配任务,以及统一跟进大家的进度并在“同事”之间实时地进行交互,保证“同事”之间必须的沟通交流。很明显我们知道此时的“中介者”担任了沟通“同事”彼此之间的重要角色了,“中介者”使得每个“同事”都变成一对一的联系方式,减轻了每个“同事”的负担,增强工作效率。
同事类族:
|
1
2
3
4
5
6
7
8
9
10
11
12
13
14
15
16
17
18
|
package
com.model.behaviour;
public
abstract
class
AbstractColleague {
protected
AbstractMediator mediator;
/**既然有中介者,那么每个具体同事必然要与中介者有联系,
* 否则就没必要存在于 这个系统当中,这里的构造函数相当
* 于向该系统中注册一个中介者,以取得联系
*/
public
AbstractColleague(AbstractMediator mediator) {
this
.mediator = mediator;
}
// 在抽象同事类中添加用于与中介者取得联系(即注册)的方法
public
void
setMediator(AbstractMediator mediator) {
this
.mediator = mediator;
}
}
|
|
1
2
3
4
5
6
7
8
9
10
11
12
13
14
15
16
17
18
19
20
21
|
//具体同事A
package
com.model.behaviour;
public
class
ColleagueA
extends
AbstractColleague {
//每个具体同事都通过父类构造函数与中介者取得联系
public
ColleagueA(AbstractMediator mediator) {
super
(mediator);
}
//每个具体同事必然有自己分内的事,没必要与外界相关联
public
void
self() {
System.out.println(
"同事A --> 做好自己分内的事情 ..."
);
}
//每个具体同事总有需要与外界交互的操作,通过中介者来处理这些逻辑并安排工作
public
void
out() {
System.out.println(
"同事A --> 请求同事B做好分内工作 ..."
);
super
.mediator.execute(
"ColleagueB"
,
"self"
);
}
}
|
|
1
2
3
4
5
6
7
8
9
10
11
12
13
14
15
16
17
18
|
//具体同事B
package
com.model.behaviour;
public
class
ColleagueB
extends
AbstractColleague {
public
ColleagueB(AbstractMediator mediator) {
super
(mediator);
}
public
void
self() {
System.out.println(
"同事B --> 做好自己分内的事情 ..."
);
}
public
void
out() {
System.out.println(
"同事B --> 请求同事A做好分内工作 ..."
);
super
.mediator.execute(
"ColleagueA"
,
"self"
);
}
}
|
中介者类族:
|
1
2
3
4
5
6
7
8
9
10
11
12
13
14
15
16
17
18
19
20
|
package
com.model.behaviour;
public
abstract
class
AbstractMediator {
//中介者肯定需要保持有若干同事的联系方式
protected
Hashtable<String, AbstractColleague> colleagues =
new
Hashtable<String, AbstractColleague>();
//中介者可以动态地与某个同事建立联系
public
void
addColleague(String name, AbstractColleague c) {
this
.colleagues.put(name, c);
}
//中介者也可以动态地撤销与某个同事的联系
public
void
deleteColleague(String name) {
this
.colleagues.remove(name);
}
//中介者必须具备在同事之间处理逻辑、分配任务、促进交流的操作
public
abstract
void
execute(String name, String method);
}
|
|
1
2
3
4
5
6
7
8
9
10
11
12
13
14
15
16
17
18
19
20
21
22
23
24
25
26
27
|
//具体中介者
package
com.model.behaviour;
public
class
Mediator
extends
AbstractMediator{
//中介者最重要的功能,来回奔波与各个同事之间
public
void
execute(String name, String method) {
if
(
"self"
.equals(method)){
//各自做好分内事
if
(
"ColleagueA"
.equals(name)) {
ColleagueA colleague = (ColleagueA)
super
.colleagues.get(
"ColleagueA"
);
colleague.self();
}
else
{
ColleagueB colleague = (ColleagueB)
super
.colleagues.get(
"ColleagueB"
);
colleague.self();
}
}
else
{
//与其他同事合作
if
(
"ColleagueA"
.equals(name)) {
ColleagueA colleague = (ColleagueA)
super
.colleagues.get(
"ColleagueA"
);
colleague.out();
}
else
{
ColleagueB colleague = (ColleagueB)
super
.colleagues.get(
"ColleagueB"
);
colleague.out();
}
}
}
}
|
测试类:
|
1
2
3
4
5
6
7
8
9
10
11
12
13
14
15
16
17
18
19
20
21
22
23
24
25
26
27
|
//测试类
package
com.model.behaviour;
public
class
Client {
public
static
void
main(String[] args) {
//创建一个中介者
AbstractMediator mediator =
new
Mediator();
//创建两个同事
ColleagueA colleagueA =
new
ColleagueA(mediator);
ColleagueB colleagueB =
new
ColleagueB(mediator);
//中介者分别与每个同事建立联系
mediator.addColleague(
"ColleagueA"
, colleagueA);
mediator.addColleague(
"ColleagueB"
, colleagueB);
//同事们开始工作
colleagueA.self();
colleagueA.out();
System.out.println(
"======================合作愉快,任务完成!\n"
);
colleagueB.self();
colleagueB.out();
System.out.println(
"======================合作愉快,任务完成!"
);
}
}
|
运行结果:
|
1
2
3
4
5
6
7
8
9
|
同事A --> 做好自己分内的事情 ...
同事A --> 请求同事B做好分内工作 ...
同事B --> 做好自己分内的事情 ...
======================合作愉快,任务完成!
同事B --> 做好自己分内的事情 ...
同事B --> 请求同事A做好分内工作 ...
同事A --> 做好自己分内的事情 ...
======================合作愉快,任务完成!
|
十一、解释器模式
解释器模式:给定一种语言,定义他的文法的一种表示,并定义一个解释器,该解释器使用该表示来解释语言中句子。
解释器模式是一个比较少用的模式。
|
1
2
3
4
5
6
7
8
9
10
11
12
13
14
15
16
17
18
19
20
21
22
23
24
25
26
27
28
29
|
package
com.model.behaviour;
public
class
Context {
private
int
num1;
private
int
num2;
public
Context(
int
num1,
int
num2) {
this
.num1 = num1;
this
.num2 = num2;
}
public
int
getNum1() {
return
num1;
}
public
void
setNum1(
int
num1) {
this
.num1 = num1;
}
public
int
getNum2() {
return
num2;
}
public
void
setNum2(
int
num2) {
this
.num2 = num2;
}
}
|
|
1
2
3
4
5
|
package
com.model.behaviour;
public
interface
Expression {
public
int
interpret(Context context);
}
|
|
1
2
3
4
5
6
7
8
9
|
package
com.model.behaviour;
public
class
Minus
implements
Expression {
@Override
public
int
interpret(Context context) {
return
context.getNum1()-context.getNum2();
}
}
|
|
1
2
3
4
5
6
7
8
9
|
package
com.model.behaviour;
public
class
Plus
implements
Expression {
@Override
public
int
interpret(Context context) {
return
context.getNum1()+context.getNum2();
}
}
|
|
1
2
3
4
5
6
7
8
9
10
11
|
package
com.model.behaviour;
public
class
Test {
public
static
void
main(String[] args) {
// 计算9+2-8的值
int
result =
new
Minus().interpret((
new
Context(
new
Plus()
.interpret(
new
Context(
9
,
2
)),
8
)));
System.out.println(result);
}
}
|


 2097
2097

 被折叠的 条评论
为什么被折叠?
被折叠的 条评论
为什么被折叠?
 到【灌水乐园】发言


