阴影
three.js中使用的是阴影贴图,阴影贴图的工作方式就是具有投射阴影的光能对所有能被投射阴影的物体从光源渲染阴影。- 注意事项:
- 每多一个能投射阴影光源,就会重复绘制一次场景。阴影的计算是一个光源一个光源的依次计算的。
- 要展示阴影需要,渲染器开启阴影渲染、灯光投开启投射阴影、物体开启接收阴影
- 只有
DirectionalLight、PointLight、RectAreaLight、SpotLight这4种光源才能投谁阴影。 MeshLambertMaterial材质是不能接受投射阴影的。
展示阴影
<!DOCTYPE html>
<html lang="en">
<head>
<meta charset="UTF-8" />
<title>学习</title>
</head>
<body>
<canvas id="c2d" class="c2d" width="1000" height="500"></canvas>
<script type="module">
import * as THREE from 'https://threejs.org/build/three.module.js'
import { OrbitControls } from 'https://threejsfundamentals.org/threejs/resources/threejs/r132/examples/jsm/controls/OrbitControls.js'
const canvas = document.querySelector('#c2d')
const renderer = new THREE.WebGLRenderer({ canvas })
const fov = 40
const aspect = 2
const near = 0.1
const far = 1000
const camera = new THREE.PerspectiveCamera(fov, aspect, near, far)
camera.position.set(0, 50, 50)
camera.lookAt(0, 0, 0)
const controls = new OrbitControls(camera, canvas)
controls.update()
const scene = new THREE.Scene()
function render() {
renderer.render(scene, camera)
requestAnimationFrame(render)
}
requestAnimationFrame(render)
</script>
</body>
</html>
开启阴影想过配置
renderer.shadowMap.enabled = true;
添加灯光并开启投射阴影
{
const color = 0xffffff
const intensity = 2
const light = new THREE.DirectionalLight(color, intensity)
light.castShadow = true
light.position.set(10, 10, 10)
light.target.position.set(-4, 0, -4)
scene.add(light)
scene.add(light.target)
const helper = new THREE.DirectionalLightHelper(light)
scene.add(helper)
}
绘制物体开启接收阴影
{
const groundGeometry = new THREE.PlaneGeometry(50, 50)
const groundMaterial = new THREE.MeshPhongMaterial({ color: 0xcc8866, side: THREE.DoubleSide })
const groundMesh = new THREE.Mesh(groundGeometry, groundMaterial)
groundMesh.rotation.x = Math.PI * -0.5
groundMesh.receiveShadow = true
scene.add(groundMesh)
}
{
const cubeSize = 4
const cubeGeo = new THREE.BoxGeometry(cubeSize, cubeSize, cubeSize)
const cubeMat = new THREE.MeshPhongMaterial({ color: '#8AC' })
const mesh = new THREE.Mesh(cubeGeo, cubeMat)
mesh.castShadow = true
mesh.receiveShadow = true
mesh.position.set(cubeSize + 1, cubeSize / 2, 0)
scene.add(mesh)
}
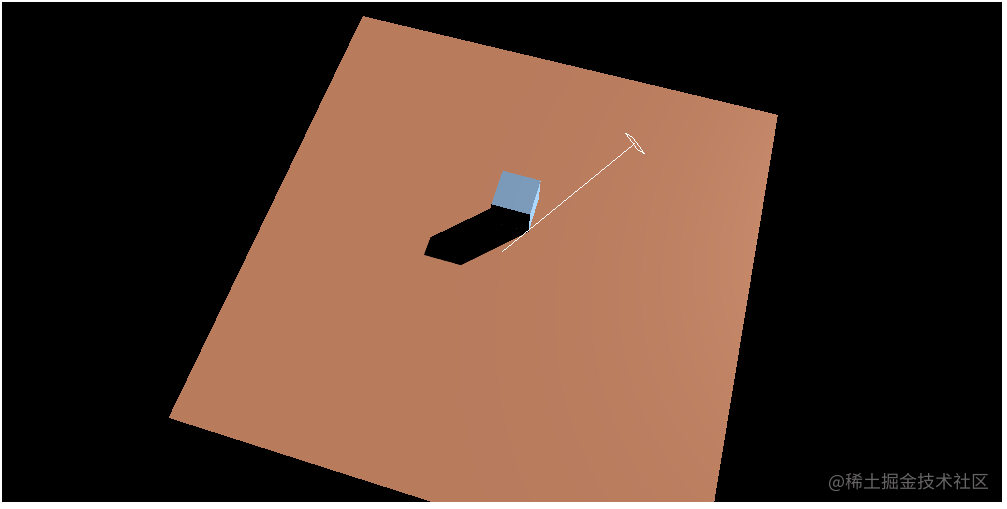
- 从结果中看,阴影少了一部分。是因为光源阴影相机决定了阴影投射的区域。使用
.CameraHelper(light.shadow.camera)来获取光源的阴影相机的辅助线。
    const cameraHelper = new THREE.CameraHelper(light.shadow.camera)
    scene.add(cameraHelper)

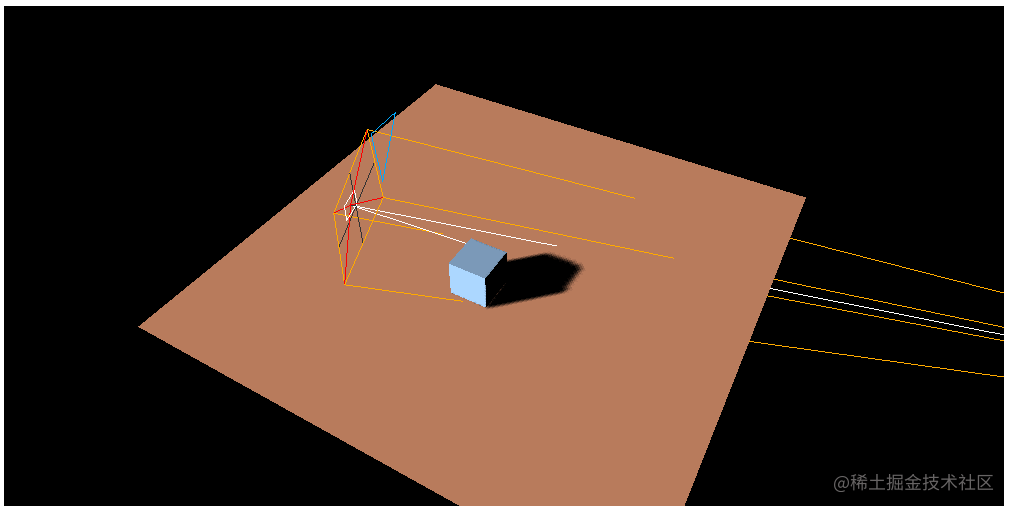
设置阴影相机
- 通过设置
light.shadow.camera修改阴影相机的区域。
    const d = 50
    light.shadow.camera.left = -d
    light.shadow.camera.right = d
    light.shadow.camera.top = d
    light.shadow.camera.bottom = -d
    light.shadow.camera.near = 1
    light.shadow.camera.far = 60
总结
- 需要注意,每添加一个光源到场景中,都会降低
three.js 渲染场景的速度,所以应该尽量使用最少的资源来实现想要的效果。 - 还有一种实现阴影的效果就是使用光照贴图或者环境光贴图,预先计算离线照明的效果。根据物体里地面的高低来控制光照贴图的透明度实现阴影变化,这种方式能加快
three.js 渲染场景的速度。后面在详细讲解。


 390
390

 被折叠的 条评论
为什么被折叠?
被折叠的 条评论
为什么被折叠?
 到【灌水乐园】发言


