


简介
本节主要使用几何体和贴图来绘制一个房子,通过模型导入来加载一个冰墩墩在门口。
开始绘制
基础代码
<!DOCTYPE html>
<html lang="en">
  <head>
    <meta charset="UTF-8" />
    <title>学习</title>
  </head>
  <body>
    <canvas id="c2d" class="c2d" width="1000" height="500"></canvas>
    <script type="module">
      import * as THREE from './file/three.js-dev/build/three.module.js'
      import { OrbitControls } from './file/three.js-dev/examples/jsm/controls/OrbitControls.js'

      const canvas = document.querySelector('#c2d')
      // 渲染器
      const renderer = new THREE.WebGLRenderer({ canvas })

      const fov = 40 // 视野范围
      const aspect = 2 // 相机默认值 画布的宽高比
      const near = 0.1 // 近平面
      const far = 10000 // 远平面
      // 透视投影相机
      const camera = new THREE.PerspectiveCamera(fov, aspect, near, far)
      camera.position.set(1000, 500, 1500)
      camera.lookAt(0, 0, 0)
      // 控制相机
      const controls = new OrbitControls(camera, canvas)
      controls.update()

      // 场景
      const scene = new THREE.Scene()

      // 渲染
      function render() {
        renderer.render(scene, camera)
        requestAnimationFrame(render)
      }
      requestAnimationFrame(render)
    </script>
  </body>
</html>
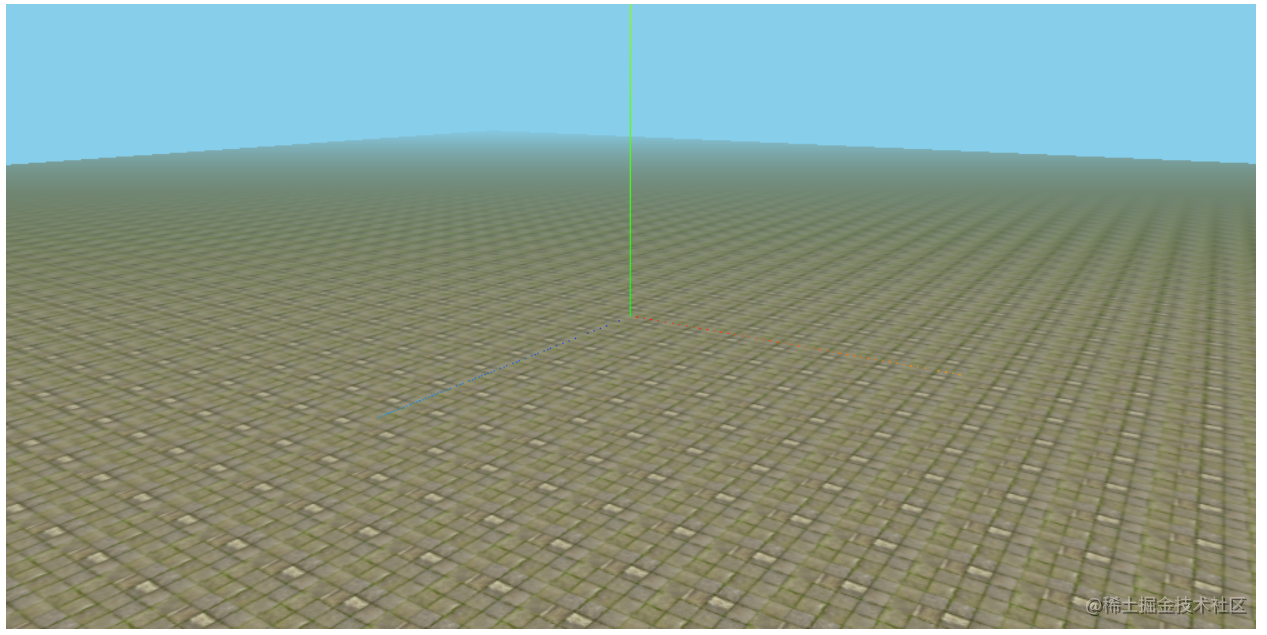
绘制地面
- 添加
.AxisHelper()增加坐标轴辅助,方便绘制几何体时定位。
      // 辅助
      const axes = new THREE.AxisHelper(700)
      scene.add(axes)
- 添加光源,增强场景立体感。
      {
        // 灯光
        const skyColor = 0xffffff // 天空 白色
        const groundColor = 0x000000 // 地面 黑色
        const intensity = 1
        const light = new THREE.HemisphereLight(skyColor, groundColor, intensity)
        scene.add(light)
      }
- 通过
.TextureLoader加载地面纹理,添加到平面几何体上,旋转平面几,地面就绘制好了。
      {
        const loader = new THREE.TextureLoader()
        const texture = loader.load('./file/23/1.jpg')
        texture.wrapS = THREE.RepeatWrapping
        texture.wrapT = THREE.RepeatWrapping
        texture.magFilter = THREE.NearestFilter
        // 纹理 重复
        texture.repeat.set(100, 100)

        const planeGeo = new THREE.PlaneGeometry(10000, 10000)
        const planeMat = new THREE.MeshPhongMaterial({
          map: texture,
          side: THREE.DoubleSide
        })
        const mesh = new THREE.Mesh(planeGeo, planeMat)
        mesh.rotation.x = Math.PI * -0.5

        scene.add(mesh)
      }

- 背景是黑色的让场景不太协调,添加背景色和雾的效果。
  // 背景
  scene.background = new THREE.Color(0x87ceeb)
  // 雾
  scene.fog = new THREE.Fog(0x87ceeb, 200, 10000)
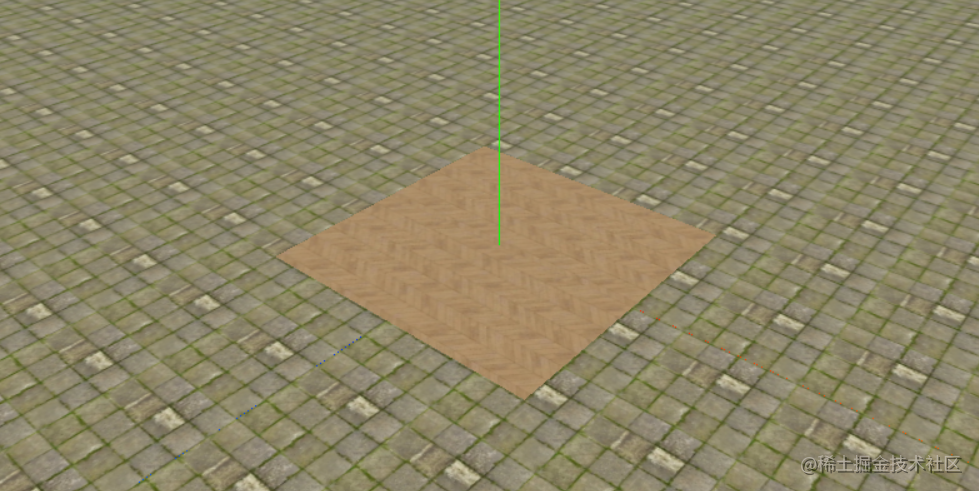
绘制房子
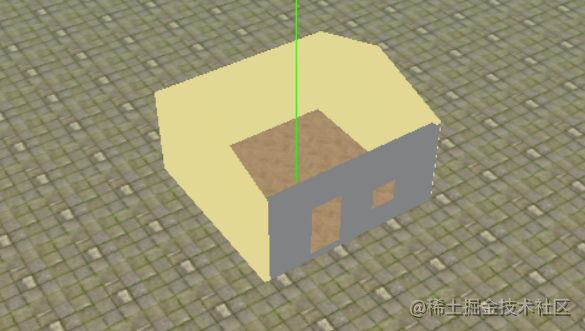
- 使用绘制地面的方式,绘制房子的地板。
      {
        // 地板
        const loader = new THREE.TextureLoader()
        const texture = loader.load('./file/23/2.jpg')
        texture.wrapS = THREE.RepeatWrapping
        texture.wrapT = THREE.RepeatWrapping
        texture.magFilter = THREE.NearestFilter
        texture.repeat.set(2, 2)
        const planeGeo = new THREE.PlaneGeometry(300, 300)
        const planeMat = new THREE.MeshPhongMaterial({
          map: texture,
          side: THREE.DoubleSide
        })
        const mesh = new THREE.Mesh(planeGeo, planeMat)
        mesh.rotation.x = Math.PI * -0.5
        mesh.position.y = 1
        scene.add(mesh)
      }
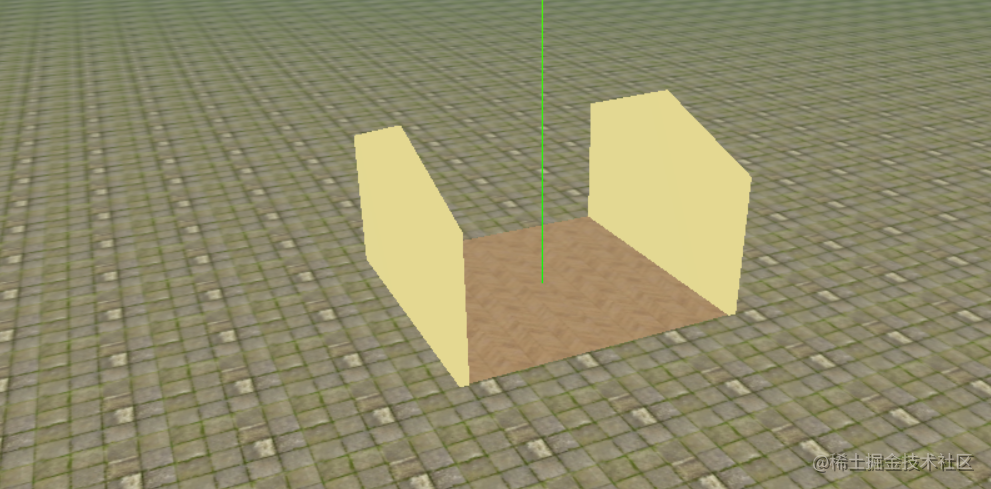
- 绘制后墙和左右墙。可以使用立方体绘制墙或则,使用
.Shape()绘制墙的形状,在使用.ExtrudeGeometry()拉伸为三维图形。
- 添加
.ExtrudeGeometry()的全局配置
// 拉伸配置
const extrudeSettings = {
    amount: 8,
    bevelSegments: 2,
    steps: 2,
    bevelSize: 1,
    bevelThickness: 1
}
- 左右墙形状是相同的可以创建公用方法,多次调用绘制。
      {
        // 绘制左右墙
        function wallAdd() {
          const shape = new THREE.Shape() // 用Shape类绘制二维形状
          shape.moveTo(-150, 0) // 绘制方法类似canvas中的绘制方法
          shape.lineTo(150, 0)
          shape.lineTo(150, 150)
          shape.lineTo(0, 200)
          shape.lineTo(-150, 150)

          const extrudeGeometry = new THREE.ExtrudeGeometry(shape, extrudeSettings)

          var material = new THREE.MeshBasicMaterial({ color: 0xe5d890 })
          const sideWall = new THREE.Mesh(extrudeGeometry, material)
          sideWall.position.y = 1
          return sideWall
        }
        const sideWall = wallAdd()
        const sideWall2 = wallAdd()
        sideWall.position.z = -150
        sideWall2.position.z = 150

        scene.add(sideWall)
        scene.add(sideWall2)
      }
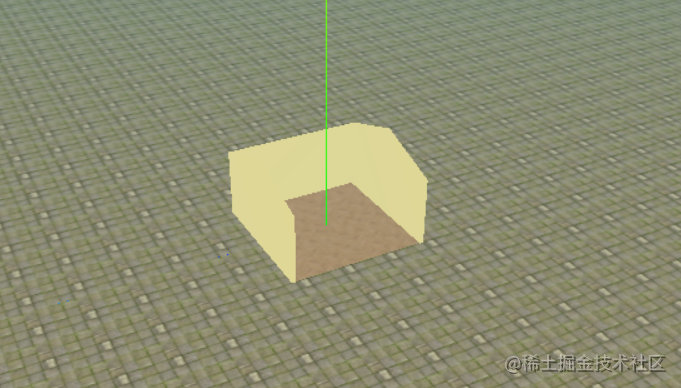
- 绘制后墙,主要注意坐标的位置能合在一起。
      {
        // 后墙
        const shape = new THREE.Shape()
        shape.moveTo(-150, 0)
        shape.lineTo(150, 0)
        shape.lineTo(150, 150)
        shape.lineTo(-150, 150)

        const extrudeGeometry = new THREE.ExtrudeGeometry(shape, extrudeSettings)

        const material = new THREE.MeshBasicMaterial({ color: 0xe5d890 })
        const backWall = new THREE.Mesh(extrudeGeometry, material)

        backWall.position.x = -150
        backWall.position.y = 1
        backWall.rotation.y = Math.PI * 0.5

        scene.add(backWall)
      }
- 绘制前墙,前墙有门和窗户就需要使用
.Shape()的.holes属性来挖洞。
        {
          // 前墙
          const shape = new THREE.Shape()
          shape.moveTo(-150, 0)
          shape.lineTo(150, 0)
          shape.lineTo(150, 150)
          shape.lineTo(-150, 150)

          const shape_a = new THREE.Path()
          shape_a.moveTo(30, 30)
          shape_a.lineTo(80, 30)
          shape_a.lineTo(80, 80)
          shape_a.lineTo(30, 80)
          shape_a.lineTo(30, 30)
          shape.holes.push(shape_a)

          const shape_b = new THREE.Path()
          shape_b.moveTo(-20, 0)
          shape_b.lineTo(-20, 100)
          shape_b.lineTo(-80, 100)
          shape_b.lineTo(-80, 0)
          shape_b.lineTo(-20, 0)
          shape.holes.push(shape_b)

          const extrudeGeometry = new THREE.ExtrudeGeometry(shape, extrudeSettings)

          const material = new THREE.MeshBasicMaterial({ color: 'grey' })
          const backWall = new THREE.Mesh(extrudeGeometry, material)

          backWall.position.x = 143
          backWall.position.y = 1
          backWall.rotation.y = Math.PI * 0.5

          scene.add(backWall)
        }
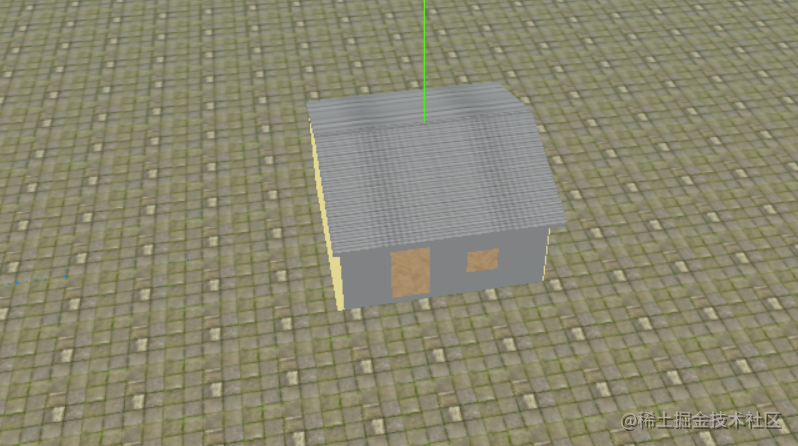
- 最后就是房顶了,使用
BoxGeometry()绘制两个几何体,加上贴图。在旋转和位移到适合的位置就好了。
      {
        // 房顶
        function roof() {
          const roofGeometry = new THREE.BoxGeometry(200, 320, 10)
          const loader = new THREE.TextureLoader()
          const roofTexture = loader.load('./file/23/3.jpg')
          roofTexture.wrapS = roofTexture.wrapT = THREE.RepeatWrapping
          roofTexture.repeat.set(2, 2)
          const textureMaterial = new THREE.MeshBasicMaterial({ map: roofTexture })
          const colorMaterial = new THREE.MeshBasicMaterial({ color: 'grey' })
          const materials = [colorMaterial, colorMaterial, colorMaterial, colorMaterial, colorMaterial, textureMaterial]
          const roof = new THREE.Mesh(roofGeometry, materials)
          return roof
        }

        const roof1 = roof()

        roof1.rotation.x = Math.PI / 2
        roof1.rotation.y = (-Math.PI / 4) * 0.4
        roof1.position.y = 170
        roof1.position.x = 90

        const roof2 = roof()
        roof2.rotation.x = Math.PI / 2
        roof2.rotation.y = (Math.PI / 4) * 0.4
        roof2.position.y = 170
        roof2.position.x = -90

        scene.add(roof1)
        scene.add(roof2)
      }
添加门和门框
- 因为门和门框都需要移动到房子门的位置,可以视为一组。使用
.group()合并在一起移动。
- 门框的初始位置和门的初始位置不是我们想要的,移动门的位置到门框中。因为实在组局部坐标轴,不会对全局坐标有影响。
      {
        // 门框
        const shape = new THREE.Shape()
        shape.moveTo(-20, 0)
        shape.lineTo(-20, 100)
        shape.lineTo(-80, 100)
        shape.lineTo(-80, 0)
        shape.lineTo(-20, 0)

        const shape_c = new THREE.Path()
        shape_c.moveTo(-25, 5)
        shape_c.lineTo(-25, 95)
        shape_c.lineTo(-75, 95)
        shape_c.lineTo(-75, 5)
        shape_c.lineTo(-25, 5)

        shape.holes.push(shape_c)
        const extrudeGeometry = new THREE.ExtrudeGeometry(shape, extrudeSettings)
        const material = new THREE.MeshBasicMaterial({ color: 'silver' })
        const frame = new THREE.Mesh(extrudeGeometry, material)

        // 门
        const doorGeometry = new THREE.BoxGeometry(50, 90, 4) //门的形状
        const doorTexture = new THREE.TextureLoader().load('./file/23/4.jpg')
        const doorMaterial = new THREE.MeshLambertMaterial({ map: doorTexture }) //门的材质
        const door = new THREE.Mesh(doorGeometry, doorMaterial)
        door.position.set(-50, 50, 5) // 门相对于group的位移和旋转,开关门动画会用到。

        const group = new THREE.Group() // 创建Group
        group.add(frame) // 往Group加入门框
        group.add(door) // 往Group加入门板

        group.position.x = 143
        group.position.y = 1
        group.rotation.y = Math.PI / 2

        scene.add(group)
      }
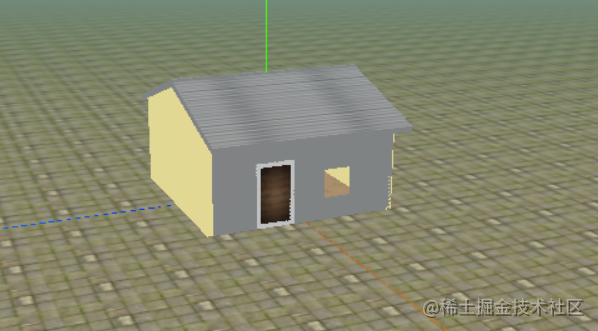
- 一个简单的房子就绘制完成。
加入模型
- 使用
GLTFLoader()插件加载模型,通过.traverse()函数遍历所有网格,修改模型材质属性,位置等信息,让他到门口。
import { GLTFLoader } from './file/three.js-dev/examples/jsm/loaders/GLTFLoader.js'
      {
        const gltfLoader = new GLTFLoader()
        gltfLoader.load('./file/bingdundun.glb', (gltf) => {
          const root = gltf.scene
          root.scale.set(110, 110, 110)
          root.position.x = 200
          root.position.y = -7.5

          // 遍历所有子对象
          root.traverse((child) => {
            if (child.isMesh) {
              // 内部
              if (child.name === 'oldtiger001') {
                // 辅助
                const axes = new THREE.AxisHelper(700)
                child.add(axes)

                // 金属度
                child.material.metalness = 0.5
                // 粗糙度
                child.material.roughness = 0.8
              }
              // 半透明外壳
              if (child.name === 'oldtiger002') {
                // 启用透明
                child.material.transparent = true
                // 透明度
                child.material.opacity = 0.5
                // 透明反射效果
                child.material.refractionRatio = 1
                child.material.metalness = 0.2
                child.material.roughness = 0
              }
            }
          })
          scene.add(root)
        })
      }
添加键盘监听
- 添加一个相机到模型局部空间里,查看模型前面的场景。
- 我们来通过键盘事件,移动模型,相应的相机在模型里也会移动。
- 创建局部相机并加入模型中。
    ...
    let cameraBin = new THREE.PerspectiveCamera(40, aspect, near, far)
    // 透视投影相机
    cameraBin.position.y = 1
    cameraBin.position.z = 15
    cameraBin.position.x = 1
    cameraBin.rotation.y = Math.PI
    ...

    // 辅助
    const axes = new THREE.AxisHelper(700)
    child.add(axes)
    // 在 oldtiger001 模型中加入相机
    child.add(cameraBin)
    ...
- 因为要操作模型位移,修改模型为全局变量。
let root = null
- 添加键盘监听事件。
      let cameraBinBol = false
      // 监听键盘事件
      document.onkeydown = function (event) {
        var e = event
        if (e && e.keyCode == 87) {
          // w
          if (root) {
            root.position.x += 1
          }
        }
        if (e && e.keyCode == 83) {
          // s
          if (root) {
            root.position.x -= 1
          }
        }
        if (e && e.keyCode == 65) {
          // a
          root.position.z += 1
        }
        if (e && e.keyCode == 68) {
          // d
          root.position.z -= 1
        }

        if (e && e.keyCode == 32) {
          // 切换相机
          if (cameraBinBol) {
            cameraBinBol = false
          } else {
            cameraBinBol = true
          }
        }
      }
- 修改渲染函数。
      // 渲染
      function render() {
        //  cameraBin
        if (cameraBinBol) {
          renderer.render(scene, cameraBin)
        } else {
          renderer.render(scene, camera)
        }

        requestAnimationFrame(render)
      }


 4362
4362


 被折叠的 条评论
为什么被折叠?
被折叠的 条评论
为什么被折叠?
 到【灌水乐园】发言


