


Spring Boot 启动过程:
1. 创建 SpringApplication 对象。
2. 执行对象的 run() 方法。
3. 将 class 变成 beanDefinition。
4. 将 beanDefinition 变成 bean
5. 图解 循环依赖
6. 图解 bean 的生命周期
7. 图解 aop 拦截器链调用
上一篇博客中写到,spring boot 应用程序在启动时先创建了 SpringApplication 对象,并且将框架默认的 启动引导器、初始化器、监听器都从文件加载到 SpringApplication 对象中。这篇博客先整体看下 run 方法做了什么。
1. 先概述下 run 方法做了什么事情
它创建了一个上下文(Context) 里面有个 IOC容器(BeanFactory),并且为系统默认的一些类和开发者写的一些类创建了一个对象(每一个对象叫做 一个bean),最后将这些对象放到了 IOC容器中。因为 BeanFactory 里面存放了很多 bean,所以将它称之为容器(或者 bean容器 )。除此以外,run 方法还做了些辅助性的事情。
2. run方法的执行过程。
先把源码贴进来,简单的直接写了,稍微复杂的执行过程写在后面。
public ConfigurableApplicationContext run(String... args) {
    StopWatch stopWatch = new StopWatch();
    stopWatch.start();
    DefaultBootstrapContext bootstrapContext = createBootstrapContext();
    ConfigurableApplicationContext context = null;
    configureHeadlessProperty();
    SpringApplicationRunListeners listeners = getRunListeners(args);
    listeners.starting(bootstrapContext, this.mainApplicationClass);
    try {
        ApplicationArguments applicationArguments = new DefaultApplicationArguments(args);
        ConfigurableEnvironment environment = prepareEnvironment(listeners, bootstrapContext, applicationArguments);
        configureIgnoreBeanInfo(environment);
        Banner printedBanner = printBanner(environment);
        context = createApplicationContext();
        context.setApplicationStartup(this.applicationStartup);
        prepareContext(bootstrapContext, context, environment, listeners, applicationArguments, printedBanner);
        refreshContext(context);
        // 空方法什么也没干。
        afterRefresh(context, applicationArguments);
        // 停止计时。里面计算了启动过程花费了多少时间。
        stopWatch.stop();
        // 打印日志。
        if (this.logStartupInfo) {
            new StartupInfoLogger(this.mainApplicationClass).logStarted(getApplicationLog(), stopWatch);
        }
        // 发布 context 启动了事件。
        listeners.started(context);
        // 执行方式,但都是空的。
        callRunners(context, applicationArguments);
    }
    catch (Throwable ex) {
        // 如果上述启动过程有有错误,处理异常。
        handleRunFailure(context, ex, listeners);
        throw new IllegalStateException(ex);
    }

    try {
        // 发布 context 运行事件。
        listeners.running(context);
    }
    catch (Throwable ex) {
        // 有错误报异常。
        handleRunFailure(context, ex, null);
        throw new IllegalStateException(ex);
    }
    return context;
}
2.1 创建时间对象并启动计时
StopWatch stopWatch = new StopWatch();
stopWatch.start();
public void start(String taskName) throws IllegalStateException {
    if (this.currentTaskName != null) {
        throw new IllegalStateException("Can't start StopWatch: it's already running");
    }
    this.currentTaskName = taskName;
    this.startTimeNanos = System.nanoTime();
}
这块代码就是设置了当前任务名和记录启动时间。
2.2 创建引导上下文
DefaultBootstrapContext bootstrapContext = createBootstrapContext();
private DefaultBootstrapContext createBootstrapContext() {
    DefaultBootstrapContext bootstrapContext = new DefaultBootstrapContext();
    this.bootstrappers.forEach((initializer) -> initializer.initialize(bootstrapContext));
    return bootstrapContext;
}
引导上下文是个DefaultBootstrapContext 对象,在 new SpringApplication() 时,已经加载了初始化引导器并存放到的 bootstrappers中,这里遍历 bootstrappers 中的每一个引导器,并执行各自的 initialize 方法给引导上下文中填充值。从上一篇博客中已经知道了bootstrappers 是个空 list,所以这里啥也没填充。
2.3 创建 IOC 容器
ConfigurableApplicationContext context = null;
这就是传说中的 IOC容器,实则是个 ConfigurableApplicationContext 对象,先创建出来,再往里面填东西。@AutoWire 就是从它里面拿 bean 实现自动装配。有些资料中提到的 applicationContext ,说的也是它。

2.4 设置当前应用为 headless 模式
configureHeadlessProperty();
private static final String SYSTEM_PROPERTY_JAVA_AWT_HEADLESS = "java.awt.headless"
private void configureHeadlessProperty() {
    System.setProperty(SYSTEM_PROPERTY_JAVA_AWT_HEADLESS,
                       System.getProperty(SYSTEM_PROPERTY_JAVA_AWT_HEADLESS, Boolean.toString(this.headless)));
}
稍微查了下其他资料,将应用程序设置为这种模式,是为了告诉程序,“你所在的服务器上缺少些硬件,没有显示器、鼠标、或者其他”。这就是一个赋值过程,不需要深究。
2.5 获取运行时监听器,并开始监听。
// 获取运行时监听器。
SpringApplicationRunListeners listeners = getRunListeners(args);
private SpringApplicationRunListeners getRunListeners(String[] args) {
    Class<?>[] types = new Class<?>[] { SpringApplication.class, String[].class };
    return new SpringApplicationRunListeners(logger,                                          getSpringFactoriesInstances(SpringApplicationRunListener.class, types, this, args),
                                             this.applicationStartup);
}
getSpringFactoriesInstances 的执行细节上篇博客已经介绍过了,这里不在赘述。这个方法执行的结果就是拿到所有的 SpringApplicationRunListener 类型的监听器。这类监听器到底有多少个呢?就 1 个。
// spring-boot-2.4.4.jar/META-INF/spring.factories
org.springframework.boot.SpringApplicationRunListener=\
org.springframework.boot.context.event.EventPublishingRunListener
所以 SpringApplicationRunListeners listeners 中是能保存所有的 运行时监听器,怎奈框架就默认了一个 EventPublishingRunListener类型的运行时监听器 ,并且程序员也没有自定义,则此时 listeners 中只有一个监听器。
listeners.starting(bootstrapContext, this.mainApplicationClass);
接下来就是启动监听了。监听器的目的是监听对象的状态,以便当对象处于某个指定状态时事件,去执行一些操作。 那运行时监听器 SpringApplicationRunListener 指定要监听什么对象的哪些状态呢?
public interface SpringApplicationRunListener {

    // 引导启动器:ConfigurableBootstrapContext 开始时,该方法被调用。
	default void starting(ConfigurableBootstrapContext bootstrapContext) {
		starting();
	}

    // 环境对象:ConfigurableEnvironment 准备完毕时,该方法被调用,但必须在 ApplicationContext
    // 被创建前调用。
	default void environmentPrepared(ConfigurableBootstrapContext bootstrapContext,
			ConfigurableEnvironment environment) {
		environmentPrepared(environment);
	}
    // 上下文(可能是IOC容器)被创建以及准备完成时,该方法被调用,但必须在 source 被加载前调用。
	default void contextPrepared(ConfigurableApplicationContext context) {
	}

    // 上下文(可能是IOC容器)被载入后,且被刷新之前,该方法被调用。
	default void contextLoaded(ConfigurableApplicationContext context) {
	}

    // 上下文(可能是IOC)容器刷新完毕,且此时还没调用 CommandLineRunner 和 ApplicationRunner
    // 时,该方法被调用。
	default void started(ConfigurableApplicationContext context) {
	}

    // run 方法执行完毕时,该方法会被调用。此时,IOC容器已经被刷新了,而且CommandLineRunner
    // 和 ApplicationRunner 也已经被调用了。
	default void running(ConfigurableApplicationContext context) {
	}

	// 应用程序运行失败是,该方法被调用。
	default void failed(ConfigurableApplicationContext context, Throwable exception) {
	}

}
这里先不管监控器发布了什么东西(不影响对整个启动过程的理解),在后面的代码中关注下上述几个方法被调用的事件点。
2.6 准备环境
应用程序运行在服务器上,而且它的运行需要依赖一些资源,比如 JDK、maven 库、文件编码格式等等。那应用程序是怎么知道这些资源都放在哪里的?或者这些属性值是什么?从而能正确读取。是因为应用程度在启动过程中创建了环境对象,它里面有个字段(成员变量):MutablePropertySources propertySources ,所有的资源属性在应用程度启动过程中被包装成 propertySource 存放在 propertySources 中。后面开发者如果有需要直接在 环境对象中拿这些资源就可以了。
除此以外,开发者可以使用 @propertySource 将自定义的配置文件导入到 环境对象中,最后被代码块调用。
ApplicationArguments applicationArguments = new DefaultApplicationArguments(args);
ConfigurableEnvironment environment = prepareEnvironment(listeners, bootstrapContext, applicationArguments);
把启动参数 args 包装成了 ApplicationArguments 类型的对象。接下来把 运行时监听器、启动引导器、启动参数,送到了 prepareEnvironment 方法中创建环境对象。再贴一段代码。
private ConfigurableEnvironment prepareEnvironment(SpringApplicationRunListeners listeners,DefaultBootstrapContext bootstrapContext, ApplicationArguments applicationArguments) {
    // 创建环境对象。(细节描述在后面)
    ConfigurableEnvironment environment = getOrCreateEnvironment();
    // 配置环境对象。(细节描述在后面)
    configureEnvironment(environment, applicationArguments.getSourceArgs());
    // 将环境对象和 ConfigurationPropertySource “绑” 起来。(细节描述在后面)
    ConfigurationPropertySources.attach(environment);
    // 在这里加载了 application.properties 文件,并确定了激活哪个 profile。(细节描述在后面)
    listeners.environmentPrepared(bootstrapContext, environment);
    // 如果 environment 中有名字叫 ‘defaultProperties’ 的 propertySource ,
    // 将该 propertySource 调整成 propertySource list 中的最末尾。
    DefaultPropertiesPropertySource.moveToEnd(environment);
    // 这个方法中的 if 不成立,实际上没有执行。
    configureAdditionalProfiles(environment);
    // 将配置好的环境对象绑定到 SpringApplication。
    bindToSpringApplication(environment);
    // this.isCustomEnvironment = false
    if (!this.isCustomEnvironment) {
		// 判断 environment 是不是 StandardEnvironment 类型的对象,如果是,那就什么都不干。
        // 如果不是,那就将其转换成 StandardEnvironment 类型的对象。
        // 怎么转换呢?
        // (1) 创建 StandardEnvironment 类型对象 obj;
        // (2) 从 environment 中拿出 activeProfiles 赋值给 obj。
        // (3) 从 environment 中拿出 conversionService 赋值给 obj。
        // (4) 从 environment 中拿出 propertySources 赋值给 obj。
        environment = new EnvironmentConverter(getClassLoader()).convertEnvironmentIfNecessary(environment,                                                                                       deduceEnvironmentClass());
    }
    // 这里又“绑”了一次,不过这次是先删除,后又添加,不增不减。
    ConfigurationPropertySources.attach(environment);
    return environment;
}
2.6.1 创建环境对象
ConfigurableEnvironment environment = getOrCreateEnvironment();
private ConfigurableEnvironment getOrCreateEnvironment() {
    // 如果环境对象存在,直接返回。
    if (this.environment != null) {
        return this.environment;
    }
    // 如果环境对象不存在,根据应用程序类型创建环境对象。
    switch (this.webApplicationType) {
            // 当前类型是 SERVLE,走这里。
        case SERVLET:
            return new StandardServletEnvironment();
        case REACTIVE:
            return new StandardReactiveWebEnvironment();
        default:
            return new StandardEnvironment();
    }
}
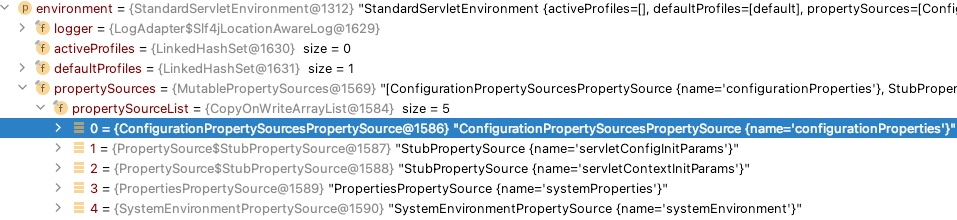
看一下新创建的 StandardServletEnvironment() 里面存了哪些资源属性

列表中当前存了四个元素,三种类型的 propertySource。前两个元素类型是:StubPropertySource,内容与 servlet相关。
第三个元素类型是:PropertiesPropertySource ,“systemProperties” 是什么意思? 看看就知道了:

这里截取一部分。总共 63 个键值对,几乎都是跟 java 引用程度相关的。这就是“systemProperties”里面的东西了。
同样,第四个元素类型是:SystemEnvironmentPropertySource,它里面存了什么呢?
[外链图片转存失败,源站可能有防盗链机制,建议将图片保存下来直接上传(img-b0NcDiB9-1619369919617)(https://raw.githubusercontent.com/diego1109/pictures/main/20210409122423.png)]
这里存放的是 机器上的环境以及一些配置信息,连 anaconda 的信息都拿到了,只截取了一部分,还有别的。
所以当环境变量被创建时,就已经加载了许多应用程序所依赖的、可能会依赖的、以及它用不到的属性信息,封装成不同类型的 PropertySource对象 存放在 环境对象中。
PropertySource 属性源,(可以理解成)所有需要的属性都存放在这里,用的时候直接从 env 里面拿。
2.6.2 配置环境对象
configureEnvironment(environment, applicationArguments.getSourceArgs());
protected void configureEnvironment(ConfigurableEnvironment environment, String[] args) {
    if (this.addConversionService) {
        // 类型转换服务,因为在程序启动时会加载外部配置文件,可能需要将文件中的 String 转化成 Integer。
        ConversionService conversionService = ApplicationConversionService.getSharedInstance();
        // 将类型转换服务添加到环境对象中。
        environment.setConversionService((ConfigurableConversionService) conversionService);
    }
    // 配置属性源
    configurePropertySources(environment, args);
    // 配置激活哪个 profile。
    configureProfiles(environment, args);
}
// Add, remove or re-order any PropertySources in this application's environment.
// 添加、移除或者重排序应用程序的环境对象的属性源。
// 因为 args 是空的,所以这个方法里大部分代码没有执行,环境对象中的属性源个数依旧是 4 个。
configurePropertySources(environment, args);
// 通过读取 spring.profiles.active 配置哪个 profile 要被激活。
configureProfiles(environment, args)
// 不过这个方法体是空的。(org.springframework.boot:2.4.3)
protected void configureProfiles(ConfigurableEnvironment environment, String[] args) {}
2.6.3 绑定环境对象
与其说是绑定,倒不如说“给环境对象的 propertySources 中再添加一个ConfigurationPropertySourcesPropertySource类型的元素。之前已经有四个了,执行完这个 attach 后就变成了 5 个,至于新添的这个内容是什么?先说个结论:内容是已存在的四个属性源的打包。
ConfigurationPropertySources.attach(environment);
代码细节:
public static void attach(Environment environment) {
    // 判定类型。
    Assert.isInstanceOf(ConfigurableEnvironment.class, environment);
    // 拿出已存在的所有属性源。
    MutablePropertySources sources = ((ConfigurableEnvironment) environment).getPropertySources();
    // 获取源名称为 “configurationProperties” 的属性源。
    PropertySource<?> attached = sources.get(ATTACHED_PROPERTY_SOURCE_NAME);
    // 如果 attahced 存在,且 attached 不是 已存在的那 4个属性源。
    if (attached != null && attached.getSource() != sources) {
        // 那就删了。
        sources.remove(ATTACHED_PROPERTY_SOURCE_NAME);
        attached = null;
    }
    //前脚删,后面再加上。
    // 又把之前的 sources 拿过来,“打包”new个新对象,凑成键值对,添加到 sources 里面去了。
    if (attached == null) {
        sources.addFirst(new ConfigurationPropertySourcesPropertySource(ATTACHED_PROPERTY_SOURCE_NAME,
                                                                        new SpringConfigurationPropertySources(sources)));
    }
}
此时的环境对象:
2.6.4 发布监听时间
listeners.environmentPrepared(bootstrapContext, environment);
别小瞧了这里只有一行,里面的调用很绕的,想再看里面的源码建议先刷一遍“观察者模式”。当被监控对象的某些发成改变时,监听器发布事件执行些操作。操作细节这里就不写了,不然又是一大段,主要看下它的执行结果。
[外链图片转存失败,源站可能有防盗链机制,建议将图片保存下来直接上传(img-GsesqlvS-1619369919618)(https://raw.githubusercontent.com/diego1109/pictures/main/20210410140351.png)]
(1)这个方法执行时加载了 application.properties 文件,读取里面的配置属性键值对封装成 OriginTrackedMapPropertySource 类型保存到环境对象的 propertySources 中。
(2)该方法执行时确定了当前应用程序激活哪个 profile。
2.6.4 小回顾
准备环境主要干了些什么事情?
- 创建环境对象 environment ;
- 给 environment 添加类型转换器 conversionService。
- 给 environment 设定 active profile。
- 加载所有的配置信息封装成 propertySource,以 propertySource list 的形式存放到 environment 中。
- 将 environment 绑定到 springApplication。
2.7 打印 banner
// 更具名字翻译是 配置下忽略 bean 的信息,(具体应用我没看明白)
configureIgnoreBeanInfo(environment);
// 打印 spring boot logo。
Banner printedBanner = printBanner(environment);
  .   ____          _            __ _ _
 /\\ / ___'_ __ _ _(_)_ __  __ _ \ \ \ \
( ( )\___ | '_ | '_| | '_ \/ _` | \ \ \ \
 \\/  ___)| |_)| | | | | || (_| |  ) ) ) )
  '  |____| .__|_| |_|_| |_\__, | / / / /
 =========|_|==============|___/=/_/_/_/
 :: Spring Boot ::                (v2.4.4)
是否打印 logo 可以在 application.properties 中配置,logo 的图案也可以修改。
2.8 创建 context
context = createApplicationContext();
// 设置 applicationStartup,就一个赋值操作。
context.setApplicationStartup(this.applicationStartup);
IOC 容器就是上面创建的 context 对象,它的类型是:AnnotationConfigServletWebServerApplicationContext,这个类名翻译过来是”基于注解配置的内嵌了 servlet 的 web服务应用程序上下文“,还是挺形象的。
2.9 准备 context
这跟之前准备环境一样,也是一大段代码,先贴上。(这行代码向上下文中设置一系类属性值)
prepareContext(bootstrapContext, context, environment, listeners, applicationArguments, printedBanner);
这个方法执行的效果也是向 context 中塞值。
private void prepareContext(DefaultBootstrapContext bootstrapContext, ConfigurableApplicationContext context,
                            ConfigurableEnvironment environment, SpringApplicationRunListeners listeners,
                            ApplicationArguments applicationArguments, Banner printedBanner) {
    // 设置环境
    context.setEnvironment(environment);
    // 尝试向 context 中赋值 beanNameGenerator、beanNameGenerator、conversionService,
    // 实际上只有 conversionService 赋值成功了。
    postProcessApplicationContext(context);
    // 执行初始化器。(细节在后面)
    applyInitializers(context);
    // 监听器发布 IOC 容器准备好 事件。
    listeners.contextPrepared(context);
    // 引导启动上下文关闭事件。
    bootstrapContext.close(context);
    // 打印日志
    if (this.logStartupInfo) {
        logStartupInfo(context.getParent() == null);
        logStartupProfileInfo(context);
    }
    // Add boot specific singleton beans
    // 向 IOC容器的 beanFactory 中添加 bean。(重点来了)要往里面塞东西了。
    // 先获取到 beanFactory,实际的类型是 DefaultListableBeanFactory。
    ConfigurableListableBeanFactory beanFactory = context.getBeanFactory();
    // 之前是将 args 包装成了 applicationArguments,这里是做成了键值对保存到 beanFactory。
    beanFactory.registerSingleton("springApplicationArguments", applicationArguments);
    // 如果有 printedBanner 将其也做成键值对塞里面。
    if (printedBanner != null) {
        beanFactory.registerSingleton("springBootBanner", printedBanner);
    }
    // 这个判断是成立的。
    if (beanFactory instanceof DefaultListableBeanFactory) {
        // 设置 beanFactory 中的 bean 是否允许被覆盖?
        // 如果允许,则当出现 key 相同的键值对时,后者会覆盖前者。
        // 如果不允许,当出现相同 key 时,会抛出异常。(当前设置不允许)。
        // 注:key 是类名,value 是类的实例。
        ((DefaultListableBeanFactory) beanFactory)
        .setAllowBeanDefinitionOverriding(this.allowBeanDefinitionOverriding);
    }
    // 是否懒惰加载? 不懒惰。
    if (this.lazyInitialization) {
        context.addBeanFactoryPostProcessor(new LazyInitializationBeanFactoryPostProcessor());
    }
    // Load the sources
    // 获取源,其实只有一个,就是我们的启动类:AutoconfigApplication
    Set<Object> sources = getAllSources();
    Assert.notEmpty(sources, "Sources must not be empty");
    // 将 source 上的注解载入 context。(这块就扯到了自动配置原理)
    load(context, sources.toArray(new Object[0]));
    // 监听器发布事件。
    listeners.contextLoaded(context);
}
2.9.1 执行初始化器
框架默认的初始化器(7 个)和开发者自定义的初始化器都在 new SpringApplication() 时被加载了,并且保存在 initializers 对象中。这里要拿这些初始化器给 context 中填充信息。不可能是给 context 多增加个成员变量,所以要么是给 context 的非集合字段赋值,要么是给集合字段删减其中元素。具体细节看下代码:
protected void applyInitializers(ConfigurableApplicationContext context) {
    // getInitializers() 获取所有的初始化器。
    for (ApplicationContextInitializer initializer : getInitializers()) {
        // 先解析 initializer 的泛型类型
        Class<?> requiredType = GenericTypeResolver.resolveTypeArgument(initializer.getClass(),
                                                                        ApplicationContextInitializer.class);
        // 如果 context 不是 initializer 的泛型的对象,那么 initializer 不能处理 context。
        // 换句话说,context 不能调用该 initializer。
        Assert.isInstanceOf(requiredType, context, "Unable to call initializer.");
        // 每个初始化器调用各自的 initialize 方法处理 context。
        initializer.initialize(context);
    }
}
但凡能拿出来的 初始化器,每个泛型都是 ConfigurableApplicationContext 。
IOC 容器初始化器 必须实现 ApplicationContextInitializer 接口
@FunctionalInterface
public interface ApplicationContextInitializer<C extends ConfigurableApplicationContext> {
	void initialize(C applicationContext);
}
看一个实际的 IOC 容器初始化器,它也只能接收ConfigurableApplicationContext 类及其子类。
public class ContextIdApplicationContextInitializer
		implements ApplicationContextInitializer<ConfigurableApplicationContext>, Ordered {
    	@Override
    // 顺便看看 initialize方法做了什么。入口参数是IOC容器。
	public void initialize(ConfigurableApplicationContext applicationContext) {
		ContextId contextId = getContextId(applicationContext);
        // 向容器中的某个非集合字段赋值。
		applicationContext.setId(contextId.getId());
        // 向容器中的某个集合对象添加元素。构建了 className:object-Of-Class 键值对,存放到了 map 中。
		applicationContext.getBeanFactory().registerSingleton(ContextId.class.getName(), contextId);
	}
    // ......  下面的不贴了。
}
所以只要 context 自己是 ConfigurableApplicationContext 的对象,那么但凡 IOC 容器初始化器 它都能调用。
可别小看这行代码,IOC 容器中的 bean 就是这么存进去的。存放到了 context 的 beanFactory 字段的 signcletonObjects 集合中。
applicationContext.getBeanFactory().registerSingleton(ContextId.class.getName(), contextId);
2.10 刷新 context(重点)
这行代码将应用程序运行所需要的所有 bean(包括开发者自己写的) 加载到了 context 的 beanFactory 中。
refreshContext(context);
理清楚主要的思路和主要干的事情即可,一句一句纠细节,会吐血的。
2.10.1 刷新 context 的方法调用
先看下里面代码的整体逻辑调用是什么样子的。
这里涉及到 context 的 向上、向下转型,当前类型是:AnnotationConfigServletWebServerApplicationContext ,可以打个 UML 类图看下转到哪个上去了。
// SpringApplication.java
refreshContext(context);
// ---
private void refreshContext(ConfigurableApplicationContext context) {
    if (this.registerShutdownHook) {
        try {
            context.registerShutdownHook();
        }
        catch (AccessControlException ex) {
            // Not allowed in some environments.
        }
    }
    // 转化成 ApplicationContext 类型。(向上转)
    refresh((ApplicationContext) context);
}
// ---
protected void refresh(ApplicationContext applicationContext) {
    Assert.isInstanceOf(ConfigurableApplicationContext.class, applicationContext);
    // 转化成 ConfigurableApplicationContext 类型。
    refresh((ConfigurableApplicationContext) applicationContext);
}
// ---
// ConfigurableApplicationContext 用到了 SPI 机制,先不管它。
protected void refresh(ConfigurableApplicationContext applicationContext) {
    // 进到里面去。
    applicationContext.refresh();
}
到了 ServletWebServerApplicationContext 的 refresh() 方法中。实际上这里是执行到了 AnnotationConfigServletWebServerApplicationContext 中,因为 后者继承前者,public refresh() 当然被继承到了。
// ServletWebServerApplicationContext.java
// (实际上 AnnotationConfigServletWebServerApplicationContext.java)
public final void refresh() throws BeansException, IllegalStateException {
    try {
        // 再调用父类(AbstractApplicationContext)的 refresh。
        super.refresh();
    }
    catch (RuntimeException ex) {
        // 如果出现异常,停止 web服务器(tomcat)。
        WebServer webServer = this.webServer;
        if (webServer != null) {
            webServer.stop();
        }
        throw ex;
    }
}
调用完 super.refresh(); 方法后,刷新 context 的调用过程就结束了。也就是说 实际容器的刷新,填充 bean 到 context 是交给父类去完成的。
调用 super.refresh() 就从 spring boot 框架(再准确些应该叫 boot 框架)中跳出来,进到了 spring 框架中。
2.10.2 刷新 context 的执行过程
先理清个头绪,虽然这会代码跳到了AbstractApplicationContext.java 中,但调用 refresh() 方法的对象是 AnnotationConfigServletWebServerApplicationContext 。
这个方法的目的是 给那些被 @Component 以及它的派生注解标记的类,创建个bean(类的实例),然后构建成 className:bean 的键值对,最后将键值对保存到 context 的 beanFactory 的 singletonObject 中。
刷新 context 中最主要也是最重要的一件事情是(自动配置):将要加载的类做成 bean 保存(注册)到 context 中。具体流程是这样的:
- 要自动配置的类得先写好了,加上注解,包存在
.java文件中;(这不是废话么)- 在启动过程中调用
BeanFactoryPostProcesser的某个实现类,它为需要自动配置的每一个类创造一个对应的 beanDefinition,并将所有的 beanDefinition 保存(注册) 到 context 中。(实际上是为每一个类构建键值对className:BeanDefinion保存到了 context 中的beanFactory属性的beanDefinitionMap属性中)。- 接着再遍历
beanDefinitionMap,根据 className 从 context 中先获取对应的 bean,如果能拿到,就表示这个类已经被注册了,如果拿不到,那就通过 BeanDefinion 创建一个新 bean 注册到 context中。(实际上是从 context 中的beanFactory属性的singletonObject属性中拿 bean,如果拿不到,创建的新 bean 也是保存到signletonObject中)。从上面三个步骤看出自动配置的基本流程是: class --> beanDefinition —> bean
在基本流程的基础上,spring 提供了扩展功能:虽然 class 定义了(写死了) bean,但是在自动配置的过程中,spring 允许对最终的 bean 做一些修改。
- 在 class --> beanDefinition 时,spring 允许使用
BeanFactoryPostProcessor对 beanDefinition 进行修改。从而间接修改了最终要生成的 bean。- 在 bean 创建前后,Spring 允许使用
BeanPostProcessor对 bean 进行修改,这是直接改。(修改 bean,不是给其增加或者减少字段,只是 set 了一些属性的值)。
接下来有两个问题:
- 执行 class --> beanDefinition 的程序入口在哪里,具体的细节是什么?
- 执行 beanDefinition --> bean 的程序入口在哪里,具体细节是什么?
注: 一层层梳理,要记住当前的重点是什么,不是重点的明白大概就行了,不要深究,不然真看不下去。
贴代码: AbstractApplicationContext.refresh()。
public void refresh() throws BeansException, IllegalStateException {
    synchronized (this.startupShutdownMonitor) {
        // 在上下文启动过程标记步骤并收集一些信息。
        // "spring.context.refresh" 类似于 description,表示当前收集的信息是
        // spring 上下文刷新阶段的信息。
        StartupStep contextRefresh = this.applicationStartup.start("spring.context.refresh");
        // 之前见过 prepareEnviroment、prepareContext 都是“准备些属性”。
		// 这里也是刷新前的准备工作,设置时间、标志位、日志、初始化器、监听器等。
        // 看看本来的注释
        // Prepare this context for refreshing, setting its startup date and active flag as well as performing any initialization of property sources.
        prepareRefresh();
        // 获取 beanFactory,这就是 IOC 容器,不过现在里面是空的,“注册”就是给它往里面填东西。
        ConfigurableListableBeanFactory beanFactory = obtainFreshBeanFactory();
        // 又是 prepare...,给 beanFactory 准备,里面 set些属性值。
        // 原本的注释:Configure the factory's standard context characteristics, such as the context's ClassLoader and post-processors.
        prepareBeanFactory(beanFactory);

        try {
			// 这个方法的注释里写着做了三件事情。
            // 但我测试的效果是:只在 beanFactory 中注册了 WebApplicationContextServletContextAwarePostProcessor。
            postProcessBeanFactory(beanFactory);
			// 标记步骤,又收集 "spring.context.beans.post-process" 阶段的信息。
            StartupStep beanPostProcess = this.applicationStartup.start("spring.context.beans.post-process");
            /**
            *	这个方法是重点,它执行了由 class --> beanDefintion。
            *	这个方法是遍历 beanFactory 所有的 beanFactoryPostProcessor,并且执行接口方法。
            *
            *	其中有个实现类:ConfigurationClassPostProcessor,这个货很牛X啊,它执行
            *	postProcessBeanDefinitionRegistry(BeanDefinitionRegistry registry) 方法,
            *	将所有的与 Spring 相关的自动配置 class 都给整成了 beanDefinition,并且注册。
            *
            *	为什么是 “与 Spring 相关呢”?因为与 mybatis 相关的自动配置,
            *	ConfigurationClassPostProcessor 整不了,
            *	人家的自动配置由 MapperScannerConfigurer 负责。
            *
            * 	该方法的内部细节这里不展开,里面内容太多,打算另写一篇。
            */
            invokeBeanFactoryPostProcessors(beanFactory);
			// 向 beanFactory 中注册 beanPostProcessor。
            registerBeanPostProcessors(beanFactory);
            beanPostProcess.end();

            // 国际化。(不是重点)
            initMessageSource();

            // Initialize event multicaster for this context.
            // 初始化广播器。(不是重点)
            initApplicationEventMulticaster();

            // Initialize other special beans in specific context subclasses.
            // 初始化主题、创建 tomcat。
            onRefresh();

            // Check for listener beans and register them.
            // 注册监听器。
            registerListeners();

            // Instantiate all remaining (non-lazy-init) singletons.
            /**
            *	这就是第二个硬核的地方了,它执行 beanDefinition --> bean。
            *	简述执行流程就是 上面第 3 步中写的内容。
            *
            *	这里也是不展开,另写一篇。
            */
            finishBeanFactoryInitialization(beanFactory);

            // Last step: publish corresponding event.
            // 到这里需要自动配置的 bean 都已经注册完了,清缓存,发布事件。
            finishRefresh();
        }
        catch (BeansException ex) {
            if (logger.isWarnEnabled()) {
                logger.warn("Exception encountered during context initialization - " +
                            "cancelling refresh attempt: " + ex);
            }

            // Destroy already created singletons to avoid dangling resources.
            // 如果启动过程中出现异常,清空已经创建的单例,避免资源悬空。
            destroyBeans();

            // Reset 'active' flag.
            // 将状态设置为不活跃。
            cancelRefresh(ex);

            // Propagate exception to caller.
            throw ex;
        }

        finally {
            // Reset common introspection caches in Spring's core, since we
            // might not ever need metadata for singleton beans anymore...
            // 还是清缓存
            resetCommonCaches();
            // context 刷新结束。
            contextRefresh.end();
        }
    }
}
从这里开始下面的感觉都不是重点了,就直接在 “run 方法的执行过程”下面贴的源码中写了注释。
还是想啰嗦几句,从去年开始逐渐看一些程序的源码,Long的享元模式、AQS、Web Security、集合等等以及现在的 SpringBoot 启动过程。
很深的感触是:别一上来就想着看源码,先使用一下功能,用熟练了或者对涉及到的组件有概念有感觉了,再尝试看源码。这个很重要!
如果你不懂场景,你根本不不知道逻辑为什么要这么写;如果对模块或者组件没有印象,几个类之间的频繁跳转,思路要变成浆糊了;如果你能熟练使用某块功能,且不说原理了解多少,起码当你看到这块对应的源码时,你已经知道结果是什么了,接下来要做的就是“顺”过程了,心里底气“足”了不少。看源码时猜测固然重要,但如果能已经知道结果,那绝对是百利而无一害。
看源码切记别转牛角尖,别一句一句抠代码,先别钻方法,看个方法注释,记住几个单词,猜个意思,错了没关系,先把大体顺下来。
看源码切记别想着看完一遍就记住了,理清楚了,(除非源码量特别少,逻辑还贼简单)。一个方法前后看几遍是很正常的,重复时往往会出现新的理解,将前面的推翻,或者将之前没看懂的地方搞清楚点了,不亏的。
看源码切记别想着句句都看懂了(除非代码量真的特别少),精力放在重点上,把它理清楚,这里要适当抠细节了。那怎么知道是哪重点?你肯定知道这个源码干了什么事情,前期看大体流程时,凭借猜、debug,确定核心点在哪里。
看源码要多动手,把思路写在代码旁边,错了没关系。再好的脑瓜子在多个文件之间来回频繁跳转,它也得嗡嗡的。但当看到零星的几个汉语注释,就能很快反应出来这块在干什么。
看源码要有耐心、要能坚持、要学会利用碎片时间。放心,因为有注释,思路能很快捡起来。
(这篇博客拖了好久,按照原先的想法,得写的老长,还不一定能说清楚。后面还欠着至少两篇博客,一定要写出来,心血不能白费,笔头也比脑子记性好)


 643
643

 被折叠的 条评论
为什么被折叠?
被折叠的 条评论
为什么被折叠?
 到【灌水乐园】发言


