


如果对View的基础知识不太了解或者Window窗口管理是怎么介入View的过程不太了解的童鞋,可以看看我的上一篇文章Android中View的相关知识(1)
Android里的Window
对手机用户来说,Window就是手机屏幕,凡是能呈现在屏幕上的东西,都属于Window范围,包括home、back、状态栏等等。
对Activity来说,Window就是除去系统状态栏、系统按键区域外的屏幕区域。
对WindowManagerService来说,已经没有Window的概念,它能接受的仅仅是view,更多的事件、责任由View去完成。
Andriod 窗口的分类
窗口类型主要分为3类:
1.应用程序窗口:比如一般应用程序的Activity窗口。
2.子窗口:一般在Activity里面的窗口,比如TabActivity.
3.系统窗口:比如Toast、输入法、墙纸等…
WindowManager.LayoutParams里面有关于各种窗口的type类型的定义,当然这个不是我们研究的重点。知道就行。根据不同的type类型的值,WindowManagerService会针对不同的type做不同的处理。
View的加载过程
书接上文,接着我们从Activity入手,看看窗口管理是怎么介入view的呈现的。
我们都知道WindowManager用来管理窗口的管理类,借助WindowManagerService进行窗口管理。具体可以看下图:

WindowManager主要用来管理窗口的一些状态、属性、view增加、删除、更新、窗口顺序、消息收集和处理等。
通过Context.getSystemService(Context.WINDOW_SERVICE)的方式可以获得WindowManager的实例.
由Android中View的相关知识(1)我们可以知道WindowManager继承自ViewManager,其中的3个重要的方法是:
addView();
updateView();
removeView();
这三个方法就是WindowManager的精髓。当然我继续往下探究去找addView();的时候,发现原来WindowManager也只是一个接口,
public interface WindowManager extends ViewManager{
    //省略其中的方法......
}
那么到底是谁实现了WindowManager中的方法呢,继续往下探究,终于发现:
public final class WindowManagerImpl implements WindowManager {
private final WindowManagerGlobal mGlobal = WindowManagerGlobal.getInstance();

    @Override
    public void addView(@NonNull View view, @NonNull ViewGroup.LayoutParams params) {
        applyDefaultToken(params);
        mGlobal.addView(view, params, mDisplay, mParentWindow);
    }
    @Override
    public void removeView(View view) {
         mGlobal.removeView(view, false);
    }

    @Override
    public void updateViewLayout(@NonNull View view, @NonNull ViewGroup.LayoutParams params) {
        applyDefaultToken(params);
        mGlobal.updateViewLayout(view, params);
    }
    ...
}
原来是WindowManagerImpl 实现了WindowManager的方法,但是它也不是真正干活的主,看代码第2行`private final WindowManagerGlobal mGlobal = WindowManagerGlobal.getInstance();这个mGlobal在WindowManager的3大方法中都有看第7、11、17行就能看到mGlobal实现了这3个方法。
mGlobal.addView(view, params, mDisplay, mParentWindow);
 mGlobal.removeView(view, false);
  mGlobal.updateViewLayout(view, params);
我们抓住主要的addView();方法继续深入;找的WindowManagerGlobal :
 public final class WindowManagerGlobal {
     //内部细节省略......
 }
哈,终于不是接口了,看来找对了,我们先来看下这个WindowManagerGlobal类的结构:
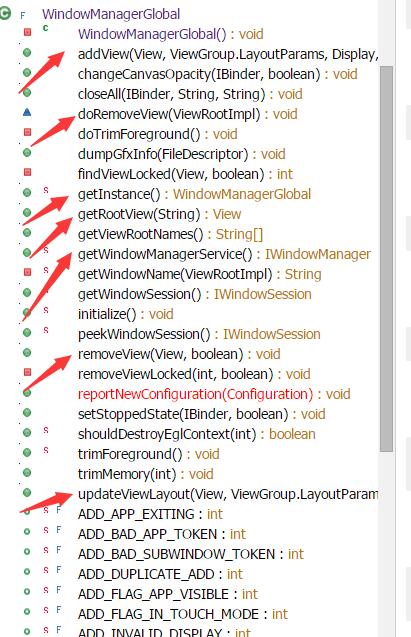
这里红色箭头标出来的都是重点,牵扯到WindowManagerService(真正干活的Service)、ViewRoot(实质上是Handler,用于View和WindowManager交互)、Session(每个应用对应一个Session)、等等一系列的东西,我们抓住一点继续研究:
public void addView(View view, ViewGroup.LayoutParams params,
            Display display, Window parentWindow) {
        if (view == null) {
            throw new IllegalArgumentException("view must not be null");
        }
        if (display == null) {
            throw new IllegalArgumentException("display must not be null");
        }
        if (!(params instanceof WindowManager.LayoutParams)) {
            throw new IllegalArgumentException("Params must be WindowManager.LayoutParams");
        }
       //重点1!!!!!!!!!!!!!!!!!!!!!!!!!!!!!
        final WindowManager.LayoutParams wparams = (WindowManager.LayoutParams)params;
        if (parentWindow != null) {
            parentWindow.adjustLayoutParamsForSubWindow(wparams);
        } else {
            // If there's no parent and we're running on L or above (or in the
            // system context), assume we want hardware acceleration.
            final Context context = view.getContext();
            if (context != null
                    && context.getApplicationInfo().targetSdkVersion >= Build.VERSION_CODES.LOLLIPOP) {
                wparams.flags |= WindowManager.LayoutParams.FLAG_HARDWARE_ACCELERATED;
            }
        }

        ViewRootImpl root;
        View panelParentView = null;

        synchronized (mLock) {
            // Start watching for system property changes.
            if (mSystemPropertyUpdater == null) {
                mSystemPropertyUpdater = new Runnable() {
                    @Override public void run() {
                        synchronized (mLock) {
                            for (int i = mRoots.size() - 1; i >= 0; --i) {
                                mRoots.get(i).loadSystemProperties();
                            }
                        }
                    }
                };
                SystemProperties.addChangeCallback(mSystemPropertyUpdater);
            }

            int index = findViewLocked(view, false);
            if (index >= 0) {
                if (mDyingViews.contains(view)) {
                    // Don't wait for MSG_DIE to make it's way through root's queue.
                    mRoots.get(index).doDie();
                } else {
                    throw new IllegalStateException("View " + view
                            + " has already been added to the window manager.");
                }
                // The previous removeView() had not completed executing. Now it has.
            }

            // If this is a panel window, then find the window it is being
            // attached to for future reference.
            if (wparams.type >= WindowManager.LayoutParams.FIRST_SUB_WINDOW &&
                    wparams.type <= WindowManager.LayoutParams.LAST_SUB_WINDOW) {
                final int count = mViews.size();
                for (int i = 0; i < count; i++) {
                    if (mRoots.get(i).mWindow.asBinder() == wparams.token) {
                        panelParentView = mViews.get(i);
                    }
                }
            }
            //重点2.。。。。。。。。。。。。。。
            root = new ViewRootImpl(view.getContext(), display);

            view.setLayoutParams(wparams);

            mViews.add(view);
            mRoots.add(root);
            mParams.add(wparams);
        }

        // do this last because it fires off messages to start doing things
        try {
        //重点3————————————————————————————————————————————————————————
            root.setView(view, wparams, panelParentView);
        } catch (RuntimeException e) {
            // BadTokenException or InvalidDisplayException, clean up.
            synchronized (mLock) {
                final int index = findViewLocked(view, false);
                if (index >= 0) {
                    removeViewLocked(index, true);
                }
            }
            throw e;
        }
}先是判断如果这为空那为空就返回各种异常,我们不管这些,直接跳到重点1;
得到当前WindowManagerGlobal的params;如果它有父View,就将其跟现在的params进行调整适配,如果没有就又是各种调整,往下走,到重点2创建了新的ViewRootImpl,然后将View,ViewRootImpl和params保存起来.(可以看WindowManagerGlobal类这几个变量都是定义的为List.如下这几个变量的定义。)
private final ArrayList<View> mViews = new ArrayList<View>();
private final ArrayList<ViewRootImpl> mRoots = new ArrayList<ViewRootImpl>();
private final ArrayList<WindowManager.LayoutParams> mParams =
new ArrayList<WindowManager.LayoutParams>();接着往下走,到了重点3View添加进ViewRootImpl里面去。好了,我们继续探究setView()方法,看看它到底做了什么;
public void setView(View view, WindowManager.LayoutParams attrs, View panelParentView) {
    synchronized (this) {
        if (mView == null) {
            mView = view;

           //省略了一些代码......
            requestLayout();

             //省略了一些代码......
            try {
                mOrigWindowType = mWindowAttributes.type;
                mAttachInfo.mRecomputeGlobalAttributes = true;
                collectViewAttributes();
                res = mWindowSession.addToDisplay(mWindow, mSeq, mWindowAttributes,
                        getHostVisibility(), mDisplay.getDisplayId(),
                        mAttachInfo.mContentInsets, mAttachInfo.mStableInsets,
                        mAttachInfo.mOutsets, mInputChannel);
            } catch (RemoteException e) {
                //省略了一些代码......
            } finally {
                if (restore) {
                    attrs.restore();
                }
            }
        }
    }
}
从setView();方法中,我们很显眼的看到 requestLayout();一看Layout就知道肯定和View的呈现有关。
@Override
public void requestLayout() {
    if (!mHandlingLayoutInLayoutRequest) {
        checkThread();
        mLayoutRequested = true;
        scheduleTraversals();
    }
}
继续深入scheduleTraversals();方法
void scheduleTraversals() {
    if (!mTraversalScheduled) {
        mTraversalScheduled = true;
        mTraversalBarrier = mHandler.getLooper().getQueue().postSyncBarrier();
        mChoreographer.postCallback(
                Choreographer.CALLBACK_TRAVERSAL, mTraversalRunnable, null);
        if (!mUnbufferedInputDispatch) {
            scheduleConsumeBatchedInput();
        }
        notifyRendererOfFramePending();
        pokeDrawLockIfNeeded();
    }
}
看到
mChoreographer.postCallback(Choreographer.CALLBACK_TRAVERSAL, mTraversalRunnable, null);其中有个mTraversalRunnable,继续深入,找到它的定义的地方。
final TraversalRunnable mTraversalRunnable = new TraversalRunnable();
好了,我们进入TraversalRunnable :
final class TraversalRunnable implements Runnable {
    @Override
    public void run() {
        doTraversal();
    }
}

void doTraversal() {
    if (mTraversalScheduled) {
      //省略了一些代码......
        performTraversals();
        //省略了一些代码......
    }
}
看到了绘制View需要调用的方法
performTraversals();调用这个方法进行View的measure,layout,draw(关于View的绘制我们会在接下来的文章中进行探索。现在我们只需要知道绘制View的时候需要performTraversals();)好了,主线终于抓住了,继续往下走requestLayout();之后就是:
 collectViewAttributes();
 res = mWindowSession.addToDisplay(mWindow, mSeq, mWindowAttributes,
                        getHostVisibility(), mDisplay.getDisplayId(),
                        mAttachInfo.mContentInsets, mAttachInfo.mStableInsets,
                        mAttachInfo.mOutsets, mInputChannel);
首先收集View的各个属性(可能是VIewGroup,所以要层层遍历),接着就是mWindowSession.addToDisplay();方法
这mWindowSession是一个IWindowSession类,其实就是一个Bidner,具体干活的是Session类。
@Override
public int addToDisplay(IWindow window, int seq, WindowManager.LayoutParams attrs,
        int viewVisibility, int displayId, Rect outContentInsets, Rect outStableInsets,
        Rect outOutsets, InputChannel outInputChannel) {

    return mService.addWindow(this, window, seq, attrs, viewVisibility, displayId,
            outContentInsets, outStableInsets, outOutsets, outInputChannel);

}
他最终是用WindowManagerService去添加Window的,通过WindowManagerService,(如果继续深入WindowManagerService会发现更多的细节,不过这个Service代码实在是太长。。。我们知道是它的作用就行了。)View就会呈现在我们的屏幕上了。
当然如果想要了解WindowManagerService的我建议去浏览下这个博客,讲的真心赞!
老罗的博客
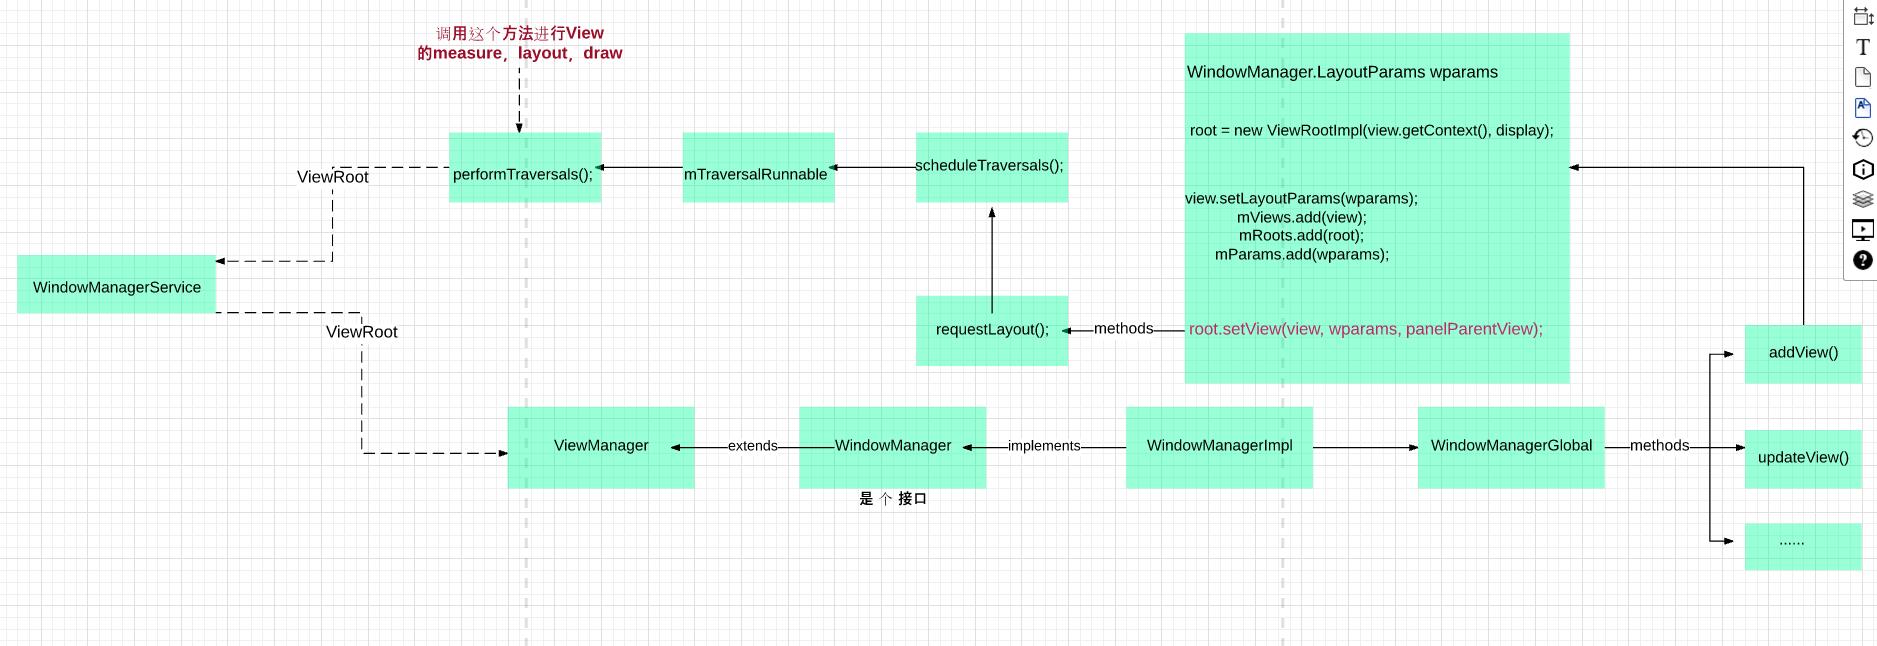
我们画个图加深下印象


 9424
9424

 被折叠的 条评论
为什么被折叠?
被折叠的 条评论
为什么被折叠?
 到【灌水乐园】发言


