


1.前言
本来一直就想做音视频开发这方面,包括我的毕业论文也是,可惜却太久没有接触有些陌生,遂写文章来复习。在这里有几个目标需要订下:第一个就是需要实现相机使用OpenGL ES进行渲染,第二个就是搞定实现一些初步的滤镜,第三个就是了解视频的各种知识。
2.正文
2.1大概介绍
老规矩,从绘制一个三角形开始。大家不防回想一下,我们使用之前是怎么绘制三角形(以Android自定义View举例)。首先就是new一个paint和path,然后paint只需要颜色,而path则是只需要提供坐标即可。如下
public class TriangleView extends View {
    private final Paint paint = new Paint();
    private final Path path = new Path();

    public TriangleView(Context context) {
        super(context);
        paint.setStyle(Paint.Style.FILL);
        paint.setColor(Color.BLUE);
        paint.setAntiAlias(true);

        path.moveTo(120, 120);
        path.lineTo(100, 200);
        path.lineTo(140, 200);
        path.close();
    }

    public TriangleView(Context context, @Nullable AttributeSet attrs) {
        this(context, attrs, 0);
    }

    public TriangleView(Context context, @Nullable AttributeSet attrs, int defStyleAttr) {
        this(context, attrs, defStyleAttr, 0);
    }

    public TriangleView(Context context, @Nullable AttributeSet attrs, int defStyleAttr, int defStyleRes) {
        super(context, attrs, defStyleAttr, defStyleRes);
        paint.setStyle(Paint.Style.FILL);
        paint.setColor(Color.BLUE);
        paint.setAntiAlias(true);

        path.moveTo(120, 120);
        path.lineTo(100, 200);
        path.lineTo(140, 200);
        path.close();
    }

    @Override
    protected void onDraw(Canvas canvas) {
        super.onDraw(canvas);
        canvas.drawPath(path, paint);
    }
}
其中paint和path为了防止在onDraw中不断创建而消耗性能,故直接final,在构造函数中进行设置。其中moveTo中的x120y120则是顶点坐标,而x100y200和x140y200则是剩下的坐标,十分简单。
显示效果如下

一个小小的三角形就在上面,很简单的例子,我们只需要知道坐标即可。但是OpenGL ES大为不同,麻烦的很。好在现在Java上能够直接操作却也还算简单。
首先在AndroidManifest.xml中添加uses-feature
    <!-- Tell the system this app requires OpenGL ES 3.1. -->
    <uses-feature android:glEsVersion="0x00030001" android:required="true" />
由于我的测试手机是百分百支持的,所以我就不会去检测是否支持,其他的兼容性需要大家自己去处理。我们直接new一个GLSurfaceView,然后设置一个Renderer即可。
        new GLSurfaceView.Renderer(){

            @Override
            public void onSurfaceCreated(GL10 gl, EGLConfig config) {

            }

            @Override
            public void onSurfaceChanged(GL10 gl, int width, int height) {

            }

            @Override
            public void onDrawFrame(GL10 gl) {

            }
        };
其中onSurfaceCreated是创建的时候callback一次,也仅此一次。在这里我们一般会通过glClearColor设置清屏的颜色,其参数为rgba。而onSurfaceChanged则是Surface发生改变的时候,比如横竖屏的改变,我们则是使用glViewport函数设置绘制区域。这当中有两个个坐标系需要记住,那就是首先Viewport的坐标系。
@Override
public void onSurfaceChanged(GL10 gl, int width, int height) {
gl.glViewport(0, 0, width / 2, height / 2);
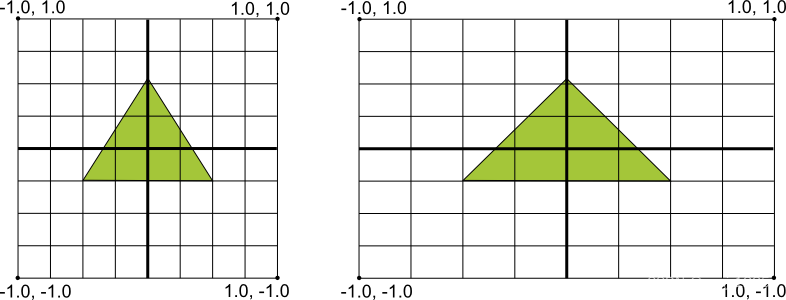
}这个代码很明显就是只使用了1/4的屏幕,但是是其原点是处于手机的坐下,这很符合我们的直觉。但是当我们绘制的时候,这个坐标系却不太一样了。它是将屏幕四个顶点都是1,只不过有正负之分,上一张Google的原图。
比如一台IQOO Z6的手机,他的像素是2408*1080,那么他的x系1单位的像素是540px,而y系1单位则是1204px。最后一个则是重新绘制时会callback。然后直接setContentView即可。
2.2正式开始
我们首先需要知道的是OpenGL是状态机,和我们平时的面向对象编程都是不太一样,这也导致了我最开始编程的时候其实是没有看的太懂的。这是因为我们是使用CPU来控制GPU进行编程,要首先切换GPU的状态,然后才能去控制GPU进行相对应的计算(应该是?个人理解,如果不正确,麻烦您指正,我将会修改),这就是为什么OpenGL有点模版化,但是却又不符合常理。为此,我们将数据送入GPU的方式也是颇为奇特的。
    public static FloatBuffer createFloatBuffer(final float[] data) {
        FloatBuffer dst = ByteBuffer.allocateDirect(data.length << 2)
                .order(ByteOrder.nativeOrder()).asFloatBuffer();
        dst.put(data).position(0);
        return dst;
    }
我们首先需要使用ByteBuffer的allocateDirect去申请一个堆外内存,并且确定大小段额和数据写入、设置position为0。然后才能使用glVertexPotiner来讲数据送入GPU。而顶点的坐标位置和Color都是这样子送进去的。
public class MainActivity extends AppCompatActivity {
@Override
protected void onCreate(Bundle savedInstanceState) {
super.onCreate(savedInstanceState);
GLSurfaceView glSurfaceView = new GLSurfaceView(this);
glSurfaceView.setRenderer(new GLSurfaceView.Renderer() {
@Override
public void onSurfaceCreated(GL10 gl, EGLConfig config) {
gl.glClearColor(1.0f, 1.0f, 1.0f, 1.0f);
}
@Override
public void onSurfaceChanged(GL10 gl, int width, int height) {
gl.glViewport(0, 0, width, height);
}
@Override
public void onDrawFrame(GL10 gl) {
gl.glClear(GL_DEPTH_BUFFER_BIT | GL_COLOR_BUFFER_BIT);
float[] vVertices = {
0.0f, 0.5f, 0.0f,
-0.5f, -0.5f, 0.0f,
0.5f, -0.5f, 0.0f,
};
float[] vColor = {
1, 1, 0, 1,
0, 1, 1, 1,
1, 0, 1, 1
};
FloatBuffer vertexBuffer = createFloatBuffer(vVertices);
FloatBuffer colorBuffer = createFloatBuffer(vColor);
gl.glEnableClientState(GL_VERTEX_ARRAY);
gl.glEnableClientState(GL_COLOR_ARRAY);
gl.glVertexPointer(3, GL_FLOAT, 0, vertexBuffer);
gl.glColorPointer(4, GL_FLOAT, 0, colorBuffer);
gl.glDrawArrays(GL_TRIANGLES, 0, 3);
gl.glFinish();
}
});
setContentView(glSurfaceView);
}
public static FloatBuffer createFloatBuffer(final float[] data) {
FloatBuffer dst = ByteBuffer.allocateDirect(data.length << 2)
.order(ByteOrder.nativeOrder()).asFloatBuffer();
dst.put(data).position(0);
return dst;
}
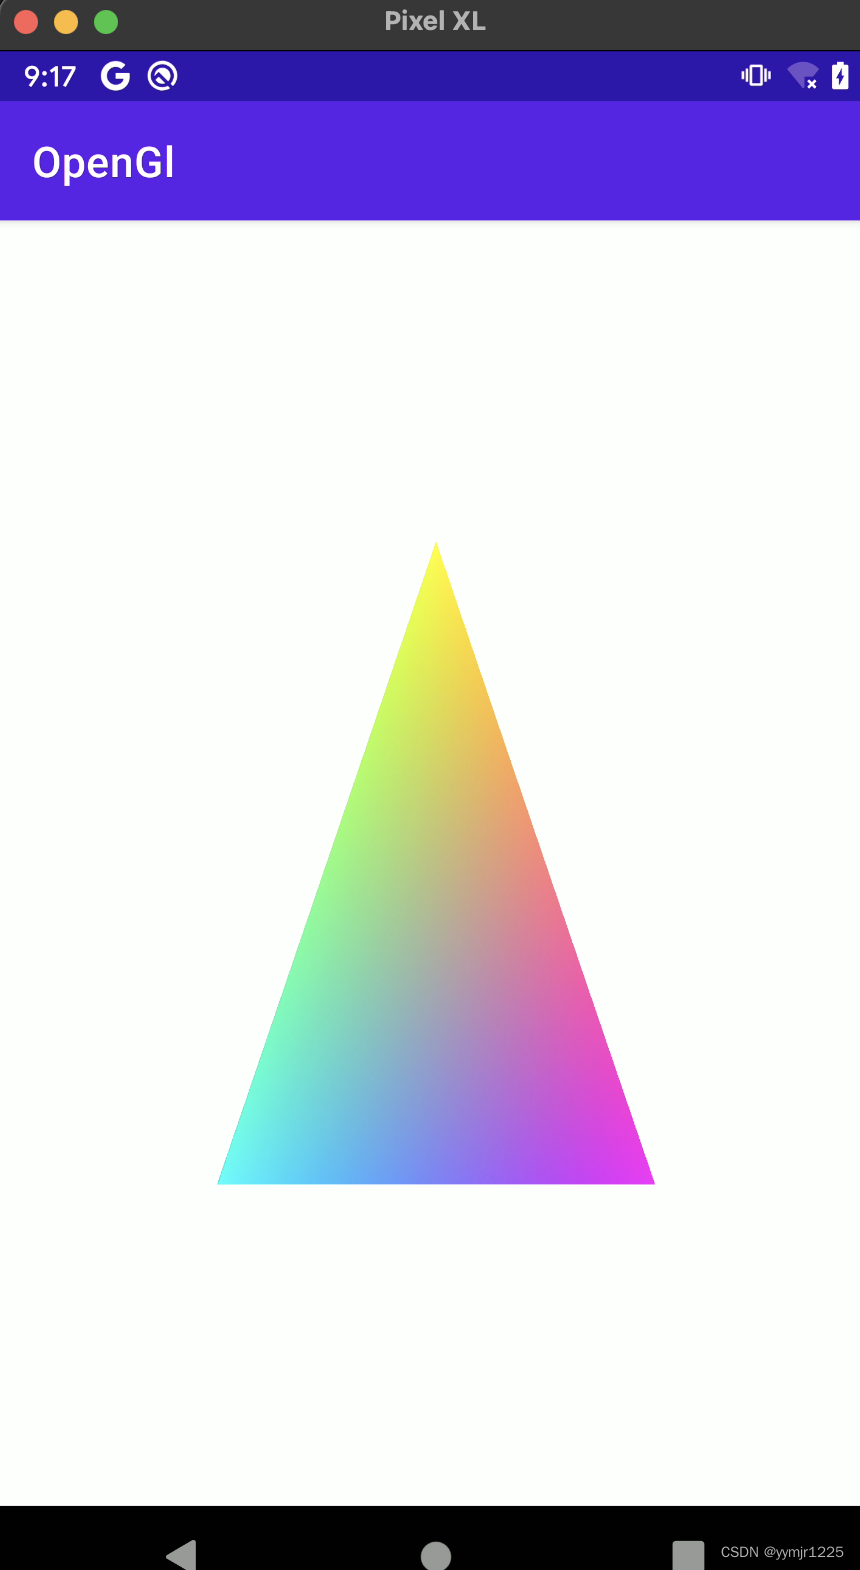
}显示效果如下,效果还是不错的。
但是随着使用,大家会发现一个问题,那就是shader去哪里?是的,不少人之前学习时都会对这个shader发生困惑,但是我这里又怎么连shader都没有呢?接下来,我将会使用shader再写一个。但是在此之前,我需要先上一张图片(ps:Hello-Triangle)。

请牢记这张图,他将会贯彻始终。首先请记住,我们是在CPU里面编码,然后去控制GPU计算,这其中我们也可以编写一段用于GPU的代码,然后通过CPU传入,而这个代码在OpenGL叫做shader。所以,在这里我们首先需要创建program,然后创建两个shader,将他们进行编译和链接,并且使用和赋值。这两个shader分别是vertexShader和fragmentShader,图上还有geometryShader,但是我们并不常用。其中vertxShader是顶点着色器,这个shader程序主要是负责输出顶点的坐标位置信息。我们来看一端最经典的vertex shader example code。
#version 330 core
layout (location = 0) in vec3 aPos;

void main()
{
    gl_Position = vec4(aPos.x, aPos.y, aPos.z, 1.0);
}
大家可能看到一头雾水,我们不是需要输出顶点的坐标位置信息,返回值呢?其实就是这个gl_Position,这个是已经定义好的,当你把值赋给gl_Position时就已经是输出顶点的位置坐标信息了,随后就是大家也在想另一个问题,那么就是我们如何把我们的数据传给他呢,并且这个gl_Position只能传一个,我们的坐标那么多,怎么处理的?
我们来一一解惑。首先就是传输和找到我们传输在这个程序里面的数据,仔细看代码,大家可以看到上面有一个我们写的变量信息。
layout (location = 0) in vec3 aPos;in关键词表示这个是我们传入参数,vec3表示这是个float数组,最后的数字表示数组长度为3;layout ( location = 0 )表示属性位置为0,所以我们使用glVertexAttribPointer传输的时候第一个参数index就可以设置为0了。这当然还有另外一种就是直接使用attribute关键词,然后使用glGetAttribLocation获取index了。
#version 330 core
attribute vec3 aPos;

void main()
{
    gl_Position = vec4(aPos.x, aPos.y, aPos.z, 1.0);
}
int location = GLES32.glGetAttribLocation(programId, "aPos");
GLES32.glEnableVertexAttribArray(location);
GLES32.glVertexAttribPointer(location, 3, GL_FLOAT, false,0, buffer)例子如上。随后就是第二个问题,那就是大家不用担心,由于GPU的特殊性,确实是一次只用处理一个即可。fragmentShader则是片段着色器,看图片也知道,这个是负责上色,我们主要赋值给gl_FragColor即可。
接下来就上我写的代码。
public class MainActivity extends AppCompatActivity {
    private final static int COORDS_PER_VERTEX = 3;
    private final static int VERTEX_Stride = COORDS_PER_VERTEX << 2; // 4 bytes per vertex
    final static String vertexShaderSource = "attribute vec3 aPos;" +
            "attribute vec3 aColor;" +
            "varying vec3 outColor;\n" +
            "void main() {" +
            "   gl_Position = vec4(aPos, 1.0f);" +
            "   outColor = aColor;" +
            "}";
    final static String fragmentShaderSource = "varying vec3 outColor;\n" +
            "void main() {" +
            "   gl_FragColor = vec4(outColor, 1.0f);" +
            "}";
    final static float[] vertexWithColor = {
            0.0f, 0.5f, 0.0f, 1.0f, 0.0f, 0.0f,
            -0.5f, -0.5f, 0.0f, 0.0f, 1.0f, 0.0f,
            0.5f, -0.5f, 0.0f, 0.0f, 0.0f, 1.0f,
    };

    @Override
    protected void onCreate(Bundle savedInstanceState) {
        super.onCreate(savedInstanceState);
        GLSurfaceView glSurfaceView = new GLSurfaceView(this);
        glSurfaceView.setEGLConfigChooser(8, 8, 8, 8, 0, 0);
        glSurfaceView.setEGLContextClientVersion(3);
        glSurfaceView.setRenderer(new GLSurfaceView.Renderer() {
            @Override
            public void onSurfaceCreated(GL10 gl, EGLConfig config) {
                int vertexShader = createShader(GLES30.GL_VERTEX_SHADER, vertexShaderSource);
                int fragmentShader = createShader(GLES30.GL_FRAGMENT_SHADER, fragmentShaderSource);

                int programId = GLES30.glCreateProgram();
                GLES30.glAttachShader(programId, vertexShader);
                GLES30.glAttachShader(programId, fragmentShader);
                GLES30.glLinkProgram(programId);
                GLES30.glUseProgram(programId);

                int[] VBOs = new int[1];
                GLES30.glGenBuffers(1, VBOs, 0);
                GLES30.glBindBuffer(GLES30.GL_ARRAY_BUFFER, VBOs[0]);
                FloatBuffer floatBuffer = createFloatBuffer(vertexWithColor);
                GLES30.glBufferData(GLES30.GL_ARRAY_BUFFER, vertexWithColor.length << 2,
                        floatBuffer, GL_STATIC_DRAW);

                int positionHandle = GLES30.glGetAttribLocation(programId, "aPos");
                GLES30.glEnableVertexAttribArray(positionHandle);
                GLES30.glVertexAttribPointer(positionHandle, COORDS_PER_VERTEX, GL_FLOAT, false, VERTEX_Stride << 1, 0);
                int colorHandle = GLES30.glGetAttribLocation(programId, "aColor");
                GLES30.glEnableVertexAttribArray(colorHandle);
                GLES30.glVertexAttribPointer(colorHandle, COORDS_PER_VERTEX, GL_FLOAT, false, VERTEX_Stride << 1, VERTEX_Stride);
            }

            @Override
            public void onSurfaceChanged(GL10 gl, int width, int height) {
                GLES30.glViewport(0, 0, width, height);
                GLES30.glClearColor(1.0f, 1.0f, 1.0f, 1.0f);
            }

            @Override
            public void onDrawFrame(GL10 gl) {
                GLES30.glClear(GL_DEPTH_BUFFER_BIT | GL_COLOR_BUFFER_BIT);

                GLES30.glDrawArrays(GL_TRIANGLES, 0, 3);
            }
        });
        setContentView(glSurfaceView);
    }

    public static int createShader(int type, String source) {
        int shaderId = GLES30.glCreateShader(type);
        GLES30.glShaderSource(shaderId, source);
        GLES30.glCompileShader(shaderId);
        int[] compiled = new int[1];
        GLES30.glGetShaderiv(shaderId, GLES30.GL_COMPILE_STATUS, compiled, 0);
        if (compiled[0] == 0) {
            GLES30.glDeleteShader(shaderId);
            GLES30.glGetShaderInfoLog(shaderId);
            shaderId = 0;
        }
        return shaderId;
    }

    public static FloatBuffer createFloatBuffer(final float[] data) {
        FloatBuffer dst = ByteBuffer.allocateDirect(data.length << 2)
                .order(ByteOrder.nativeOrder()).asFloatBuffer();
        dst.put(data).position(0);
        return dst;
    }
}
代码效果

应该还是可以的,其中首先就是这两个shaderSource,本来我是想使用layout location的,但是不知道为什么却报错,识别不到vec3,然后查询Google官方资料后(绘制形状),也是使用的attribute关键词,所以就放弃挣扎了。然后解析参数
                int positionHandle = GLES30.glGetAttribLocation(programId, "aPos");
                GLES30.glEnableVertexAttribArray(positionHandle);
                GLES30.glVertexAttribPointer(positionHandle, COORDS_PER_VERTEX, GL_FLOAT, false, VERTEX_Stride << 1, 0);
                int colorHandle = GLES30.glGetAttribLocation(programId, "aColor");
                GLES30.glEnableVertexAttribArray(colorHandle);
GLES30.glVertexAttribPointer(colorHandle, COORDS_PER_VERTEX, GL_FLOAT, false, VERTEX_Stride << 1, VERTEX_Stride);其中有几个点需要注意的是这个stride的单位是4byte,所以导致,并且还要加上自身。所以这里的实际上是24。而glBufferData其中的size单位也是byte,这两个地方一定要注意,否则很难调试发现。在这里我们使用了VBO,下一步就是纹理啦。
2.3纹理部分
我们首先需要知道纹理(textures)是什么?纹理就是一个OpenGL Object,里面可以存放2D\3D图片,也可以是一张,或者多张。是为了方便我们使用所弄出来的。在Java中使用Bitmap创建纹理还是比较简单的。代码如下
    public static int createTexture(@NonNull Bitmap bitmap) {
        int[] textureHandles = new int[1];
        GLES30.glGenTextures(1, textureHandles, 0);
        int textureId = textureHandles[0];
        GLES30.glBindTexture(GL_TEXTURE_2D, textureId);

        GLES30.glTexParameterf(GL_TEXTURE_2D, GLES20.GL_TEXTURE_WRAP_S, GLES20.GL_REPEAT);
        GLES30.glTexParameterf(GL_TEXTURE_2D, GLES20.GL_TEXTURE_WRAP_T, GLES20.GL_REPEAT);
        GLES30.glTexParameterf(GL_TEXTURE_2D, GLES20.GL_TEXTURE_MIN_FILTER, GLES20.GL_NEAREST);
        GLES30.glTexParameterf(GL_TEXTURE_2D, GLES20.GL_TEXTURE_MAG_FILTER, GLES20.GL_LINEAR);

        GLUtils.texImage2D(GL_TEXTURE_2D, 0, bitmap, 0);
        return textureId;
    }

    public Bitmap getImageFromAssets(String fileName) {
        Bitmap bitmap = null;
        try (InputStream is = getAssets().open(fileName)) {
            bitmap = BitmapFactory.decodeStream(is);
        } catch (IOException ignored) {
        }
        return bitmap;
    }
其中glTexParameterf方法,这是一个设置纹理参数的函数。可以自行看自己需求来配置,一般情况,直接copy就行,随后就是绑定纹理了。
                //texture
                int textureId = createTexture(bitmap);
                GLES30.glActiveTexture(textureId);
                GLES30.glBindTexture(GL_TEXTURE_2D, textureId);
大家可以看下,我们似乎并没有如之前那般去传入program中,这是因为OpenGL自己就帮我传入了。随后我们再看下这个shaderSourceCode。
    final static String vertexShaderSource = "attribute vec3 inPos;" +
            "attribute vec2 inTexCoord;" +
            "varying vec2 TexCoord;\n" +
            "void main() {" +
            "   gl_Position = vec4(inPos, 1.0f);" +
            "   TexCoord = inTexCoord;" +
            "}";
    final static String fragmentShaderSource = "varying vec2 TexCoord;" +
            "uniform sampler2D inTexture;\n" +
            "void main() {" +
            "   gl_FragColor = texture2D(inTexture, TexCoord);" +
            "}";
其中只有两个不同,那么就是uniform和sample2D,而sample2D就表示是纹理了,而uniform关键词则是表明是全局变量,只不过既然OpenGL自己处理,那么其实只需要明白就行了。随后就是其中的TexCoord,这个是纹理坐标系。其中2D纹理坐标系则是下图,手画。

再配合我的代码,大家就可以看明白了。
    final static float[] vertexWithTexture = {
            -1.0f, 1.0f, 0.0f, 0.0f, 0.0f,
            -1.0f, -1.0f, 0.0f, 0.0f, 1.0f,
            1.0f, -1.0f, 0.0f, 1.0f, 1.0f,
            1.0f, 1.0f, 0.0f, 1.0f, 0.0f
    };
我这里是一一对应的。前三个是顶点坐标,后两个则纹理坐标,所以当你想要实现颠倒或者其他操作时,可以在这里进行修改,当然,最好还是一一对应,然后再进行旋转或者其他操作以达到相同目标。最后需要讲解的就是绘制操作了。我们需要用glDrawElements进行绘制。
    final static short[] drawOrder = {0, 1, 2, 0, 2, 3};
    final static Buffer drawOrderBuffer = ByteBuffer.allocateDirect(drawOrder.length << 1)
            .order(ByteOrder.nativeOrder()).asShortBuffer().put(drawOrder).position(0);
这个是绘制顺序,分别绘制了两个三角形(我也不知道为什么是这样?莫非天下所有的图案都是以无数个三角形来进行绘制的吗?)。最后附上完整代码。
public class MainActivity extends AppCompatActivity {
    private final static int COORDS_PER_VERTEX = 3;
    private final static int VERTEX_Stride = COORDS_PER_VERTEX << 2; // 4 bytes per vertex
    final static String vertexShaderSource = "attribute vec3 inPos;" +
            "attribute vec2 inTexCoord;" +
            "varying vec2 TexCoord;\n" +
            "void main() {" +
            "   gl_Position = vec4(inPos, 1.0f);" +
            "   TexCoord = inTexCoord;" +
            "}";
    final static String fragmentShaderSource = "varying vec2 TexCoord;" +
            "uniform sampler2D inTexture;\n" +
            "void main() {" +
            "   gl_FragColor = texture2D(inTexture, TexCoord);" +
            "}";
    final static float[] vertexWithTexture = {
            -1.0f, 1.0f, 0.0f, 0.0f, 0.0f,
            -1.0f, -1.0f, 0.0f, 0.0f, 1.0f,
            1.0f, -1.0f, 0.0f, 1.0f, 1.0f,
            1.0f, 1.0f, 0.0f, 1.0f, 0.0f
    };

    final static short[] drawOrder = {0, 1, 2, 0, 2, 3};
    final static Buffer drawOrderBuffer = ByteBuffer.allocateDirect(drawOrder.length << 1)
            .order(ByteOrder.nativeOrder()).asShortBuffer().put(drawOrder).position(0);

    @Override
    protected void onCreate(Bundle savedInstanceState) {
        super.onCreate(savedInstanceState);
        final Bitmap bitmap = getImageFromAssets("yymjr.png");
        GLSurfaceView glSurfaceView = new GLSurfaceView(this);
        glSurfaceView.setEGLConfigChooser(8, 8, 8, 8, 0, 0);
        glSurfaceView.setEGLContextClientVersion(3);
        glSurfaceView.setRenderer(new GLSurfaceView.Renderer() {
            @Override
            public void onSurfaceCreated(GL10 gl, EGLConfig config) {
                int vertexShader = createShader(GLES30.GL_VERTEX_SHADER, vertexShaderSource);
                int fragmentShader = createShader(GLES30.GL_FRAGMENT_SHADER, fragmentShaderSource);

                int programId = GLES30.glCreateProgram();
                GLES30.glAttachShader(programId, vertexShader);
                GLES30.glAttachShader(programId, fragmentShader);
                GLES30.glLinkProgram(programId);
                GLES30.glUseProgram(programId);

                //texture
                int textureId = createTexture(bitmap);
                GLES30.glActiveTexture(textureId);
                GLES30.glBindTexture(GL_TEXTURE_2D, textureId);

                //vbo
                int[] VBOs = new int[1];
                GLES30.glGenBuffers(1, VBOs, 0);

                GLES30.glBindBuffer(GLES30.GL_ARRAY_BUFFER, VBOs[0]);
                FloatBuffer floatBuffer = createFloatBuffer(vertexWithTexture);
                GLES30.glBufferData(GLES30.GL_ARRAY_BUFFER, vertexWithTexture.length << 2, floatBuffer, GL_STATIC_DRAW);


                int positionHandle = GLES30.glGetAttribLocation(programId, "inPos");
                GLES30.glEnableVertexAttribArray(positionHandle);
                GLES30.glVertexAttribPointer(positionHandle, 3, GL_FLOAT, false, (3 + 2) << 2, 0);
                int colorHandle = GLES30.glGetAttribLocation(programId, "inTexCoord");
                GLES30.glEnableVertexAttribArray(colorHandle);
                GLES30.glVertexAttribPointer(colorHandle, 2, GL_FLOAT, false, (3 + 2) << 2, VERTEX_Stride);
            }

            @Override
            public void onSurfaceChanged(GL10 gl, int width, int height) {
                GLES30.glViewport(0, 0, width, height);
                GLES30.glClearColor(1.0f, 1.0f, 1.0f, 1.0f);
            }

            @Override
            public void onDrawFrame(GL10 gl) {
                GLES30.glClear(GL_DEPTH_BUFFER_BIT | GL_COLOR_BUFFER_BIT);
                GLES30.glDrawElements(GL_TRIANGLE_STRIP, drawOrder.length, GL_UNSIGNED_SHORT, drawOrderBuffer);
            }
        });
        setContentView(glSurfaceView);
    }

    public static int createShader(int type, String source) {
        int shaderId = GLES30.glCreateShader(type);
        GLES30.glShaderSource(shaderId, source);
        GLES30.glCompileShader(shaderId);
        int[] compiled = new int[1];
        GLES30.glGetShaderiv(shaderId, GLES30.GL_COMPILE_STATUS, compiled, 0);
        if (compiled[0] == 0) {
            GLES30.glDeleteShader(shaderId);
            GLES30.glGetShaderInfoLog(shaderId);
            shaderId = 0;
        }
        return shaderId;
    }

    public static FloatBuffer createFloatBuffer(final float[] data) {
        FloatBuffer dst = ByteBuffer.allocateDirect(data.length << 2)
                .order(ByteOrder.nativeOrder()).asFloatBuffer();
        dst.put(data).position(0);
        return dst;
    }

    public static int createTexture(@NonNull Bitmap bitmap) {
        int[] textureHandles = new int[1];
        GLES30.glGenTextures(1, textureHandles, 0);
        int textureId = textureHandles[0];
        GLES30.glBindTexture(GL_TEXTURE_2D, textureId);

        GLES30.glTexParameterf(GL_TEXTURE_2D, GLES20.GL_TEXTURE_WRAP_S, GLES20.GL_REPEAT);
        GLES30.glTexParameterf(GL_TEXTURE_2D, GLES20.GL_TEXTURE_WRAP_T, GLES20.GL_REPEAT);
        GLES30.glTexParameterf(GL_TEXTURE_2D, GLES20.GL_TEXTURE_MIN_FILTER, GLES20.GL_NEAREST);
        GLES30.glTexParameterf(GL_TEXTURE_2D, GLES20.GL_TEXTURE_MAG_FILTER, GLES20.GL_LINEAR);

        GLUtils.texImage2D(GL_TEXTURE_2D, 0, bitmap, 0);
        return textureId;
    }

    public Bitmap getImageFromAssets(String fileName) {
        Bitmap bitmap = null;
        try (InputStream is = getAssets().open(fileName)) {
            bitmap = BitmapFactory.decodeStream(is);
        } catch (IOException ignored) {
        }
        return bitmap;
    }
}
还是老样子,看下效果。

3.结尾
等待下一篇的时候我上传到github吧,应该是使用MediaCodec进行视频解码,然后外加添加水印、滤镜等功能的实现。应该不会太久?欢迎大家指正我的错误!


 3758
3758


 被折叠的 条评论
为什么被折叠?
被折叠的 条评论
为什么被折叠?
 到【灌水乐园】发言


