


一、泛型
1、引出泛型

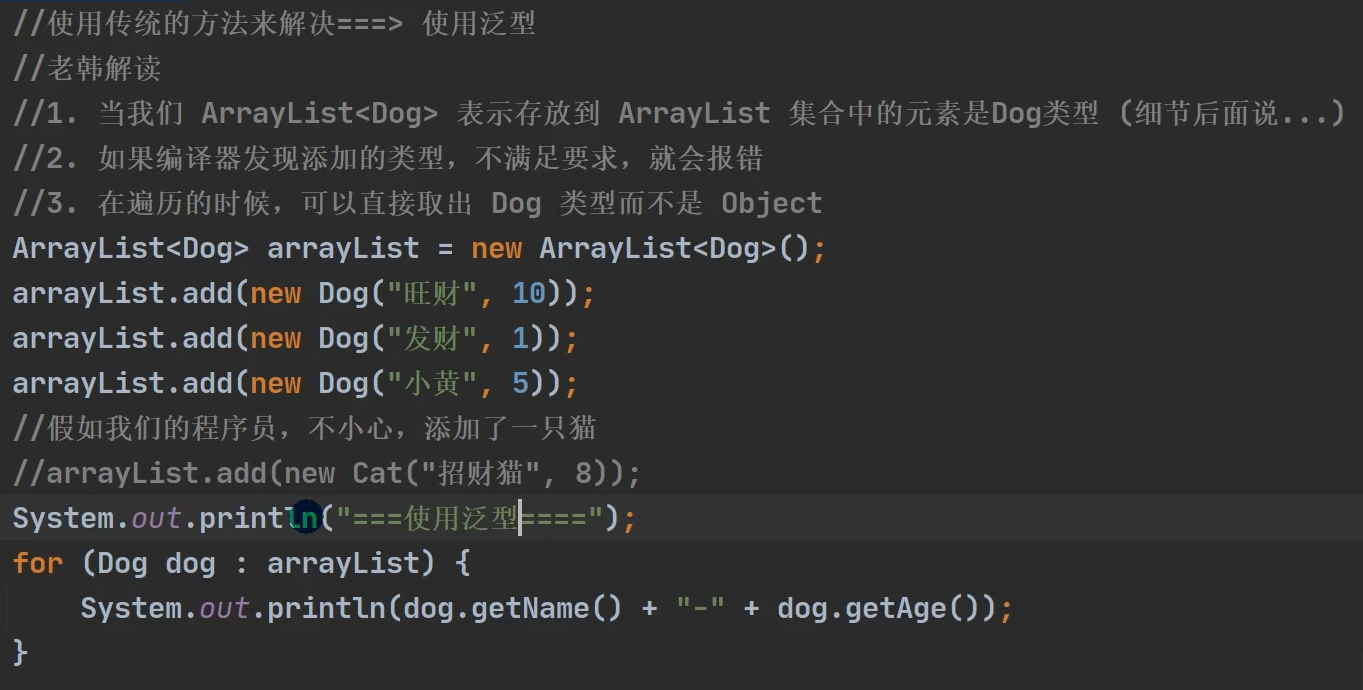
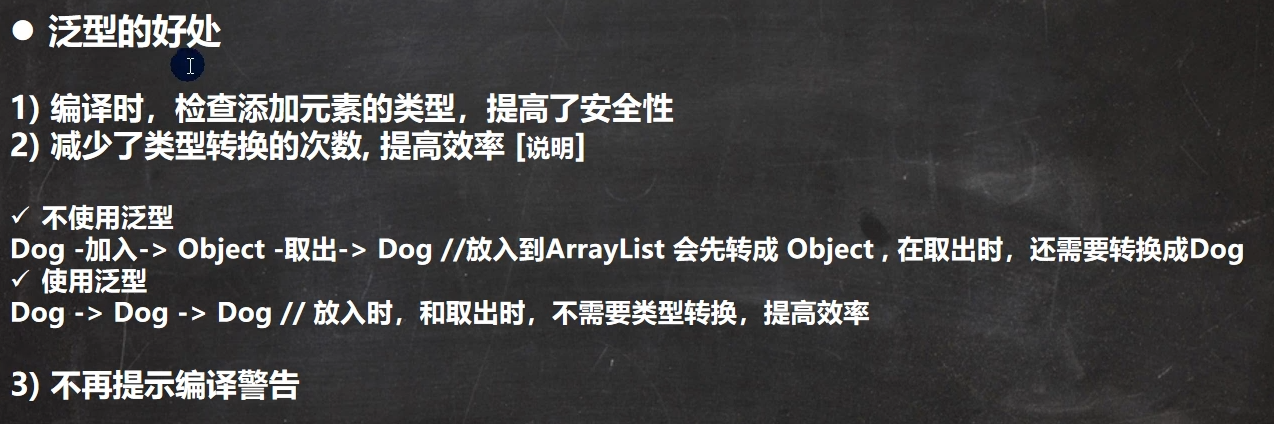
2、泛型介绍
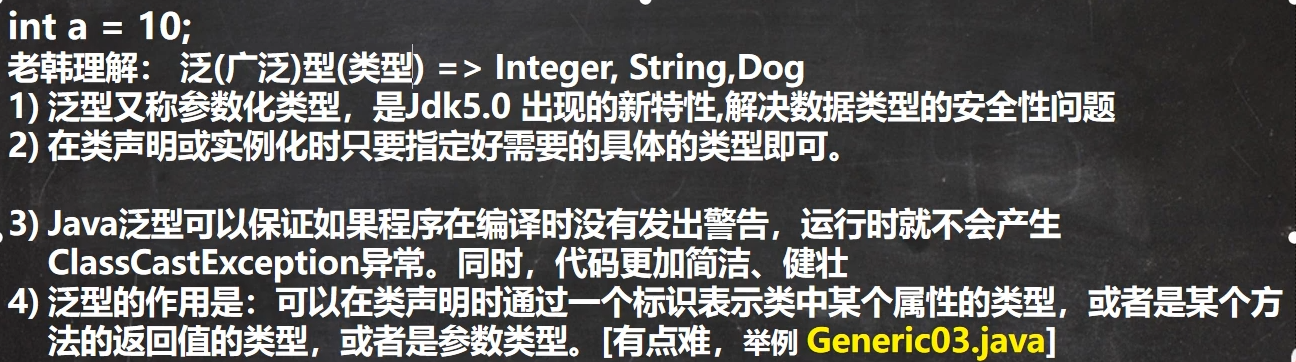
可以理解为:泛型就是可以表示数据类型的一种数据类型。
public class Generic01 {
    public static void main(String[] args) {
        //注意:特别强调:E 具体的数据类型在定义Person对象的时候指定,即在编译期间,就确定 E 是什么类型
        Person<String> person = new Person<String>("叶育笙");
        System.out.println(person);
        person.show(); //显示 s 的运行类型
        /*
        可以理解为:把 String 赋给了 E
        class Person{
            String s;
            public Person(String s) {
                this.s = s;
            }
            public String f(){
                return s;
            }
         */
    }
}
/*
泛型得作用是:可以再类声明时通过一个表示类中某个属性得类型,
或者是某个方法的返回值的类型,或者是参数类型
 */
class Person<E> {
    E s; //E表示 s的数据类型,该数据类型是在定义Person对象的时候指定的,即在编译期间,就确定E是说明类型


    public Person(E s) {//E也可以是参数类型
        this.s = s;
    }


    public E f(){//返回类型使用E
        return s;
    }


    @Override
    public String toString() {
        return "Person{" +
                "s=" + s +
                '}';
    }


    public void show(){
        System.out.println(s.getClass()); //显示 s 的运行类型
    }
}
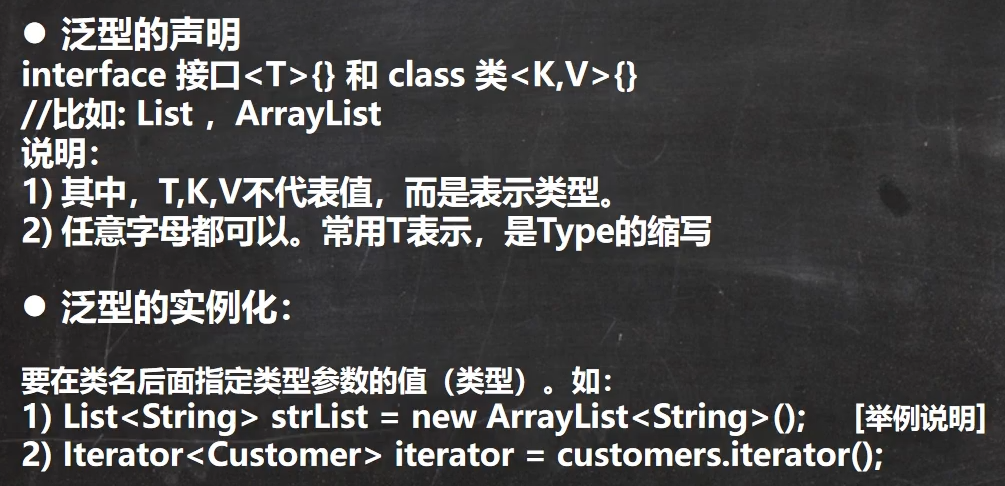
3、泛型的语法
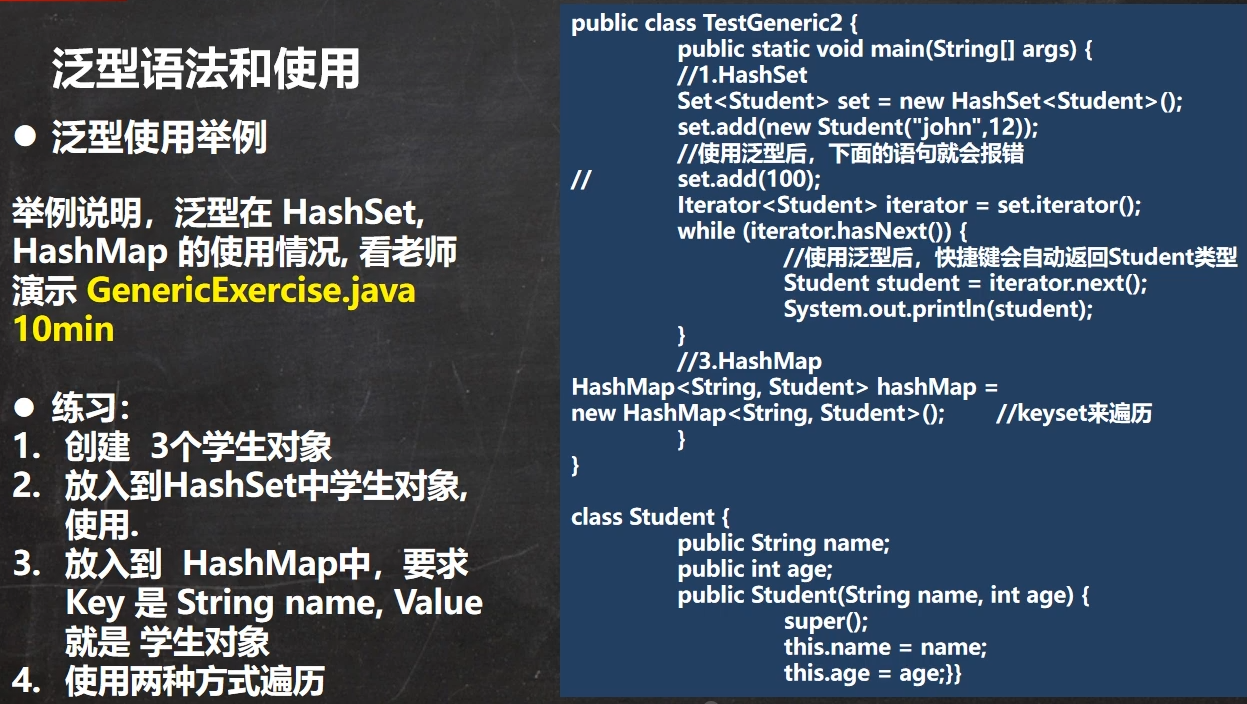
public class GenericExercise {
    public static void main(String[] args) {
        //使用泛型方式给HashSet放入3个学生对象
        HashSet<Student> students = new HashSet<Student>();
        students.add(new Student("jack",18));
        students.add(new Student("tom",28));
        students.add(new Student("mary",19));


        //遍历
        for (Student student :students) {
            System.out.println(student);
        }


        //使用泛型方式给HashMap放入3个学生对象
        Hashtable<String, Student> hm = new Hashtable<String, Student>();
        hm.put("tom",new Student("tom",28));
        hm.put("jack",new Student("jack",18));
        hm.put("mary",new Student("mary",19));


        //迭代器 EntrySet
        Set<Map.Entry<String, Student>> entries = hm.entrySet();
        Iterator<Map.Entry<String, Student>> iterator = entries.iterator();
        while (iterator.hasNext()) {
            Map.Entry<String, Student> next = iterator.next();
            System.out.println(next.getKey()+"-"+next.getValue());
        }
    }
}
/*
    创建3个学生对象
    放入到HashSet中学生对象,使用
    放入到HashMap中,要求Key是String name,Value 就是 学生对象
    使用两种遍历方式
 */
class Student{
    private String name;
    private int age;


    public Student(String name, int age) {
        this.name = name;
        this.age = age;
    }


    public String getName() {
        return name;
    }


    public void setName(String name) {
        this.name = name;
    }


    public int getAge() {
        return age;
    }


    public void setAge(int age) {
        this.age = age;
    }


    @Override
    public String toString() {
        return "Student{" +
                "name='" + name + '\'' +
                ", age=" + age +
                '}';
    }
}
4、泛型的使用细节
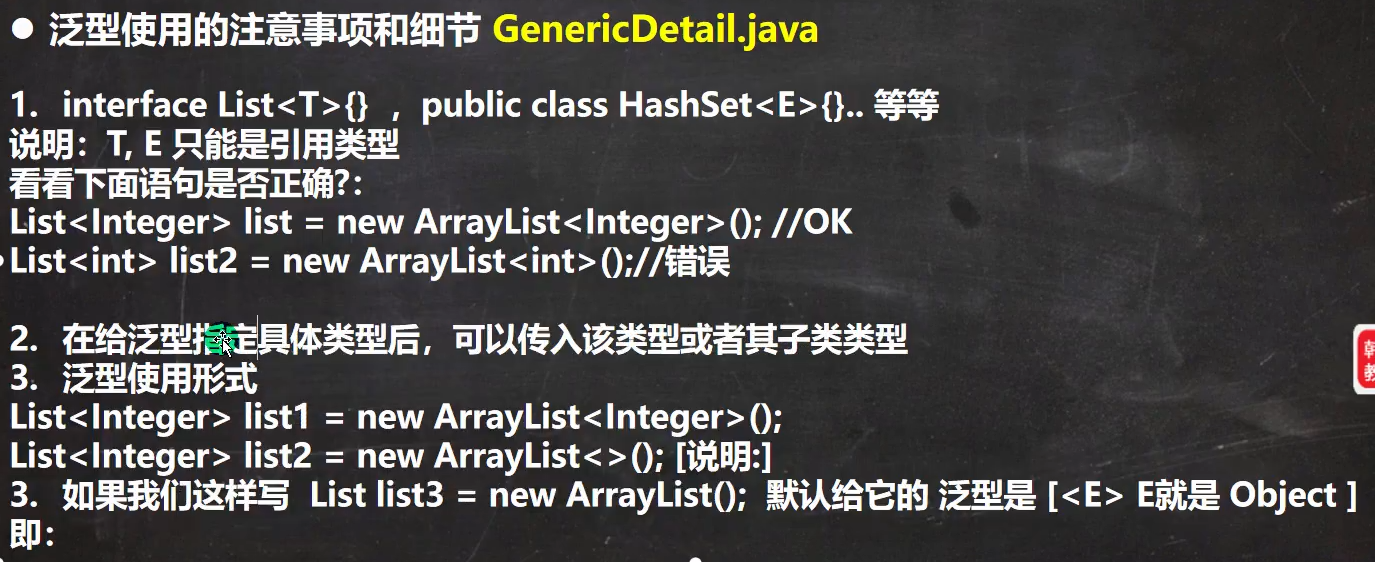
练习:

package generic_;


import java.util.ArrayList;
import java.util.Comparator;


@SuppressWarnings({"all"})
public class GenericExercise02 {
    public static void main(String[] args) {
        ArrayList<Employee> employees = new ArrayList<>();
        employees.add(new Employee("tom", 20000, new MyDate(2000, 11, 11)));
        employees.add(new Employee("jack", 12000, new MyDate(2001, 12, 12)));
        employees.add(new Employee("yys", 50000, new MyDate(2001, 4, 30)));
        System.out.println("排序前:" + employees);


        employees.sort(new Comparator<Employee>() {
            @Override
            public int compare(Employee emp1, Employee emp2) {
                //排序规则:如果name相同,则按生日日期的先后排序。( 即:定制排序)
                //先对传入的参数进行验证
                if(!(emp1 instanceof Employee && emp2 instanceof Employee)){
                    System.out.println("类型不正确");
                    return 0;
                }
                //比较name
                int i = emp1.getName().compareTo(emp2.getName());
                if (i != 0) {
                    return i;
                }
                //下面是对birthday的比较,因此,我们最好把这个比较,放在MyDate中完成
//                //如果name相同就比较birthday 中的 year. Minus 是相减的意思
//                int yearMinus = emp1.getBirthday().getYear() - emp2.getBirthday().getYear();
//                if (yearMinus != 0){
//                    return yearMinus;
//                }
//                //如果year相同,就比较month
//                int monthMinus = emp1.getBirthday().getMonth() - emp2.getBirthday().getMonth();
//                if(monthMinus != 0){
//                    return monthMinus;
//                }
//                //如果year 和 month 相同
//                return emp1.getBirthday().getDay() - emp2.getBirthday().getDay();
                //封装后,将来的可维护性和复用性,就大大增强
                return emp1.getBirthday().compareTo(emp2.getBirthday());
            }
        });
        System.out.println("排序后");
        System.out.println(employees);
    }
}


/*
泛型课堂练习题
定义Employee类
1)该类包含: private成员变量name,sal,birthday, 其中birthday为MyDate类的对象;
2)为每一个属性定义getter, setter方法;
3)重写toString方法输出name, sal, birthday
4)MyDate类包含: private成员变量month,day,year;并为每一个属性定义getter,setter方法;
5)创建该类的3个对象,并把这些对象放入ArrayList集合中(ArrayList 需使用泛型来定义) ,
  对集合中的元素进行排序,并遍历输出:
  排序方式:调用ArrayList 的sort方法,传入Comparator对象[使用泛型],先按照name排序,
  如果name相同,则按生日日期的先后排序。( 即:定制排序)
有一定难度,比较经典泛型使用案例
 */
class Employee {
    private String name;
    private double sal;
    private MyDate birthday;


    public Employee(String name, double sal, MyDate birthday) {
        this.name = name;
        this.sal = sal;
        this.birthday = birthday;
    }


    public String getName() {
        return name;
    }


    public void setName(String name) {
        this.name = name;
    }


    public double getSal() {
        return sal;
    }


    public void setSal(double sal) {
        this.sal = sal;
    }


    public MyDate getBirthday() {
        return birthday;
    }


    public void setBirthday(MyDate birthday) {
        this.birthday = birthday;
    }


    @Override
    public String toString() {
        return "\nEmployee{" +
                "name='" + name + '\'' +
                ", sal=" + sal +
                ", birthday=" + birthday +
                '}';
    }
}


class MyDate implements Comparable<MyDate> {
    private int year;
    private int month;
    ;
    private int day;


    public MyDate(int year, int month, int day) {
        this.year = year;
        this.month = month;
        this.day = day;
    }


    public int getYear() {
        return year;
    }


    public void setYear(int year) {
        this.year = year;
    }


    public int getMonth() {
        return month;
    }


    public void setMonth(int month) {
        this.month = month;
    }


    public int getDay() {
        return day;
    }


    public void setDay(int day) {
        this.day = day;
    }


    @Override
    public String toString() {
        return "MyDate{" +
                "year=" + year +
                ", month=" + month +
                ", day=" + day +
                '}';
    }


    @Override
    public int compareTo(MyDate o) { //把对 年、月、日 的比较放在这


        int yearMinus = year- o.getYear(); //year 相当与于 this.year
        if (yearMinus != 0){
            return yearMinus;
        }
        //如果year相同,就比较month
        int monthMinus = month - o.getMonth();
        if(monthMinus != 0){
            return monthMinus;
        }
        //如果year 和 month 相同
        return day - o.getDay();
    }
}
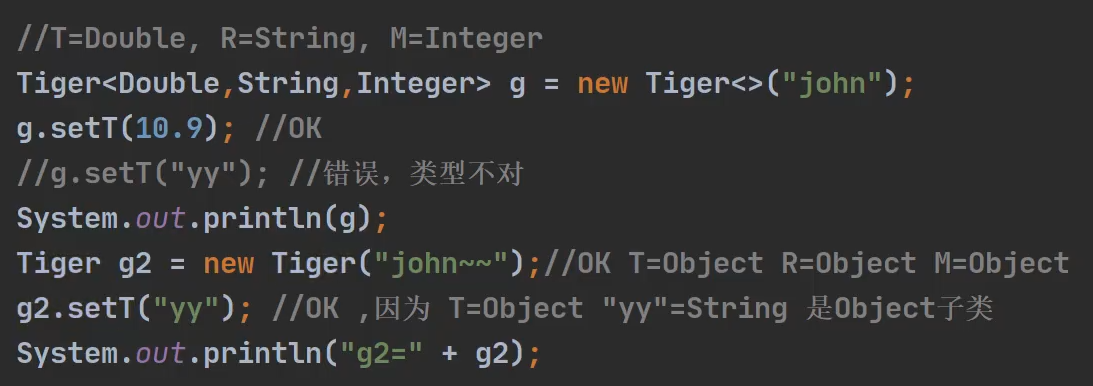
二、自定义泛型
1、自定义泛型类
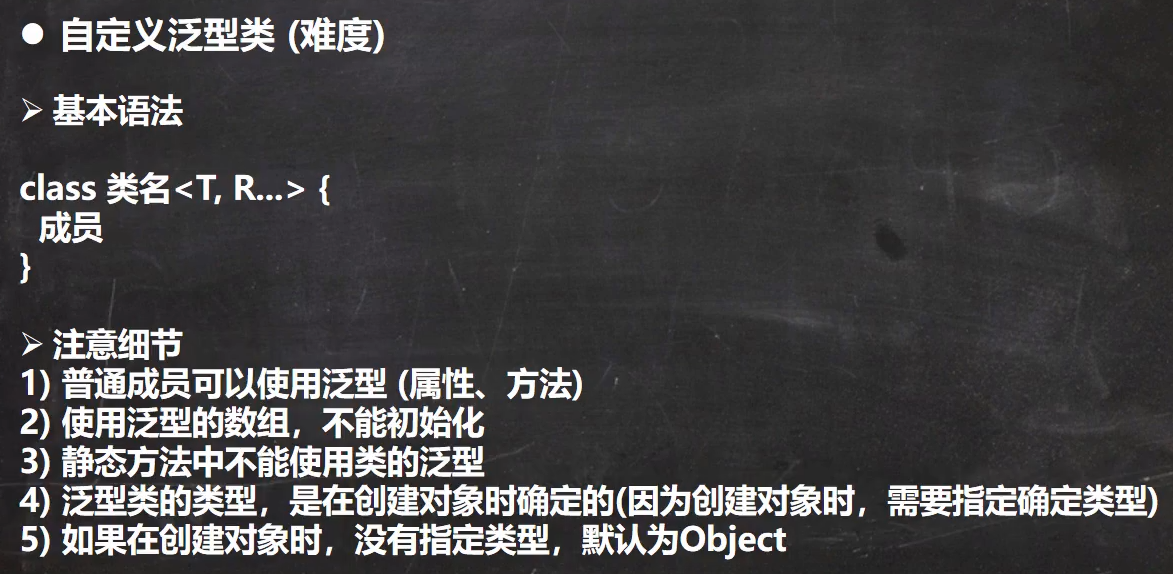
注:默认是 Object
2、自定义泛型接口
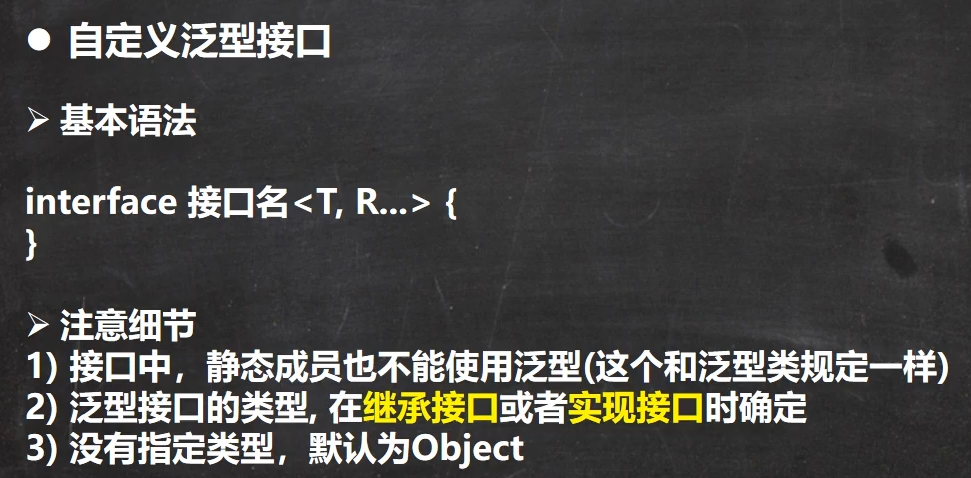
注:默认是 Object
3、自定义方法
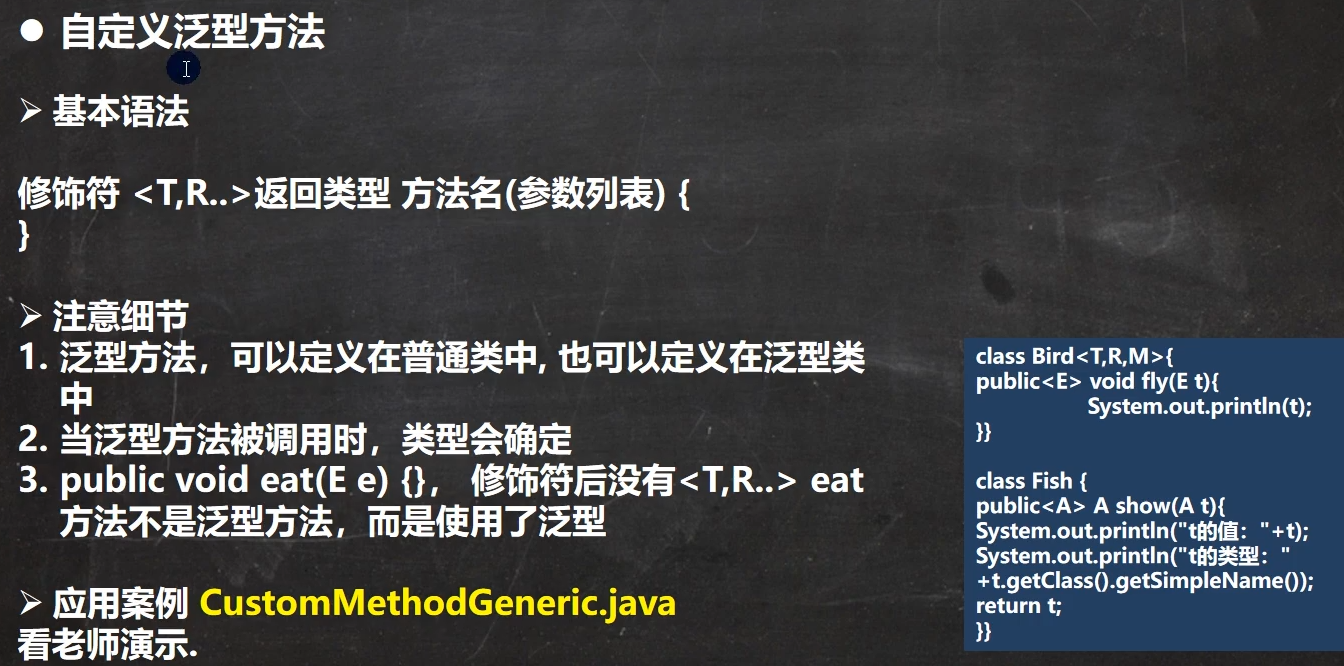
注:注意第3点
泛型方法,可以使用类声明的泛型,也可以使用自己声明的泛型,例:
class Fish<T,R>{ //泛型类
    public void run(){ //普通方法
    }
    public<U,M> void eat(U u, M m){  //泛型方法
    }
    //说明
    //1、下面 hi 方法不是泛型方法
    //2、是 hi 方法使用了类声明的 泛型
    public void hi(T t){
    }
    //泛型方法,可以使用类声明的泛型,也可以使用自己声明的泛型
    public<K> void hello(R r, K k){
    }
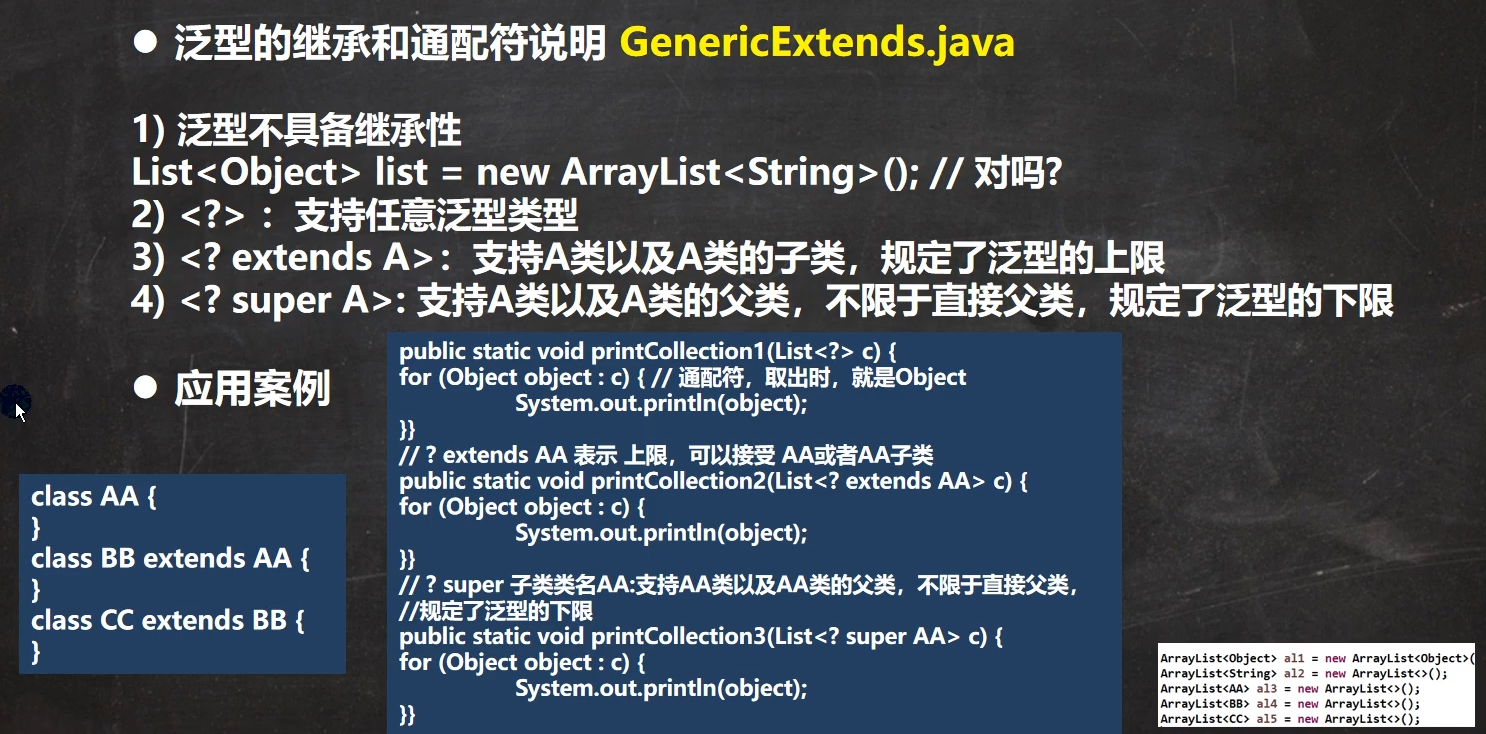
三、泛型的继承和通配符
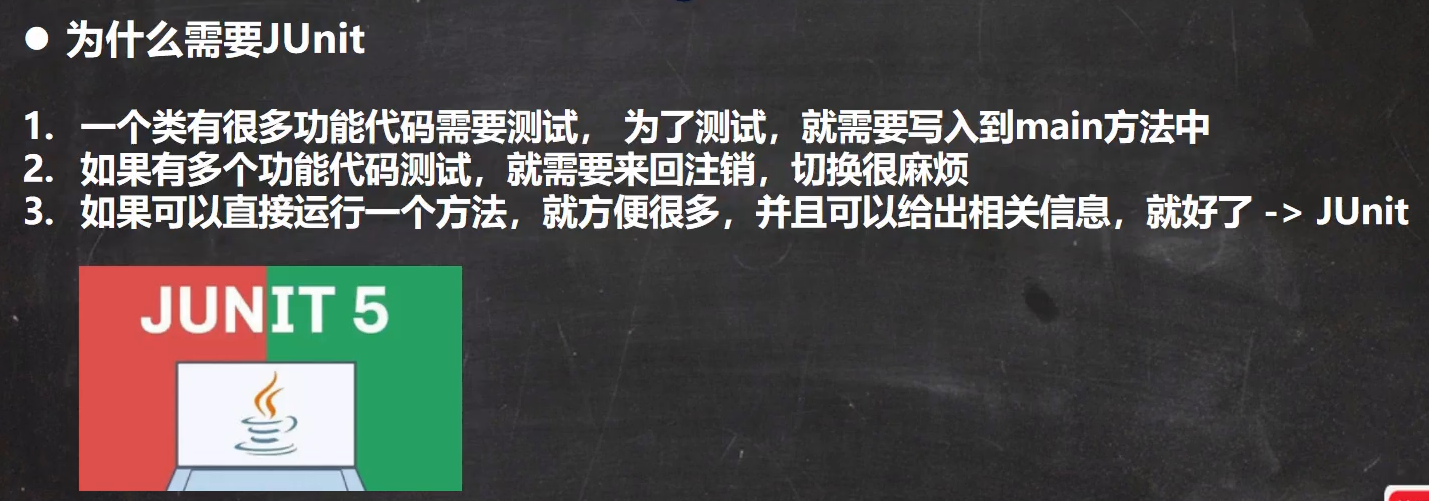
四、JUnit 使用
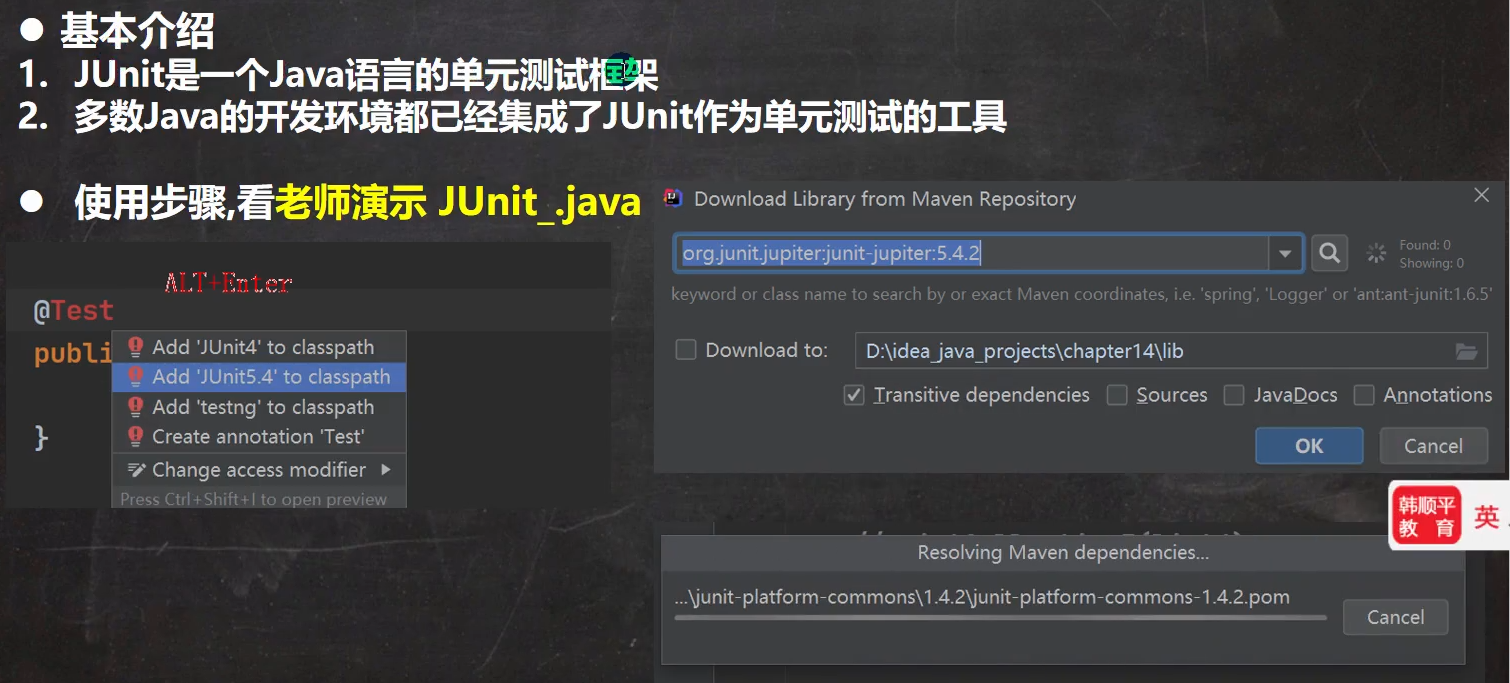
练习:
package generic_;
import org.junit.jupiter.api.Test;
import java.util.*;
public class HomeWork01 {
public static void main(String[] args) {
}
@Test
public void testList(){
//说明:这里我们给T指定类型是User
DAO<User> dao = new DAO<>();
dao.save("001",new User(1,10,"jack"));
dao.save("002",new User(2,18,"king"));
dao.save("003",new User(3,38,"smith"));
//map.get(key)返回的就是User对象 -> ArrayList
List<User> list = dao.list();
System.out.println(list);
System.out.println(dao.get("003"));
}
}
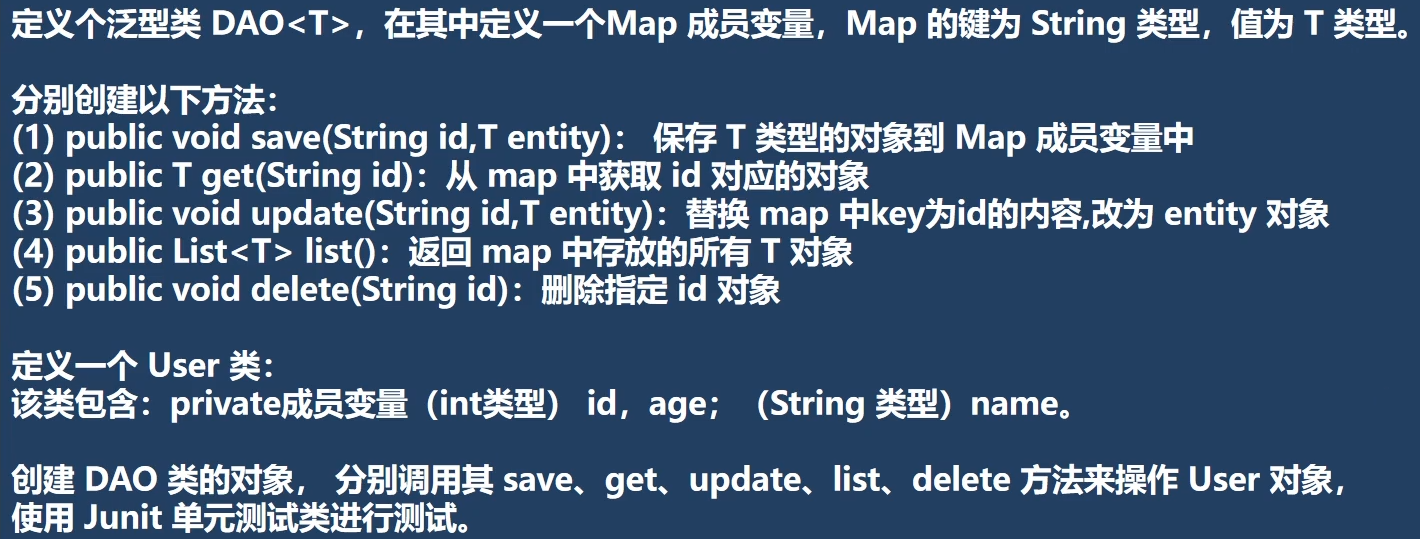
/*
定义个泛型类DAO<T>,在其中定义一个Map成员变量,Map的键为String类型,值为T类型。
分别创建以下方法:
(1) public void save(String id,T entity):保存T类型的对象到Map成员变量中
(2) public T get(String id):从map中获取id对应的对象
(3) public void update(String id,T entity):替换map中key为id的内容,改为entity对象
(4) public List<T> list(): 返回map中存放的所有T对象
(5) public void delete(String id):删除指定id对象
定义一个User类:
该类包含: private成员变量(int类型) id, age;(String类型) name。
创建DAO类的对象,分别调用其 save、get、 update、list、 delete 方法来操作User对象,
使用Junit单元测试类进行测试。
思路分析:
1、定义User类
2、定义DAO<T> 泛型类
*/
class User{
private int id;
private int age;
private String name;
public User(int id, int age, String name) {
this.id = id;
this.age = age;
this.name = name;
}
public int getId() {
return id;
}
public void setId(int id) {
this.id = id;
}
public int getAge() {
return age;
}
public void setAge(int age) {
this.age = age;
}
public String getName() {
return name;
}
public void setName(String name) {
this.name = name;
}
@Override
public String toString() {
return "User{" +
"id=" + id +
", age=" + age +
", name='" + name + '\'' +
'}';
}
}
class DAO<T>{
private Map<String, T> map = new HashMap<>();
public void save(String id,T entity){//把entity保存到map
map.put(id,entity);
}
public T get(String id){
return map.get(id);
}
public void update(String id,T entity){
map.put(id,entity);
}
//返回map中存放的所有T对象
//遍历 map [k-v],将map的所有的value(entity),封装到ArrayList
public List<T> list(){
//创建一个ArrayList
List<T> list = new ArrayList<>();
//遍历 map
Set<String> keySet = map.keySet();
for (String key : keySet) {
list.add(get(key)); //相当于map.get(key),调用get方法
}
return list;
}
public void delete(String id){
map.remove(id);
}
}


 206
206


 被折叠的 条评论
为什么被折叠?
被折叠的 条评论
为什么被折叠?
 到【灌水乐园】发言


