MySQL主从复制的优点包括:
1、横向扩展解决方案 - 在多个从站之间分配负载以提高性能。在此环境中,所有写入和更新都必须在主服务器上进行。但是,读取可以在一个或多个从设备上进行。该模型可以提高写入性能(因为主设备专用于更新),同时显着提高了越来越多的从设备的读取速度。
2、数据安全性 - 因为数据被复制到从站,并且从站可以暂停复制过程,所以可以在从站上运行备份服务而不会破坏相应的主数据。
3、分析 - 可以在主服务器上创建实时数据,而信息分析可以在从服务器上进行,而不会影响主服务器的性能。
4、备份 - 可以使用从服务器数据进行备份,减轻主服务器的压力。
Replication的原理
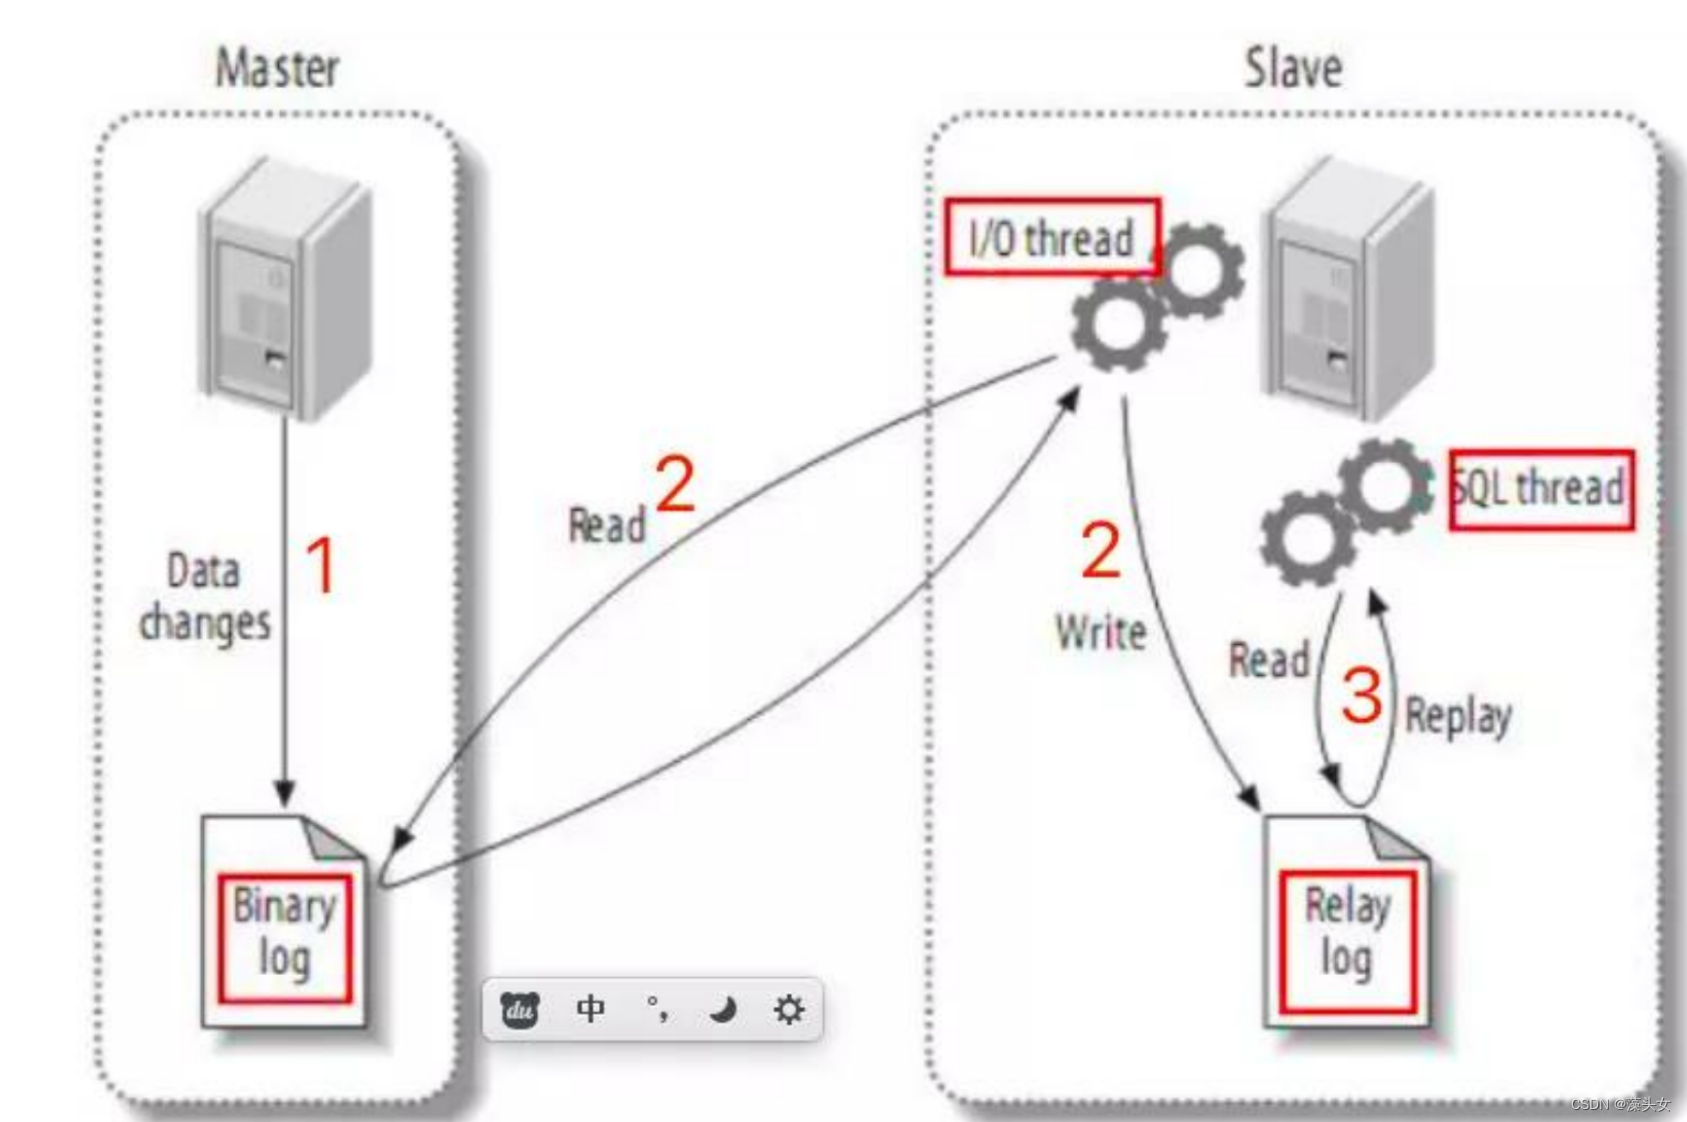
原理 主服务器上面的任何修改都会保存在二进制日志( Bin-log日志) 里面。
1、从库上面启动一个I/O线程,(5.5以后多线程)连接到主服务器上面请求读取二进制(Bin-log)日志文件
2、把读取到的二进制日志写到本地的Realy-log(中继日志)里面
3、从服务器上面同时开启一个SQL线程,读取Realy-log(中继日志),如果发现有更新立即把更新的内容在本机的数据库上面执行一遍。
注:前提是作为主服务器角色的数据库服务器必须开启二进制(binlog)日志
主库机无数据配置主从
主从同时操作
1.准备环境
#防火墙 selinux
[root@m ~]# systemctl stop firewalld --now && setenforce 0


# 修改主机名
[root@m ~]# hostnamectl set-hostname master

# 固定IP
[root@master ~]# vim /etc/sysconfig/network-scripts/ifcfg-ens33
TYPE=Ethernet
PROXY_METHOD=none
BROWSER_ONLY=no
BOOTPROTO=static #静态ip
DEFROUTE=yes
NAME=ens33
DEVICE=ens33
ONBOOT=yes #网卡开机自启
IPADDR=110.12.155.112 #需要固定的ip地址
PREFIX=24 #子网掩码
GATEWAY=10.12.155.250 #网关
DNS1=223.5.5.5
DNS2=223.6.6.6
保存退出后重启网卡
[root@master ~]# systemctl restart network
注:为防止配对成功以后ip地址改变出现连接问题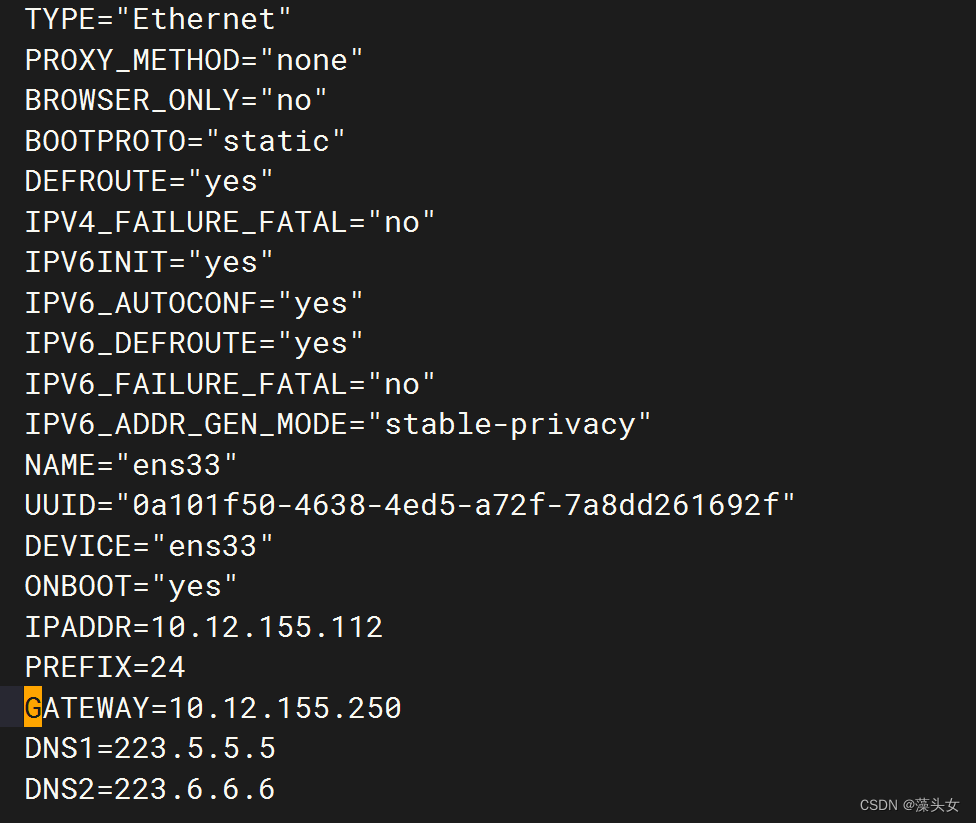
2.主机名解析
主机名解析
[root@master ~]# vim /etc/hosts #添加以下内容
10.12.155.112 master #主库机ip和主机名
10.12.155.113 slave #从库机ip和主机名

3.清理环境
# 清理系统数据库
[root@master ~]# yum -y erase `rpm -qa | egrep "mysql|mariadb"`
[root@master ~]# rm -rf /etc/my* && rm -rf /var/lib/mysql && rm -rf /usr/bin/mysql
# 检查一下
[[ ! -f /etc/my.cnf ]] && [[ ! -d /var/lib/mysql ]] && [[ ! -f /usr/bin/mysql ]] && echo "环境已经清理完成" || echo "环境未清理"

4.安装数据库
#1、yum安装
(安装数据库步骤请看博主前面的文章)
https://blog.csdn.net/yz2322944912/article/details/135071777?spm=1001.2014.3001.5502
#2、启动数据库
[root@master ~]# systemctl start msyqld
#3、修改密码
[root@master ~]# mysqladmin -uroot -p"`awk '/temporary password/{p=$NF}END{print p}' /var/log/mysqld.log`" password '新密码'
配置主库[master]
#开启binlog
[root@master ~]# mkdir -pv /data/ # 创建二进制日志文件的存储目录
[root@master ~]# chown mysql.mysql /data #改属主属组为mysql
[root@master ~]# vim /etc/my.cnf #编辑mysql配置文件添加以下内容
server-id=328 #id号可自定义
log-bin=/data/mysql-bin #日志文件名可自定义
# 重启数据库
[root@master ~]# systemctl restart msyqld
# 创建并授权一个账号
mysql> grant replication slave on *.* to '账号名'@'授权网段或ip' identified by '账号的密码';
mysql> flush privileges;
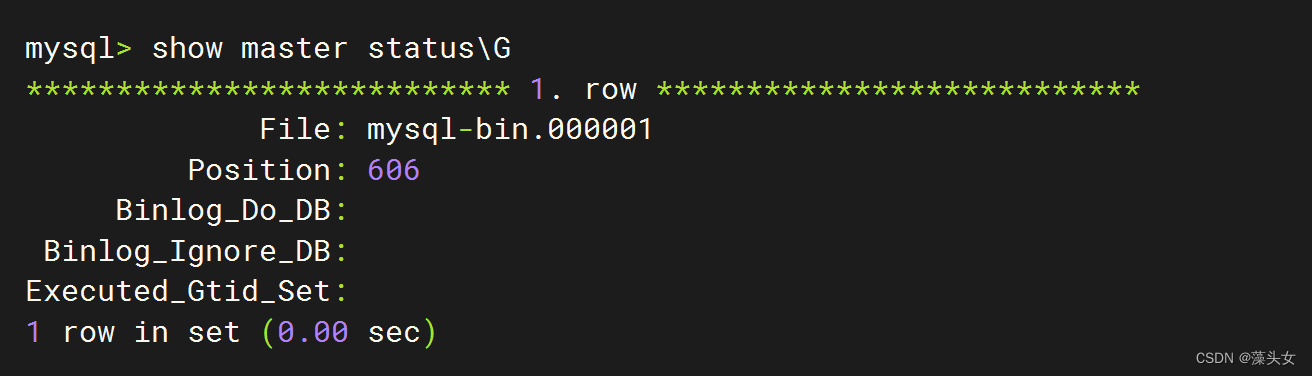
# 查看当前binlog日志文件以及pos位置点
mysql> show master status\G
*************************** 1. row ***************************
File: mysql-bin.000001
Position: 606
Binlog_Do_DB:
Binlog_Ignore_DB:
Executed_Gtid_Set:
1 row in set (0.00 sec)
配置从库[slave]
#编辑mysql配置文件添加server-id
[root@slavr ~]# vim /etc/my.cnf
server-id=329
# 重启数据库
[root@slavr ~]# systemctl restart msyqld
#登录数据库后执行
mysql> ? change master to #查找需要插入的配置主从信息模板
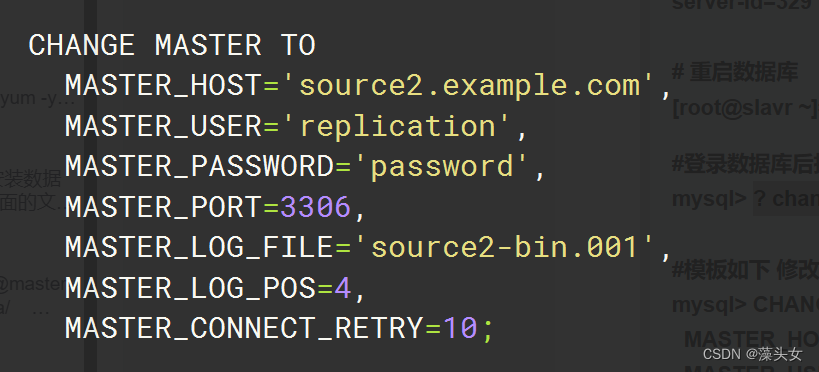
#模板如下 修改配置信息后并执行
mysql> CHANGE MASTER TO
MASTER_HOST='master',
MASTER_USER='账号名',
MASTER_PASSWORD='账号的密码',
MASTER_PORT=3306,
MASTER_LOG_FILE='mysql-bin.000001',
MASTER_LOG_POS=606,
MASTER_CONNECT_RETRY=10;
# 启动slave
mysql> start slave;
# 查看主从状态
mysql> show slave status\G
默认配置信息
主从状态显示
mysql> show slave status\G
*************************** 1. row ***************************
               Slave_IO_State: Waiting for master to send event
                  Master_Host: master
                  Master_User: relication
                  Master_Port: 3306
                Connect_Retry: 10
              Master_Log_File: mysql-bin.000001
          Read_Master_Log_Pos: 154
               Relay_Log_File: slave-relay-bin.000002
                Relay_Log_Pos: 320
        Relay_Master_Log_File: mysql-bin.000001
             Slave_IO_Running: Yes
            Slave_SQL_Running: Yes
              Replicate_Do_DB:
          Replicate_Ignore_DB:
           Replicate_Do_Table:
       Replicate_Ignore_Table:
      Replicate_Wild_Do_Table:
  Replicate_Wild_Ignore_Table:
                   Last_Errno: 0
                   Last_Error:
                 Skip_Counter: 0
          Exec_Master_Log_Pos: 154
              Relay_Log_Space: 527
              Until_Condition: None
               Until_Log_File:
                Until_Log_Pos: 0
           Master_SSL_Allowed: No
           Master_SSL_CA_File:
           Master_SSL_CA_Path:
              Master_SSL_Cert:
            Master_SSL_Cipher:
               Master_SSL_Key:
        Seconds_Behind_Master: 0
Master_SSL_Verify_Server_Cert: No
                Last_IO_Errno: 0
                Last_IO_Error:
               Last_SQL_Errno: 0
               Last_SQL_Error:
  Replicate_Ignore_Server_Ids:
             Master_Server_Id: 203
                  Master_UUID: 6f6d0551-a073-11ee-9f28-000c298a6e96
             Master_Info_File: /var/lib/mysql/master.info
                    SQL_Delay: 0
          SQL_Remaining_Delay: NULL
      Slave_SQL_Running_State: Slave has read all relay log; waiting for more updates
           Master_Retry_Count: 86400
                  Master_Bind:
      Last_IO_Error_Timestamp:
     Last_SQL_Error_Timestamp:
               Master_SSL_Crl:
           Master_SSL_Crlpath:
           Retrieved_Gtid_Set:
            Executed_Gtid_Set:
                Auto_Position: 0
         Replicate_Rewrite_DB:
                 Channel_Name:
           Master_TLS_Version:
1 row in set (0.00 sec)
需注意
## 14 15行 :两个YES表示主从成功
## 关注39-42的信息
## 38行表示主从复制延迟时间
## 46行主库mysqlUUID要和从库mysql的UUID不一致
如有问题要重新配置主从
#首先关闭线程服务
mysql>stop slave;
#重新修改配置主从信息
mysql> reset slave;
mysql>CHANGE MASTER TO
MASTER_HOST='master',
MASTER_USER='relication',
MASTER_PASSWORD='Qianfeng@123',
MASTER_PORT=3306,
MASTER_LOG_FILE='mysql-bin.000001',
MASTER_LOG_POS=154,
MASTER_CONNECT_RETRY=10;
# 启动slave
mysql>start slave;
#继续查看主从状态 直到成功
mysql> show slave status\G
主库机有数据配置主从
配置主库[master]
#创建授权账号
mysql> grant replication slave on *.* to '账号名'@'授权网段或ip' identified by '账号的密码';
#刷新数据库生效
mysql>flush privileges;
# 创建必要目录
[root@master ~]# mkdir /data
[root@master ~]# chown mysql.mysql /data
# 修改配置文件
[root@master ~]# vim /etc/my.cnf
server-id = 328
log-bin = /data/mysql-bin
# 重启数据库
[root@master ~]# systemctl restart mysqld
进入数据库并且锁表备份(重点)
锁表备份
mysql>flush tables with read lock;
#新开一个终端备份全库
[root@master ~]# mysqldump -uroot -p密码 -A | gzip > all.sql.gz
#将备份好的全库文件压缩包远程拷贝至从库
[root@master ~]# scp all.sql.gz slave:需要存放的位置
#返回登录mysql的终端查看二进制日志文件以及位置点信息
mysql>show master status\G
*************************** 1. row ***************************
File: mysql-bin.000001
Position: 1205
Binlog_Do_DB:
Binlog_Ignore_DB:
Executed_Gtid_Set:
1 row in set (0.00 sec)
配置从库[slave]
#导入主库备份的数据全库
[root@slave ~]# mysql -uroot -p密码 < all.sql
#配置主从
[root@slave ~]# vim /etc/my.cnf
server-id = 329
# 重启数据库
[root@slave ~]# systemctl restart mysqld
修改主从配置信息并执行
mysql>change master to
master_host='master',
master_user='replication',
master_password='Aa@123456',
master_port=3306,
master_log_file='mysql-bin.000001',
master_log_pos=1250;
#启动slave
mysql>start slave;
# 查看主从状态
mysql> show slave status\G
*************************** 1. row ***************************
               Slave_IO_State: Waiting for master to send event
                  Master_Host: master
                  Master_User: repl
                  Master_Port: 3306
                Connect_Retry: 60
              Master_Log_File: mysql-bin.000001
          Read_Master_Log_Pos: 154
               Relay_Log_File: slave-relay-bin.000002
                Relay_Log_Pos: 320
        Relay_Master_Log_File: mysql-bin.000001
             Slave_IO_Running: Yes
            Slave_SQL_Running: Yes
              Replicate_Do_DB:
          Replicate_Ignore_DB:
           Replicate_Do_Table:
       Replicate_Ignore_Table:
      Replicate_Wild_Do_Table:
  Replicate_Wild_Ignore_Table:
                   Last_Errno: 0
                   Last_Error:
                 Skip_Counter: 0
          Exec_Master_Log_Pos: 154
              Relay_Log_Space: 527
              Until_Condition: None
               Until_Log_File:
                Until_Log_Pos: 0
           Master_SSL_Allowed: No
           Master_SSL_CA_File:
           Master_SSL_CA_Path:
              Master_SSL_Cert:
            Master_SSL_Cipher:
               Master_SSL_Key:
        Seconds_Behind_Master: 0
Master_SSL_Verify_Server_Cert: No
                Last_IO_Errno: 0
                Last_IO_Error:
               Last_SQL_Errno: 0
               Last_SQL_Error:
  Replicate_Ignore_Server_Ids:
             Master_Server_Id: 203
                  Master_UUID: 5aad69d6-a09e-11ee-b909-000c298a6e96
             Master_Info_File: /var/lib/mysql/master.info
                    SQL_Delay: 0
          SQL_Remaining_Delay: NULL
      Slave_SQL_Running_State: Slave has read all relay log; waiting for more updates
           Master_Retry_Count: 86400
                  Master_Bind:
      Last_IO_Error_Timestamp:
     Last_SQL_Error_Timestamp:
               Master_SSL_Crl:
           Master_SSL_Crlpath:
           Retrieved_Gtid_Set:
            Executed_Gtid_Set:
                Auto_Position: 0
         Replicate_Rewrite_DB:
                 Channel_Name:
           Master_TLS_Version:
主库解锁
mysql> unlock tables; 或者 直接退出mysql数据库自动解锁
还可以通过打开gtid配置主从,但是太鸡肋了不建议使用

感谢观看!希望能够帮助到大家!


 414
414


 被折叠的 条评论
为什么被折叠?
被折叠的 条评论
为什么被折叠?
 到【灌水乐园】发言


