


目录
前言
本文主要是讲解 <script setup> 与 TypeScript 的基本使用。
<script setup> 是什么?
<script setup> 是在单文件组件 (SFC) 中使用 composition api 的编译时语法糖。
本文写作时,vue 使用的 3.2.26 版本。
1、发展历程
我们先看看 vue3 <script setup> 的发展历程:
-
Vue3在早期版本(3.0.0-beta.21之前)中对composition api的支持,只能在组件选项setup函数中使用。
<template>
  <h1>{{ msg }}</h1>
  <button type="button" @click="add">count is: {{ count }}</button>
  <ComponentA />
  <ComponentB />
</template>

<script>
import { defineComponent, ref } from 'vue'
import ComponentA from '@/components/ComponentA'
import ComponentB from '@/components/ComponentB'

export default defineComponent({
  name: 'HelloWorld',
  components: { ComponentA, ComponentB },
  props: {
    msg: String,
  },
  setup(props, ctx) {
    const count = ref(0)
    function add() {
      count.value++
    }
    // 使用return {} 把变量、方法暴露给模板
    return {
      count,
      add,
    }
  },
})
</script>-
在 3.0.0-beta.21 版本中增加了
<script setup>的实验特性。如果你使用了,会提示你<script setup>还处在实验特性阶段。 -
在 3.2.0 版本中移除
<script setup>的实验状态,从此,宣告<script setup>正式转正使用,成为框架稳定的特性之一。
<script setup lang="ts">
import { ref } from 'vue'
import ComponentA from '@/components/ComponentA'
import ComponentB from '@/components/ComponentB'

defineProps<{ msg: string }>()

const count = ref(0)

function add() {
  count.value++
}
</script>

<template>
  <h1>{{ msg }}</h1>
  <button type="button" @click="add">count is: {{ count }}</button>
  <ComponentA />
  <ComponentB />
</template>
2、优势
与组件选项 setup 函数对比, <script setup> 的优点:
-
更少、更简洁的代码,不需要使用
return {}暴露变量和方法了,使用组件时不需要主动注册了;
-
更好的
Typescript支持,使用纯Typescript声明props和抛出事件,不会再像option api里那么蹩脚了;
-
更好的运行时性能;
当然, <script setup> 也是有自己的缺点的,比如需要学习额外的 API。
那么 <script setup> 怎么使用呢?有哪些使用要点?与TypeScript如何结合?
3、工具
Vue3 单文件组件 (SFC) 的 TS IDE 支持请用 <script setup lang="ts"> + VSCode + Volar。
类型检查使用 vue-tsc 命令。
-
VSCode:前端最好用的
IDE。 -
Volar:为
Vue3的*.vue单文件组件提供代码高亮、语法提示等功能支持的VSCode插件;Vue2你可能是使用的Vetur插件,需要禁用Vetur,下载Volar,并启用它。 -
vue-tsc:类型检查和
dts构建命令行工具。
4、基本用法
将 setup 属性添加到 <script> 代码块上。
<script setup>
import { ref } from 'vue'

defineProps({
  msg: String
})

const count = ref(0)

function add() {
  count.value++
}
</script>

<template>
  <h1>{{ msg }}</h1>
  <button type="button" @click="add">count is: {{ count }}</button>
</template>
若需要使用 TypeScript,则将 lang 属性添加到 <script> 代码块上,并赋值 ts。
<script setup lang="ts">
import { ref } from 'vue'

defineProps<{ msg: string }>()

const count = ref(0)

function add() {
  count.value++
}
</script>

<template>
  <h1>{{ msg }}</h1>
  <button type="button" @click="add">count is: {{ count }}</button>
</template>
<script setup> 块中的脚本会被编译成组件选项 setup 函数的内容,也就是说它会在每次组件实例被创建的时候执行。
在 <script setup> 声明的顶层绑定(变量、函数、import引入的内容),都会自动暴露给模板,在模板中直接使用。
<script setup>
import { ref } from 'vue'
// 外部引入的方法,不需要通过 methods 选项来暴露它,模板可以直接使用
import { getToken } from './utils'
// 外部引入的组件,不需要通过 components 选项来暴露它,模板可以直接使用
import ComponentA from '@/components/ComponentA'

defineProps({
  msg: String
})
// 变量声明,模板可以直接使用
const count = ref(0)
// 函数声明,模板可以直接使用
function add() {
  count.value++
}
</script>

<template>
  <h1>{{ msg }}</h1>
  <h1>{{ getToken() }}</h1>
  <button type="button" @click="add">count is: {{ count }}</button>
  <ComponentA />
</template>
注意:
-
每个
*.vue文件最多可同时包含一个<script>块 (不包括<script setup>);
-
每个
*.vue文件最多可同时包含一个<script setup>块 (不包括常规的<script>);
5、编译器宏
编译器宏(compiler macros) 有:defineProps、defineEmits、withDefaults、defineExpose 等。
编译器宏只能在 <script setup> 块中使用,不需要被导入,并且会在处理 <script setup> 块时被一同编译掉。
编译器宏必须在 <script setup> 的顶层使用,不可以在 <script setup> 的局部变量中引用。
5.1 defineProps
在 <script setup> 块中是没有组件配置项的,也就是说是没有 props 选项,需要使用 defineProps 来声明 props 相关信息。defineProps 接收的对象和组件选项 props 的值一样。
<script setup>
const props = defineProps({
  msg: String,
  title: {
    type: String,
    default: '我是标题'
  },
  list: {
    type: Array,
    default: () => []
  }
})

// 在 js 中使用 props 中的属性
console.log(props.msg)
</script>

<template>
  <!-- 在模板中直接使用 props 中声明的变量 -->
  <h1>{{ msg }}</h1>
  <div>{{ title }}</div>
</template>
TS 版本:
<script setup lang="ts">
interface ListItem {
  name: string
  age: number
}
const props = defineProps<{
  msg: string
  title: string
  list: ListItem[]
}>()

// 在 ts 中使用 props 中的属性,具有很好的类型推断能力
console.log(props.list[0].age)
</script>

<template>
  <h1>{{ msg }}</h1>
  <div>{{ title }}</div>
</template>
从代码中可以发现 TS 写法里 props 没有定义默认值。
Vue3 为我们提供了 withDefaults 这个编译器宏,给 props 提供默认值。
<script setup lang="ts">
interface ListItem {
  name: string
  age: number
}
interface Props {
  msg: string
  // title可选
  title?: string
  list: ListItem[]
}
// withDefaults 的第二个参数便是默认参数设置,会被编译为运行时 props 的 default 选项
const props = withDefaults(defineProps<Props>(), {
  title: '我是标题',
  // 对于array、object需要使用函数,和以前的写法一样
  list: () => []
})
// 在 ts 中使用 props 中的属性,具有很好的类型推断能力
console.log(props.list[0].age)
</script>

<template>
  <h1>{{ msg }}</h1>
  <div>{{ title }}</div>
</template>一个需要注意的地方:在顶层声明一个和props的属性同名的变量,会有些问题。
<script setup>
const props = defineProps({
  title: {
    type: String,
    default: '我是标题'
  }
})
// 在顶层声明一个和props的属性title同名的变量
const title = '123'
</script>

<template>
  <!-- props.title 显示的是 props.title 的值,‘我是标题’ -->
  <div>{{ props.title }}</div>
  <!-- title 显示的是 在顶层声明的 title 的值,‘123’ -->
  <div>{{ title }}</div>
</template>
所以,和组件选项一样,不要定义和 props 的属性同名的顶层变量。
5.2 defineEmits
一样的,在 <script setup> 块中也是没有组件配置项 emits 的,需要使用 defineEmits 编译器宏声明 emits 相关信息。
// ./components/HelloWorld.vue
<script setup>
defineProps({
  msg: String,
})

const emits = defineEmits(['changeMsg'])

const handleChangeMsg = () => {
  emits('changeMsg', 'Hello TS')
}
</script>

<template>
  <h1>{{ msg }}</h1>
  <button @click="handleChangeMsg">handleChangeMsg</button>
</template>
使用组件:
<script setup>
import { ref } from 'vue'
import HelloWorld from './components/HelloWorld.vue'

const msg = ref('Hello Vue3')
const changeMsg = (v) => {
  msg.value = v
}
</script>

<template>
  <HelloWorld :msg="msg" @changeMsg="changeMsg" />
</template>
TS 版本:
// ./components/HelloWorld.vue
<script setup lang="ts">

defineProps<{
  msg: string
}>()

const emits = defineEmits<{
  (e: 'changeMsg', value: string): void
}>()

const handleChangeMsg = () => {
  emits('changeMsg', 'Hello TS')
}
</script>

<template>
  <h1>{{ msg }}</h1>
  <button @click="handleChangeMsg">handleChangeMsg</button>
</template>
使用组件:
<script setup lang="ts">
import { ref } from 'vue'
import HelloWorld from './components/HelloWorld.vue'
const msg = ref('Hello Vue3')
const changeMsg = (v: string) => {
  msg.value = v
}
</script>

<template>
  <HelloWorld :msg="msg" @changeMsg="changeMsg" />
</template>
5.3 defineExpose
在 Vue3 中,默认不会暴露任何在 <script setup> 中声明的绑定,即不能通过模板 ref 获取到组件实例声明的绑定。
Vue3 提供了 defineExpose 编译器宏,可以显式地暴露需要暴露的组件中声明的变量和方法。
// ./components/HelloWorld.vue
<script setup>
import { ref } from 'vue'
const msg = ref('Hello Vue3')

const handleChangeMsg = (v) => {
  msg.value = v
}
// 对外暴露的属性
defineExpose({
  msg,
  handleChangeMsg,
})
</script>

<template>
  <h1>{{ msg }}</h1>
</template>
使用组件:
<script setup>
import { ref, onMounted } from 'vue'
import HelloWorld from './components/HelloWorld.vue'

const root = ref(null)

onMounted(() => {
  console.log(root.value.msg)
})

const handleChangeMsg = () => {
  root.value.handleChangeMsg('Hello TS')
}
</script>

<template>
  <HelloWorld ref="root" />
  <button @click="handleChangeMsg">handleChangeMsg</button>
</template>
TS 版本:
// ./components/HelloWorld.vue
<script setup lang="ts">
import { ref } from 'vue'
const msg = ref('Hello Vue3')

const handleChangeMsg = (v: string) => {
  msg.value = v
}

defineExpose({
  msg,
  handleChangeMsg
})
</script>

<template>
  <h1>{{ msg }}</h1>
</template>
使用组件:
<script setup lang="ts">
import { ref, onMounted } from 'vue'
import HelloWorld from './components/HelloWorld.vue'
// 此处暂时使用any,需要定义类型
const root = ref<any>(null)

onMounted(() => {
  console.log(root.value.msg)
})

const handleChangeMsg = () => {
  root.value.handleChangeMsg('Hello TS')
}
</script>

<template>
  <HelloWorld ref="root" />
  <button @click="handleChangeMsg">handleChangeMsg</button>
</template>
6、辅助函数
在 <script setup> 中常用的辅助函数hooks api,主要有:useAttrs、useSlots、useCssModule,其他的辅助函数还在实验阶段,不做介绍。
6.1 useAttrs
在模板中使用 $attrs 来访问 attrs 数据,与 Vue2 相比,Vue3 的 $attrs 还包含了 class 和 style 属性。
在 <script setup> 中使用 useAttrs 函数获取 attrs 数据。
<script setup>
import HelloWorld from './components/HelloWorld.vue'
</script>

<template>
  <HelloWorld class="hello-word" title="我是标题" />
</template>
// ./components/HelloWorld.vue
<script setup>
import { useAttrs } from 'vue'
const attrs = useAttrs()
// js中使用
console.log(attrs.class) // hello-word
console.log(attrs.title) // 我是标题
</script>
<template>
<!-- 在模板中使用 $attrs 访问属性 -->
<div>{{ $attrs.title }}</div>
</template>6.2 useSlots
在模板中使用 $slots 来访问 slots 数据。
在 <script setup> 中使用 useSlots 函数获取 slots 插槽数据。
<script setup>
import HelloWorld from './components/HelloWorld.vue'
</script>

<template>
  <HelloWorld>
    <div>默认插槽</div>
    <template v-slot:footer>
      <div>具名插槽footer</div>
    </template>
  </HelloWorld>
</template>
<script setup>
import { useSlots } from 'vue'
const slots = useSlots()
// 在js中访问插槽默认插槽default、具名插槽footer
console.log(slots.default)
console.log(slots.footer)
</script>
<template>
<div>
<!-- 在模板中使用插槽 -->
<slot></slot>
<slot name="footer"></slot>
</div>
</template>6.3 useCssModule
在 Vue3 中,也是支持 CSS Modules 的,在 <style> 上增加 module 属性,即<style module> 。
<style module> 代码块会被编译为 CSS Modules 并且将生成的 CSS 类作为 $style 对象的键暴露给组件,可以直接在模板中使用 $style。而对于如 <style module="content"> 具名 CSS Modules,编译后生成的 CSS 类作为 content 对象的键暴露给组件,即module 属性值什么,就暴露什么对象。
<script setup lang="ts">
import { useCssModule } from 'vue'

// 不传递参数,获取<style module>代码块编译后的css类对象
const style = useCssModule()
console.log(style.success)  // 获取到的是success类名经过 hash 计算后的类名

// 传递参数content,获取<style module="content">代码块编译后的css类对象
const contentStyle = useCssModule('content')
</script>

<template>
  <div class="success">普通style red</div>

  <div :class="$style.success">默认CssModule pink</div>
  <div :class="style.success">默认CssModule pink</div>

  <div :class="contentStyle.success">具名CssModule blue</div>
  <div :class="content.success">具名CssModule blue</div>
</template>

<!-- 普通style -->
<style>
.success {
  color: red;
}
</style>

<!-- 无值的css module -->
<style module lang="less">
.success {
  color: pink;
}
</style>

<!-- 具名的css module -->
<style module="content" lang="less">
.success {
  color: blue;
}
</style>
注意,同名的CSS Module,后面的会覆盖前面的。
7、使用组件
在组件选项中,模板需要使用组件(除了全局组件),需要在 components 选项中注册。
而在 <script setup> 中组件不需要再注册,模板可以直接使用,其实就是相当于一个顶层变量。
建议使用大驼峰(PascalCase)命名组件和使用组件。
<script setup>
import HelloWorld from './HelloWorld.vue'
</script>

<template>
  <HelloWorld />
</template>
8、组件name
<script setup> 是没有组件配置项 name 的,可以再使用一个普通的 <script> 来配置 name。
// ./components/HelloWorld.vue
<script>
export default {
  name: 'HelloWorld'
}
</script>

<script setup>
import { ref } from 'vue'
const total = ref(10)
</script>

<template>
  <div>{{ total }}</div>
</template>
使用:
<script setup>
import HelloWorld from './components/HelloWorld.vue'
console.log(HelloWorld.name)  // 'HelloWorld'
</script>

<template>
  <HelloWorld />
</template>
注意:如果你设置了 lang 属性,<script setup> 和 <script> 的 lang 需要保持一致。
9、inheritAttrs
inheritAttrs 表示是否禁用属性继承,默认值是 true。
<script setup> 是没有组件配置项 inheritAttrs 的,可以再使用一个普通的 <script>。
<script setup>
import HelloWorld from './components/HelloWorld.vue'
</script>

<template>
  <HelloWorld title="我是title"/>
</template>
./components/HelloWorld.vue
<script>
export default {
  name: 'HelloWorld',
  inheritAttrs: false,
}
</script>

<script setup>
import { useAttrs } from 'vue'
const attrs = useAttrs()
</script>

<template>
  <div>
    <span :title="attrs.title">hover一下看title</span>
    <span :title="$attrs.title">hover一下看title</span>
  </div>
</template>
10、顶层await支持
<script setup> 中可以使用顶层 await。结果代码会被编译成 async setup()
<script setup>
const userInfo = await fetch(`/api/post/getUserInfo`)
</script>注意:async setup() 必须与 Suspense 组合使用,Suspense 目前还是处于实验阶段的特性,其 API 可能随时会发生变动,建议暂时不要使用。
11、命名空间组件
在 vue3 中,我们可以使用点语法来使用挂载在一个对象上的组件。
// components/Form/index.js
import Form from './Form.vue'
import Input from './Input.vue'
import Label from './Label.vue'
// 把Input、Label组件挂载到 Form 组件上
Form.Input = Input
Form.Label = Label

export default Form
// 使用:
<script setup lang="ts">
import Form from './components/Form'
</script>
<template>
<Form>
<Form.Label />
<Form.Input />
</Form>
</template>命名空间组件在另外一种场景中的使用,从单个文件中导入多个组件时:
// FormComponents/index.js
import Input from './Input.vue'
import Label from './Label.vue'

export default {
    Input,
    Label,
}
// 使用
<script setup>
import * as Form from './FormComponents'
</script>
<template>
<Form.Input>
<Form.Label>label</Form.Label>
</Form.Input>
</template>
12、状态驱动的动态css
Vue3 中 <style> 标签可以通过 v-bind 这一 CSS 函数将 CSS 的值关联到动态的组件状态上。
<script setup>
const theme = {
  color: 'red'
}
</script>

<template>
  <p>hello</p>
</template>

<style scoped>
p {
  // 使用顶层绑定
  color: v-bind('theme.color');
}
</style>
13、指令
全局指令:
<template>
  <div v-click-outside />
</template>
自定义指令:
<script setup>
import { ref } from 'vue'
const total = ref(10)

// 自定义指令
// 必须以 小写字母v开头的小驼峰 的格式来命名本地自定义指令
// 在模板中使用时,需要用中划线的格式表示,不可直接使用vMyDirective
const vMyDirective = {
  beforeMount: (el, binding, vnode) => {
    el.style.borderColor = 'red'
  },
  updated(el, binding, vnode) {
    if (el.value % 2 !== 0) {
      el.style.borderColor = 'blue'
    } else {
      el.style.borderColor = 'red'
    }
  },
}

const add = () => {
  total.value++
}
</script>

<template>
  <input :value="total" v-my-directive />
  <button @click="add">add+1</button>
</template>
导入的指令:
<script setup>
// 导入的指令同样需要满足命名规范
import { directive as vClickOutside } from 'v-click-outside'
</script>

<template>
  <div v-click-outside />
</template>
更多关于指令,见官方文档
14、Composition Api类型约束
<script setup lang="ts">
import { ref, reactive, computed } from 'vue'

type User = {
  name: string
  age: number
}

// ref
const msg1 = ref('')  //  会默认约束成 string 类型,因为ts类型推导
const msg2 = ref<string>('')  //  可以通过范型约束类型
const user1 = ref<User>({ name: 'tang', age: 18 })  //  范型约束
const user2 = ref({} as User)  // 类型断言

// reactive
const obj = reactive({})
const user3 = reactive<User>({ name: 'tang', age: 18 })
const user4 = reactive({} as User)

// computed
const msg3 = computed(() => msg1.value)
const user5 = computed<User>(() => {
  return { name: 'tang', age: 18 }
})

// watch
//监视一个数据变化
watch(num, function (newVal, oldVal) {
      console.log('num值变化了', newVal, oldVal);
},{immediate:true,deep:true});

//监听多个数据变化
watch([num, msg], function (newVal, oldVal) {
        console.log('num或msg值变化了', newVal, oldVal);
},{ immediate: true });
//num或msg值变化了 (2) [1, '你好'] (2) [0, '你好']


// 获取vue实例属性
import { getCurrentInstance, ComponentInternalInstance } from 'vue'
// as ComponetInternalInstance表示类型断言,ts时使用。否则报错,proxy为null
const { proxy } = getCurrentInstance() as ComponetInternalInstance
proxy.$parent
proxy.$refs
proxy.$nextTick
proxy.$attrs
proxy.$data
proxy.$el
proxy.$emit
proxy.$forceUpdate
proxy.$options
proxy.$props
proxy.$root
proxy.$slots
proxy.$watch

</script>
14.1 ref()
<script setup lang="ts">

type User = {
  name: string
  age: number
}

// ref
const msg1 = ref('')  //  会默认约束成 string 类型,因为ts类型推导
const msg2 = ref<string>('')  //  可以通过范型约束类型
const user1 = ref<User>({ name: 'tang', age: 18 })  //  范型约束
const user2 = ref({} as User)  // 类型断言

</script>
14.2 reactive
<script setup lang="ts">

type User = {
  name: string
  age: number
}


// reactive
const obj = reactive({})
const user3 = reactive<User>({ name: 'tang', age: 18 })
const user4 = reactive({} as User)

</script>
14.3 computed
<script setup lang="ts">

type User = {
  name: string
  age: number
}

// computed
const msg3 = computed(() => msg1.value)
const user5 = computed<User>(() => {
  return { name: 'tang', age: 18 }
})


</script>
14.4 watch
<script setup lang="ts">

// watch
//监视一个数据变化
watch(num, function (newVal, oldVal) {
      console.log('num值变化了', newVal, oldVal);
},{immediate:true,deep:true});

//监听多个数据变化
watch([num, msg], function (newVal, oldVal) {
        console.log('num或msg值变化了', newVal, oldVal);
},{ immediate: true });
//num或msg值变化了 (2) [1, '你好'] (2) [0, '你好']

</script>
14.4 getCurrentInstance(this)
<script setup lang="ts">

// 获取vue实例属性
import { getCurrentInstance, ComponentInternalInstance } from 'vue'
// as ComponetInternalInstance表示类型断言,ts时使用。否则报错,proxy为null
const { proxy } = getCurrentInstance() as ComponetInternalInstance
proxy.$parent
proxy.$refs
proxy.$nextTick
proxy.$attrs
proxy.$data
proxy.$el
proxy.$emit
proxy.$forceUpdate
proxy.$options
proxy.$props
proxy.$root
proxy.$slots
proxy.$watch

</script>
15、全局注册
// main.ts

app.config.globalProperties.$message = ElMessage;


//使用
import { getCurrentInstance } from "vue";
const { proxy } = getCurrentInstance();
proxy.$message
16、mitt 库($on、$off)
Vue3移除了$on $off等自带的自定义事件相关方法,因此在vue3中他推荐我们下载mitt库来使用事件总线传递数据,其实mitt的使用方式和vue原本的自定义事件使用方式相同,所以我们不必担心学习成本!
16.1 创建mitt.ts文件
// mitt库默认导出的是一个函数,我们需要执行它从而得到事件总线的对象
/* mitt.ts */
// 这里我们在ts中暴露这个事件总线对象

import type { Emitter } from "mitt";
import mitt from "mitt";
export const emitter: Emitter = mitt();
16.2 传入、监听、销毁
16.2.1 $emit
// 这里我们导入我们单独写的暴露事件总线对象的ts
/* a.vue */  //模板代码

<button @click="setEmitter">send</button>

// 导入事件总线
import emitter from "./utils/mitt.ts";

const setEmitter = () => {
  // 触发自定义总线why,并传入一个对象
  emitter.emit("test",{name:'why',age:19})
};
16.2.2 $on
/* b.vue */

// 导入事件总线
import emitter from "./utils/mitt.ts";

emitter.on("test", e => console.log("test", e));


// emitter.on的第一个参数如果是 * 代表监听所有的事件触发!
// 回调函数的参数就会有2个,1是事件的类型,2是实际实参
emitter.on("*",(eventType,item)=>{
  console.log(`* 监听到的事件类型是:${eventType},接收的参数为:`,item)
})
16.2.3 $off
// 导入事件总线
import emitter from "./utils/mitt.ts";

emitter.off("test"); // 取消监听


// 取消所有的mitt事件
emitter.all.clear()
17、pinia库(vuex)
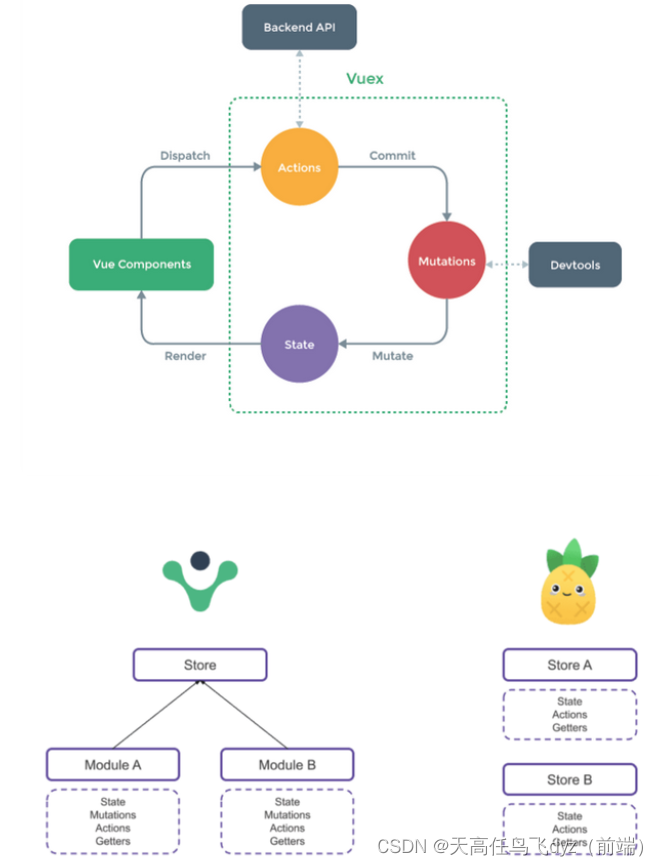
官网地址:Pinia
17.1 挂载pinia
import { createApp } from 'vue'
import App from './App.vue'
import { createPinia } from 'pinia' // 全局状态管理 类似vuex

const app = createApp(App)

app.use(createPinia()).mount('#app')
17.2 pinia模块化
import { defineStore } from 'pinia'
import { store } from '../index'

// state 类型定义
interface AppState {
  num: number
}

export const useAppStore = defineStore({
  id: 'useApp',
  state: (): AppState => ({
    num: 1, // 用于测试使用,没有实际作用
  }),
  getters: {},
  actions: {
    SETNUM(data: number) {
      console.log(data, 8)
      this.num = data
    },
  },
})

export function useAppStoreHook() {
  return useAppStore(store)
}
17.3 使用
<script setup>
  import { useAppStoreHook } from '@/store/modules/useAppStore'
  const useAppStore = useAppStoreHook()
  const add = () => {
    useAppStore.num++

    // useAppStore.SETNUM(60)

    // useAppStore.$patch({
    //   num: 10,
    // })

    console.log(useAppStore.num)
  }
</script>

<template>
  <div>
    <div>{{ useAppStore.num }}</div>
    <el-button type="info" @click="add">测试</el-button>
  </div>
</template>

<style lang="scss" scoped></style>
18、:deep()
vue3版本将vue2中的/deep/和>>>废除 写法改为:deep()
#swiper >.swiperContext :deep(p) {
  width: 100vw;
  height:60vw;
  background: #000;
  border:5px solid;
}
19、import.meta(require的替代方案)
getImageUrl(name) {
  const url = `../${name}`
  return new URL(url, import.meta.url).pathname
},
总结
日常记述,随时进度更新。。。。。


 5343
5343


 被折叠的 条评论
为什么被折叠?
被折叠的 条评论
为什么被折叠?
 到【灌水乐园】发言


