


上次我把 RabbitMQ 集成到项目中,但是每次使用 RabbitMQ 时都去 New 一个连接,导致并发起不来,所以这次我们就给 RabbitMQ 加一个连接池。
为了偷个懒,我直接用 ChatGPT 教我加。
01 ChatGPT 生成的代码
我输入的关键字如下:
rabbitmq 实现一个连接池 java
下面是 GhatGPT 4.0 给我的回复:
以下是在Java中使用连接池创建RabbitMQ连接的示例:
首先,需要添加pika客户端依赖项,例如:
<dependency>
    <groupId>com.rabbitmq</groupId>
    <artifactId>amqp-client</artifactId>
    <version>5.9.0</version>
</dependency>

创建一个RabbitMQ连接类:
import com.rabbitmq.client.Connection;
public class RabbitMQConnection {
    private Connection connection;
    public RabbitMQConnection(String host, int port, String username, String password) {
        ConnectionFactory factory = new ConnectionFactory();
        factory.setHost(host);
        factory.setPort(port);
        factory.setUsername(username);
        factory.setPassword(password);
        try {
            connection = factory.newConnection();
        } catch (IOException | TimeoutException e) {
            e.printStackTrace();
        }
    }
    public Connection getConnection() {
        return connection;
    }
    public void close() {
        try {
            connection.close();
        } catch (IOException e) {
            e.printStackTrace();
        }
    }
}

创建一个RabbitMQ连接池类:
import java.util.concurrent.BlockingQueue;
import java.util.concurrent.LinkedBlockingQueue;
public class RabbitMQConnectionPool {
    private final BlockingQueue<RabbitMQConnection> pool;
    public RabbitMQConnectionPool(String host, int port, String username, String password, int poolSize) {
        pool = new LinkedBlockingQueue<>(poolSize);
        for (int i = 0; i < poolSize; i++) {
            pool.add(new RabbitMQConnection(host, port, username, password));
        }
    }
    public RabbitMQConnection getConnection() throws InterruptedException {
        return pool.take();
    }
    public void returnConnection(RabbitMQConnection connection) {
        pool.add(connection);
    }
    public void close() {
        pool.forEach(RabbitMQConnection::close);
    }
}

创建一个消费者类:
import com.rabbitmq.client.*;
public class RabbitMQConsumer implements Runnable {
    private final RabbitMQConnectionPool connectionPool;
    private final String queueName;
    public RabbitMQConsumer(RabbitMQConnectionPool connectionPool, String queueName) {
        this.connectionPool = connectionPool;
        this.queueName = queueName;
    }
    @Override
    public void run() {
        try {
            Connection connection = connectionPool.getConnection().getConnection();
            Channel channel = connection.createChannel();
            channel.queueDeclare(queueName, false, false, false, null);
            channel.basicConsume(queueName, true, (consumerTag, delivery) -> {
                String message = new String(delivery.getBody(), "UTF-8");
                System.out.println("Received message: " + message);
            }, consumerTag -> {});
        } catch (InterruptedException | IOException e) {
            e.printStackTrace();
        }
    }
}

创建一个生产者类:
import com.rabbitmq.client.Channel;
import com.rabbitmq.client.Connection;
import com.rabbitmq.client.MessageProperties;
public class RabbitMQProducer {
    private final RabbitMQConnectionPool connectionPool;
    private final String queueName;
    public RabbitMQProducer(RabbitMQConnectionPool connectionPool, String queueName) {
        this.connectionPool = connectionPool;
        this.queueName = queueName;
    }
    public void send(String message) {
        try {
            Connection connection = connectionPool.getConnection().getConnection();
            Channel channel = connection.createChannel();
            channel.queueDeclare(queueName, false, false, false, null);
            channel.basicPublish("", queueName, MessageProperties.PERSISTENT_TEXT_PLAIN, message.getBytes());
            System.out.println("Sent message: " + message);
            channel.close();
            connection.close();
        } catch (InterruptedException|IOException e) {
            e.printStackTrace();
        }
    }
}

创建一个RabbitMQ连接池和多个消费者来消费队列:
public class Main {
    public static void main(String[] args) throws InterruptedException {
        RabbitMQConnectionPool connectionPool = new RabbitMQConnectionPool("localhost", 5672, "guest", "guest", 10);
        RabbitMQProducer producer = new RabbitMQProducer(connectionPool, "hello");
        producer.send("Hello, world!");
        RabbitMQConsumer consumer1 = new RabbitMQConsumer(connectionPool, "hello");
        Thread thread1 = new Thread(consumer1);
        thread1.start();
        RabbitMQConsumer consumer2 = new RabbitMQConsumer(connectionPool, "hello");
        Thread thread2 = new Thread(consumer2);
        thread2.start();
        thread1.join();
        thread2.join();
        connectionPool.close();
    }
}

该示例代码创建了大小为10的连接池,并创建了两个消费者线程来消费队列,并使用一个生产者向队列发送消息。每个消费者从连接池获取连接,并消费队列中的消息,当完成任务后,将连接还回连接池。在实际部署中,您需要根据您的应用程序需求选择合适大小的池,并调整代码以使用正确的参数。
我靠,这代码写的真牛逼,我需要做的事情,就是把里面连接池的部分,集成到我的项目中。
02 给 RabbitMQ 加连接池
2.1 加入连接池
之前我们给 ConnectionFactory 加了个单例工厂,具体可以参考我上一篇文章,由于我们有连接池,所以这个单例工厂就直接废弃了。
/**
 * @author Louzai
 * @date 2023/5/10
 */
public class RabbitmqConnection {

    private Connection connection;

    public RabbitmqConnection(String host, int port, String userName, String password, String virtualhost) {
        ConnectionFactory connectionFactory = new ConnectionFactory();
        connectionFactory.setHost(host);
        connectionFactory.setPort(port);
        connectionFactory.setUsername(userName);
        connectionFactory.setPassword(password);
        connectionFactory.setVirtualHost(virtualhost);
        try {
            connection = connectionFactory.newConnection();
        } catch (IOException | TimeoutException e) {
            e.printStackTrace();
        }
    }

    /**
     * 获取链接
     *
     * @return
     */
    public Connection getConnection() {
        return connection;
    }

    /**
     * 关闭链接
     *
     */
    public void close() {
        try {
            connection.close();
        } catch (IOException e) {
            e.printStackTrace();
        }
    }
}
这个代码就是 ChatGPT 给我写的,我是直接 Copy 过来,然后稍微改动了一下。
public class RabbitmqConnectionPool {

    private static BlockingQueue<RabbitmqConnection> pool;

    public static void initRabbitmqConnectionPool(String host, int port, String userName, String password,
                                             String virtualhost,
                                           Integer poolSize) {
        pool = new LinkedBlockingQueue<>(poolSize);
        for (int i = 0; i < poolSize; i++) {
            pool.add(new RabbitmqConnection(host, port, userName, password, virtualhost));
        }
    }

    public static RabbitmqConnection getConnection() throws InterruptedException {
        return pool.take();
    }

    public static void returnConnection(RabbitmqConnection connection) {
        pool.add(connection);
    }

    public static void close() {
        pool.forEach(RabbitmqConnection::close);
    }
}
2.2 RabbitMQ 发送消费消息
RabbitMQ 发送消息:从连接池拿到连接 -> 创建通道 -> 声明交换机 -> 发送消息 -> 将连接归还连接池。
这里的逻辑基本和之前的一样,只是之前是 New 一个连接,现在是直接从连接池拿到连接,然后最后多了一步归还连接的操作。
@Override
public void publishMsg(String exchange,
                       BuiltinExchangeType exchangeType,
                       String toutingKey,
                       String message) {
    try {
        //创建连接
        RabbitmqConnection rabbitmqConnection = RabbitmqConnectionPool.getConnection();
        Connection connection = rabbitmqConnection.getConnection();
        //创建消息通道
        Channel channel = connection.createChannel();
        // 声明exchange中的消息为可持久化,不自动删除
        channel.exchangeDeclare(exchange, exchangeType, true, false, null);
        // 发布消息
        channel.basicPublish(exchange, toutingKey, null, message.getBytes());
        System.out.println("Publish msg:" + message);
        channel.close();
        RabbitmqConnectionPool.returnConnection(rabbitmqConnection);
    } catch (InterruptedException | IOException | TimeoutException e) {
        e.printStackTrace();
    }

}
RabbitMQ 消费消息:从连接池拿到连接 -> 创建通道 -> 确定消息队列 -> 绑定队列到交换机 -> 接受并消费消息 -> 将连接归还连接池。
同上,这里的逻辑基本和之前的一样,只是多了一个拿连接和归还连接的过程。
@Override
public void consumerMsg(String exchange,
                        String queueName,
                        String routingKey) {

    try {
        //创建连接
        RabbitmqConnection rabbitmqConnection = RabbitmqConnectionPool.getConnection();
        Connection connection = rabbitmqConnection.getConnection();
        //创建消息信道
        final Channel channel = connection.createChannel();
        //消息队列
        channel.queueDeclare(queueName, true, false, false, null);
        //绑定队列到交换机
        channel.queueBind(queueName, exchange, routingKey);

        Consumer consumer = new DefaultConsumer(channel) {
            @Override
            public void handleDelivery(String consumerTag, Envelope envelope, AMQP.BasicProperties properties,
                                       byte[] body) throws IOException {
                String message = new String(body, "UTF-8");
                System.out.println("Consumer msg:" + message);

                // 获取Rabbitmq消息,并保存到DB
                // 说明:这里仅作为示例,如果有多种类型的消息,可以根据消息判定,简单的用 if...else 处理,复杂的用工厂 + 策略模式
                notifyService.saveArticleNotify(JsonUtil.toObj(message, UserFootDO.class), NotifyTypeEnum.PRAISE);

                channel.basicAck(envelope.getDeliveryTag(), false);
            }
        };
        // 取消自动ack
        channel.basicConsume(queueName, false, consumer);
        RabbitmqConnectionPool.returnConnection(rabbitmqConnection);
    } catch (InterruptedException | IOException e) {
        e.printStackTrace();
    }
}
这个代码,其实 ChatGPT 写的有问题,你再回过头去看 ChatGPT 写的代码,发现连接取出,但是没有归还,那会出现什么问题呢?
这里给大家分析一下,由于我们的连接池用的是 BlockingQueue,连接池大小是 5,如果连接全部取出并都不归还,当第 6 个请求过来后,请求就卡住了,导致界面操作会被阻塞,请求完全没有反应。
不要问我怎么知道,因为我是踩坑过来的。
2.3 代码仓库
为了方便大家学习功能演变的过程,每个模块都会单独开个分支,连接池的分支和仓库如下:
- 代码仓库:https://github.com/itwanger/paicoding
- 代码分支:feature/rabbitmq_connection_pool_20230511
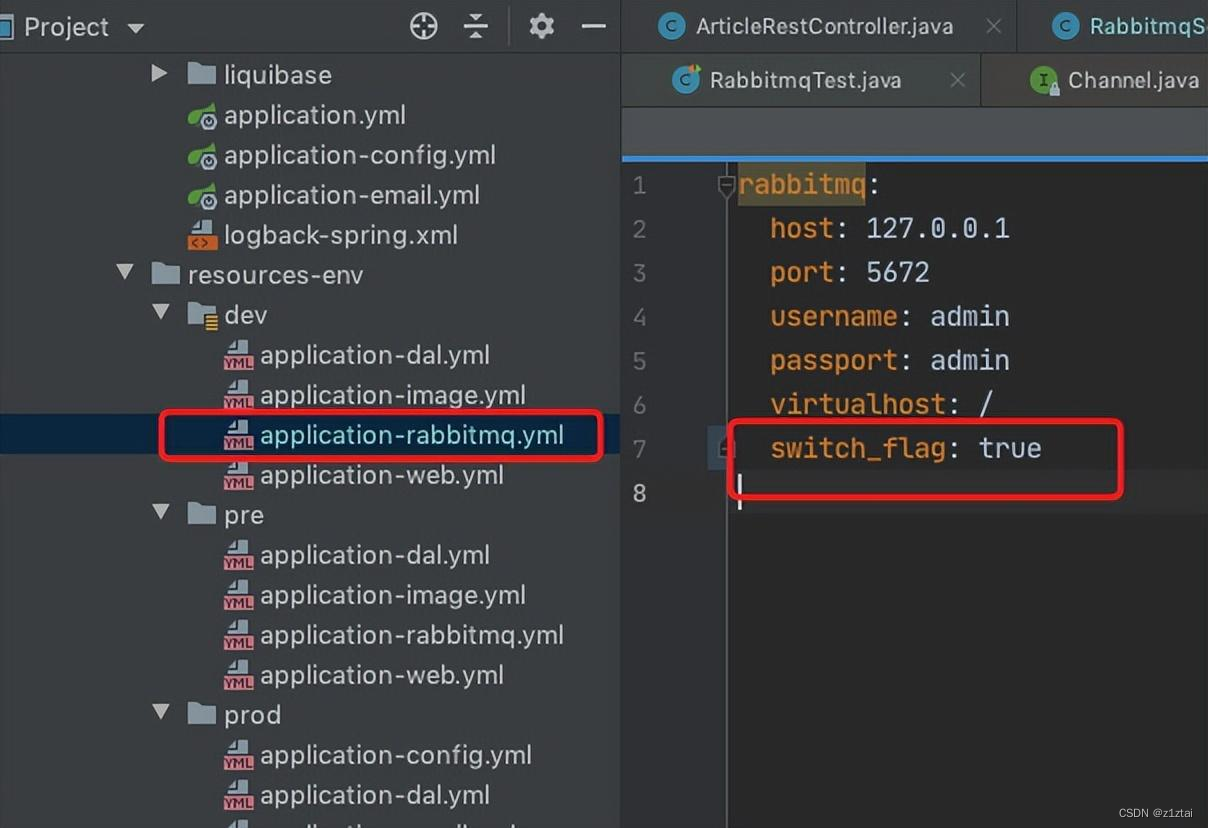
如果需要运行 RabbitMQ,下面的配置需要改成 true,因为代码默认是 false。
03 实际效果
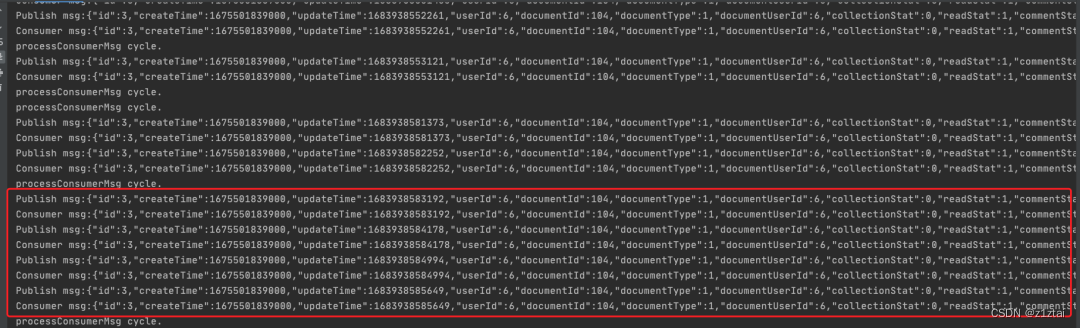
我们是把技术派的“点赞”功能消息,通过 RabbitMQ 方式处理,我们多次点击“点赞”按钮,触发 RammitMQ 消息发送。

可以通过日志,也可以看到发送和消费过的消息。
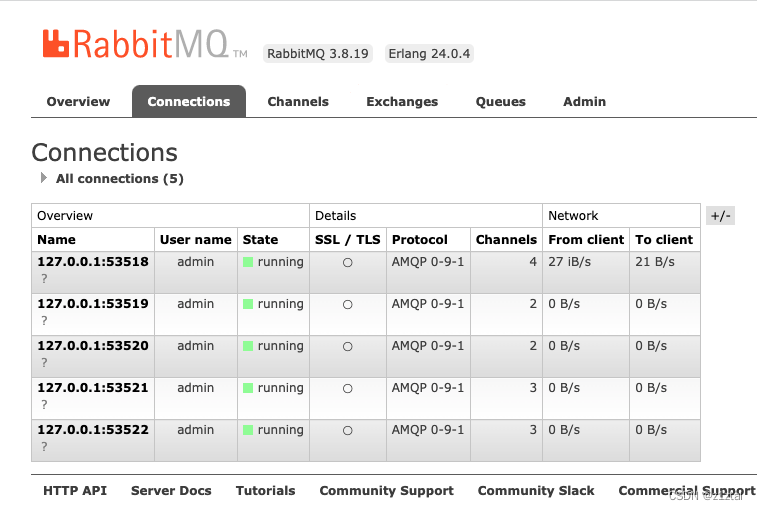
最后就是大家关心的连接池个数,打开 RabbitMQ 后台,发现永远只有 5 个连接,和我们的连接池大小一致,符合预期。
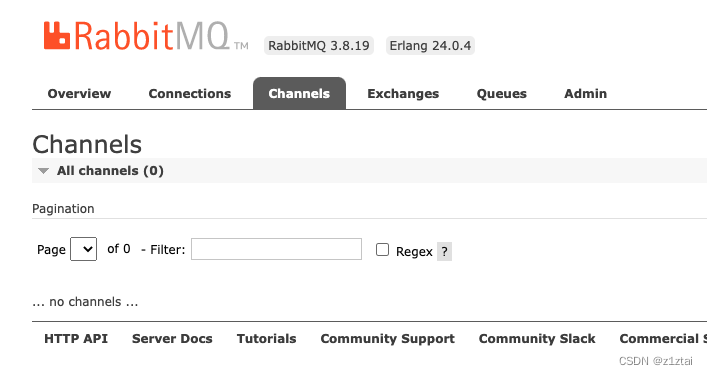
再看看打开的 Channel,由于每次都关闭,所以也没有了,也符合预期。
这里抛个疑问,每次新开一个 Channel,用完后关闭,是不是也很耗时?是否需要给 Channel 也搞一个连接池呢?可以评论区告诉我哈~~
04 后记
如果用 ChatGPT 3.5,给的结果就不一样,需要加入更多关键字,如果需要达到 GhatGPT 4.0 给的结果,你需要给 ChatGPT 3.5 以下关键字。
rabbitmq 用BlockingQueue实现一个连接池 java
再回到 RabbitMQ 本身,上一篇文章只是告诉大家 RabbitMQ 的基本原理,以及如何集成 RabbitMQ,这篇文章主要教大家加连接池,其实这个示例,里面可以加的东西还很多。
学习嘛,就是边学边玩,后面有空,我想再加点东西,主要是想把 RabbitMQ 的消费方式,由阻塞改成非阻塞方式,可能会在下一篇文章给出,敬请期待!


 2632
2632


 被折叠的 条评论
为什么被折叠?
被折叠的 条评论
为什么被折叠?
 到【灌水乐园】发言


