


iOS Xib & Storyboard
在iOS开发中,我们会经常接触到的 xib 文件,还能听到它的另一个名字 nib,其实它们俩差不多是指代同一个东西,只不过 xib 是编译前,nib是编译后, 还有后来的 storyboard,它们其实都xml文件,通过右键这些文件然后 open as > source code 就可以看到文件的源码。
这次主要从以下几点分析Xib & Storyboard
- InterfaceBuilder简介
- Xib文件格式分析
- Xib解析方式猜测
- 简单模拟ViewControll加载xib
- 平时使用xib方式的注意事项
- 自定义View关联xib的两种方式
- Storyboard简单介绍
- Storyboard的启动
InterfaceBuilder
Interface Builder(缩写:IB)是用于苹果公司Mac OS X操作系统的软件开发程序,是Xcode套件的一部分。Cocoa开发者可以使用Interface Builder来创建和修改应用程序的图形用户界面。其数据以XML的形式被储存在.xib文件中。
Xib文件
如果你仔细比对xib和storyboard的xml的文件内容,你会发现差别很小,其中两个重要的差别是:
- storyboard的type是com.apple.InterfaceBuilder3.CocoaTouch.Storyboard.XIB
- xib的type是com.apple.InterfaceBuilder3.CocoaTouch.XIB
- storyboard相对于xib多了一个scene的概念, 所有xml里会有一个顶层标签是scenes而xib里的顶层标签是objects
xib和storyboard就像一个配置文件,在图形化界面里将想要的界面搭建好,然后调用系统提供的方法来读取这些文件来构建一个个对象。
最常用的就是从xib里面初始化ViewController了。在创建ViewController的时候,Xcode会询问是否创建一个xib,如果选择是那么和这个ViewController同名的xib将会被创建。
ViewController加载xib流程
- (instancetype)init; //该方法会转调下面的方法
- (instancetype)initWithNibName:(NSString *)nibNameOrNil bundle:(NSBundle *)nibBundleOrNil;
以下均可正常展示
1. Test1ViewController *viewController = [[Test1ViewController alloc] init];
[self.navigationController pushViewController:viewController animated:YES];

2. Test1ViewController *viewController = [[Test1ViewController alloc] initWithNibName:@"Test1ViewController" bundle:[NSBundle mainBundle]];
[self.navigationController pushViewController:viewController animated:YES];

3. Test1ViewController *viewController = [[Test1ViewController alloc] initWithNibName:@"Test2ViewController" bundle:[NSBundle mainBundle]];
[self.navigationController pushViewController:viewController animated:YES];
默认情况下ViewController会找对应类名的xib文件,需要注意的是,xib中如果有connections*(用IB拖出来的线会在conections标签下生成相关数据)*则ViewController一定要有相对应的IBOutlet,否则会因找不到相应的selector造成crash。
分析一下xib文件
<?xml version="1.0" encoding="UTF-8"?>
<document type="com.apple.InterfaceBuilder3.CocoaTouch.XIB" version="3.0" toolsVersion="14460.31" targetRuntime="iOS.CocoaTouch" propertyAccessControl="none" useAutolayout="YES" useTraitCollections="YES" useSafeAreas="YES" colorMatched="YES">
    <device id="retina4_7" orientation="portrait">
        <adaptation id="fullscreen"/>
    </device>
    <dependencies>
        <deployment identifier="iOS"/>
        <plugIn identifier="com.apple.InterfaceBuilder.IBCocoaTouchPlugin" version="14460.20"/>
        <capability name="Safe area layout guides" minToolsVersion="9.0"/>
        <capability name="documents saved in the Xcode 8 format" minToolsVersion="8.0"/>
    </dependencies>
    <objects>
        <placeholder placeholderIdentifier="IBFilesOwner" id="-1" userLabel="File's Owner" customClass="TestCustom">
            <connections>
                <outlet property="titleLabel" destination="HBy-2B-FHf" id="Aqm-dl-WXp"/>
                <outlet property="view" destination="i5M-Pr-FkT" id="sfx-zR-JGt"/>
            </connections>
        </placeholder>
        <placeholder placeholderIdentifier="IBFirstResponder" id="-2" customClass="UIResponder"/>
        <view clearsContextBeforeDrawing="NO" contentMode="scaleToFill" id="i5M-Pr-FkT">
            <rect key="frame" x="0.0" y="0.0" width="375" height="667"/>
            <autoresizingMask key="autoresizingMask" widthSizable="YES" heightSizable="YES"/>
            <subviews>
                <label opaque="NO" userInteractionEnabled="NO" contentMode="left" horizontalHuggingPriority="251" verticalHuggingPriority="251" text="Test for ViewController" textAlignment="natural" lineBreakMode="tailTruncation" baselineAdjustment="alignBaselines" adjustsFontSizeToFit="NO" translatesAutoresizingMaskIntoConstraints="NO" id="HBy-2B-FHf">
                    <rect key="frame" x="100" y="323" width="175" height="21"/>
                    <fontDescription key="fontDescription" type="system" pointSize="17"/>
                    <nil key="textColor"/>
                    <nil key="highlightedColor"/>
                </label>
            </subviews>
            <color key="backgroundColor" red="1" green="1" blue="1" alpha="1" colorSpace="custom" customColorSpace="sRGB"/>
            <constraints>
                <constraint firstItem="HBy-2B-FHf" firstAttribute="centerX" secondItem="i5M-Pr-FkT" secondAttribute="centerX" id="3Jb-mF-KMo"/>
                <constraint firstItem="HBy-2B-FHf" firstAttribute="centerY" secondItem="i5M-Pr-FkT" secondAttribute="centerY" id="7fQ-gk-QU8"/>
            </constraints>
            <viewLayoutGuide key="safeArea" id="Q5M-cg-NOt"/>
        </view>
    </objects>
</document>
xib文件使用的xml格式其中除了objects标签内数据其他均是配置信息,我们主要分析objects标签。
File's Owner 标签
我们用Xcode创建ViewController时勾选xib, 其中Xcode会自动设置为对应的ViewController类, 表现为File’s Owner对应标签的customClass为ViewController的类名(如下HomeViewController);并且会有一个property="view"的outlet标签,该标签和ViewController.view对象关联(如下outlet标签)。
<objects>
    <placeholder placeholderIdentifier="IBFilesOwner" id="-1" userLabel="File's Owner" customClass="HomeTabViewController">
        <connections>
            <outlet property="view" destination="iN0-l3-epB" id="HvV-il-KfN"/>
        </connections>
    </placeholder>
    <placeholder placeholderIdentifier="IBFirstResponder" id="-2" customClass="UIResponder"/>
    <view contentMode="scaleToFill" id="iN0-l3-epB">
        ...
    </view>
</objects>
outlet标签指定了iN0-l3-epB,而iN0-l3-epB就是view的id。
在ViewController中可以通过如下方式拿到对应的view
- (void)viewDidLoad {
    [super viewDidLoad];

    self.view
}
如果手动删除xib中view这个outlet标签,self.view就是nil
其实xib被解析时,如果有outlet则调用对应class的selector,而调用那个selector则是由property这一属性值决定。
view subviews label 等标签是布局相关的 constraints标签是配置约束关系
了解这几个标签后,初步知道xib是被解析然后绑定到ViewController上的,接下来更加细化的分析和验证一下.
Xib解析方式
xib文件的解析是 NSBundle(UINibLoadingAdditions) 完成的,h文件如下
#import <Foundation/Foundation.h>
#import <UIKit/UIKitDefines.h>

NS_ASSUME_NONNULL_BEGIN

typedef NSString * UINibOptionsKey NS_TYPED_ENUM;

UIKIT_EXTERN UINibOptionsKey const UINibExternalObjects NS_AVAILABLE_IOS(3_0);

@interface NSBundle(UINibLoadingAdditions)
- (nullable NSArray *)loadNibNamed:(NSString *)name owner:(nullable id)owner options:(nullable NSDictionary<UINibOptionsKey, id> *)options;
@end

@interface NSObject(UINibLoadingAdditions)
- (void)awakeFromNib NS_REQUIRES_SUPER;
- (void)prepareForInterfaceBuilder NS_AVAILABLE_IOS(8_0);
@end

UIKIT_EXTERN NSString * const UINibProxiedObjectsKey NS_DEPRECATED_IOS(2_0, 3_0) __TVOS_PROHIBITED;

NS_ASSUME_NONNULL_END
import了这个h文件后,任何对象就会新增两个方法 awakeFromNib prepareForInterfaceBuilder xib加载好 (不包含布局好,这时候控件的位置和大小还未完全确定) 就会调对应Class的这两个方法。
由于看不到源码,所以只能猜了,下面就根据猜测模拟一下
模拟示例
简单模拟ViewController加载
TestCustom.h
#import <Foundation/Foundation.h>

NS_ASSUME_NONNULL_BEGIN

@interface TestCustom : UIResponder

@end

NS_ASSUME_NONNULL_END
TestCustom.m
#import <UIKit/UIKit.h>

#import "TestCustom.h"

@interface TestCustom()

//这两行可以手动加,也可以改一下xib中File's owner后鼠标拖出
@property (weak, nonatomic) IBOutlet UIView *view;
@property (weak, nonatomic) IBOutlet UILabel *titleLabel;

@end

@implementation TestCustom

- (instancetype)init {
    self = [super init];
    if (self) {
        [self setup];
    }
    return self;
}

- (void)setup {
    //调用loadNibName:::方法, owner设置成self,这样解析outlet时就会调owner对应的方法
    [[NSBundle mainBundle] loadNibNamed:@"TestCustom" owner:self options:nil];

    NSLog(@"TestCustom, setup, view = %@, titleLabel = %@", self.view, self.titleLabel);
}

- (void)awakeFromNib {
    NSLog(@"TestCustom, awakeFromNib");
}

@end
Log:
TestCustom, setup
view = <UIView: 0x7fcf84f53f10;...>
titleLabel = <UILabel: 0x7fcf84f6c4c0;...>
TestCustom.xib文件
<objects>
    <placeholder placeholderIdentifier="IBFilesOwner" id="-1" userLabel="File's Owner" customClass="TestCustom">
        <connections>
            <outlet property="titleLabel" destination="HBy-2B-FHf" id="Aqm-dl-WXp"/>
            <outlet property="view" destination="i5M-Pr-FkT" id="sfx-zR-JGt"/>
        </connections>
    </placeholder>
    <placeholder placeholderIdentifier="IBFirstResponder" id="-2" customClass="UIResponder"/>
    <view clearsContextBeforeDrawing="NO" contentMode="scaleToFill" id="i5M-Pr-FkT">
        <rect key="frame" x="0.0" y="0.0" width="375" height="667"/>
        <autoresizingMask key="autoresizingMask" widthSizable="YES" heightSizable="YES"/>
        <subviews>
            <label opaque="NO" ...... id="HBy-2B-FHf">
                <rect key="frame" x="60" y="48" width="92" height="21"/>
                <fontDescription key="fontDescription" type="system" pointSize="17"/>
                <nil key="textColor"/>
                <nil key="highlightedColor"/>
            </label>
        </subviews>
        ......
    </view>
</objects>
解析 <outlet property="titleLabel" ..."/> 和 <outlet property="view" ..."/> 时调了TestCustom设置titleLabel的selector和设置view的selector,如果删除TestCustom中的 IBOutlet UIView *view 和 IBOutlet UILabel *titleLabel 就会出crash,如下
*** Terminating app due to uncaught exception ‘NSUnknownKeyException’, reason: ‘[<TestCustom 0x600002709660> setValue:forUndefinedKey:]: this class is not key value coding-compliant for the key titleLabel.’
*** Terminating app due to uncaught exception ‘NSUnknownKeyException’, reason: ‘[<TestCustom 0x600000662370> setValue:forUndefinedKey:]: this class is not key value coding-compliant for the key view.’
如果再将view放到window上那一个可见的界面就产生了,同时TestCustom继承了UIResponder, 不仅能看到界面还能处理用户操作,如果再维护一个NavigationController就完完全全是一个ViewController了,当然肯定还有其他很多的细节.
###自定义View实现方式
第一种:
#import "Test1View.h"

@interface Test1View()

@property (weak, nonatomic) IBOutlet UILabel *titleLabel;

@end

@implementation Test1View

+ (instancetype)view {
    return [[[NSBundle mainBundle] loadNibNamed:@"Test1" owner:nil options:nil] firstObject];
}

- (void)awakeFromNib {
    [super awakeFromNib];

    NSLog(@"Test1View, awakeFromNib");
}

- (void)layoutSubviews {
    [super layoutSubviews];

    NSLog(@"Test1View, layoutSubviews");
}

@end
对应的xib文件
<objects>
    <placeholder placeholderIdentifier="IBFilesOwner" id="-1" userLabel="File's Owner"/>
    <placeholder placeholderIdentifier="IBFirstResponder" id="-2" customClass="UIResponder"/>
    <view contentMode="scaleToFill" id="iN0-l3-epB" customClass="Test1View">
        ...
        <connections>
            <outlet property="titleLabel" destination="Hcy-Sp-Hbg" id="znM-fY-xwR"/>
        </connections>
    </view>
</objects>
log都正常
xib中 File's Owner 没有指定 customClass , 代码上 owner 为空
xib中objects下一层也没有outlet;
xib中view的下一层添加了outlet 同时指定了view是由Test1View实现的,xib解析时就会创建Test1View并调Test1View的titleLabel的设置方法。
这种方式需要注意view的customClass一定要有对应的IBOutlet,否则会Crash,正常Xcode手动操作不会出问题,切记手动修改类名或者xib文件名.
第二种:
#import "Test2View.h"

@interface Test2View()

@property (weak, nonatomic) IBOutlet UIView *view;
@property (weak, nonatomic) IBOutlet UILabel *titleLabel;

@end

@implementation Test2View

+ (instancetype)view {
    return [[Test2View alloc] init];
}

- (instancetype)init {
    self = [super init];
    if (self) {
        [[NSBundle mainBundle] loadNibNamed:@"Test2" owner:self options:nil];
        [self addSubview:self.view];

        NSLog(@"Test2View, init, view = %@, titleLabel = %@", self.view, self.titleLabel);
    }
    return self;
}

- (void)awakeFromNib {
    [super awakeFromNib];

    NSLog(@"Test2View, awakeFromNib");
}

- (void)layoutSubviews {
    [super layoutSubviews];

    NSLog(@"Test2View, layoutSubviews");
}

@end
对应的xib文件
<objects>
    <placeholder placeholderIdentifier="IBFilesOwner" id="-1" userLabel="File's Owner" customClass="Test2View">
        <connections>
            <outlet property="titleLabel" destination="Hcy-Sp-Hbg" id="3Mf-4P-MnA"/>
            <outlet property="view" destination="iN0-l3-epB" id="HvV-il-KfN"/>
        </connections>
    </placeholder>
    <placeholder placeholderIdentifier="IBFirstResponder" id="-2" customClass="UIResponder"/>
    <view contentMode="scaleToFill" id="iN0-l3-epB">
        。。。
    </view>
</objects>
log中没有awakeFromNib, 从xib解析中实例化的view才会有awakeFromNib的回调,这一点可以通过在xib中view的实现者来验证
xib中 File's Owner 指定了 customClass , 代码上 owner 指定了 self
xib中objects有outlet,对应owner有相关的IBOutlet,xib解析时就会owner的titleLabel和view的设置方法,
这种方式需要注意owner一定要有对应的IBOutlet,否则会Crash,正常xcode手动操作不会出问题,切记手动修改类名或者xib文件名。
第一种和第二种的区别:
- 第一种拿到的是xib中objects第一层级的view,xib加载生成的实例
- 第二种拿到的是添加outlet的View,该view的实例也是xib加载生成,只是通过IBOutlet给了Test2View.view
综上并结合ViewController的xib内容,可以断定ViewController用的就是第二种方式,并且ViewController - (instancetype)initWithNibName:(NSString *)nibNameOrNil bundle:(NSBundle *)nibBundleOrNil; 方法中调了 [[NSBundle mainBundle] loadNibNamed:@"XXX" owner:self options:nil]
Storyboard
storyboard相对于xib多了一个scene的概念,xml里会有一个顶层标签是scenes而xib里的顶层标签是objects。
storyboard分析
要介绍Storyboard是什么,从这张图讲起:
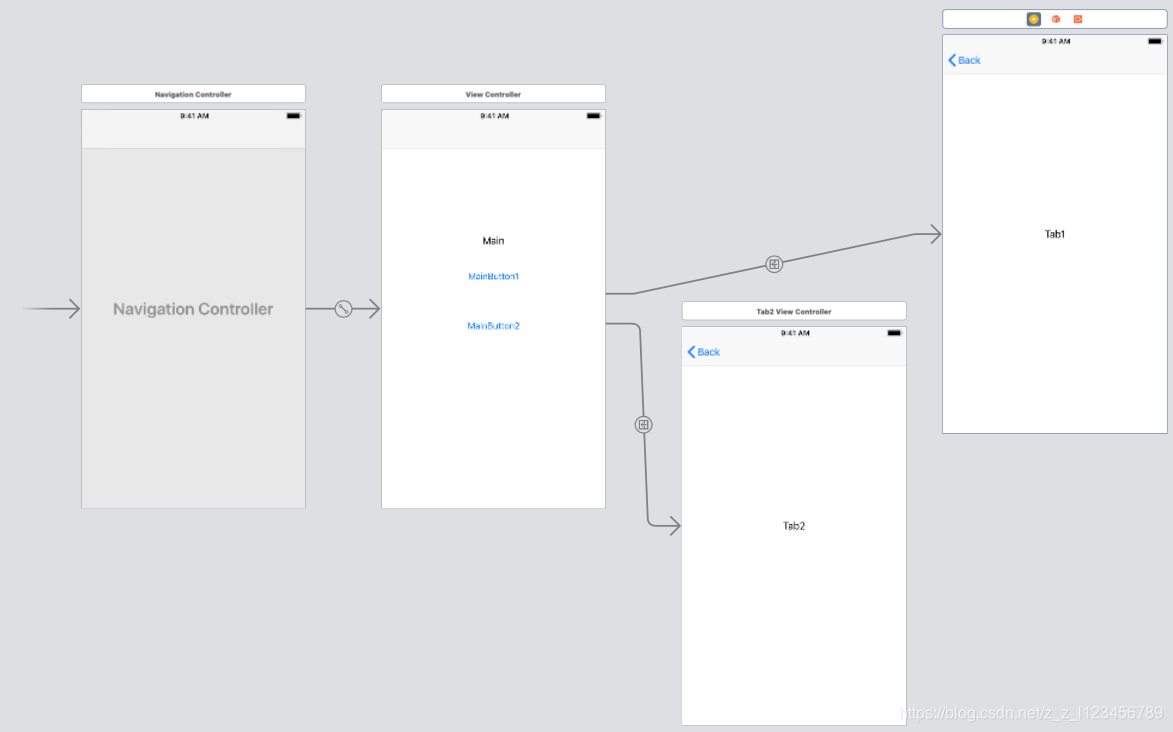
上面是Main.storyboard的内容,从左到右依次是 Navigation Controller Scenc View Controller Scenc Tab2 View Controller Scene Tab1 View Controller Scene
Tab1ViewController和Tab2ViewController对应的线分别是MainButton1和MainButton2,这样点击Button1就会跳转到Tab1ViewController点击Button2就会跳到Tab2ViewController
看一下Main.stroyboard文件
...
<scene sceneID="tne-QT-ifu">
    <objects>
        <viewController id="BYZ-38-t0r" customClass="ViewController" sceneMemberID="viewController">
            <view key="view" contentMode="scaleToFill" id="8bC-Xf-vdC">
                ...
                <subviews>
                    <label ...>
                    <button .../>
                        <connections>
                            <segue destination="D7z-E4-gRL" kind="push" id="1Of-px-wpF"/>
                        </connections>
                    </button>
                    <button ...>
                </subviews>
                ...
            </view>
            <navigationItem key="navigationItem" id="jgj-Ur-zGs"/>
        </viewController>
        ...
    </objects>
    <point key="canvasLocation" x="1199" y="167"/>
</scene>
...
...
<!--Tab1 View Controller-->
<scene sceneID="zkj-DY-y2h">
    <objects>
        <viewController id="D7z-E4-gRL" customClass="Tab1ViewController" sceneMemberID="viewController">
            <view key="view" contentMode="scaleToFill" id="exE-0e-ynF">
                ...
            </view>
            <navigationItem key="navigationItem" id="s1g-wa-3DJ"/>
        </viewController>
        ...
    </objects>
    <point key="canvasLocation" x="2703" y="54"/>
</scene>
...
...
<!--Tab2 View Controller-->
<scene sceneID="7uO-pe-oCU">
    <objects>
        <viewController id="VPd-VG-xrk" customClass="Tab2ViewController" sceneMemberID="viewController">
            <view key="view" contentMode="scaleToFill" id="7CO-RC-wiG">
                ...
            </view>
        </viewController>
        ...
    </objects>
    <point key="canvasLocation" x="2004" y="495"/>
</scene>
...
上面分析xib时我们知道xib文件中objects标签包含的为主要内容,storyboard是以scenes标签页包含的为主要内容,每一个scene下包含objects. storyboard相当于多个xib的集合。
其中点击button跳转ViewController在segue标签内声明。button点击自动跳转其实是storyboard解析时给button添加了targets, 如下是加断点打印出button的targets
2019-03-08 11:15:13.892396+0800 LayoutTest[13748:366986] libMobileGestalt MobileGestalt.c:890: MGIsDeviceOneOfType is not supported on this platform.
(lldb) po self.tab1Button.allTargets
{(
    <UIStoryboardPushSegueTemplate: 0x600003724fc0>
)}

(lldb)
storyboard和xib的本质都一样:在解析中执行代码
storyboard的启动
默认情况下storyboard是这样启动
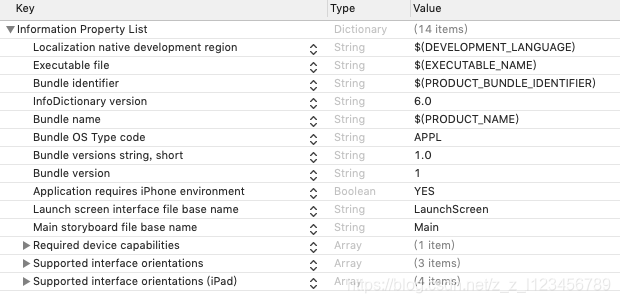
info.plist 中 Main storyboard file base name 这一项指定了app启动的storyboard,其实也是执行代码,把这个配置删掉用代码如下:
AppDelegate.h
- (BOOL)application:(UIApplication *)application didFinishLaunchingWithOptions:(NSDictionary *)launchOptions {
    self.window = [[UIWindow alloc] initWithFrame:[[UIScreen mainScreen] bounds]];

    UIStoryboard * storyBoard = [UIStoryboard storyboardWithName:@"Main" bundle:nil];
    self.window.rootViewController = [storyBoard instantiateInitialViewController];

    self.window.backgroundColor = [UIColor whiteColor];
    [self.window makeKeyAndVisible];

    return YES;
}
UIStoryboard.h
#import <Foundation/Foundation.h>
#import <UIKit/UIKitDefines.h>

@class UIViewController;

NS_ASSUME_NONNULL_BEGIN

NS_CLASS_AVAILABLE_IOS(5_0) @interface UIStoryboard : NSObject {
}

+ (UIStoryboard *)storyboardWithName:(NSString *)name bundle:(nullable NSBundle *)storyboardBundleOrNil;

- (nullable __kindof UIViewController *)instantiateInitialViewController;
- (__kindof UIViewController *)instantiateViewControllerWithIdentifier:(NSString *)identifier;

@end

NS_ASSUME_NONNULL_END
storyboard是UIStoryboard类解析的,并且storyboard的启动其实就是指定一个ViewController作为RootViewController。
storyboard相比于xib, 其实是一个包含的关系,storyboard只是多出了scenes这个,至于这些标签和xib思路是想通的,具体什么含义就不再赘述。
使用Storyboard可以更好地了解App中所有的视图以及它们之间的关联的概况。掌控全局更加容易,因为所有的设计都包含在一个文件中,而不是分散在很多单独的xib文件中,当然这也是storyboard的一个弊端,都集中在一个文件不利于团队开发,所以在平时的开发还是要以具体情况分析。


 515
515


 被折叠的 条评论
为什么被折叠?
被折叠的 条评论
为什么被折叠?
 到【灌水乐园】发言


