


最近研究tomcat负载均衡,在网上查了很多资料感觉都不太全,好不容易自己研究出来了。想写一篇完整的搭建教程,一方面方便以后查阅,另一方便也分享给需要的人。我这个人有个毛病,一般对网上写的东西都不放心,所以还是要亲力亲为:)
好了废话少说,开始!
JDK环境变量配置:
vi /etc/profile, 把下面代码粘在末尾,只需要修改你的JAVA_HOME目录:
export JAVA_HOME=/usr/lib/jvm/java1.8
export JRE_HOME=${JAVA_HOME}/jre
export CLASSPATH=.:${JAVA_HOME}/lib:${JRE_HOME}/lib
export PATH=${JAVA_HOME}/bin:$PATH
百度百科小白一下:
首先说一下背景,以下来自于百度百科。mod_jk 简称JK,是Apache服务器的一个可插入模块,用以为Apache或IIS服务器提供处理JSP/Servlet的能力。Apache作为一款强大的Web服务器,本身缺乏处理JSP/Servlet的功能,为了能够处理对JSP/Servlet的请求,必须使用JSP/Servlet容器,如Tomcat等。Tomcat本身也可以作为Web服务器使用,但是其功能远不及Apache强大,所以Tomcat往往作为JSP/Servlet容器使用。mod_jk实质上是Apache与Tomcat的连接器,并藉此附带提供集群和负载均衡的功能。
我的配置环境:两台ubuntu server14.04,tomcat8,apache2。
- 运行以下两条命令,安装apache2和mod_jk.so;
 sudo apt-get install apache2
 sudo apt-get install libapache2-mod-jk
安装完之后,可在/usr/lib/apache2/modules文件夹下看到mod_jk.so文件。
如果遇到安装错误,先运行以下命令即可:
apt-get update- 配置apache.conf文件,在ubuntu 14.04系统中,配置有一些不一样的地方。在apache2的文件夹下,找不到httpd.conf文件。查看apache2.conf文件,发现文件中有这样的两行代码,在/etc/apache2/mod-enabled文件夹下,看到了jk.conf和jk.load文件,因此,配置mod_jk可在这两个文件里进行。
/etc/apache2/apache2.conf里面可以发现如下配置:
# Include module configuration:
IncludeOptional mods-enabled/*.load
IncludeOptional mods-enabled/*.conf
3.打开jk.conf文件,添加如下代码,增加服务器的安全性。
//把原来的注释去掉即可
JkOptions +RejectUnsafeURI
然后再添加如下的代码,使Apache可以转发请求到我们设置的worker上。
重点内容,经过测试,这块不配置也可以,主要是后面的/etc/apache2/sites-available/000-default.conf
JkMount /* loadbalancer4.配置work.properties文件
在jk.conf文件中,我们可以看到如下一行代码,这说明workers.properties文件放在了/etc/libapache2-mod-jk/workers.properties文件下,当然你也可以更改这个路径,重新建立一个worker.properties。但是为了简便,可以直接到这个路径下修改workers.properties。
JkWorkersFile /etc/libapache2-mod-jk/workers.properties
5.下面针对每一tomcat worker做一下配置,如下所示。这里port是8009,它是tomcat默认的AJP13协议的监听端口,可在Tomcat的context.xml中修改这个端口。host是远程tomcat的地址可带上端口号,host可以是主机名也可以是IP地址。type是我们使用的apache和tomcat的通信协议,这里是ajp13。lbfactor是用于负载均衡的权值,值越大那么apache就认为这个服务器的性能越好,那么就会将更多的请求发送给这个Tomcat服务器。socket_timeout是如果tomcat在这个时间内没有回应JK时,JK就会生成一个错误,然后进行重试,如果不设置这个值,默认情况下,JK会一直等待。socket_keepalive设置为True是防止防火墙将JK和Tomcat之间闲置的连接切断。ping_mode指示在什么时候进行连接侦测,即检查JK和Tomcat的连接是否正常,它有很多检测的模式,这里我使用的是I,然后再给出一个探测的超时时间ping_timeout,那么当连接空闲时间超过connection_ping_interval时,JK就会去检测连接是否正常,connection_ping_interval的默认时间是(ping_timeout/1000)*10。
下面贴出我的配置(两台Ubuntu虚拟机,一个tomcat在本机):
worker.list=loadbalancer,tomcat1,tomcat2

#
#------ ajp13_worker WORKER DEFINITION ------------------------------
#---------------------------------------------------------------------
#

#
# Defining a worker named ajp13_worker and of type ajp13
# Note that the name and the type do not have to match.
#
#============tomcat1==============
worker.tomcat1.port=8009
worker.tomcat1.host=localhost
worker.tomcat1.type=ajp13
worker.tomcat1.lbfactor=1

#=============tomcat2=============
worker.tomcat2.port=8009
worker.tomcat2.host=10.134.0.88
worker.tomcat2.type=ajp13
worker.tomcat2.lbfactor=1
#
worker.loadbalancer.type=lb
worker.loadbalancer.balance_workers=tomcat1,tomcat2
worker.loadbalancer.sticky_session=1
如果要共享session,必须将sticky_session=1
5.在work.properties文件中配置负载均衡worke
这个负责负载均衡的worker是一个虚拟的worker,它并不直接与Tomcat服务器进行交流,但它却管理着其它worker,负责负载均衡。在worker.properties文件中添加如下两行。这样声明创建一个loadbalance worker,它的类型是lb,负责负载均衡,它管理着namenode和cloud2这两个worker。其它的配置选项用默认的就好了。
worker.loadbalancer.type=lb
worker.loadbalancer.balance_workers=tomcat1,tomcat2
worker.loadbalancer.sticky_session=false6.编辑/etc/apache2/sites-available/000-default.conf文件,在<VirtualHost*:80>中添加如下代码。
这块必须要配置:JkMount /* loadbalancer,否则过滤出现问题
<VirtualHost *:80>
        # The ServerName directive sets the request scheme, hostname and port that
        # the server uses to identify itself. This is used when creating
        # redirection URLs. In the context of virtual hosts, the ServerName
        # specifies what hostname must appear in the request's Host: header to
        # match this virtual host. For the default virtual host (this file) this
        # value is not decisive as it is used as a last resort host regardless.
        # However, you must set it for any further virtual host explicitly.
        #ServerName www.example.com

        ServerAdmin webmaster@localhost
        DocumentRoot /var/www/html

        # Available loglevels: trace8, ..., trace1, debug, info, notice, warn,
        # error, crit, alert, emerg.
        # It is also possible to configure the loglevel for particular
        # modules, e.g.
        #LogLevel info ssl:warn

        ErrorLog ${APACHE_LOG_DIR}/error.log
        CustomLog ${APACHE_LOG_DIR}/access.log combined
        JkMount /* loadbalancer
        # For most configuration files from conf-available/, which are
        # enabled or disabled at a global level, it is possible to
        # include a line for only one particular virtual host. For example the
        # following line enables the CGI configuration for this host only
        # after it has been globally disabled with "a2disconf".
        #Include conf-available/serve-cgi-bin.conf
</VirtualHost>
至此apache就配置完成了。
7.在每个Tomcat节点上进行配置
首先,在标签中配置jvmRoute属性,如下所示,注意这个属性的值要和你的worker的名字一样。
<Engine name="Catalina" defaultHost="localhost" jvmRoute="cloud2"> 然后,在标签中添加以下这段代码。
<Cluster className="org.apache.catalina.ha.tcp.SimpleTcpCluster"/> Tomcat8/conf/server.xml修改代码贴出,方便拷贝:
注:我用的垂直测试,就是tomcat在不同机子上,不过水平测试我也会尝试下:)
<Engine name="Catalina" defaultHost="localhost" jvmRoute="tomcat2">
<!--For clustering, please take a look at documentation at:
/docs/cluster-howto.html (simple how to)
/docs/config/cluster.html (reference documentation) -->
<!--
<Cluster className="org.apache.catalina.ha.tcp.SimpleTcpCluster"/>
-->
<!-- Use the LockOutRealm to prevent attempts to guess user passwords
via a brute-force attack -->
<Realm className="org.apache.catalina.realm.LockOutRealm">
<!-- This Realm uses the UserDatabase configured in the global JNDI
resources under the key "UserDatabase". Any edits
that are performed against this UserDatabase are immediately
available for use by the Realm. -->
<Realm className="org.apache.catalina.realm.UserDatabaseRealm"
resourceName="UserDatabase"/>
</Realm>
<Host name="localhost" appBase="webapps"
unpackWARs="true" autoDeploy="true">
<!-- SingleSignOn valve, share authentication between web applications
Documentation at: /docs/config/valve.html -->
<!--
<Valve className="org.apache.catalina.authenticator.SingleSignOn" />
-->
<!-- Access log processes all example.
Documentation at: /docs/config/valve.html
Note: The pattern used is equivalent to using pattern="common" -->
<Valve className="org.apache.catalina.valves.AccessLogValve" directory="logs"
prefix="localhost_access_log" suffix=".txt"
pattern="%h %l %u %t "%r" %s %b" />
</Host>
<Cluster className="org.apache.catalina.ha.tcp.SimpleTcpCluster"/>
</Engine>
8.你要部署的项目集群配置:
(1)修改项目中的WEB-INF/web.xml文件,加入如下行:
<Context distributable="true" />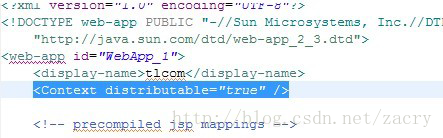
所有需要集群的web项目,其web.xml中都必须添加
这个定义
(2) 将tlcom分别部署到2个tomcat中:
这里因为我沿用原来在tomcat上的开发方式,并不直接把项目放到tomcat/webapp目录下
(3) 分别启动两个tomcat
可以在tomcat\bin目录下执行
来启动,也可以通过在eclipse中先将server配置好(配置对应的2个tomcat server),在
eclipse中启动。
启动tomcat1:
和正常eclipse中启动一样,加载插件:
RONE初始化:
成功启动:
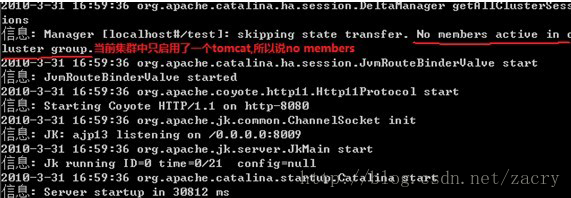
启动tomcat2:
启动过程和tomcat1一样,值得注意的是,在tomcat2启动的时候,tomcat1会打印出集群中加入
member的提示:

(4) 启动apache.通过IP访问apache. 比如我的是 http://10.188.182.43 (这里80端
口写不写是一样的)。
你会发现可能RONE都登陆不了,或者登陆了页面都无法正常打开。原因在于我们一开始配置的
Mod_jk.conf文件。文件末尾的请求转发。我们只转发了jsp页面的请求,就是说apache只会把
jsp页面的请求转发到2个tomcat上去。因此我们需要修改过滤的规则。我没有找到资料具体的各
种规则应该怎么写,只能写一个大的过滤:
JkMount /* controller
JkMount /*.do controller
将mod_jk.conf末尾改成上面这样。重启apache,你就可以看到RONE登陆界面了
完成以上步骤后,直接用浏览器访问apache地址,就能进入Tomcat主页。关闭其中一个Tomcat服务器,其它Tomcat也能访问。
命令相关
- 重启apache2:
/etc/init.d/apache2 restart- 编辑workers:
vi /etc/libapache2-mod-jk/workers.properties- 编辑apache2.conf
vi /etc/apache2/apache2.conf- 编辑jk.conf
vi /etc/apache2/mods-enabled/jk.conf完整配置贴出,方便以后查阅
- jk.conf
# Licensed to the Apache Software Foundation (ASF) under one or more
# contributor license agreements.  See the NOTICE file distributed with
# this work for additional information regarding copyright ownership.
# The ASF licenses this file to You under the Apache License, Version 2.0
# (the "License"); you may not use this file except in compliance with
# the License.  You may obtain a copy of the License at
#
#     http://www.apache.org/licenses/LICENSE-2.0
#
# Unless required by applicable law or agreed to in writing, software
# distributed under the License is distributed on an "AS IS" BASIS,
# WITHOUT WARRANTIES OR CONDITIONS OF ANY KIND, either express or implied.
# See the License for the specific language governing permissions and
# limitations under the License.

# Configuration Example for mod_jk
# used in combination with Apache 2.2.x

<IfModule jk_module>

    # We need a workers file exactly once
    # and in the global server
    JkWorkersFile /etc/libapache2-mod-jk/workers.properties

    # Our JK error log
    # You can (and should) use rotatelogs here
    JkLogFile /var/log/apache2/mod_jk.log

    # Our JK log level (trace,debug,info,warn,error)
    JkLogLevel info

    # Our JK shared memory file
    JkShmFile /var/log/apache2/jk-runtime-status

    # Define a new log format you can use in any CustomLog in order
    # to add mod_jk specific information to your access log.
    # LogFormat "%h %l %u %t \"%r\" %>s %b \"%{Referer}i\" \"%{User-Agent}i\" \"%{Cookie}i\" \"%{Set-Cookie}o\" %{pid}P %{tid}P %{JK_LB_FIRST_NAME}n %{JK_LB_LAST_NAME}n ACC %{JK_LB_LAST_ACCESSED}n ERR %{JK_LB_LAST_ERRORS}n BSY %{JK_LB_LAST_BUSY}n %{JK_LB_LAST_STATE}n %D" extended_jk

    # This option will reject all requests, which contain an
    # encoded percent sign (%25) or backslash (%5C) in the URL
    # If you are sure, that your webapp doesn't use such
    # URLs, enable the option to prevent double encoding attacks.
    # Since: 1.2.24
    JkOptions +RejectUnsafeURI

    # This option will collapse multiple adjacent slashes
    # in request URLs before looking for mount or unmount
    # matches.
    # Since: 1.2.41
    # JkOptions +CollapseSlashesAll

    # After setting JkStripSession to "On", mod_jk will
    # strip all ";jsessionid=..." from request URLs it
    # does *not* forward to a backend.
    # This is useful, if all links in a webapp use
    # URLencoded session IDs and parts of the static
    # content should be delivered directly by Apache.
    # Of course you can also do it with mod_rewrite.
    # Since: 1.2.21
    # JkStripSession On

    # Start a separate thread for internal tasks like
    # idle connection probing, connection pool resizing
    # and load value decay.
    # Run these tasks every JkWatchdogInterval seconds.
    # Since: 1.2.27
    JkWatchdogInterval 60

    # Configure access to jk-status and jk-manager
    # If you want to make this available in a virtual host,
    # either move this block into the virtual host
    # or copy it logically there by including "JkMountCopy On"
    # in the virtual host.
    # Add an appropriate authentication method here!
    <Location /jk-status>
        # Inside Location we can omit the URL in JkMount
        JkMount jk-status
        Order deny,allow
        Deny from all
        Allow from 127.0.0.1
    </Location>
    <Location /jk-manager>
        # Inside Location we can omit the URL in JkMount
        JkMount jk-manager
        Order deny,allow
        Deny from all
        Allow from 127.0.0.1
    </Location>

    # If you want to put all mounts into an external file
    # that gets reloaded automatically after changes
    # (with a default latency of 1 minute),
    # you can define the name of the file here.
    # JkMountFile conf/extra/uriworkermap.properties

    # Example for Mounting a context to the worker "balancer"
    # The URL syntax "a|b" instantiates two mounts at once,
    # the first one is "a", the second one is "ab".
    JkMount /* loadbalancer

    # Example for UnMounting requests for all workers
    # using a simple URL pattern
    # Since: 1.2.26
    # JkUnMount /myapp/static/* *

    # Example for UnMounting requests for a named worker
    # JkUnMount /myapp/images/* balancer

    # Example for UnMounting requests using regexps
    # SetEnvIf REQUEST_URI "\.(htm|html|css|gif|jpg|js)$" no-jk

    # Example for setting a reply timeout depending on the request URL
    # Since: 1.2.27
    # SetEnvIf Request_URI "/transactions/" JK_REPLY_TIMEOUT=600000

    # Example for disabling reply timeouts for certain request URLs
    # Since: 1.2.27
    # SetEnvIf Request_URI "/reports/" JK_REPLY_TIMEOUT=0

    # IMPORTANT: Mounts and virtual hosts
    # If you are using VirtualHost elements, you
    # - can put mounts only used in some virtual host into its VirtualHost element
    # - can copy all global mounts to it using "JkMountCopy On" inside the VirtualHost
    # - can copy all global mounts to all virtual hosts by putting
    #   "JkMountCopy All" into the global server
    # Since: 1.2.26

</IfModule>
- workers.properties
# workers.properties -
#
# This file is a simplified version of the workers.properties supplied
# with the upstream sources. The jni inprocess worker (not build in the
# debian package) section and the ajp12 (deprecated) section are removed.
#
# As a general note, the characters $( and ) are used internally to define
# macros. Do not use them in your own configuration!!!
#
# Whenever you see a set of lines such as:
# x=value
# y=$(x)\something
#
# the final value for y will be value\something
#
# Normaly all you will need to do is un-comment and modify the first three
# properties, i.e. workers.tomcat_home, workers.java_home and ps.
# Most of the configuration is derived from these.
#
# When you are done updating workers.tomcat_home, workers.java_home and ps
# you should have 3 workers configured:
#
# - An ajp13 worker that connects to localhost:8009
# - A load balancer worker
#
#

# OPTIONS ( very important for jni mode )

#
# workers.tomcat_home should point to the location where you
# installed tomcat. This is where you have your conf, webapps and lib
# directories.
#
#workers.tomcat_home=/opt/tomcat8

#
# workers.java_home should point to your Java installation. Normally
# you should have a bin and lib directories beneath it.
#
#workers.java_home=/usr/lib/jvm/java1.8

#
# You should configure your environment slash... ps=\ on NT and / on UNIX
# and maybe something different elsewhere.
#
ps=/

#
#------ ADVANCED MODE ------------------------------------------------
#---------------------------------------------------------------------
#

#
#------ worker list ------------------------------------------
#---------------------------------------------------------------------
#
#
# The workers that your plugins should create and work with
#
worker.list=loadbalancer,tomcat1,tomcat2

#
#------ ajp13_worker WORKER DEFINITION ------------------------------
#---------------------------------------------------------------------
#

#
# Defining a worker named ajp13_worker and of type ajp13
# Note that the name and the type do not have to match.
#
#============tomcat1==============
worker.tomcat1.port=8009
worker.tomcat1.host=localhost
worker.tomcat1.type=ajp13
worker.tomcat1.lbfactor=1

#=============tomcat2=============
worker.tomcat2.port=8009
worker.tomcat2.host=10.134.0.88
worker.tomcat2.type=ajp13
worker.tomcat2.lbfactor=1
#
worker.loadbalancer.type=lb
worker.loadbalancer.balance_workers=tomcat1,tomcat2
worker.loadbalancer.sticky_session=false
- apache2.conf
# This is the main Apache server configuration file.  It contains the
# configuration directives that give the server its instructions.
# See http://httpd.apache.org/docs/2.4/ for detailed information about
# the directives and /usr/share/doc/apache2/README.Debian about Debian specific
# hints.
#
#
# Summary of how the Apache 2 configuration works in Debian:
# The Apache 2 web server configuration in Debian is quite different to
# upstream's suggested way to configure the web server. This is because Debian's
# default Apache2 installation attempts to make adding and removing modules,
# virtual hosts, and extra configuration directives as flexible as possible, in
# order to make automating the changes and administering the server as easy as
# possible.

# It is split into several files forming the configuration hierarchy outlined
# below, all located in the /etc/apache2/ directory:
#
#   /etc/apache2/
#   |-- apache2.conf
#   |   `--  ports.conf
#   |-- mods-enabled
#   |   |-- *.load
#   |   `-- *.conf
#   |-- conf-enabled
#   |   `-- *.conf
#   `-- sites-enabled
#       `-- *.conf
#
#
# * apache2.conf is the main configuration file (this file). It puts the pieces
#   together by including all remaining configuration files when starting up the
#   web server.
#
# * ports.conf is always included from the main configuration file. It is
#   supposed to determine listening ports for incoming connections which can be
#   customized anytime.
#
# * Configuration files in the mods-enabled/, conf-enabled/ and sites-enabled/
#   directories contain particular configuration snippets which manage modules,
#   global configuration fragments, or virtual host configurations,
#   respectively.
#
#   They are activated by symlinking available configuration files from their
#   respective *-available/ counterparts. These should be managed by using our
#   helpers a2enmod/a2dismod, a2ensite/a2dissite and a2enconf/a2disconf. See
#   their respective man pages for detailed information.
#
# * The binary is called apache2. Due to the use of environment variables, in
#   the default configuration, apache2 needs to be started/stopped with
#   /etc/init.d/apache2 or apache2ctl. Calling /usr/bin/apache2 directly will not
#   work with the default configuration.


# Global configuration
#

#
# ServerRoot: The top of the directory tree under which the server's
# configuration, error, and log files are kept.
#
# NOTE!  If you intend to place this on an NFS (or otherwise network)
# mounted filesystem then please read the Mutex documentation (available
# at <URL:http://httpd.apache.org/docs/2.4/mod/core.html#mutex>);
# you will save yourself a lot of trouble.
#
# Do NOT add a slash at the end of the directory path.
#
#ServerRoot "/etc/apache2"

#
# The accept serialization lock file MUST BE STORED ON A LOCAL DISK.
#
Mutex file:${APACHE_LOCK_DIR} default

#
# PidFile: The file in which the server should record its process
# identification number when it starts.
# This needs to be set in /etc/apache2/envvars
#
PidFile ${APACHE_PID_FILE}

#
# Timeout: The number of seconds before receives and sends time out.
#
Timeout 300

#
# KeepAlive: Whether or not to allow persistent connections (more than
# one request per connection). Set to "Off" to deactivate.
#
KeepAlive On

#
# MaxKeepAliveRequests: The maximum number of requests to allow
# during a persistent connection. Set to 0 to allow an unlimited amount.
# We recommend you leave this number high, for maximum performance.
#
MaxKeepAliveRequests 100

#
# KeepAliveTimeout: Number of seconds to wait for the next request from the
# same client on the same connection.
#
KeepAliveTimeout 5


# These need to be set in /etc/apache2/envvars
User ${APACHE_RUN_USER}
Group ${APACHE_RUN_GROUP}

#
# HostnameLookups: Log the names of clients or just their IP addresses
# e.g., www.apache.org (on) or 204.62.129.132 (off).
# The default is off because it'd be overall better for the net if people
# had to knowingly turn this feature on, since enabling it means that
# each client request will result in AT LEAST one lookup request to the
# nameserver.
#
HostnameLookups Off

# ErrorLog: The location of the error log file.
# If you do not specify an ErrorLog directive within a <VirtualHost>
# container, error messages relating to that virtual host will be
# logged here.  If you *do* define an error logfile for a <VirtualHost>
# container, that host's errors will be logged there and not here.
#
ErrorLog ${APACHE_LOG_DIR}/error.log

#
# LogLevel: Control the severity of messages logged to the error_log.
# Available values: trace8, ..., trace1, debug, info, notice, warn,
# error, crit, alert, emerg.
# It is also possible to configure the log level for particular modules, e.g.
# "LogLevel info ssl:warn"
#
LogLevel warn

# Include module configuration:
IncludeOptional mods-enabled/*.load
IncludeOptional mods-enabled/*.conf

# Include list of ports to listen on
Include ports.conf


# Sets the default security model of the Apache2 HTTPD server. It does
# not allow access to the root filesystem outside of /usr/share and /var/www.
# The former is used by web applications packaged in Debian,
# the latter may be used for local directories served by the web server. If
# your system is serving content from a sub-directory in /srv you must allow
# access here, or in any related virtual host.
<Directory />
    Options FollowSymLinks
    AllowOverride None
    Require all denied
</Directory>

<Directory /usr/share>
    AllowOverride None
    Require all granted
</Directory>

<Directory /var/www/>
    Options Indexes FollowSymLinks
    AllowOverride None
    Require all granted
</Directory>

#<Directory /srv/>
#   Options Indexes FollowSymLinks
#   AllowOverride None
#   Require all granted
#</Directory>


# AccessFileName: The name of the file to look for in each directory
# for additional configuration directives.  See also the AllowOverride
# directive.
#
AccessFileName .htaccess

#
# The following lines prevent .htaccess and .htpasswd files from being
# viewed by Web clients.
#
<FilesMatch "^\.ht">
    Require all denied
</FilesMatch>


#
# The following directives define some format nicknames for use with
# a CustomLog directive.
#
# These deviate from the Common Log Format definitions in that they use %O
# (the actual bytes sent including headers) instead of %b (the size of the
# requested file), because the latter makes it impossible to detect partial
# requests.
#
# Note that the use of %{X-Forwarded-For}i instead of %h is not recommended.
# Use mod_remoteip instead.
#
LogFormat "%v:%p %h %l %u %t \"%r\" %>s %O \"%{Referer}i\" \"%{User-Agent}i\"" vhost_combined
LogFormat "%h %l %u %t \"%r\" %>s %O \"%{Referer}i\" \"%{User-Agent}i\"" combined
LogFormat "%h %l %u %t \"%r\" %>s %O" common
LogFormat "%{Referer}i -> %U" referer
LogFormat "%{User-agent}i" agent

# Include of directories ignores editors' and dpkg's backup files,
# see README.Debian for details.

# Include generic snippets of statements
IncludeOptional conf-enabled/*.conf

# Include the virtual host configurations:
IncludeOptional sites-enabled/*.conf

# vim: syntax=apache ts=4 sw=4 sts=4 sr noet
- 000-default.conf
<VirtualHost *:80>
    # The ServerName directive sets the request scheme, hostname and port that
    # the server uses to identify itself. This is used when creating
    # redirection URLs. In the context of virtual hosts, the ServerName
    # specifies what hostname must appear in the request's Host: header to
    # match this virtual host. For the default virtual host (this file) this
    # value is not decisive as it is used as a last resort host regardless.
    # However, you must set it for any further virtual host explicitly.
    #ServerName www.example.com

    ServerAdmin webmaster@localhost
    DocumentRoot /var/www/html

    # Available loglevels: trace8, ..., trace1, debug, info, notice, warn,
    # error, crit, alert, emerg.
    # It is also possible to configure the loglevel for particular
    # modules, e.g.
    #LogLevel info ssl:warn

    ErrorLog ${APACHE_LOG_DIR}/error.log
    CustomLog ${APACHE_LOG_DIR}/access.log combined
    JkMount /* loadbalancer
    # For most configuration files from conf-available/, which are
    # enabled or disabled at a global level, it is possible to
    # include a line for only one particular virtual host. For example the
    # following line enables the CGI configuration for this host only
    # after it has been globally disabled with "a2disconf".
    #Include conf-available/serve-cgi-bin.conf
</VirtualHost>

# vim: syntax=apache ts=4 sw=4 sts=4 sr noet


 172
172

 被折叠的 条评论
为什么被折叠?
被折叠的 条评论
为什么被折叠?
 到【灌水乐园】发言


