


public void setHeightBasedOnChildren(ListView listView) {
        ListAdapter gxyAdapter = listView.getAdapter();
        if (gxyAdapter == null) {
            return;
        }
        int totalHeight = 0;
        WindowManager windowManager = (WindowManager) context.getSystemService(Context.WINDOW_SERVICE);
        Display display = windowManager.getDefaultDisplay();
        Point point = new Point();
        display.getSize(point);
        int width=(int) (point.x>point.y? (point.y) :(point.x));
        for (int i = 0, len = gxyAdapter.getCount(); i < len; i++) {
            // listAdapter.getCount()返回数据项的数目
            View listItem = gxyAdapter.getView(i, null, listView);
            // 计算子项View 的宽高
            int widthMeasureSpec = View.MeasureSpec.makeMeasureSpec(width, View.MeasureSpec.EXACTLY);//宽是match_parent 所以是确定 即屏幕宽,因为在ScrollView内所以高是不确定的
//            int heightMeasureSpec = View.MeasureSpec.makeMeasureSpec(DensityUtil.dip2px(UnionMedApplication.getInstance(),50), View.MeasureSpec.AT_MOST);
            listItem.measure(widthMeasureSpec, 0);//宽是match_parent 所以是确定 即屏幕宽,因为在ScrollView内所以高是不确定的  0就是MeasureSpec.UNSPECIFIED
            // 统计所有子项的总高度
            totalHeight += listItem.getMeasuredHeight();
        }
        ViewGroup.LayoutParams params = listView.getLayoutParams();
        params.height = totalHeight + (listView.getDividerHeight() * (tjAdapter.getCount() - 1));
        // listView.getDividerHeight()获取子项间分隔符占用的高度
        // params.height最后得到整个ListView完整显示需要的高度
        listView.setLayoutParams(params);
        listView.setFocusable(false);
    }
转载请注明出处:http://blog.csdn.net/cyp331203/article/details/45027641
自定义view/viewgroup要重写的几个方法:onMeasure(),onLayout(),onDraw()。(不熟悉的话可以查看专栏的前几篇文章:Android自定义控件系列二:自定义开关按钮(一))。
今天的任务就是详细研究一下protected void onMeasure(int widthMeasureSpec, int heightMeasureSpec)方法。
如果只是说要重写什么方法有什么用的话,还是不太清楚。先去源码中看看为什么要重写onMeasure()方法,这个方法是在哪里调用的:
一、源码中的measure/onMeasure方法:
实际上是在View这个类中的public final void measure(int widthMeasureSpec, int heightMeasureSpec)方法中被调用的:
1、measure()
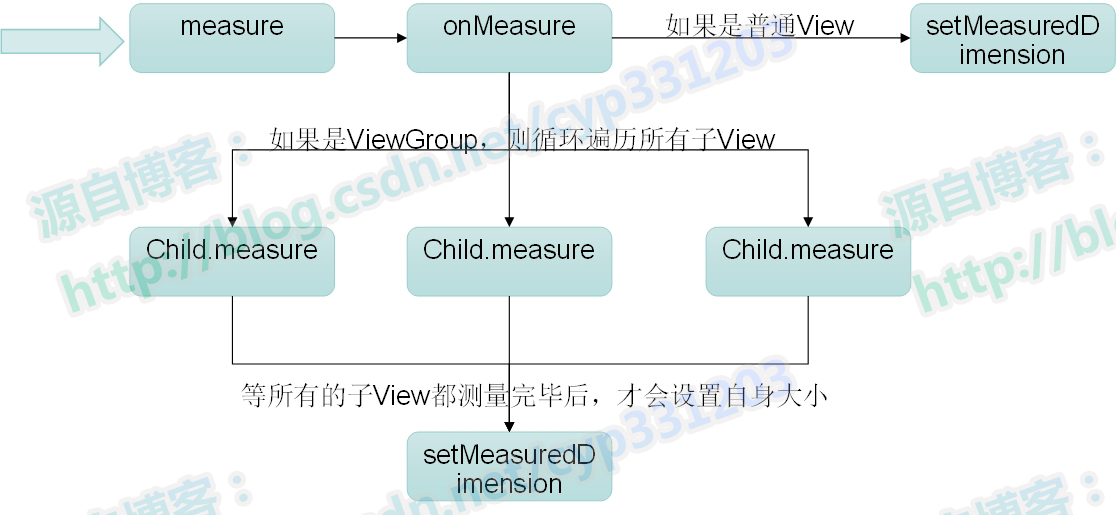
可以看到,measure()这个方法是一个由final来修饰的方法,意味着不能够被子类重写.measure()方法的作用是:测量出一个View的实际大小,而实际性的测量工作,Android系统却并没有帮我们完成,因为这个工作交给了onMeasure()来作,所以我们需要在自定义View的时候按照自己的需求,重写onMeasure方法.而子控件又分为view和viewGroup两种情况,那么测量的流程是怎样的呢,看一下下面这个图你就明白了:
2、onMeasure
onMeasure(int widthMeasureSpec, int heightMeasureSpec)中,两个参数的作用: widthMeasureSpec和heightMeasureSpec这两个int类型的参数,看名字应该知道是跟宽和高有关系,但它们其实不是宽和高,而是由宽、高和各自方向上对应的模式来合成的一个值:其中,在int类型的32位二进制位中,31-30这两位表示模式,0~29这三十位表示宽和高的实际值.其中模式一共有三种,被定义在Android中的View类的一个内部类中:View.MeasureSpec:
①UNSPECIFIED:表示默认值,父控件没有给子view任何限制。------二进制表示:00
②EXACTLY:表示父控件给子view一个具体的值,子view要设置成这些值的大小。------二进制表示:01
③AT_MOST:表示父控件个子view一个最大的特定值,而子view不能超过这个值的大小。------二进制表示:10
二、MeasureSpec
MeasureSpe描述了父View对子View大小的期望.里面包含了测量模式和大小.我们可以通过以下方式从MeasureSpec中提取模式和大小,该方法内部是采用位移计算.
int specMode = MeasureSpec.getMode(measureSpec);//得到模式
int specSize = MeasureSpec.getSize(measureSpec);//得到大小
也可以通过MeasureSpec的静态方法把大小和模式合成,该方法内部只是简单的相加.
MeasureSpec.makeMeasureSpec(specSize,specMode);
每个View都包含一个ViewGroup.LayoutParams类或者其派生类,LayoutParams中包含了View和它的父View之间的关系,而View大小正是View和它的父View共同决定的。
我们平常使用类似于RelativeLayout和LinearLayout的时候,在其内部添加view的时候,不管是布局文件中加入还是在代码中使用addView方法添加,实际上都会调用这个onMeasure方法,而measure和onMeasure中的两个参数,是由各级父控件往子控件/子view进行一层层传递的。我们可以在xml中定义Layout的宽和高的具体的值或宽高的填充方式:matchparent/wrapcontent,也可以在代码中使用LayoutParams设置,而实际上这里设置的值就会对应到上面的measure和onMeasure方法中的两个参数的模式,对应关系如下:
具体的值(如width=200dp)和matchparent/fillparent,对应模式中的MeasureSpec.EXACTLY
包裹内容(width=wrapcontent)则对应模式中的MeasureSpec.AT_MOST
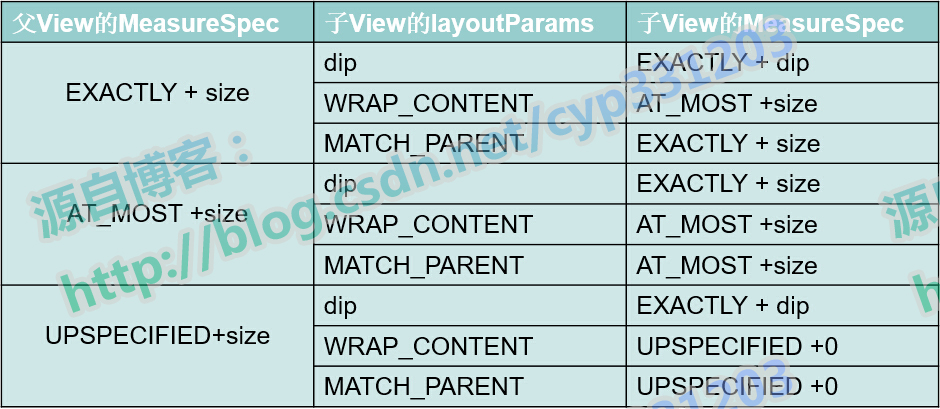
系统调用measure方法,从父控件到子控件的heightMeasureSpec的传递是有一套对应的判断规则的,列表如下:
一个view的宽高尺寸,只有在测量之后才能得到,也就是measure方法被调用之后。大家都应该使用过View.getWidth()和View.getHeight()方法,这两个方法可以返回view的宽和高,但是它们也不是在一开始就可以得到的,比如oncreate方法中,因为这时候measure方法还没有被执行,测量还没有完成,我们可以来作一个简单的实验:自定义一个MyView,继承View类,然后在OnCreate方法中,将其new出来,通过addview方法,添加到现在的布局中。然后调用MyView对象的getWidth()和getHeight()方法,会发现得到的都是0。
onMeasure通过父View传递过来的大小和模式,以及自身的背景图片的大小得出自身最终的大小,然后通过setMeasuredDimension()方法设置给mMeasuredWidth和mMeasuredHeight.
普通View的onMeasure逻辑大同小异,基本都是测量自身内容和背景,然后根据父View传递过来的MeasureSpec进行最终的大小判定,例如TextView会根据文字的长度,文字的大小,文字行高,文字的行宽,显示方式,背景图片,以及父View传递过来的模式和大小最终确定自身的大小.
三、ViewGroup的onMeasure
ViewGroup是个抽象类,本身没有实现onMeasure,但是他的子类都有各自的实现,通常他们都是通过measureChildWithMargins函数或者其他类似于measureChild的函数来遍历测量子View,被GONE的子View将不参与测量,当所有的子View都测量完毕后,才根据父View传递过来的模式和大小来最终决定自身的大小.
在测量子View时,会先获取子View的LayoutParams,从中取出宽高,如果是大于0,将会以精确的模式加上其值组合成MeasureSpec传递子View,如果是小于0,将会把自身的大小或者剩余的大小传递给子View,其模式判定在前面表中有对应关系.
ViewGroup一般都在测量完所有子View后才会调用setMeasuredDimension()设置自身大小,如第一张图所示.
可能看到现在,还是没搞清楚Android系统通过measure和onmeasure一层层传递参数的具体方法。在研究这个问题之前,先来看一下最简单的helloworld的UI层级关系图:
为了方便起见,这里我们使用requestWindowFeature(Window.FEATURE_NO_TITLE);去除标题栏的影响,只看层级关系。
UI层级关系图:
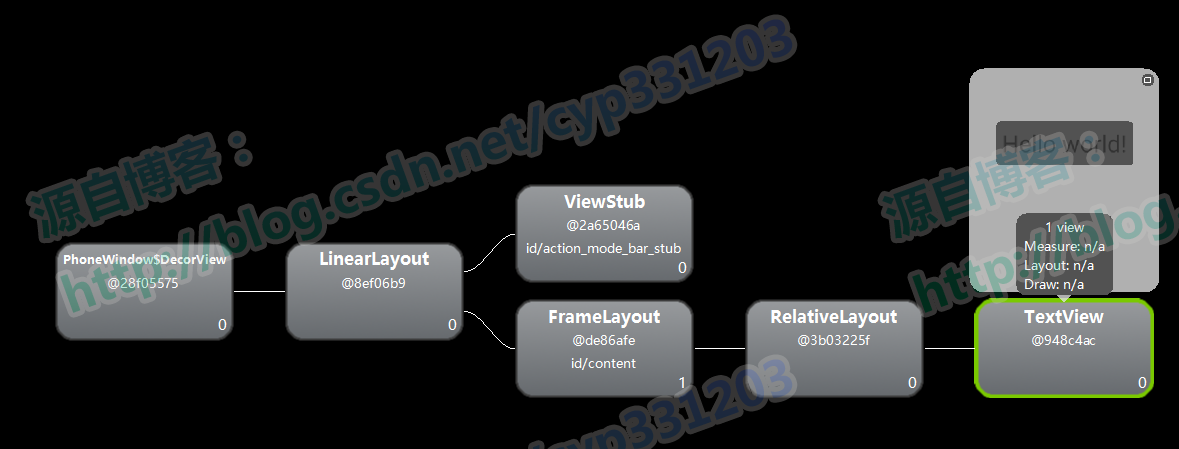
可以发现最简单的helloworld的层级关系图是这样的,最开始是一个PhoneWindow的内部类DecorView,这个DecorView实际上是系统最开始加载的最底层的一个viewGroup,它是FrameLayout的子类,然后加载了一个LinearLayout,然后在这个LinearLayout上加载了一个id为content的FrameLayout和一个ViewStub,这个实际上是原本为ActionBar的位置,由于我们使用了requestWindowFeature(Window.FEATURE_NO_TITLE),于是变成了空的ViewStub;然后在id为content的FrameLayout才加载了我们的布局XML文件中写的RelativeLayout和TextView。
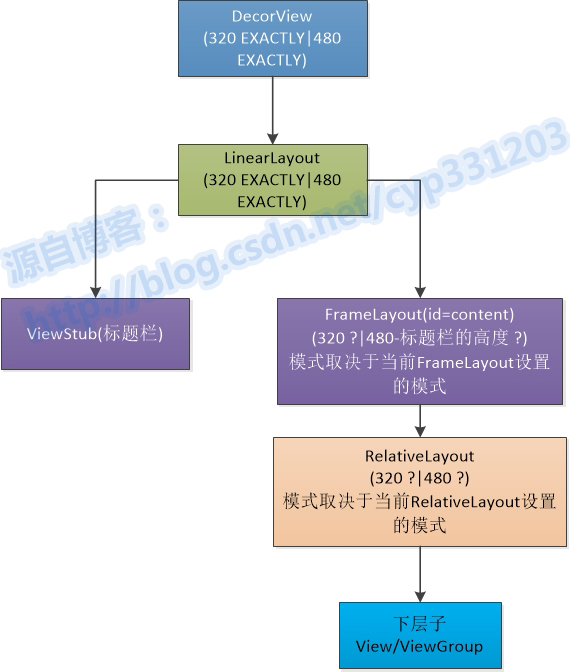
那么measure方法在系统中传递尺寸和模式,必定是从DecorView这一层开始的,我们假定手机屏幕是320*480,那么DecorView最开始是从硬件的配置文件中读取手机的尺寸,然后设置measure的参数大小为320*480,而模式是EXCACTLY,传递关系可以由下图示意:
好了,原理将到这里,下一篇将看到利用onMeasure来测量一个自定义一个ImageView,使其能够自动填满屏幕的宽度,且能通过measure测量高度,自适应的调整高度,永远不出现拉伸/压缩变形的情况,敬请关注,谢谢。
一个Android开发者总会遇到自定义控件的问题。要学会自定义控件的开发,最好的方法是将要用到的知识点一个个掌握。当掌握这些分散的知识点就意味着写一个自定义控件会变得容易。本篇文章是对View的测量的探究。
概念
View的测量主要掌握三种测量模式:
贴上源码:
/**
         * Measure specification mode: The parent has not imposed any constraint
         * on the child. It can be whatever size it wants.
         */
        public static final int UNSPECIFIED = 0 << MODE_SHIFT;

        /**
         * Measure specification mode: The parent has determined an exact size
         * for the child. The child is going to be given those bounds regardless
         * of how big it wants to be.
         */
        public static final int EXACTLY     = 1 << MODE_SHIFT;

        /**
         * Measure specification mode: The child can be as large as it wants up
         * to the specified size.
         */
        public static final int AT_MOST     = 2 << MODE_SHIFT;
这里的测量是对View的width和height进行测量。
UNSPECIFIED:未指定测量模式。View大小不确定,想要多大有多大。
EXACTLY: 精确值模式。当控件的width和height设置为具体值或者match_parent时就是这个模式。
AT_MOST:最大值模式。父布局决定子布局大小(例如:父布局width或者height设置一个默认的精确值,子布局设置为wrap_content。此时子布局的最大width或者height就是父布局的width或者height)。使用这种测量模式的View,设置的一定是wrap_content。
测试
接下来通过具体的代码来测试三种测量模式使用的场景:
准备工作:新建一个View。在onMesure()中写测量的代码。
public class TestMesureView extends View {

    public TestMesureView(Context context) {
        this(context, null);
    }

    public TestMesureView(Context context, AttributeSet attrs) {
        this(context, attrs, 0);
    }

    public TestMesureView(Context context, AttributeSet attrs, int defStyleAttr) {
        super(context, attrs, defStyleAttr);
    }

    @Override
    protected void onMeasure(int widthMeasureSpec, int heightMeasureSpec) {
        super.onMeasure(widthMeasureSpec, heightMeasureSpec);
        int width = 0;
        int height = 0;

        int widthMode = getMode(widthMeasureSpec);
        int heightMode = getMode(heightMeasureSpec);

        /** 测量width **/
        width = getReallySize(widthMode,widthMeasureSpec);
        /** 测量height **/
        height = getReallySize(heightMode,heightMeasureSpec);

        Log.i("really width mode",logMode(widthMode));
        Log.i("really width",String.valueOf(width));

        Log.i("really split","---------------------------");

        Log.i("really height mode",logMode(heightMode));
        Log.i("really height",String.valueOf(height));
        setMeasuredDimension(width, height);
    }

    /**
     * 获取测量模式
     * @param sizeMeasureSpec
     * @return
     */
    private int getMode(int sizeMeasureSpec){
        return MeasureSpec.getMode(sizeMeasureSpec);
    }

    /**
     * 通过测量模式获取真正的Size
     * @param mode
     * @param sizeMeasureSpec
     * @return
     */
    private int getReallySize(int mode,int sizeMeasureSpec){
        int specSize = 0;
        switch (mode){
            case MeasureSpec.AT_MOST:
            case MeasureSpec.EXACTLY:
                specSize = MeasureSpec.getSize(sizeMeasureSpec);
                break;
            case MeasureSpec.UNSPECIFIED:
                specSize = sizeMeasureSpec;
                break;
        }
        return specSize;
    }

    private String logMode(int mode){
        switch (mode){
            case MeasureSpec.AT_MOST:
                return "AT_MOST";
            case MeasureSpec.EXACTLY:
                return "EXACTLY";
            case MeasureSpec.UNSPECIFIED:
                return "UNSPECIFIED";
        }
        return "";
    }

}
如上代码:
getMode() : 获取测量模式的方法,核心方法为 MeasureSpec.getMode(sizeMeasureSpec); 将onMeasure(int widthMeasureSpec, int heightMeasureSpec)。中两个参数分别传入就可分别得到width的测量模式和height的测量模式。
getReallySize(): 获取测量到的值的方法。核心方法为 MeasureSpec.getSize(sizeMeasureSpec);将onMeasure(int widthMeasureSpec, int heightMeasureSpec)。中两个参数分别传入就可分别得到width的真实大小和height的真实大小。
1、EXACTLY
a、将layout_width,layout_height 都设为 match_parent。
<?xml version="1.0" encoding="utf-8"?>
<LinearLayout xmlns:android="http://schemas.android.com/apk/res/android"
    android:layout_width="match_parent"
    android:layout_height="match_parent"
    android:orientation="vertical">
    <com.mg.axe.androiddevelop.view.TestMesureView
        android:background="#33ee33"
        android:layout_width="match_parent"
        android:layout_height="match_parent" />
</LinearLayout>10-10 22:25:21.271 8207-8207/com.mg.axe.androiddevelop I/really width mode: EXACTLY
10-10 22:25:21.271 8207-8207/com.mg.axe.androiddevelop I/really width: 1080
10-10 22:25:21.271 8207-8207/com.mg.axe.androiddevelop I/really split: ---------------------------
10-10 22:25:21.271 8207-8207/com.mg.axe.androiddevelop I/really height mode: EXACTLY
10-10 22:25:21.271 8207-8207/com.mg.axe.androiddevelop I/really height: 1860 
运行结果
分析Log和截图:
通过运行结果可以看到view充满整个屏幕。
分析Log可以知道,两者的测量模式都是 EXACTLY
手机的分辨率为1920*1080 , width为1080 , height为1860(因为有状态栏所以不是1920)
b、指定精确大小,将layout_width,layout_height 都设为 100dp。
<?xml version="1.0" encoding="utf-8"?>
<LinearLayout xmlns:android="http://schemas.android.com/apk/res/android"
    android:layout_width="match_parent"
    android:layout_height="match_parent"
    android:orientation="vertical">
    <com.mg.axe.androiddevelop.view.TestMesureView
        android:background="#33ee33"
        android:layout_width="100dp"
        android:layout_height="100dp" />

</LinearLayout>10-11 00:13:23.511 763-763/com.mg.axe.androiddevelop I/really width mode: EXACTLY
10-11 00:13:23.511 763-763/com.mg.axe.androiddevelop I/really width: 300
10-11 00:13:23.511 763-763/com.mg.axe.androiddevelop I/really split: ---------------------------
10-11 00:13:23.511 763-763/com.mg.axe.androiddevelop I/really height mode: EXACTLY
10-11 00:13:23.511 763-763/com.mg.axe.androiddevelop I/really height: 300 
运行结果
分析:
分析Log可以知道,两者的测量模式都是 EXACTLY
获取到的width和height都为 300. (系统测量会将单位转为px)
2、AT_MOST
a、父布局将layout_width,layout_height 都设为 match_parent
将子布局的layout_width,layout_height 都设为 wrap_content
<?xml version="1.0" encoding="utf-8"?>
<LinearLayout xmlns:android="http://schemas.android.com/apk/res/android"
    android:layout_width="match_parent"
    android:layout_height="match_parent"
    android:orientation="vertical">
    <com.mg.axe.androiddevelop.view.TestMesureView
        android:layout_width="wrap_content"
        android:layout_height="wrap_content"
        android:background="#33ee33"/>
</LinearLayout>10-11 01:27:32.656 29513-29513/com.mg.axe.androiddevelop I/really width mode: AT_MOST
10-11 01:27:32.656 29513-29513/com.mg.axe.androiddevelop I/really width: 1080
10-11 01:27:32.656 29513-29513/com.mg.axe.androiddevelop I/really split: ---------------------------
10-11 01:27:32.656 29513-29513/com.mg.axe.androiddevelop I/really height mode: AT_MOST
10-11 01:27:32.656 29513-29513/com.mg.axe.androiddevelop I/really height: 1860分析:
子布局的宽高测量模式都为: AT_MOST
父布局的layout_width和layout_height都为match_parent,父布局的宽高约为屏幕的宽高。
子布局的layout_width和layout_height都为wrap_content,子布局大小不固定,但是最大值受父布局大小影响。这种情况的测量模式就是 AT_MOST 。
b、将父布局设置为指定大小,需要测量的布局将layout_width,layout_height 都设为 wrap_content
<?xml version="1.0" encoding="utf-8"?>
<LinearLayout xmlns:android="http://schemas.android.com/apk/res/android"
    android:layout_width="100dp"
    android:layout_height="100dp"
    android:orientation="vertical">
    <com.mg.axe.androiddevelop.view.TestMesureView
        android:layout_width="wrap_content"
        android:layout_height="wrap_content"
        android:background="#33ee33" />
</LinearLayout>10-11 01:30:41.126 2423-2423/com.mg.axe.androiddevelop I/really width mode: AT_MOST
10-11 01:30:41.126 2423-2423/com.mg.axe.androiddevelop I/really width: 300
10-11 01:30:41.126 2423-2423/com.mg.axe.androiddevelop I/really split: ---------------------------
10-11 01:30:41.126 2423-2423/com.mg.axe.androiddevelop I/really height mode: AT_MOST
10-11 01:30:41.126 2423-2423/com.mg.axe.androiddevelop I/really height: 300分析:
这种情况和上面a测试的结论一样。子布局大小不固定,但是最大值受父布局大小影响。这种情况的测量模式就是 EXACTLY 。
c、测试出一种特殊的情况
当父布局是RelativeLayout,子布局的layout_width,layout_height 都设为 wrap_content时,子布局的width测量模式为EXACTLY
<?xml version="1.0" encoding="utf-8"?>
<RelativeLayout xmlns:android="http://schemas.android.com/apk/res/android"
    android:layout_width="100dp"
    android:layout_height="100dp"
    android:orientation="vertical">


    <com.mg.axe.androiddevelop.view.TestMesureView
        android:layout_width="wrap_content"
        android:layout_height="wrap_content"
        android:background="#33ee33" />
</RelativeLayout>10-11 09:05:26.970 14275-14275/com.mg.axe.androiddevelop I/really width mode: EXACTLY
10-11 09:05:26.970 14275-14275/com.mg.axe.androiddevelop I/really width: 300
10-11 09:05:26.970 14275-14275/com.mg.axe.androiddevelop I/really split: ---------------------------
10-11 09:05:26.970 14275-14275/com.mg.axe.androiddevelop I/really height mode: AT_MOST
10-11 09:05:26.970 14275-14275/com.mg.axe.androiddevelop I/really height: 300分析:
我暂时也不知道子View的宽的测量模式是EXACTLY。这应该是一种特殊情况。
这里再次做提醒:如果这个View的测量模式为AT_MOST,这个View一定设置了wrap_content
3、UNSPECIFIED
a、添加父布局scrollview,将测试的view放在里面
<?xml version="1.0" encoding="utf-8"?>
<LinearLayout xmlns:android="http://schemas.android.com/apk/res/android"
    android:layout_width="match_parent"
    android:layout_height="match_parent"
    android:orientation="vertical">

    <ScrollView
        android:layout_width="match_parent"
        android:layout_height="match_parent">

    <com.mg.axe.androiddevelop.view.TestMesureView
        android:layout_width="wrap_content"
        android:layout_height="wrap_content"
        android:background="#33ee33"/>
    </ScrollView>
</LinearLayout>10-11 01:18:23.566 15113-15113/com.mg.axe.androiddevelop I/really width mode: AT_MOST
10-11 01:18:23.566 15113-15113/com.mg.axe.androiddevelop I/really width: 1080
10-11 01:18:23.566 15113-15113/com.mg.axe.androiddevelop I/really split: ---------------------------
10-11 01:18:23.566 15113-15113/com.mg.axe.androiddevelop I/really height mode: UNSPECIFIED
10-11 01:18:23.566 15113-15113/com.mg.axe.androiddevelop I/really height: 0分析:
这里我们只要分析height就行了,这种情况下 父布局ScrollView的子view的高度是不固定的,想要多大就可多大。所以这里height的测量模式为 UNSPECIFIED
实际应用
1、先测量再绘制
在写自定义控件时,涉及到测量绘制的。一般是先测量再绘制。
2、测量方法
这个是上面写的方法。是参照源码写的。
private int getReallySize(int mode,int sizeMeasureSpec){
        int specSize = 0;
        switch (mode){
            case MeasureSpec.AT_MOST:
            case MeasureSpec.EXACTLY:
                specSize = MeasureSpec.getSize(sizeMeasureSpec);
                break;
            case MeasureSpec.UNSPECIFIED:
                specSize = sizeMeasureSpec;
                break;
        }
        return specSize;
    }
在View的源码中有一个getDefaultSize的方法。
public static int getDefaultSize(int size, int measureSpec) {
        int result = size;
        int specMode = MeasureSpec.getMode(measureSpec);
        int specSize = MeasureSpec.getSize(measureSpec);

        switch (specMode) {
        case MeasureSpec.UNSPECIFIED:
            result = size;
            break;
        case MeasureSpec.AT_MOST:
        case MeasureSpec.EXACTLY:
            result = specSize;
            break;
        }
        return result;
    }
}
3、测量完毕之后一定要调用setMeasuredDimension(width, height);
要调用setMeasuredDimension或者super.onMeasure来设置自身的mMeasuredWidth和mMeasuredHeight,否则,就会抛出异常.
来自:http://www.jianshu.com/p/85548a440cd2


 1760
1760

 被折叠的 条评论
为什么被折叠?
被折叠的 条评论
为什么被折叠?
 到【灌水乐园】发言


