


传统IO
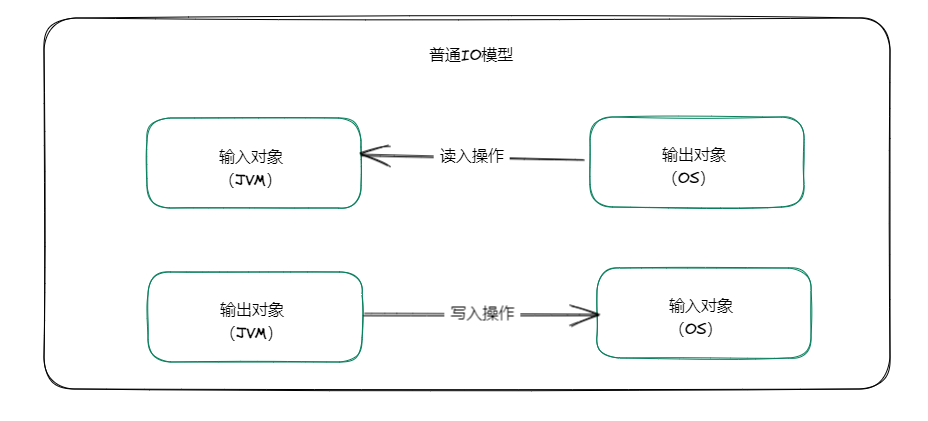
这里以文件输入输出流:FileInputStream 、 FileOutputStream 来进行解释。由继承关系得知,这两个输入和输出类继承自 InputStream 和 OutputStream 这两个基础的输入、输出的抽象类,这时我们可以看到当我们需要读写文件的时候,就需要创建两个流对象。原理图如下

由图中可以知道,OS 提供了 API 的接口给用户程序调用,这时我们可以将 API 接口和 OS ,比如成 C/S ,也即应用程序就是浏览器端或者桌面端程序, OS 和 API 等价于服务器,也即 Controller 接口。
public class FileInputStream extends InputStream {}
public class FileOutputStream extends OutputStream {}
抽象类描述
输入流源码
流程如下:
read(byte b[])直接调用read(byte b[], int off, int len)函数- 校验
byte数组是否为空 - 校验读取范围是否正确
- 校验读取长度
- 调用
read()函数读入一个字节 - 验证字节是否达到了文件的末尾
- 将该字节的数据保存到
b数组中 - 循环将文件的数据,逐字节的从磁盘中读入放到
b字节数组中
// 只以文件流为例
public abstract class InputStream implements Closeable {
	public int read(byte b[]) throws IOException {
        return read(b, 0, b.length);  // 直接调用 read(byte b[], int off, int len) 函数
    }
    public int read(byte b[], int off, int len) throws IOException {
        if (b == null) {  // 校验 byte 数组是否为空
            throw new NullPointerException();
        } else if (off < 0 || len < 0 || len > b.length - off) {  // 校验读取范围是否正确
            throw new IndexOutOfBoundsException();
        } else if (len == 0) {  // 校验读取长度
            return 0;
        }
		// 调用 read() 函数读入一个字节
        int c = read();
        if (c == -1) { // 验证字节是否达到了文件的末尾
            return -1;
        }
        b[off] = (byte)c;  // 将该字节的数据保存到 b 数组中

        int i = 1;
        try {
            // 将文件的数据,逐字节的从磁盘中读入放到 b 字节数组中
            for (; i < len ; i++) {
                c = read();
                if (c == -1) {
                    break;
                }
                b[off + i] = (byte)c;
            }
        } catch (IOException ee) {
        }
        return i;
    }

}
输出流源码
流程如下:
write(byte b[])直接调用write(byte b[], int off, int len)函数- 校验数组不能为空
- 校验写入范围是否合理
- 校验写入的长度是否为0
- 循环将
b数组中的数据,逐个字节写入文件
public abstract class OutputStream implements Closeable, Flushable {
    public void write(byte b[]) throws IOException {
        write(b, 0, b.length); // 直接调用 write(byte b[], int off, int len) 函数
    }
    public void write(byte b[], int off, int len) throws IOException {
        if (b == null) {  // 校验数组不能为空
            throw new NullPointerException();
        } else if ((off < 0) || (off > b.length) || (len < 0) ||
                   ((off + len) > b.length) || ((off + len) < 0)) {  // 校验写入范围是否合理
            throw new IndexOutOfBoundsException();
        } else if (len == 0) {  // 校验写入的长度是否为0
            return;
        }
        // 循环将 b 数组中的数据,逐个字节写入文件
        for (int i = 0 ; i < len ; i++) {
            write(b[off + i]);
        }
    }
}
文件输入流和输出流复写抽象类方法原理
FileInputStream 复写抽象类方法原理
FileInputStream 流程如下:
read(byte b[])方法直接调用readBytes(byte b[], int off, int len)方法read(byte b[], int off, int len)方法直接调用readBytes(byte b[], int off, int len)方法- 可以看到
readBytes(byte b[], int off, int len)方法为native,称之为JNI (Java Native Interface)方法
public class FileInputStream extends InputStream {
    public int read(byte b[]) throws IOException {
        return readBytes(b, 0, b.length);  // 直接调用 readBytes(byte b[], int off, int len) 方法
    }
    public int read(byte b[], int off, int len) throws IOException {
        return readBytes(b, off, len);  // 直接调用 readBytes(byte b[], int off, int len) 方法
    }
    // 可以看到该方法为 native ,称之为 JNI (Java Native Interface)方法
    private native int readBytes(byte b[], int off, int len) throws IOException;
}
FileOutputStream 复写抽象类方法原理
FileOutputStream 流程如下:
write(byte b[])方法直接调用writeBytes(byte b[], int off, int len, boolean append)方法write(byte b[], int off, int len)方法直接调用writeBytes(byte b[], int off, int len, boolean append)方法- 可以看到
writeBytes(byte b[], int off, int len, boolean append)方法为native,称之为JNI (Java Native Interface)方法
public class FileOutputStream extends OutputStream {
    public void write(byte b[]) throws IOException {
        writeBytes(b, 0, b.length, append);  // 直接调用 writeBytes(byte b[], int off, int len, boolean append) 方法
    }
    public void write(byte b[], int off, int len) throws IOException {
        writeBytes(b, off, len, append); // 直接调用 writeBytes(byte b[], int off, int len, boolean append) 方法
    }
    // 可以看到该方法为 native ,称之为 JNI (Java Native Interface)方法
    private native void writeBytes(byte b[], int off, int len, boolean append) throws IOException;
}
readBytes 方法与 writeBytes 底层实现原理
readBytes 方法,关键流程如下:
malloc分配一片空间- 调用
read函数读取数据 - 将数据保存放入堆内存的
bytes数组中
原理图如下所示:
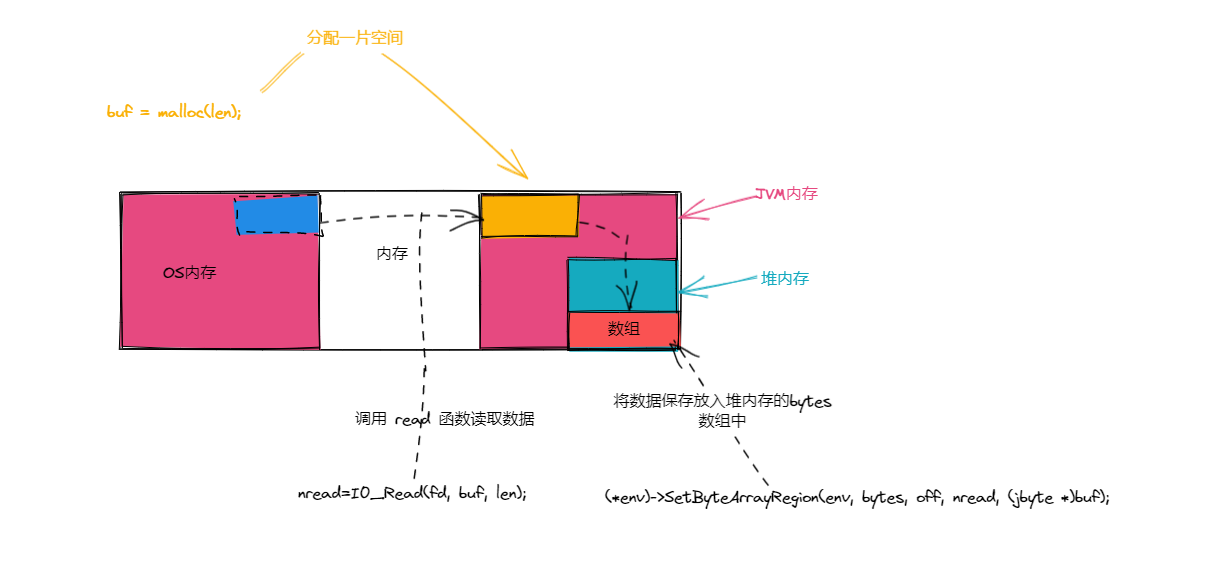
jint readBytes(JNIEnv *env, jobject this, jbyteArray bytes, jint off, jint len, jfieldID fid){
    if(len==0){
        return 0;
    else if (len BUF_SIZE){
        buf = malloc(len); // 分配一片空间
    }
    ...
    if(fd=-1){
        ...
    } else {
        nread=I0_Read(fd, buf, len); // 调用 read 函数读取数据
        if (nread 0){
        // 将数据保存放入堆内存的 bytes 数组中
    	(*env)->SetByteArrayRegion(env, bytes, off, nread, (jbyte *)buf);
        }
        ...
    }
    ...
}
writeBytes 方法,关键流程如下:
- 分配一片空间
- 将
java堆内存空间中的 bytes 数组中的内容复制到buf中 - 将
buf中的数据写入到 OS 中
原理图如下所示:

void writeBytes(JNIEnv *env, jobject this, jbyteArray bytes, jint off, jint len, jboolean append, jfieldID fid) {
    ...
    if(len == 0) {
        return;
    } else if (len > BUF_SIZE) {
        buf = malloc(len);  // 分配一片空间
        ...
    }
    ...
    // 将 java 堆内存空间中的 bytes 数组中的内容复制到 buf 中
	(*env)->GetByteArrayRegion(env, bytes, off, len, (jbyte *)buf);
    if (!(*env)->ExceptionOccurred(env)) {
        off = 0;
        ...
        while (1en 0){
            ...
            if (append = JNI_TRUE) {
                ...
            } else {
                n = I0_Write(fd, buf+off, len); // 将 buf 中的数据写入到 OS 中
            }
            ...
        }
    }
    ...
}
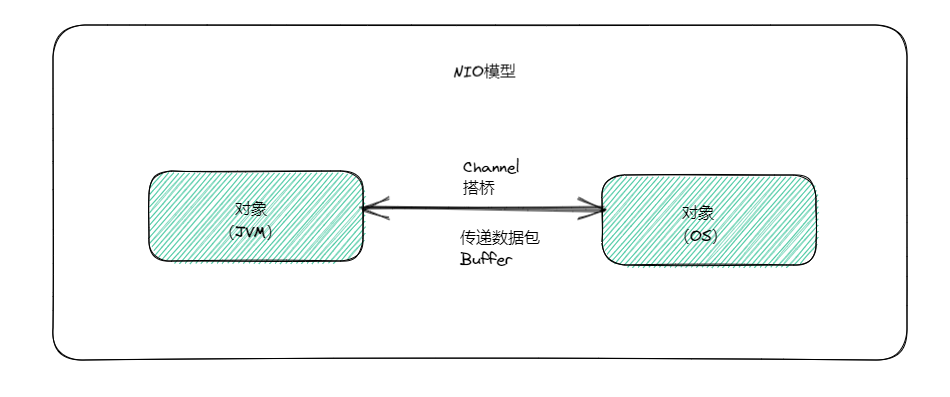
NIO 模型
如图所示,如果我们使用普通的 IO 操作,这时我们要完成输入输出对象时,就需要创建两个对象:输入流、输出流,同时我们在传输时面向的数据为字节数据,也即字节流。
这时我们可以引入下图,如图所示,我们可以引入一个新的 IO 模型,这时,不需要再为了传输数据时创建两个对象流,我们只需要在两个通讯的对象之间,构建一个 Channel 抽象通道,将数据抽象为 Buffer ,这时我们只需要双方在该 Channel 通道中传递 Buffer 即可,我们只需要将数据放入 Buffer ,然后在通道之间传递即可。
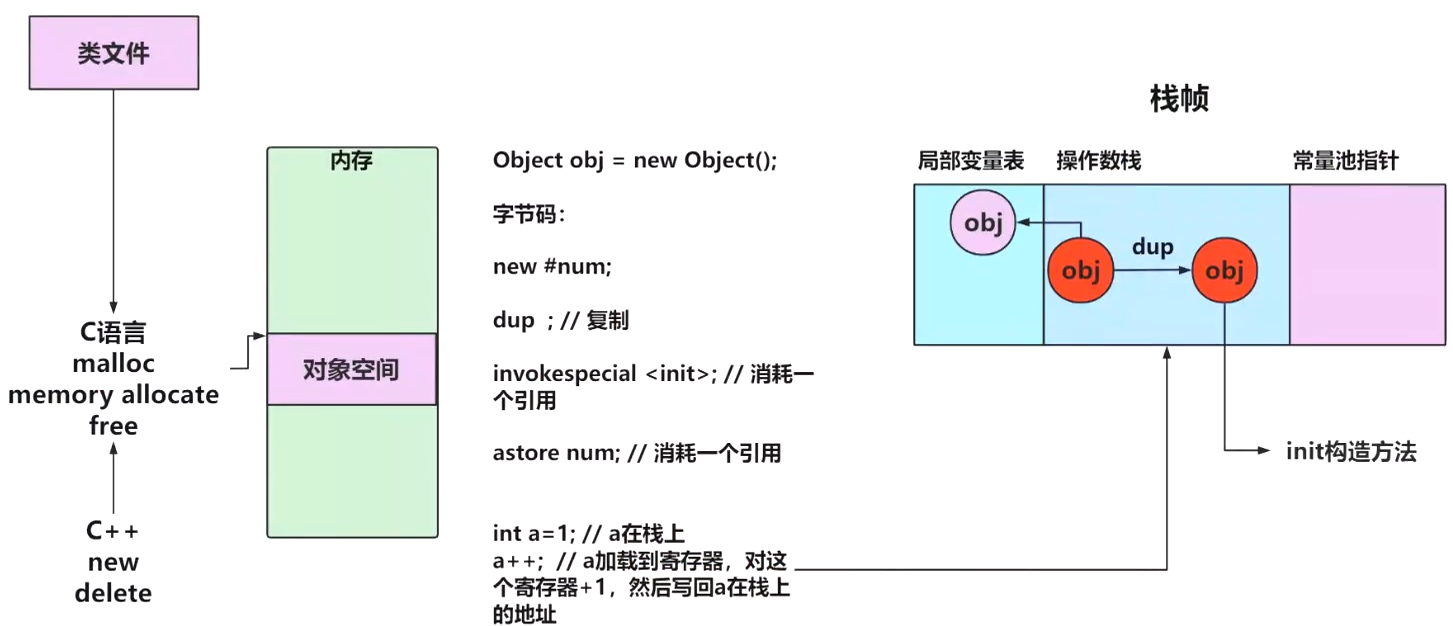
从 JVM 内存引入直接内存和堆内存原理
如下图所示,我们以创建一个对象的原理,来引入直接内存和堆内存的原理。我们看到在创建一个对像时,包含创建对象、放置对象的引用、复制对象引用、存放对像引用,为何需要复制?因为 invokespecial 、astore 这两个字节码需要消耗两个引用,而 new 会返回一个引用,所以我们需要 dup复制一个引用,在创建对像时,需要创建一片空间,该空间如果用 c语言 来描绘,我们可以用 malloc 函数来进行创建该对象空间,同时 free 函数可以释放该空间,在 C++ 中由于引入了面向对象的概念,这时不会使用 malloc 来分配原始内存,引入了 new 操作符和 delete 操作符,new 在用 malloc 分配完内存后,将会调用构造函数和构造初始化列表,delete 会在执行析构函数后,调用 free 来释放空间。
直接内存和堆内存原理
如下图所示,我们可以称:
- 在
JVM内存中分配的空间为: 直接内存缓冲区(DirectByteBuffer) - 在
JVM内存中的堆内存中开辟的空间为:堆内缓冲区(HeapByteBuffer)


 123
123


 被折叠的 条评论
为什么被折叠?
被折叠的 条评论
为什么被折叠?
 到【灌水乐园】发言


