


一.部署前的准备工作
-
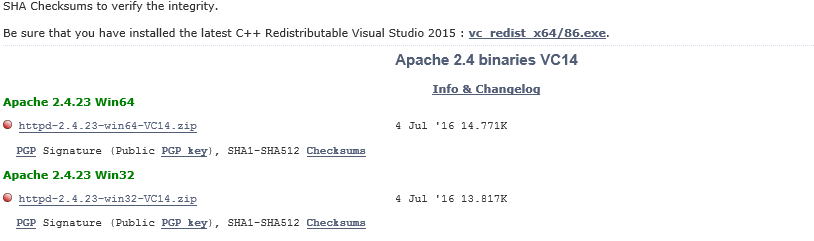
下载Apache.
服务器windows64位的机子,所以需要下载个64位的版本,去官网上找,没有找到,
官网好像是没有windows版本的,要下载的要去其他地方下载,然后给了几个下载地址。随便点开一个http://www.apachelounge.com/downloa
下载win64的 -
选择连接方式,有三种,第一种http_proxy,第二种用jk,第三种ajp_proxy。(重要)http://www.ibm.com/developerworks/cn/opensource/os-lo-apache-tomcat/ 有详细介绍
相对于 JK 的连接方式,后两种在配置上是比较简单的,灵活性方面也一点都不逊色。但就稳定性而言就不像 JK 这样久经考验,毕竟 Apache 2.2.3 推出的时间并不长,采用这种连接方式的网站还不多,因此,如果是应用于关键的互联网网站,还是建议采用 JK 的连接方式。
我选择jk方式。 -
下载jk,记得下载64位httpd-2.4.x版的,最开始没有注意这个下载了个32位的启动报错。
二. ## 配置流程 ##
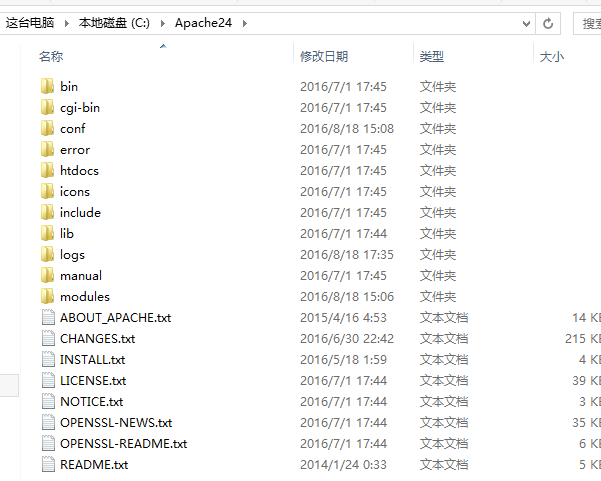
- 解压下载的httpd-2.4.23-win64-VC14.zip。
-
解压完后,看下ReadMe.txt,里面说默认目录是c:,懒的改就 直接放 到c盘根目录下,文档里面有很多有用的信息,可以看看
3.将下载的64位jk文件mod_jk.so拷贝到modules文件夹里
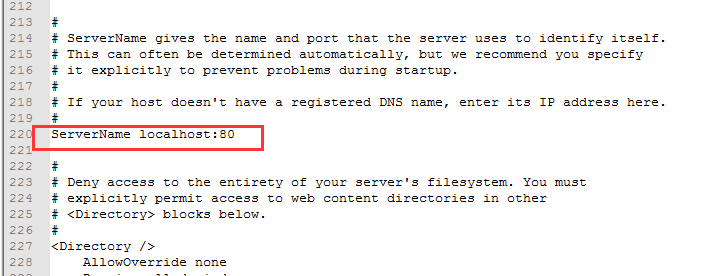
4.修改conf/httpd.conf,把注释的ServerName localhost:80放开(220行),
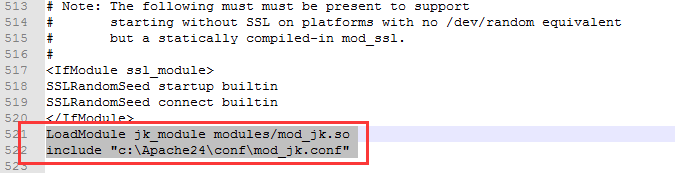
然后再文件末尾加上
LoadModule jk_module modules/mod_jk.so
include “c:\Apache24\conf\mod_jk.conf”
5.添加mod_jk.conf配置到fc:\Apache24\conf目录。mod_jk.conf内容为
JkWorkersFile conf/workers.properties
JkMount /* controler
6.加入workers.properties 到conf目录, workers.properties 内容为
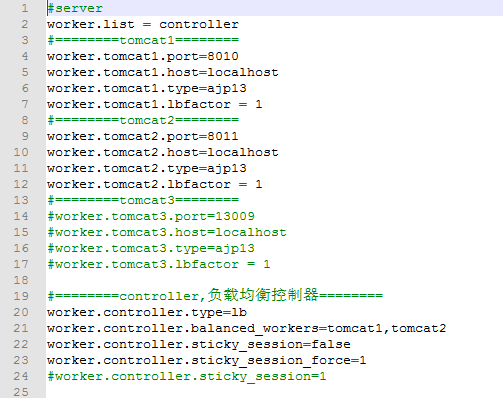
7.修改tomcat的server.xml 配置修改主要修改端口号
<Connector port="8010" protocol="AJP/1.3" redirectPort="8443" /> 端口不要重复(workers.properties 里的 worker.tomcat1.port=8010 8010就是这里,用的是ajp) ,还有一处需要修改 <Engine name="Catalina" defaultHost="localhost" jvmRoute="jvm2"> 给加上 jvmRoute="jvm2" ,每个tomcat的值别设置一样。还有 <Server port="8189" shutdown="SHUTDOWN">端口也记得修改。
以下是我的tomcat配置
<?xml version='1.0' encoding='utf-8'?>
<!--
  Licensed to the Apache Software Foundation (ASF) under one or more
  contributor license agreements.  See the NOTICE file distributed with
  this work for additional information regarding copyright ownership.
  The ASF licenses this file to You under the Apache License, Version 2.0
  (the "License"); you may not use this file except in compliance with
  the License.  You may obtain a copy of the License at

      http://www.apache.org/licenses/LICENSE-2.0

  Unless required by applicable law or agreed to in writing, software
  distributed under the License is distributed on an "AS IS" BASIS,
  WITHOUT WARRANTIES OR CONDITIONS OF ANY KIND, either express or implied.
  See the License for the specific language governing permissions and
  limitations under the License.
-->
<!-- Note:  A "Server" is not itself a "Container", so you may not
     define subcomponents such as "Valves" at this level.
     Documentation at /docs/config/server.html
 -->
<Server port="8088" shutdown="SHUTDOWN">

  <!--APR library loader. Documentation at /docs/apr.html -->
  <Listener className="org.apache.catalina.core.AprLifecycleListener" SSLEngine="on" />
  <!--Initialize Jasper prior to webapps are loaded. Documentation at /docs/jasper-howto.html -->
  <Listener className="org.apache.catalina.core.JasperListener" />
  <!-- Prevent memory leaks due to use of particular java/javax APIs-->
  <Listener className="org.apache.catalina.core.JreMemoryLeakPreventionListener" />
  <!-- JMX Support for the Tomcat server. Documentation at /docs/non-existent.html -->
  <Listener className="org.apache.catalina.mbeans.ServerLifecycleListener" />
  <Listener className="org.apache.catalina.mbeans.GlobalResourcesLifecycleListener" />


  <GlobalNamingResources>

    <Resource name="UserDatabase" auth="Container"
              type="org.apache.catalina.UserDatabase"
              description="User database that can be updated and saved"
              factory="org.apache.catalina.users.MemoryUserDatabaseFactory"
              pathname="conf/tomcat-users.xml" />
  </GlobalNamingResources>


  <Service name="Catalina">


    <Connector port="8787" protocol="HTTP/1.1"
               connectionTimeout="20000"
               redirectPort="8443" />

    <!-- Define an AJP 1.3 Connector on port 8009 -->
    <Connector port="8010" protocol="AJP/1.3" redirectPort="8443" />


    <Engine name="Catalina" defaultHost="localhost"> -->
<Engine name="Catalina" defaultHost="localhost" jvmRoute="jvm1">

      <Realm className="org.apache.catalina.realm.UserDatabaseRealm"
             resourceName="UserDatabase"/>

      <!-- Define the default virtual host
           Note: XML Schema validation will not work with Xerces 2.2.
       -->
      <Host name="localhost"  appBase="webapps"
            unpackWARs="true" autoDeploy="true"
            xmlValidation="false" xmlNamespaceAware="false">


      </Host>
    </Engine>
  </Service>
</Server>
-
在网上找了2个test.jsp的页面,放入tomcat,在web.xml加入 test
9.启动全部tomcat,然后运行 httpd.exe
10.访问页面,查看效果
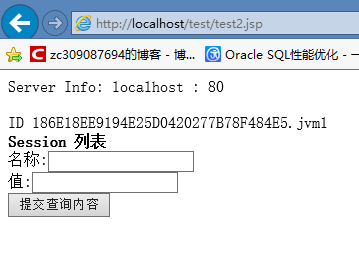
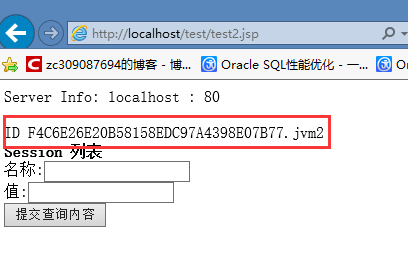
这些是我已经配置好的, Apache24放入C盘根目录,tomcat解压,然后启动tomcat,启动httpd.exe,然后ok。访问http://localhost/test/test2.jsp 地址查看效果
附件: apache24 下载地址 http://pan.baidu.com/s/1slmv2dJ
tomcat6 下载地址 http://pan.baidu.com/s/1boZqKYN
附带一个jk的下载 http://pan.baidu.com/s/1skJVkCl
如果要安装httpd为servers服务,需要安装vc_redist(64位)
http://pan.baidu.com/s/1qXT0EU4


 2703
2703


 被折叠的 条评论
为什么被折叠?
被折叠的 条评论
为什么被折叠?
 到【灌水乐园】发言


