


C语言学习: iOS开发分分钟搞定C语言
OC语言学习: iOS开发核心语言Objective C
分享400G iOS学习资料。
获取途径:新浪微博 关注➕私信极客James

一.MVVM设计模式及思想
在 iOS 应用中日益增长的重量级视图控制器的问题。在典型的 MVC 应用里, 许多逻辑被放在 View Controller 里。
它们中的一些确实属于 View Controller,但更多的是所谓的“表示逻辑(presentation logic);
为了不让控制器日益增大,便于测试管理,便出现了MVVM.
MVVM:它其实是一个 MVC 的增强版,并将表示逻辑从 Controller 移出放到一个新的对象里,即 View Model
在 iOS 上使用 MVVM 的动机,就是让它能减少 View Controller 的复杂性并使得表示逻辑更易于测试.下面就通过一个小Demo来展示MVVM设计模式.
有关MVVM 设计模式的Demo
项目需求:
通过纯代码实现自定义不等高cell。
设计思路:
(1)创建项目,导入素材。
(2)创建数据模型
(3)创建视图模型
(4)在控制器中完成数据源及数据源方法
代码实现步骤
(1)创建项目,导入素材
(2)创建数据模型ZJStatus
在ZJSTatus.h中
@interface ZJStatus : NSObject
/*********显示数据模型********/
/** 头像 */
@property (nonatomic ,copy)NSString *icon;
/** 昵称 */
@property (nonatomic ,copy)NSString *name;
/** vip */
@property (nonatomic ,assign)BOOL vip;
/** 文字 */
@property (nonatomic ,copy)NSString *text;
/** 配图 */
@property (nonatomic ,copy)NSString *picture;
/*********显示frame模型********/
/** 头像 */
@property (nonatomic ,assign)CGRect iconFrame;
/** 昵称 */
@property (nonatomic ,assign)CGRect nameFrame;
/** vip */
@property (nonatomic ,assign)CGRect vipFrame;
/** 文字 */
@property (nonatomic ,assign)CGRect textframe;
/** 配图 */
@property (nonatomic ,assign)CGRect pictureFrame;
/** cell 的高度*/
@property (nonatomic,assign)CGFloat cellHeight;在ZJSTatus.m中
#define KNameFont [UIFont systemFontOfSize:17]
#define KTextFont [UIFont systemFontOfSize:14]
@implementation ZJStatus

// 重写cellHeight的get方法
- (CGFloat)cellHeight{
    if (_cellHeight == 0) {
        // 设置边距为10
        CGFloat margin = 10;
        // 设置cellHeight默认为0
        CGFloat cellHeight = 0;

        // 1.头像
        CGFloat iconX = margin;
        CGFloat iconY = margin;
        CGFloat iconW = 40;
        CGFloat iconH = iconW;
        self.iconFrame = CGRectMake(iconX, iconY, iconW, iconH);

        // 2.昵称
        CGFloat nameX = CGRectGetMaxX(self.iconFrame) + margin;
        CGFloat nameY = iconY;
        // 昵称占据的宽度
        NSDictionary *nameAttres = @{NSFontAttributeName :KNameFont};
        CGSize nameSize = [self.name sizeWithAttributes:nameAttres];
        // 通过结构体来存name的frame
        self.nameFrame = (CGRect){{nameX,nameY},nameSize};

        // 3.vip
        if (self.vip) {
        CGFloat vipX = CGRectGetMaxX(self.nameFrame)+margin;
        CGFloat vipY = nameY;
        CGFloat vipW = 14;
        CGFloat vipH = nameSize.height;
        self.vipFrame = CGRectMake(vipX, vipY, vipW, vipH);

        }

        // 4.文字 TEXT
        CGFloat textY = CGRectGetMaxY(self.iconFrame) + margin ;
        CGFloat textX = iconX;
        CGFloat textW = [UIScreen mainScreen].bounds.size.width - 2*textX;
        // 4.1定义文字最大的显示尺寸
        CGSize textMaxSize = CGSizeMake(textW, MAXFLOAT);
        // 4.2设置文字大小
        NSDictionary *textAttr = @{NSFontAttributeName : KTextFont };
        // 4.3设置文字的高度
        CGFloat textH = [self.text boundingRectWithSize:textMaxSize options:NSStringDrawingUsesLineFragmentOrigin attributes:textAttr context:nil].size.height;
        self.textframe = CGRectMake(textX, textY, textW, textH);
        // 5.配图
        if (self.picture) {
            CGFloat pictureW = 100;
            CGFloat pictureH = pictureW;
            CGFloat pictureX = textX;
            CGFloat pictureY = CGRectGetMaxY(self.textframe) + margin;
            self.pictureFrame = CGRectMake(pictureX, pictureY, pictureW, pictureH );

            // 如果有图 cell的高度为
            _cellHeight = CGRectGetMaxY(self.pictureFrame);
        }
        else{
            // 如果没有图
            _cellHeight = CGRectGetMaxY(self.textframe);
        }
        // 让cellHeight 增加一个margin的高度
        _cellHeight += margin;

    }

    return _cellHeight;

}
(3)创建一个继承自UITableViewCell的视图模型ZJStatusCell
在ZJStatusCell.h中
@class ZJStatus;
@interface ZJStatusCell : UITableViewCell
/** status的数据 */
@property (nonatomic,strong) ZJStatus *status;
在ZJStatusCell.m中
#import "ZJStatus.h"
#define KNameFont [UIFont systemFontOfSize:17]
#define KTextFont [UIFont systemFontOfSize:14]

@interface ZJStatusCell ()
/** 头像 */
@property (nonatomic ,weak)UIImageView *iconImageView;
/** 昵称 */
@property (nonatomic ,weak)UILabel *nameLabel;
/** vip */
@property (nonatomic ,weak)UIImageView * vipImageView;
/** 文字 */
@property (nonatomic ,weak)UILabel *TEXTLabel;
/** 图片 */
@property (nonatomic ,weak)UIImageView *pictureImageView;

@end
@implementation ZJStatusCell
/**
 *  添加子控件(把有可能显示的子控件都加进去)
 */
- (instancetype)initWithStyle:(UITableViewCellStyle)style reuseIdentifier:(NSString *)reuseIdentifier{
    if (self = [super initWithStyle:style reuseIdentifier:reuseIdentifier]) {

        // 1.昵称
        UIImageView *iconImageView = [[UIImageView alloc]init];
        [self.contentView addSubview:iconImageView];
        // 连线 建立关系
        self.iconImageView = iconImageView;

        // 2.标题
        UILabel *nameLabel = [[UILabel alloc]init];
        [self.contentView addSubview:nameLabel];
        self.nameLabel = nameLabel;
        // 设置文字大小
        self.nameLabel.font = KNameFont;
        // 连线 建立关系
        self.nameLabel = nameLabel;

        // 3.vip
        UIImageView *vipImageView = [[UIImageView alloc]init];
        vipImageView.image = [UIImage imageNamed:@"vip"];
        // 图片显示格式
        vipImageView.contentMode = UIViewContentModeCenter;
        [self.contentView addSubview:vipImageView];
        // 连线 建立关系
        self.vipImageView = vipImageView;

        // 4.文字
        UILabel *TEXTlabel = [[UILabel alloc]init];
        [self.contentView addSubview:TEXTlabel];
        self.TEXTLabel = TEXTlabel;
        // 设置文字大小
        self.TEXTLabel.font = KTextFont;
        // 连线 建立关系
        self.TEXTLabel = TEXTlabel;
        // 换行
        self.TEXTLabel.numberOfLines = 0;
        // 设置一个背景颜色
        // self.TEXTLabel.backgroundColor = [UIColor redColor];

        // 5.配图
        UIImageView *pictureImageView = [[UIImageView alloc]init];
        [self.contentView addSubview:pictureImageView];
        self.pictureImageView = pictureImageView;
        // 连线 建立关系
        self.pictureImageView = pictureImageView;
    }

    return self;
}

// 布局自控件
- (void)layoutSubviews{
#warning 一定要调用 [super layoutSubviews];
    [super layoutSubviews];
    // 直接从模型中调用相应的frame
    // 头像
    self.iconImageView.frame = self.status.iconFrame;
    // 昵称
    self.nameLabel.frame = self.status.nameFrame;
    // vip
    self.vipImageView.frame = self.status.vipFrame;
    // 文字
    self.TEXTLabel.frame = self.status.textframe;
    // 图片
    self.pictureImageView.frame = self.status.pictureFrame;

}

// 设置数据
- (void)setStatus:(ZJStatus *)status{
    _status = status;
    self.iconImageView.image = [UIImage imageNamed:status.icon];
    self.nameLabel.text = status.name;
    self.TEXTLabel.text = status.text;
    // 图片
    if (status.picture) {
        self.pictureImageView.hidden = NO;
        self.pictureImageView.image = [UIImage imageNamed:status.picture];
    }
    else {
        self.pictureImageView.hidden = YES;

    }
    // vip 图标
    if (status.vip) {
        self.vipImageView.hidden = NO;

        self.nameLabel.textColor = [UIColor orangeColor];
    }else{
        self.vipImageView.hidden = YES;
        self.nameLabel.textColor = [UIColor blackColor];
    }

}
(5)在控制器中
#import "ZJStatus.h"
#import "ZJStatusCell.h"
#import "MJExtension.h"

@interface ViewController ()

/** status的数组 */
@property (nonatomic,strong) NSArray *statuses;
@end

@implementation ViewController

- (NSArray *)statuses{
    if (!_statuses) {
        _statuses = [ZJStatus objectArrayWithFilename:@"statuses.plist"];
    }
    return _statuses;

}
 NSString *ID = @"status";
- (void)viewDidLoad {
    [super viewDidLoad];
    [self.tableView registerClass:[ZJStatusCell class] forCellReuseIdentifier:ID];
    // 设置cell 的高度为
    //self.tableView.rowHeight = 250;

 }

#pragma  mark - 数据源方法
- (NSInteger)tableView:(UITableView *)tableView numberOfRowsInSection:(NSInteger)section{
    return self.statuses.count;

}
- (UITableViewCell *)tableView:(UITableView *)tableView cellForRowAtIndexPath:(NSIndexPath *)indexPath{

    ZJStatusCell *cell = [tableView dequeueReusableCellWithIdentifier:ID];
    cell.status = self.statuses[indexPath.row];
    return cell
    ;
}
#pragma mark - 代理方法来算高度

- (CGFloat)tableView:(UITableView *)tableView heightForRowAtIndexPath:(NSIndexPath *)indexPath{
    ZJStatus *statue = self.statuses[indexPath.row];
    return statue.cellHeight;

}
二.MVC与MVVM设计模式对比
MVC与MVVM设计
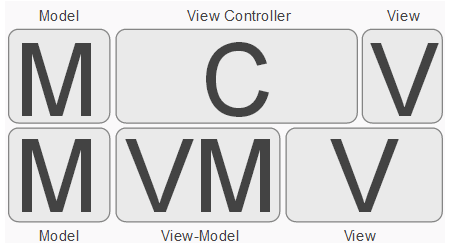
上图展示了MVVM与MVC的差别。
在MVC模式的iOS开发中,Controller承担了太多的代码,包含着我们的视图处理逻辑和业务逻辑。
在MVVM中,我们将视图处理逻辑从C中剥离出来给V,剩下的业务逻辑部分被称做View-Model。
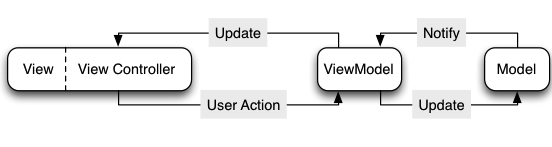
使用MVVM模式的iOS应用的可测试性要好于MVC,因为ViewModel中并不包含对View的更新,相比于MVC,减轻了Controller的负担,使功能划分更加合理。
MVVM模式的正确实践是,我们应该为app delegate的根视图创建一个ViewModel,当我们要生成或展示另一个次级ViewController时,采用当前的ViewModel为其创建一个子ViewModel。
而这些ViewModel的代码并不放在ViewController中,我们的View请求自己的ViewModel来获取所需的数据,ViewController完全归于View。


 236
236

 被折叠的 条评论
为什么被折叠?
被折叠的 条评论
为什么被折叠?
 到【灌水乐园】发言


