


@ConfigurationProperties注解的使用步骤如下:
- 在需要绑定属性的Java类上添加@ConfigurationProperties注解。
- 在注解中指定属性的前缀,该前缀对应配置文件中的属性键的前缀。
- 定义与配置文件中属性键相对应的字段或方法,并使用注解的方式将它们与配置文件中的属性值进行绑定。
下面是一个示例:
import lombok.Data;
import org.springframework.boot.context.properties.ConfigurationProperties;
import org.springframework.context.annotation.Configuration;

/**
 * jw配置类
 */
@Data
@Configuration
@ConfigurationProperties(prefix = "zzyl.framework.jwt")
public class JwtTokenProperties {

    private String secretKey;//签名密钥
    private Integer ttl;//有效时间
}
在上面的示例中,我们使用@ConfigurationProperties注解将一个名为"MyAppProperties"的Java类与配置文件中的属性进行绑定。通过指定prefix属性为"myapp",我们告诉Spring框架要将以"myapp"为前缀的属性值注入到该类的字段或方法中。
假设在application-jwt.yml配置文件中有以下属性:
zzyl:
  framework:
    jwt:
      secret-key: $2a$10$PVtHnkj86mJgf6li/yron.LRx/cQAlaiZkBJ9BeogCNTryXJRT1YC
      ttl: 3600000
当Spring容器启动时,会自动将配置文件中的属性值注入到MyAppProperties类的对应字段中。我们可以通过在其他的Spring组件中注入MyAppProperties对象来使用这些属性值。
@Component
public class MyComponent {
    @Autowired
    private MyAppProperties myAppProperties;

    public void printProperties() {
        System.out.println(myAppProperties);
    }
}
在上面的示例中,我们在一个Spring组件中注入了MyAppProperties对象,并通过调用printProperties()方法来打印属性值。
通过这种方式,我们可以方便地将配置文件中的属性值注入到Java对象中,实现配置的灵活性和可管理性。
1.BCrypt加密和md5加密的区别及代码示例
对于用户密码的保护,通常都会进行加密。我们通常对密码进行加密,然后存放在数据库中,在用户进行登录的时候,将其输入的密码与数据库中存放的密文进行比较,以验证用户密码是否正确。
BCrypt和MD5介绍
BCrypt加密: 一种加盐的单向Hash,不可逆的加密算法,同一种明文(plaintext),每次加密后的密文都不一样,而且不可反向破解生成明文,破解难度很大。
MD5加密: 是不加盐的单向Hash,不可逆的加密算法,同一个密码经过hash的时候生成的是同一个hash值,在大多数的情况下,有些经过md5加密的方法将会被破解。
Bcrypt生成的密文是60位的。而MD5的是32位的。
目前,MD5和BCrypt比较流行。相对来说,BCrypt比MD5更安全,但加密更慢。
虽然BCrpyt也是输入的字符串+盐,但是与MD5+盐的主要区别是:每次加的盐不同,导致每次生成的结果也不相同。无法比对!
代码示例:
import cn.hutool.crypto.digest.BCrypt;
import cn.hutool.crypto.digest.DigestUtil;

public class PwdTest {

    public static void main(String[] args) {
        //md5加密
        String md5Pswd1 = DigestUtil.md5Hex("123456");
        String md5Pswd2 = DigestUtil.md5Hex("123456");
        System.out.println(md5Pswd1);
        System.out.println(md5Pswd2);

        //BCrypt加密
        String hashpw1 = BCrypt.hashpw("123456", BCrypt.gensalt());
        String hashpw2 = BCrypt.hashpw("123456", BCrypt.gensalt());
        System.out.println(hashpw1);
        System.out.println(hashpw2);

        //验证密码是否正确
        boolean checkpw = BCrypt.checkpw("123456", "$2a$10$QPYqZUGv6w53RWOH3hU.gOc4vIOU4Uysif1e.7sQRDIU3BeQsEcZS");
        System.out.println(checkpw);

    }
}
1.对于jwt进行封装,后续可以直接调用jwt这个类
import cn.hutool.core.date.DateField;
import cn.hutool.core.date.DateUtil;
import com.zzyl.enums.BasicEnum;
import com.zzyl.exception.BaseException;
import io.jsonwebtoken.Claims;
import io.jsonwebtoken.JwtBuilder;
import io.jsonwebtoken.Jwts;
import io.jsonwebtoken.SignatureAlgorithm;

import java.nio.charset.StandardCharsets;
import java.util.Date;
import java.util.Map;

public class JwtUtil {
    /**
     * 生成jwt,使用Hs256算法, 私匙使用固定秘钥
     *
     * @param secretKey jwt秘钥
     * @param ttl       jwt过期时间(小时)
     * @param claims    设置的信息
     * @return
     */
    public static String createJWT(String secretKey, int ttl, Map<String, Object> claims) {
        // 指定签名的时候使用的签名算法,也就是header那部分
        SignatureAlgorithm signatureAlgorithm = SignatureAlgorithm.HS256;

        // 设置jwt的body
        JwtBuilder builder = Jwts.builder()
                // 如果有私有声明,一定要先设置这个自己创建的私有的声明,这个是给builder的claim赋值,一旦写在标准的声明赋值之后,就是覆盖了那些标准的声明的
                .setClaims(claims)
                // 设置签名使用的签名算法和签名使用的秘钥
                .signWith(signatureAlgorithm, secretKey.getBytes(StandardCharsets.UTF_8))
                // 设置过期时间
                .setExpiration(DateUtil.offset(new Date(), DateField.HOUR_OF_DAY, ttl));

        return builder.compact();
    }

    /**
     * Token解密
     *
     * @param secretKey jwt秘钥 此秘钥一定要保留好在服务端, 不能暴露出去, 否则sign就可以被伪造, 如果对接多个客户端建议改造成多个
     * @param token     加密后的token
     * @return
     */
    public static Claims parseJWT(String secretKey, String token) {
        try {
            // 得到DefaultJwtParser
            Claims claims = Jwts.parser()
                    // 设置签名的秘钥
                    .setSigningKey(secretKey.getBytes(StandardCharsets.UTF_8))
                    // 设置需要解析的jwt
                    .parseClaimsJws(token).getBody();
            return claims;
        } catch (Exception e) {
            //            throw new AccessDeniedException("没有权限,请登录");
            //这里的异常是封装的自定义异常,如果使用这个需要自定义异常,或者直接使用运行时异常,直接抛出就行
            //(备选throw new RuntimeException("没有权限,请登录");)
            throw new BaseException(BasicEnum.LOGIN_LOSE_EFFICACY);
        }
    }

}
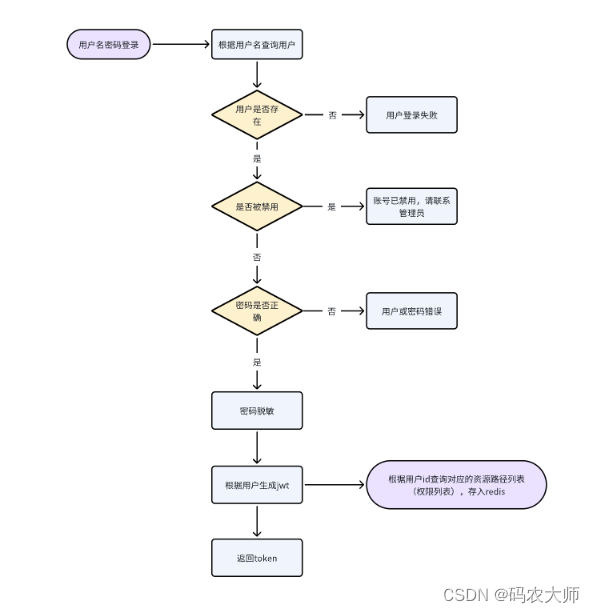
2.登录代码逻辑业务层代码
import cn.hutool.core.bean.BeanUtil;
import cn.hutool.core.util.ObjectUtil;
import cn.hutool.crypto.digest.BCrypt;
import com.zzyl.constant.Constants;
import com.zzyl.constant.SuperConstant;
import com.zzyl.dto.LoginDto;
import com.zzyl.entity.User;
import com.zzyl.enums.BasicEnum;
import com.zzyl.exception.BaseException;
import com.zzyl.mapper.UserMapper;
import com.zzyl.properties.JwtTokenProperties;
import com.zzyl.service.LoginService;
import com.zzyl.utils.JwtUtil;
import com.zzyl.vo.UserVo;
import org.springframework.beans.factory.annotation.Autowired;
import org.springframework.stereotype.Service;

import java.util.HashMap;
import java.util.Map;

@Service
public class LoginServiceImpl implements LoginService {

    @Autowired
    private UserMapper userMapper;
    @Autowired
    private JwtTokenProperties jwtTokenProperties;


    /**
     * 登录
     *
     * @param loginDto
     * @return
     */
    @Override
    public UserVo login(LoginDto loginDto) {

        //根据用户名查询用户表的用户数据
        User user = userMapper.selectByUsername(loginDto.getUsername());

        //判断查询的用户数据是否为空
        if (ObjectUtil.isEmpty(user)) {
            throw new BaseException(BasicEnum.LOGIN_FAIL);
        }

        //判断数据库的密码和前端用户传过来的密码是否一致
//        if (!(loginDto.getPassword().equals(user.getPassword()))) {
//            throw new RuntimeException("用户或密码登录错误");
//        }

        if(BCrypt.checkpw(loginDto.getPassword(),user.getPassword())){
            throw new BaseException(BasicEnum.INCORRECT_PASSWORD);

        }

        //判读当前用户是否为启用状态
        if (user.getDataState().equals(SuperConstant.DATA_STATE_1)) {
            throw new BaseException(BasicEnum.ACCOUNT_DISABLED);

        }

        //创建对象,把user封装到userVo,因为返回值是userVo,所以需要转换
        UserVo userVo = BeanUtil.toBean(user, UserVo.class);

        //密码脱敏,就是对密码进行清空
        userVo.setPassword("");

        //创建map集合,把id放进去,创建map集合,根据用户id进行token的创建
        Map<String, Object> map = new HashMap<>();
        //添加id,数据库里面的id数据
        map.put(Constants.JWT_USERID, userVo.getId());

        //根据用户生成jwt鉴权,  这里就是运用了上述jwt封装好的实体类,传入秘钥,传入时间,传入根据id生成的map集合,就能生成token
        String token = JwtUtil.createJWT(jwtTokenProperties.getSecretKey(), jwtTokenProperties.getTtl(), map);

        //把生成好的token返回给前台
        userVo.setUserToken(token);

        return userVo;
    }
}
2.1解析token (这个是如果想要根据token解析数据就可以使用这个形式去获取用户id,根据id就能拿到当前用户的数据了)
import cn.hutool.core.map.MapUtil;
import cn.hutool.jwt.JWT;
import cn.hutool.jwt.JWTUtil;
import com.zzyl.constant.Constants;
import com.zzyl.properties.JwtTokenProperties;
import com.zzyl.utils.JwtUtil;
import com.zzyl.utils.MobThreadLocal;
import io.jsonwebtoken.Claims;
import org.springframework.beans.factory.annotation.Autowired;
import org.springframework.stereotype.Component;
import org.springframework.web.servlet.HandlerInterceptor;

import javax.servlet.http.HttpServletRequest;
import javax.servlet.http.HttpServletResponse;

/**
 * 移动端拦截器
 */
@Component
public class MobileInterceptor implements HandlerInterceptor {

    @Autowired
    private JwtTokenProperties jwtTokenProperties;


    public boolean preHandle(HttpServletRequest request, HttpServletResponse response, Object handler) throws Exception {

        //1.通过requesr获取token
        String token = request.getHeader(Constants.USER_TOKEN);

        //解析token, 需要获取jwtTokenProperties类.getSecretKey()秘钥,传入token
        Claims claims = JwtUtil.parseJWT(jwtTokenProperties.getSecretKey(), token);


        //获取解析后的id
        Long aLong = MapUtil.get(claims, Constants.JWT_USERID, Long.class);

//(这里有牵扯到本地线程的概念,先不管)
        MobThreadLocal.set(aLong);

        return true;


    }


}
3.登录实现之后就需要进行拦截器的使用,登录和拦截器是相辅相成的,有登陆也必然就有拦截器的概念
import com.zzyl.intercept.MobileInterceptor;
import org.springframework.beans.factory.annotation.Autowired;
import org.springframework.context.annotation.Configuration;
import org.springframework.web.servlet.config.annotation.InterceptorRegistry;
import org.springframework.web.servlet.config.annotation.WebMvcConfigurer;

/**
 * WebMvc高级配置类
 */
 //拦截器的注解
@Configuration
public class WebMvcConfig implements WebMvcConfigurer {

    @Autowired
    private MobileInterceptor mobileInterceptor;

    public void addInterceptors(InterceptorRegistry registry) {

        registry.addInterceptor(mobileInterceptor)
                .excludePathPatterns("/customer/user/login")
                .addPathPatterns("/customer/**");
    }


}


 3788
3788

 被折叠的 条评论
为什么被折叠?
被折叠的 条评论
为什么被折叠?
 到【灌水乐园】发言


