


 本文介绍如何在JavaEE应用中通过CXF框架发布WebService,并实现跨平台调用。包括配置CXFServlet、设置WebService地址、定义接口及实现类等关键步骤。
一. 概述
可以在传统的Java EE应用的基础上添加一层Web Service层, 我们的Java EE应用就可以对外暴漏Web Service, 这样就允许任何平台、任何语言编写的程序来调用这个Java EE应用
二. 步骤
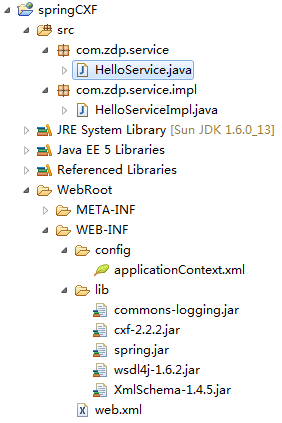
1. 新建web工程springCXF, 并复制需要的Jar包:见上图
2. 在web.xml中配置CXF的核心控制器: CXFServlet
<?xml version="1.0" encoding="UTF-8"?>
<web-app version="2.5" xmlns="http://java.sun.com/xml/ns/javaee"
	xmlns:xsi="http://www.w3.org/2001/XMLSchema-instance"
	xsi:schemaLocation="http://java.sun.com/xml/ns/javaee
	http://java.sun.com/xml/ns/javaee/web-app_2_5.xsd">

    <!-- Spring核心配置文件 -->
	<context-param>
		<param-name>contextConfigLocation</param-name>
		<param-value>/WEB-INF/config/applicationContext.xml</param-value>
	</context-param>

	<!-- 加载Spring容器 -->
	<listener>
		<listener-class>org.springframework.web.context.ContextLoaderListener</listener-class>
	</listener>

	<!-- 配置CXF的核心Servlet -->
	<servlet>
		<servlet-name>CXFServlet</servlet-name>
		<servlet-class>org.apache.cxf.transport.servlet.CXFServlet</servlet-class>
	</servlet>

	<!-- 为CXF的核心Servlet配置URL -->
	<servlet-mapping>
		<servlet-name>CXFServlet</servlet-name>
		<url-pattern>/webService/*</url-pattern>
	</servlet-mapping>
</web-app>
3. 在Spring配置文件applicationContext.xml中导入CXF提供的Schema, xml配置文件, 并使用jaxws:endpoint元素来暴露web service
<?xml version="1.0" encoding="GBK"?>
<beans xmlns="http://www.springframework.org/schema/beans"
	xmlns:xsi="http://www.w3.org/2001/XMLSchema-instance"
	xmlns:jaxws="http://cxf.apache.org/jaxws"
	xsi:schemaLocation="http://www.springframework.org/schema/beans
	http://www.springframework.org/schema/beans/spring-beans-2.5.xsd
	http://cxf.apache.org/jaxws
	http://cxf.apache.org/schemas/jaxws.xsd">

	<!-- 导入CXF为扩展Spring提供的几个XML配置文件 -->
	<import resource="classpath:META-INF/cxf/cxf.xml" />
	<import resource="classpath:META-INF/cxf/cxf-extension-soap.xml" />
	<import resource="classpath:META-INF/cxf/cxf-servlet.xml" />

	<!--
		id:指定所定义的Bean在Spring容器中的唯一标识。
		implementor:指定Web Services的实现类,或者引用容器中另一个已有的Bean实例
		address:指定所创建的Web Service的地址,因为CXF不知道该Web应用对应的URL,
				  也不知道Web服务器的监听端口。因此address属性指定的只是一个相对地址,
				 CXF将会在运行时动态确定该Web Services的服务地址。
	-->
	<jaxws:endpoint id="sayHello" implementor="com.zdp.service.impl.HelloServiceImpl" address="/sayHello"></jaxws:endpoint>
</beans>HelloService
//以@WebService Annotation标注,表明该接口将对应一个Web Services
@WebService
public interface HelloService {
	//定义一个方法,该方法将被暴露成一个Web Services操作
	public void sayHello(String name);
}
@WebService(endpointInterface = "com.zdp.service.HelloService")
public class HelloServiceImpl implements HelloService{
	public void sayHello(String name) {
		System.out.println("hello " + name + ", current time is " + new Date());
	}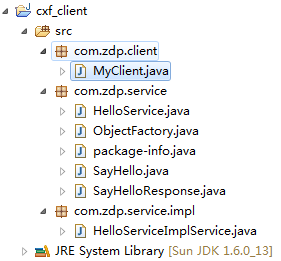
}6. 新建一个Java工程cxf_Client, 在命令行进入该工程src目录
输入一下命令: wsdl2java http://localhost:9999/springCXF/webService/sayHello?wsdl
7. 写一个测试类:
public class MyClient {
	public static void main(String[] args) {
		HelloServiceImplService factory = new HelloServiceImplService();
		HelloService helloService = factory.getHelloServiceImplPort(); // 返回一个代理
		helloService.sayHello("zhangsan");
	}
}
三. 配置拦截器
其实配置拦截器就是在applicationContext.xml中增加一个配置, 具体的拦截器类请见上一篇博文: http://blog.csdn.net/zdp072/article/details/29245575
<?xml version="1.0" encoding="GBK"?>
<beans xmlns="http://www.springframework.org/schema/beans"
	xmlns:xsi="http://www.w3.org/2001/XMLSchema-instance"
	xmlns:jaxws="http://cxf.apache.org/jaxws"
	xsi:schemaLocation="http://www.springframework.org/schema/beans
	http://www.springframework.org/schema/beans/spring-beans-2.5.xsd
	http://cxf.apache.org/jaxws
	http://cxf.apache.org/schemas/jaxws.xsd">

	<!-- 导入CXF为扩展Spring提供的几个XML配置文件 -->
	<import resource="classpath:META-INF/cxf/cxf.xml" />
	<import resource="classpath:META-INF/cxf/cxf-extension-soap.xml" />
	<import resource="classpath:META-INF/cxf/cxf-servlet.xml" />

	<!-- 拦截器 -->
    <bean id="authInterceptor" class="com.zdp.interceptor.AuthInterceptor"/>

	<jaxws:endpoint id="sayHello" implementor="com.zdp.service.impl.HelloServiceImpl" address="/sayHello">
		<jaxws:inInterceptors>
            <ref bean="authInterceptor"/>
        </jaxws:inInterceptors>
	</jaxws:endpoint>
</beans>


 544
544

 被折叠的 条评论
为什么被折叠?
被折叠的 条评论
为什么被折叠?
 到【灌水乐园】发言


