


1.快速搭建电商平台后台管理系统
目前在Gitee开源软件中,人人开源 和 若依 关注度比较高,优品电商平台后台系统采用人人开源的框架
来快速构建,完成基本的CRUD,开发更加关注复杂业务、高并发、高可用以及分布式架构层面。
- 若依:https://gitee.com/y_project (官网:http://www.ruoyi.vip)
- 人人开源:https://gitee.com/renrenio (官网:https://www.renren.io)
1.1.人人开源快速构建
人人开源说明:
- renren-fast:用于快速构建电商后台管理系统(后端)
- renren-fast-vue:用于快速构建电商后台管理系统(前端)
- renren-generator:用于快速构建微服务基础CRUD代码
1.2.克隆人人开源框架
git clone https://gitee.com/renrenio/renren-fast.git
git clone https://gitee.com/renrenio/renren-fast-vue.git
1.3.搭建电商后台系统
1.3.1.Java后台
1.将克隆好的renren-fast工程改名gmall-admin拷贝到gmall工程中,并添加到Modules
- 改名: gmall-admin
- 注意:将 .git 文件夹删除
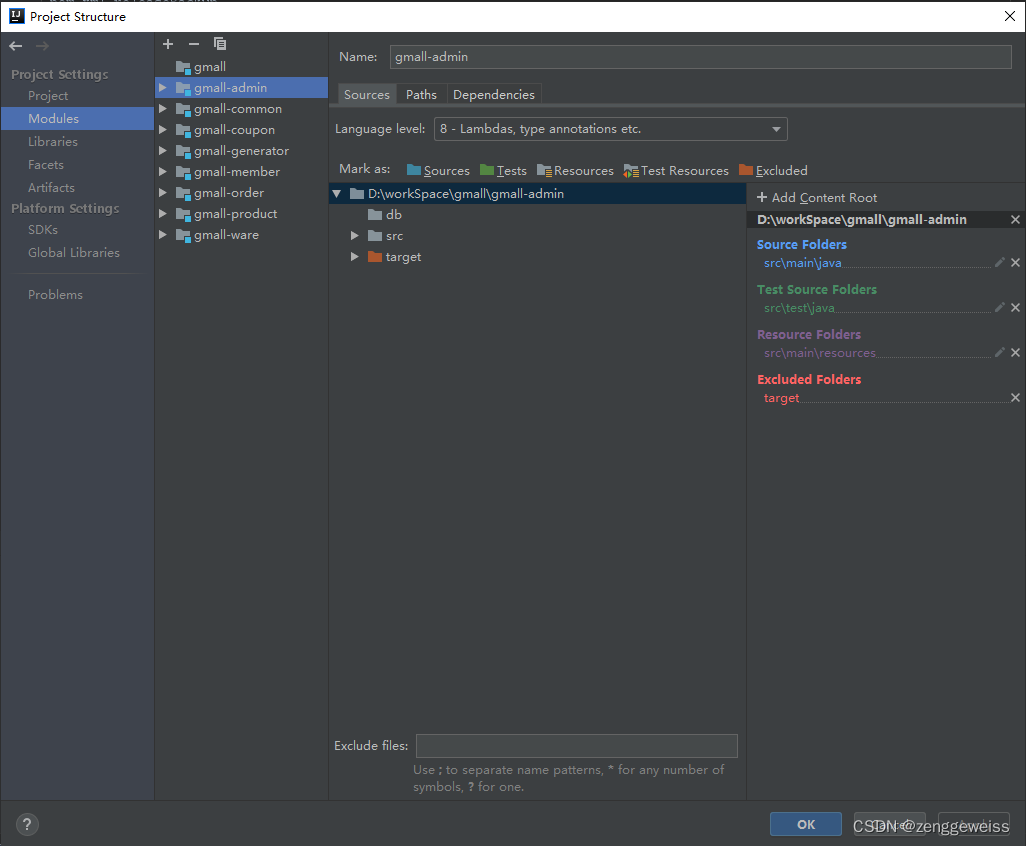
- 将 gmall-admin 聚合到 gmall 工程的 modules 中
<modules>
	<module>gmall-admin</module>
</modules>
- 创建数据库 gmall_admin ,执行 gmall_admin 工程里的 MySQL 数据库脚本 mysql.sql
- 修改 gmall_admin 工程中 application-dev.yml 配置文件中 MySQL 的连接配置
spring:
    datasource:
        type: com.alibaba.druid.pool.DruidDataSource
        druid:
            driver-class-name: com.mysql.cj.jdbc.Driver
            url: jdbc:mysql://192.168.56.10:3306/gmall_admin?useUnicode=true&characterEncoding=UTF-8&serverTimezone=Asia/Shanghai
            username: root
            password: root
- 修改 gmall_admin 工程 application.yml 中 context-path
servlet:
	context-path: /gmall_admin
- 启动 gmall_admin 后台服务
1.3.2.前端工程
前端工程搭建文档:https://gitee.com/renrenio/renren-fast-vue/wikis/Home
- 安装 Node.js ,并配置 npm 使用淘宝镜像
npm config set registry http://registry.npm.taobao.org
npm install -g cnpm --registry=https://registry.npm.taobao.org
-
VSCode中打开 renren-fast-vue 前端工程(更名: gmall-admin-vue )
-
修改前端访问的入口文件 index.js

-
进入VSCode终端,安装并运行前端项目
#安装项目所需的依赖到 node_modules 文件中
npm install
#运行项目
npm dev run

#Error: nodeб sass@4.9.0 postinstall: node scripts/build.js
#实际是因为sass安装时获取源的问题,使用cnpm进行安装
npm install -g cnpm --registry=https://registry.npm.taobao.org
cnpm install node-sass --save
启动成功,如下图所示:

- 启动完成后会自动打开浏览器访问 http://localhost:8001
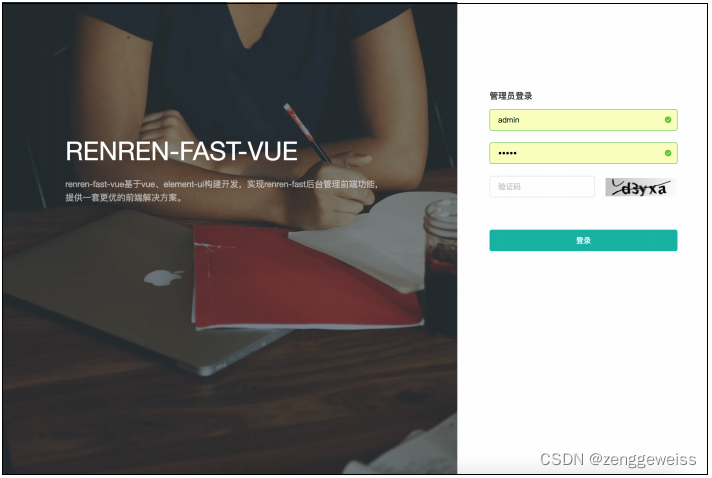
- 输入admin / admin 成功进入后台,说明系统搭建成功!
2.逆向生成微服务
2.1.代码生成器
克隆 renren-generator 改名 gmall-generator 拷贝到 gmall 工程中,并聚合到 modules中
git clone https://gitee.com/renrenio/renren-generator.git
<modules>
	<module>gmall-generator</module>
</modules>
2.2.快速构建微服务
商品服务 gmall-product 基础代码生成步骤:
修改代码生成器 gmall-generator 配置:
1)application.yml
spring:
  datasource:
    type: com.alibaba.druid.pool.DruidDataSource
    #MySQL配置
    driverClassName: com.mysql.cj.jdbc.Driver
    url: jdbc:mysql://192.168.56.10:3306/gmall_pms?useUnicode=true&characterEncoding=UTF-8&useSSL=false&serverTimezone=Asia/Shanghai
    username: root
    password: root
2)generator.properties
# 域名
mainPath=com.atguigu
# 项目包名
package=com.atguigu.gmall
# 模块名
moduleName=product
# 开发人员
author=zhangwen
# 开发者Email
email=1466787185@qq.com
# 数据库表前缀(类名不会包含表前缀)
tablePrefix=pms_
3)修改Controller 生成类,去除 shiro 相关注解,后续项目中使用 Spring Security
- 进入到 renren-generator/src/main/resources/template/Controller.java.vm
- 注释 import org.apache.shiro.authz.annotation.RequiresPermissions;
- 注释 Controller.java.vm 模板中所有Method方法 @RequiresPermissions
4)运行项目,进入到 代码生成器 控制台,全选 -> 生成代码
5)解压生成的代码包,将 main 文件夹全部拷贝到 gmall-product/src/ 目录下即可
6)按照 gmall-product 基础代码生成步骤,依次生成其它服务的代码
- gmall-order
- gmall-member
- gmall-coupon
- gmall-ware
3.创建公共服务模块
公共服务模块: gmall-common
- 每个微服务公共的依赖,Bean,工具类等放入到这里
- 每个微服务都引入 gmall-common
3.1.gmall-common
3.1.1.创建Maven工程
将 gmall-common 公共服务模块聚合到 modules 中
<modules>
	<module>gmall-common</module>
</modules>
3.1.2.引入公共依赖
引入公共依赖,后续根据需要再依次引入所需的公共依赖
<!-- 微服务公共依赖 -->
<dependencies>
		<!-- mysql -->
        <dependency>
            <groupId>mysql</groupId>
            <artifactId>mysql-connector-java</artifactId>
            <version>8.0.21</version>
        </dependency>
        <!-- mybatis-plus-->
        <dependency>
            <groupId>com.baomidou</groupId>
            <artifactId>mybatis-plus-boot-starter</artifactId>
            <version>3.3.2</version>
        </dependency>
 		<!-- lombok -->
        <dependency>
            <groupId>org.projectlombok</groupId>
            <artifactId>lombok</artifactId>
            <version>1.18.12</version>
            <scope>provided</scope>
        </dependency>
        <dependency>
            <groupId>org.apache.httpcomponents</groupId>
            <artifactId>httpcore</artifactId>
            <version>4.4.13</version>
        </dependency>
        <dependency>
            <groupId>commons-lang</groupId>
            <artifactId>commons-lang</artifactId>
            <version>2.6</version>
        </dependency>
</dependencies>
3.2.工具类
3.2.1.com.atguigu.common.utils
- Constant
- PageUtils
- Query
- R
3.2.2.com.atguigu.common.xss
- SQLFilter
3.2.3.com.atguigu.common.exception
- RRException
4.整合MyBatis-Plus
4.1.MyBatis-Plus介绍
MyBatis-Plus 官网:https://baomidou.com/
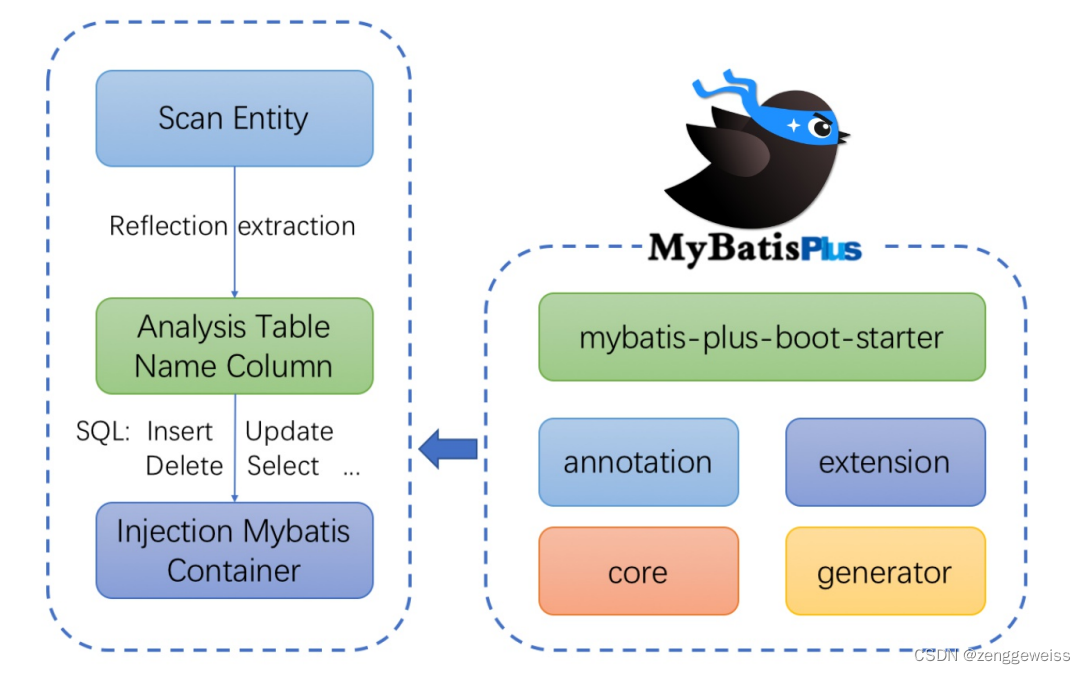
4.2.导入依赖
在 gmall-common 公共模块中导入依赖
<dependency>
	<groupId>com.baomidou</groupId>
	<artifactId>mybatis-plus-boot-starter</artifactId>
	<version>3.3.2</version>
</dependency>
4.3.数据源配置
4.3.1.引入数据库驱动
MySQL Connector/J Versions
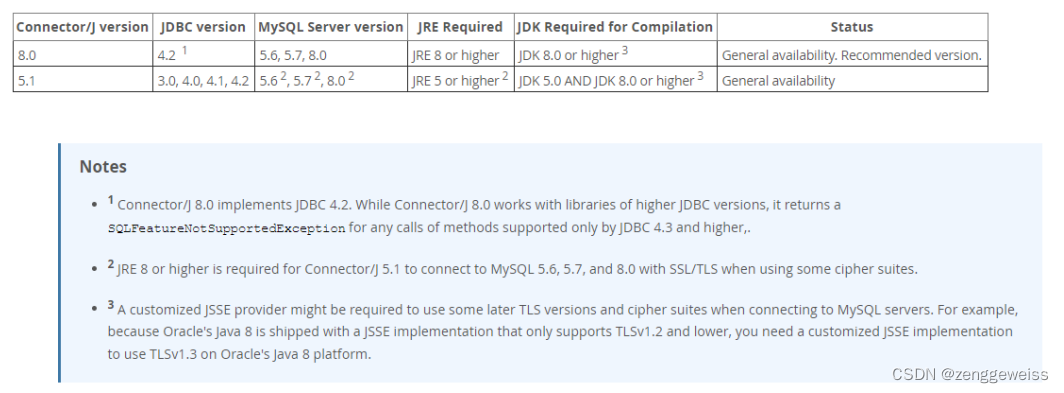
在 gmall-common 公共模块中导入依赖
<dependency>
	<groupId>mysql</groupId>
	<artifactId>mysql-connector-java</artifactId>
	<version>8.0.21</version>
</dependency>
4.3.2.配置数据源
在商品服务 gmall-product 的 application.yml 配置数据源相关信息
spring:
  datasource:
    url: jdbc:mysql://192.168.56.10:3306/gmall_pms?useUnicode=true&characterEncoding=UTF-8&useSSL=false&serverTimezone=Asia/Shanghai
    driver-class-name: com.mysql.cj.jdbc.Driver
    username: root
    password: root
4.4.配置MyBatis-Plus
4.4.1.使用@MapperScan
在服务启动类上使用 @MapperScan
@MapperScan(“com.atguigu.gmall.product.dao”)
4.4.2.SQL映射文件
告诉MyBatis-Plus,SQL映射文件位置
mybatis-plus:
  mapper-locations: classpath:/mapper/product/*.xml
  global-config:
    db-config:
      id-type: auto  #id自增,后续分库分表后再使用其它方式
4.4.3.单元测试
@SpringBootTest
class GmallProductApplicationTests {
	@Autowired
	private BrandService brandService;
	/**
	 * 测试插入
	 */
	@Test
	void testSave() {
		BrandEntity brandEntity = new BrandEntity();
		brandEntity.setName("华为");
		brandService.save(brandEntity);
	}

	/**
	 * 测试更新
	 */
	@Test
	void testUpdate() {
		BrandEntity brandEntity = new BrandEntity();
		brandEntity.setBrandId(1L);
		brandEntity.setDescript("华为");
		brandService.updateById(brandEntity);
	}

	/**
	 * 测试查询
	 */
	@Test
	void testQuery() {
		List<BrandEntity> list = brandService.list(
			new QueryWrapper<BrandEntity>()
				.eq("brand_id", 1L));
		list.forEach(item -> {
			System.out.println(item);
		});
	}
}
测试结果:

对其它服务模块依次进行测试:
- gmall-coupon
- gmall-member
- gmall-order
- gmall-ware
在每个微服务模块 pom 文件中导入公共模块 gmall-common
 		<dependency>
            <groupId>com.atguigu.gmall</groupId>
            <artifactId>gmall-common</artifactId>
            <version>0.0.1-SNAPSHOT</version>
        </dependency>
修改每个模块的 application.yml 配置文件,主要是 port 和 数据库名称
server:
  port: 7000
spring:
  datasource:
    url: jdbc:mysql://192.168.56.10:3306/gmall_oms?useUnicode=true&characterEncoding=UTF-8&useSSL=false&serverTimezone=Asia/Shanghai
    driver-class-name: com.mysql.cj.jdbc.Driver
    username: root
    password: root
mybatis-plus:
  mapper-locations: classpath:/mapper/order/*.xml
  global-config:
    db-config:
      id-type: auto
微服务端口规划
- 优惠服务(gmall-coupon):5000
- 会员服务(gmall-member):6000
- 订单服务(gmall-order):7000
- 商品服务(gmall-product):8000
- 仓储服务(gmall-ware):9000


 629
629


 被折叠的 条评论
为什么被折叠?
被折叠的 条评论
为什么被折叠?
 到【灌水乐园】发言


