


简介
在Prism官方文档中,第四章讲到Modular Application Development,即模块化的程序开发,本文是作者对官方示例“Quickstart中ModularityWithUnity.Silverlight”学习后自己试验得来的,文档和示例,可从官网获得。
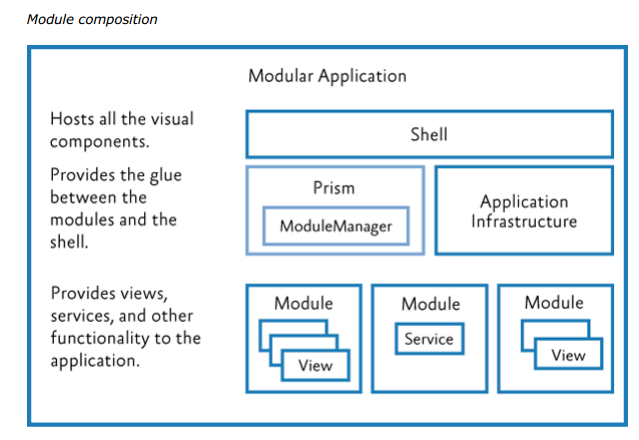
图:Prism的模块化开发框架示例
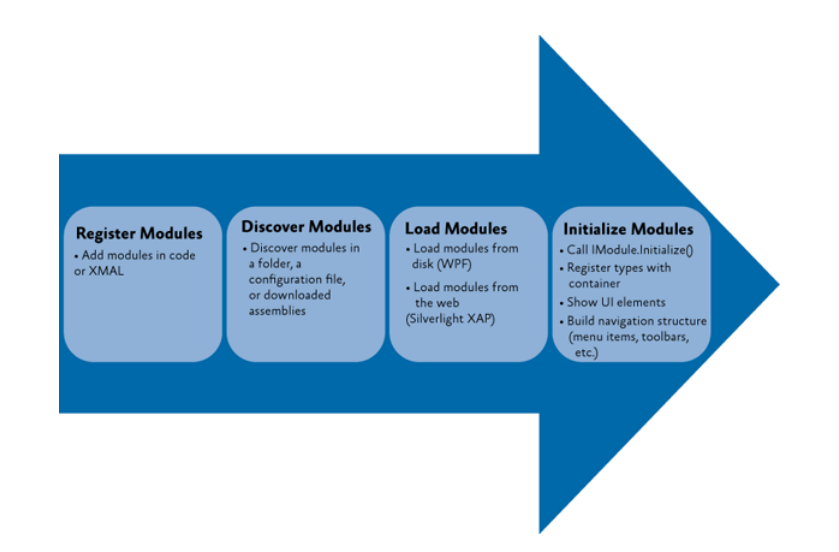
图:Prism中模块的加载过程。
示例
在VS中新建Silverlight项目:

我们一个个来分析这些项目。
PortalBase
子模块所必须的基类或接口集合,里边可以初始化容器、日志等类,将来也可以定义View或ViewModel的接口
其中,
ModuleBase
该类类加入了模块加载的基本动作:
    public abstract class ModuleBase : IModule
    {
        protected IRegionManager RegionManager { get; private set; }
        protected IUnityContainer Container { get; private set; }

        public ModuleBase(IUnityContainer container, IRegionManager regionManager)
        {
            Container = container;
            RegionManager = regionManager;
        }

        public void Initialize()
        {
            RegisterTypes();
            InitializeModule();
        }

        protected abstract void RegisterTypes();
        protected abstract void InitializeModule();


    }
别忘了添加Prism和Unity for Silverlight的引用。
RegionNames
该类枚举了主程序中用到的Region的名字,这样在模块单独开发时,可以方便的为主程序的region绑定控件。
    public class RegionNames
    {
        public static readonly string TopRegion = "TopRegion";
        public static readonly string BottomRegion = "BottomRegion";
    }
PrismPortal
加载模型的主程序,采取Unity+Xaml的方式实现模块动态加载和Region的动态填充。
Bootstrapper.cs
它提供了程序入口,这里重写CreateModuleCatalog方法,实现从Xaml读取模块信息。
    class Bootstrapper : UnityBootstrapper
    {
        private const string MODULE_URI = "/PrismPortal;component/ModuleCatalog.xaml";

        protected override System.Windows.DependencyObject CreateShell()
        {
            return Container.Resolve<Shell>();
        }

        protected override void InitializeShell()
        {
            base.InitializeShell();

            App.Current.RootVisual = (UIElement)this.Shell;
        }

        protected override Microsoft.Practices.Prism.Modularity.IModuleCatalog CreateModuleCatalog()
        {
            var a = Microsoft.Practices.Prism.Modularity.ModuleCatalog.CreateFromXaml(new Uri(MODULE_URI, UriKind.Relative));
            return a;
        }

    }
ModuleCatalog.xaml
在这个文件中,定义待加载模块的信息。
<Modularity:ModuleCatalog xmlns="http://schemas.microsoft.com/winfx/2006/xaml/presentation"
                          xmlns:x="http://schemas.microsoft.com/winfx/2006/xaml"
                          xmlns:Modularity='clr-namespace:Microsoft.Practices.Prism.Modularity;assembly=Microsoft.Practices.Prism'>
    <Modularity:ModuleInfo Ref='SLAppModule.xap'
                           ModuleName='SLAppModule'
                           ModuleType='SLAppModule.SLAppModule, SLAppModule, Version=1.0.0.0, Culture=neutral, PublicKeyToken=null'
                           InitializationMode='WhenAvailable'/>
    <Modularity:ModuleInfo Ref='SLAppModule.xap'
                           ModuleName='SLDllModule'
                           ModuleType='SLDllModule.SLDllModule, SLDllModule, Version=1.0.0.0, Culture=neutral, PublicKeyToken=null'
                           InitializationMode='WhenAvailable'/>
</Modularity:ModuleCatalog>
每一个ModuleInfo表示一个模块,Ref是模块所在的xap包文件(silverlight应用程序文件,注意,一个包文件可有多个模块),ModuleName貌似不太重要,因为后来我随便改成什么都能加载成功O.O。ModuleType是实现IModule接口的类(即继承ModuleBase的类),InitializationMode是加载时机,随启动加载,或者按需加载。
在官方的示例中的配置文件里可以看出,ModuleInfo是可以分组的:
<Modularity:ModuleCatalog xmlns="http://schemas.microsoft.com/winfx/2006/xaml/presentation"
                          xmlns:x="http://schemas.microsoft.com/winfx/2006/xaml"
                          xmlns:sys="clr-namespace:System;assembly=mscorlib"
                          xmlns:Modularity="clr-namespace:Microsoft.Practices.Prism.Modularity;assembly=Microsoft.Practices.Prism">
    <Modularity:ModuleInfoGroup Ref="ModuleB.xap"
                                InitializationMode="WhenAvailable">
        <Modularity:ModuleInfo ModuleName="ModuleB"
                               ModuleType="ModuleB.ModuleB, ModuleB, Version=1.0.0.0, Culture=neutral, PublicKeyToken=null" />
    </Modularity:ModuleInfoGroup>
    <Modularity:ModuleInfoGroup InitializationMode="OnDemand">
        <Modularity:ModuleInfo Ref="ModuleE.xap"
                               ModuleName="ModuleE"
                               ModuleType="ModuleE.ModuleE, ModuleE, Version=1.0.0.0, Culture=neutral, PublicKeyToken=null" />
        <Modularity:ModuleInfo Ref="ModuleF.xap"
                               ModuleName="ModuleF"
                               ModuleType="ModuleF.ModuleF, ModuleF, Version=1.0.0.0, Culture=neutral, PublicKeyToken=null">
            <Modularity:ModuleInfo.DependsOn>
                <sys:String>ModuleE</sys:String>
            </Modularity:ModuleInfo.DependsOn>
        </Modularity:ModuleInfo>
    </Modularity:ModuleInfoGroup>

    <!-- Module info without a group -->
    <Modularity:ModuleInfo Ref="ModuleD.xap"
                           ModuleName="ModuleD"
                           ModuleType="ModuleD.ModuleD, ModuleD, Version=1.0.0.0, Culture=neutral, PublicKeyToken=null" />
</Modularity:ModuleCatalog>
Shell.xaml
这是程序启动后加载的主窗体,这里暂时定义Region以演示,不必须。<UserControl x:Class="PrismPortal.Shell"
xmlns="http://schemas.microsoft.com/winfx/2006/xaml/presentation"
xmlns:x="http://schemas.microsoft.com/winfx/2006/xaml"
xmlns:prism='clr-namespace:Microsoft.Practices.Prism.Regions;assembly=Microsoft.Practices.Prism'
xmlns:base='clr-namespace:PortalBase;assembly=PortalBase'
Height="300"
Width="300">
<Grid>
<Grid.RowDefinitions>
<RowDefinition />
<RowDefinition />
</Grid.RowDefinitions>
<ContentControl prism:RegionManager.RegionName='TopRegion' />
<ContentControl prism:RegionManager.RegionName='BottomRegion'
Grid.Row='1' />
</Grid>
</UserControl>
这里的两个Region即将被两个子模块中的控件替代。
App.xaml.cs
用来引导Bootstrapper的启动
    public partial class App : Application
    {
        public App()
        {
            this.Startup += this.Application_Startup;
            InitializeComponent();
        }

        private void Application_Startup(object sender, StartupEventArgs e)
        {
            Bootstrapper bootstrapper = new Bootstrapper();
            bootstrapper.Run();
        }

    }
SLAppModule
子模块的实现类,可实现Region定义的主程序中的指定位置的控件。
SLAppModule.cs
该类为模块的加载类,需要实现ModuleBase的虚方法(Module需要实现IModule接口)。
    public class SLAppModule : ModuleBase
    {
        public SLAppModule(IUnityContainer container, IRegionManager regionManager) :
            base(container, regionManager) { }

        protected override void RegisterTypes()
        {
            Container.RegisterType<ContentView>();
        }

        protected override void InitializeModule()
        {
            RegionManager.RegisterViewWithRegion(RegionNames.TopRegion, typeof(ContentView));
        }
    }
ContentView
任意的自定义控件即可
<UserControl x:Class="SLAppModule.Views.ContentView"
xmlns="http://schemas.microsoft.com/winfx/2006/xaml/presentation"
xmlns:x="http://schemas.microsoft.com/winfx/2006/xaml"
xmlns:d="http://schemas.microsoft.com/expression/blend/2008"
xmlns:mc="http://schemas.openxmlformats.org/markup-compatibility/2006"
mc:Ignorable="d"
d:DesignHeight="184"
d:DesignWidth="303">
<Grid x:Name="LayoutRoot"
Background="White">
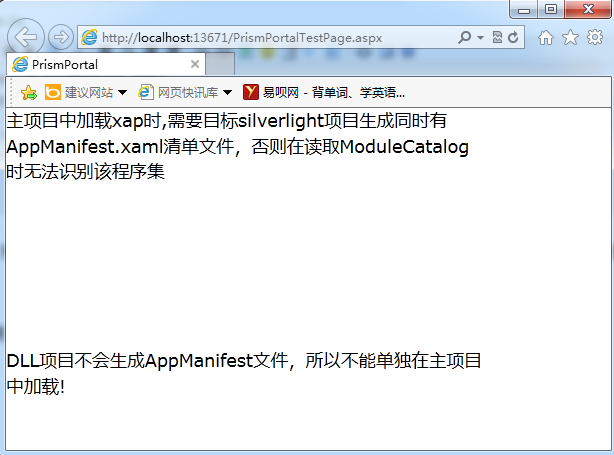
<TextBlock Text='主项目中加载xap时,需要目标silverlight项目生成同时有AppManifest.xaml清单文件,否则在读取ModuleCatalog时无法识别该程序集'
TextWrapping='Wrap' />
</Grid>
</UserControl>SLDllModule
和SLAppModule类似,这也是个模块,不同的是,这是一个Silverlight程序集,不能生成xap,只能生成dll。尝试将dll复制到主程序目录,但仍然无法加载,可能放置在iis的运行目录下可行,后来想想这么做是在没有必要,如果生成dll的一定都是一些纯被引用,比如被SLAppModule引用,那么此时SLDllModule仍然可以被识别的(因为在SLAppModule打包过程中加入了对它的说明)。说到这里要再强调一下,在silverlight应用程序的属性页中
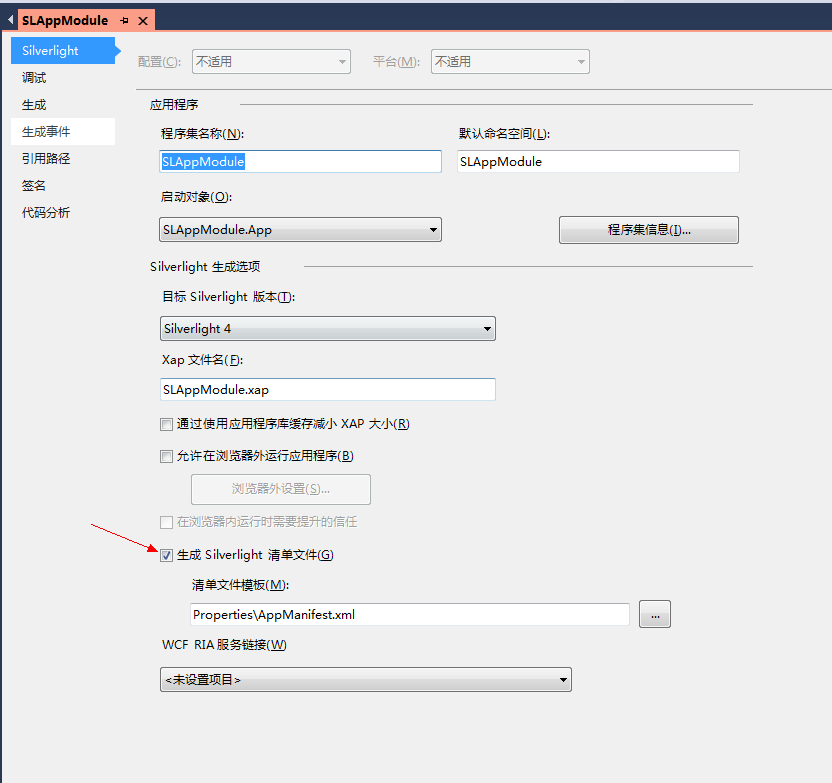
千万不要手欠的把这个勾勾掉,没有他,你的xap文件是无法被主程序读取和识别的。
事实上,这个文件:
<Deployment xmlns="http://schemas.microsoft.com/client/2007/deployment"
            xmlns:x="http://schemas.microsoft.com/winfx/2006/xaml"
            EntryPointAssembly="SLAppModule"
            EntryPointType="SLAppModule.App"
            RuntimeVersion="4.0.60310.0">
  <Deployment.Parts>
    <AssemblyPart x:Name="SLAppModule" Source="SLAppModule.dll" />
    <AssemblyPart x:Name="SLDllModule" Source="SLDllModule.dll" />
  </Deployment.Parts>
</Deployment>
定义了xap项目中的程序集信息(xap就是一个zip!用压缩工具可以打开!),模块信息就是从它里面读取的!所以千万不要不生成它!
至此,一个简单的动态加载模块的框架就搭建完毕了:
总结
利用Prism,我们可以快速便捷的搭建程序表现层的开发框架。这只是Prism冰山一角,事实上,上述搭建框架的任意过程,基本上都是可以自定义的,例如,可以通过实现IModuleTypeLoader 接口来实现加载任意类型模块文件(xap的加载类为XapModuleTypeLoader ),之前说的直接加载dll也有可能实现了。
还得继续啃Prism。


 1295
1295

 被折叠的 条评论
为什么被折叠?
被折叠的 条评论
为什么被折叠?
 到【灌水乐园】发言


