


1.新建一个Vue项目,并成功运行
vue init webpack mp-demo
2.目录结构
因为在同一个项目中,分了移动端和PC端,所以我们在入口,页面,路由等地方都要把移动端和PC端区别开来。

3.修改配置文件
先说说我们要修改哪几个文件以及这几个文件的作用,都在build文件夹下:
- utils.js
a> 计算资源文件存放路径
b> 生成cssLoaders用于加载 .vue文件中的样式
c> 生成styleLoaders用于加载不在 .vue文件中的单独存在的样式文件 - webpack.base.conf.js
a> 配置webpack编译入口
b> 配置webpack输出路径和命名规则
c> 配置模块resolve规则 - webpack.dev.conf.js
a> 将webpack的热重载客户端代码添加到每个entry对应的应用
b> 合并基础的webpack配置
c> 配置样式文件的处理规则,styleLoaders
d> 配置Source Maps
e> 配置webpack插件 - webpack.pro.conf.js
a> 合并基础的webpack配置
b> 配置样式文件的处理规则,styleLoaders
c> 配置webpack的输出
d> 配置webpack插件
e> gzip模式下的webpack插件配置
f> webpack-bundle分析
// utils.js
// Generate loaders for standalone style files (outside of .vue)
exports.styleLoaders = function (options) {
  const output = []
  const loaders = exports.cssLoaders(options)

  for (const extension in loaders) {
    const loader = loaders[extension]
    output.push({
      test: new RegExp('\\.' + extension + '$'),
      use: loader
    })
  }

  return output
}
/**
 * 开始添加
 * @returns {Function}
 */
// glob 是webpack安装时依赖的一个第三方模块,该模块允许你使用*等符号,例如lib/*.js就是获取lib文件夹下的所有js后缀名的文件
var glob = require('glob')
// 页面模板
var HtmlWebpackPlugin = require('html-webpack-plugin')
// 取得相应的页面路径,因为之前的目录结构,所以是src文件下的framework文件夹
var PAGE_PATH = path.resolve(__dirname, '../src/framework')
// 用于做相应的merge处理
var merge = require('webpack-merge')

// 多入口配置
// 通过glob模块读取framework文件夹下的js后缀文件,如果该文件存在
// 那么就作为入口处理
exports.entries = function () {
  var entryFiles = glob.sync(PAGE_PATH + '/*/*.js')
  var map = {}
  entryFiles.forEach((filePath) => {
    var filename = filePath.substring(filePath.lastIndexOf('\/') + 1, filePath.lastIndexOf('.'))
    map[filename] = filePath
  })
  return map
}

// 多页面输出配置
// 与上面的多页面入口配置相同,读取framework文件夹下对应的html后缀文件,然后放入数组中
exports.htmlPlugin = function () {
  let entryHtml = glob.sync(PAGE_PATH + '/*/*.html')
  let arr = []
  entryHtml.forEach((filePath) => {
    let filename = filePath.substring(filePath.lastIndexOf('\/') + 1, filePath.lastIndexOf('.'))
    let conf = {
      // 模板来源
      template: filePath,
      // 文件名称
      filename: filename + '.html',
      // 页面模板需要加对应的js脚本,如果不加这行则每个页面都会引入所有的js脚本
      chunks: ['manifest', 'vendor', filename],
      inject: true
    }
    if (process.env.NODE_ENV === 'production') {
      conf = merge(conf, {
        minfy: {
          removeComments: true,
          collapseWhitespace: true,
          removeAttributeQuotes: true
        },
        chunksSortMode: 'dependency'
      })
    }
    arr.push(new HtmlWebpackPlugin(conf))
  })
  return arr
}
/**
 * 结束添加
 * @returns {Function}
 */
exports.createNotifierCallback = () => {
  const notifier = require('node-notifier')

  return (severity, errors) => {
    if (severity !== 'error') return

    const error = errors[0]
    const filename = error.file && error.file.split('!').pop()

    notifier.notify({
      title: packageConfig.name,
      message: severity + ': ' + error.name,
      subtitle: filename || '',
      icon: path.join(__dirname, 'logo.png')
    })
  }
}
// webpack.base.conf.js
module.exports = {
  context: path.resolve(__dirname, '../'),
  /**
   * webpack入口文件
   */
  // 修改开始
  entry: utils.entries(),
  // 修改结束
  output: {
    path: config.build.assetsRoot,
    filename: '[name].js',
    publicPath: process.env.NODE_ENV === 'production'
      ? config.build.assetsPublicPath
      : config.dev.assetsPublicPath
  },
  resolve: {
    extensions: ['.js', '.vue', '.json'],
    alias: {
      'vue$': 'vue/dist/vue.esm.js',
      '@': resolve('src'),
    }
  },
// webpack.dev.conf.js
plugins: [
    new webpack.DefinePlugin({
      'process.env': require('../config/dev.env')
    }),
    new webpack.HotModuleReplacementPlugin(),
    new webpack.NamedModulesPlugin(), // HMR shows correct file names in console on update.
    new webpack.NoEmitOnErrorsPlugin(),
    // https://github.com/ampedandwired/html-webpack-plugin
    // 自动将依赖注入到html模板中,并输出最终的html文件到目标文件夹
    /**
     * 注释下面这一块
     */
    // new HtmlWebpackPlugin({
    //   filename: 'index.html',
    //   template: 'index.html',
    //   inject: true
    // }),
    /**
     * 注释结束
     */
    // copy custom static assets
    new CopyWebpackPlugin([
      {
        from: path.resolve(__dirname, '../static'),
        to: config.dev.assetsSubDirectory,
        ignore: ['.*']
      }
    ])
    /**
     * 添加.concat(utils.htmlPlugin())
     */
  ].concat(utils.htmlPlugin())
})
// webpack.prod.conf.js
/**
     * 注释下面这块代码块
     */
    // new HtmlWebpackPlugin({
    //   filename: config.build.index,
    //   template: 'index.html',
    //   inject: true,
    //   minify: {
    //     removeComments: true,
    //     collapseWhitespace: true,
    //     removeAttributeQuotes: true
    //     // more options:
    //     // https://github.com/kangax/html-minifier#options-quick-reference
    //   },
    //   // necessary to consistently work with multiple chunks via CommonsChunkPlugin
    //   chunksSortMode: 'dependency'
    // }),
    /**
     * 注释结束
     */
    // keep module.id stable when vendor modules does not change
    new webpack.HashedModuleIdsPlugin(),
    // enable scope hoisting
    new webpack.optimize.ModuleConcatenationPlugin(),
    // split vendor js into its own file
    new webpack.optimize.CommonsChunkPlugin({
      name: 'vendor',
      minChunks (module) {
        // any required modules inside node_modules are extracted to vendor
        return (
          module.resource &&
          /\.js$/.test(module.resource) &&
          module.resource.indexOf(
            path.join(__dirname, '../node_modules')
          ) === 0
        )
      }
    }),
    // extract webpack runtime and module manifest to its own file in order to
    // prevent vendor hash from being updated whenever app bundle is updated
    new webpack.optimize.CommonsChunkPlugin({
      name: 'manifest',
      minChunks: Infinity
    }),
    // This instance extracts shared chunks from code splitted chunks and bundles them
    // in a separate chunk, similar to the vendor chunk
    // see: https://webpack.js.org/plugins/commons-chunk-plugin/#extra-async-commons-chunk
    new webpack.optimize.CommonsChunkPlugin({
      name: 'app',
      async: 'vendor-async',
      children: true,
      minChunks: 3
    }),

    // copy custom static assets
    new CopyWebpackPlugin([
      {
        from: path.resolve(__dirname, '../static'),
        to: config.build.assetsSubDirectory,
        ignore: ['.*']
      }
    ])
    /**
     * 添加.concat(utils.htmlPlugin())
     */
  ].concat(utils.htmlPlugin())
})
至此,相关的多页面配置结束
4.下面了解一下vue项目的几个入口文件(main.js, App.vue, index.html)
webpack的入口,见build/webpack.base.conf.js文件
entry: {
    app: './src/main.js' // 这是我们没有修改配置之前的,修改之后也是一样的,看我们utils里面自己写的entries方法
}
所以,main.js是webpack的入口文件。
在main.js中,加载的是App.vue文件,所以App.vue是vue渲染的入口,也可以理解成根组件,其他组件挂载在它之下。
最后是index.html文件,就是网页模板。
5.简单了解这三个入口文件之后,我们就可以写多页面的入口了
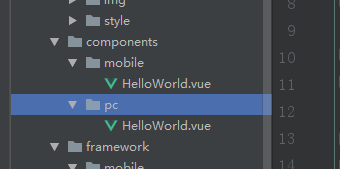
先看看目录结构

这里我偷下懒,把原本就有的三个文件复制到molie和PC文件夹下就行,然后修改一下文件名即可。
注意:1、在mobile文件夹下的m_index.html 文件中,把原本的<meta name="viewport" content="width=device-width,initial-scale=1.0"> 替换为<meta name="viewport" content="width=device-width,initial-scale=1.0,minimum-scale=1.0,maximum-scale=1.0,user-scalable=no">2、m_index.js和p_index.js中的路由的路径应该选择与自己相对应的路径
6.可以写一点简单的页面了
7.配置路由

为了能使PC和移动端切换时自动识别设备类型,我们加一个简单的判断
// pc/index.js
import Vue from 'vue'
import Router from 'vue-router'
import HelloWorld from '@/components/pc/HelloWorld'

Vue.use(Router)

let router = new Router({
  routes: [
    {
      path: '/',
      name: 'HelloWorld',
      component: HelloWorld
    }
  ]
})

/**
 * 判断是否为移动设备,是,则跳转到移动端的路径
 */
router.beforeEach((to, from, next) => {
  if (/Android|webOS|iPhone|iPod|BlackBerry/i.test(navigator.userAgent)) {
    window.location.href = '/m_index.html#/'
    return
  }
  next()
})

export default router
那么mobile/index.js中也同理
router.beforeEach((to, from, next) => {
  if (!/Android|webOS|iPhone|iPod|BlackBerry/i.test(navigator.userAgent)) {
    window.location.href = '/p_index.html#/'
    return
  }
  next()
})
不了解导航守卫的可以去官网看看,这里附上beforeEach的链接。
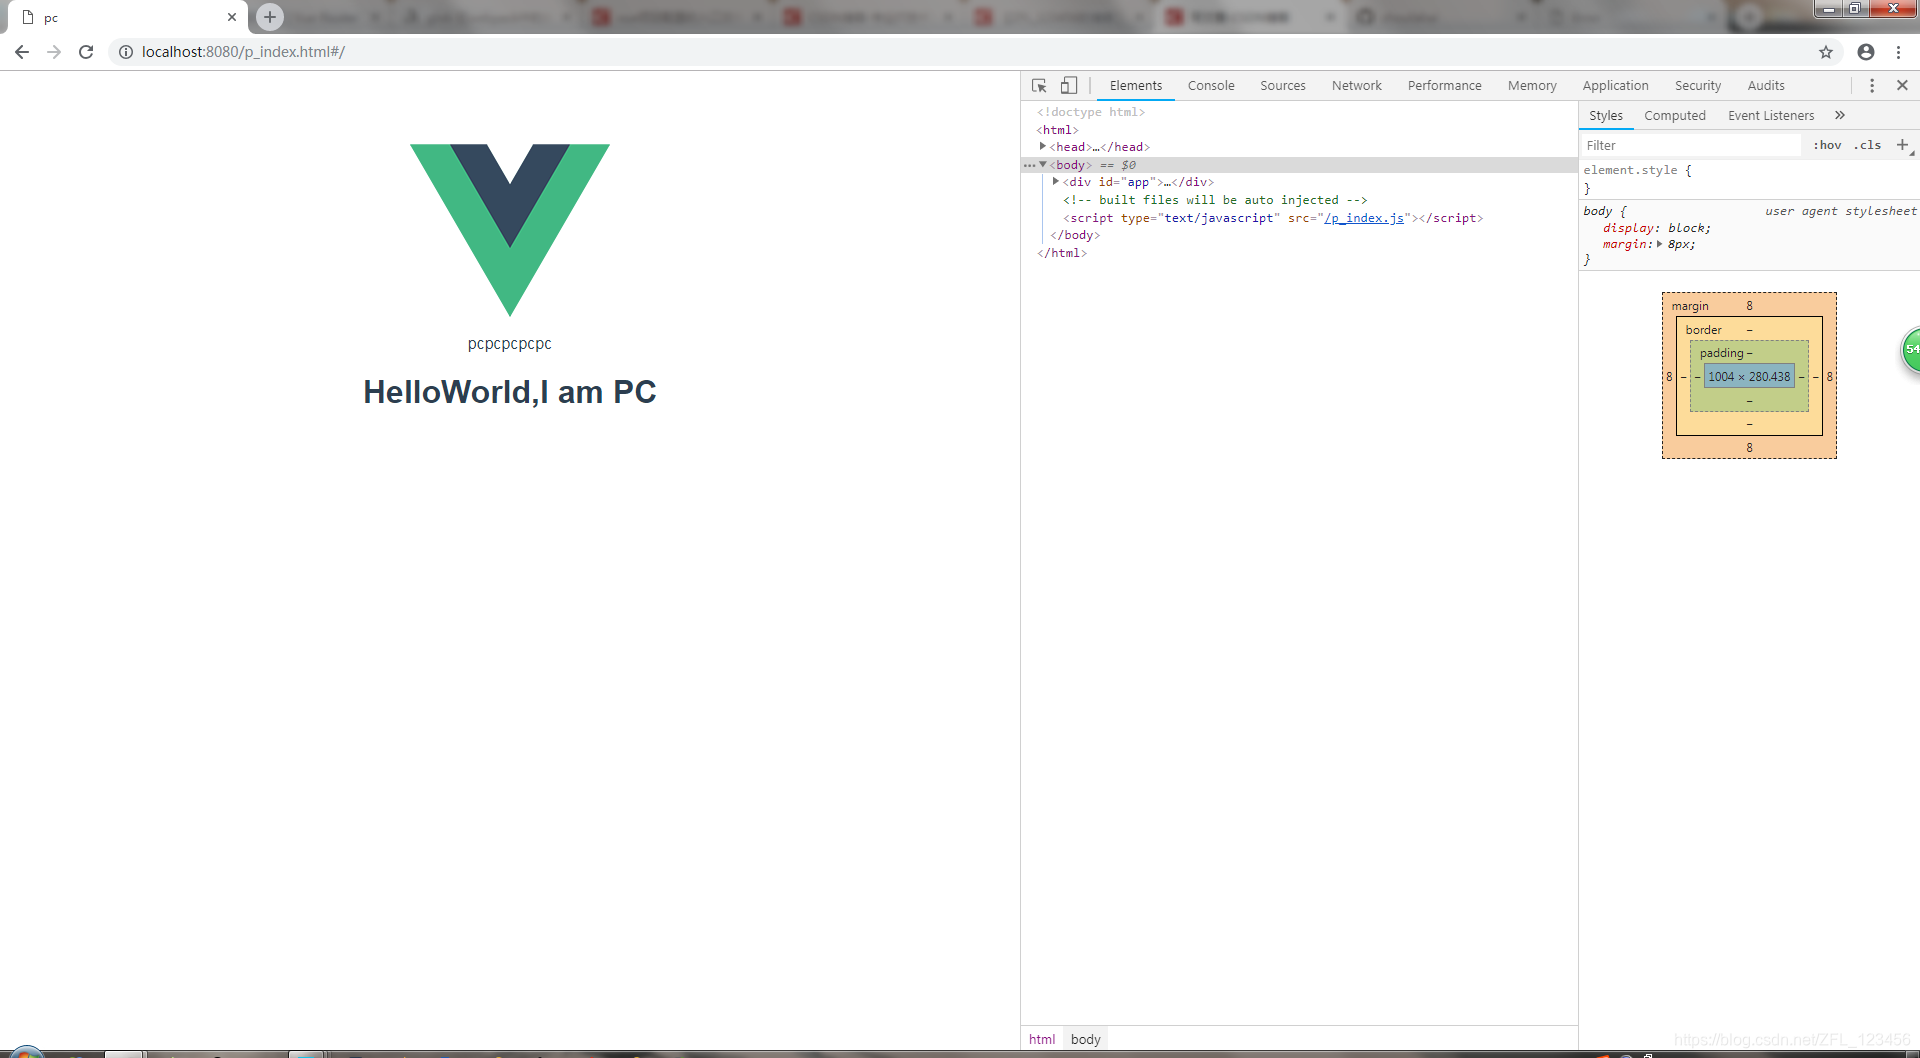
现在我们就可以启动项目看看效果了
在浏览器地址栏输入 http://localhost:8080/p_index.html#/ 这是PC页面
当我们将浏览器选择成手机模式,然后按F5刷新页面。


 1103
1103


 被折叠的 条评论
为什么被折叠?
被折叠的 条评论
为什么被折叠?
 到【灌水乐园】发言


