


1.UIAlertView
①简单无代理模式,代码如下:
UIAlertView *alertView = [[UIAlertView alloc]
                           initWithTitle:@"提示" message:@"这是一个警告" delegate:nil
                                   cancelButtonTitle:@"取消" otherButtonTitles:@"确定",
                                                            @"按钮一", @"按钮二", nil];
 [alertView show];//显示是调用, 无需添加父视图
 [alertView release];//内存管理
  UIAlertViewStyle这个枚举提供了几个样式
  UIAlertViewStyleDefault = 0,//缺省样式
  UIAlertViewStyleSecureTextInput,//密文输入框
  UIAlertViewStylePlainTextInput, //明文输入框
  UIAlertViewStyleLoginAndPasswordInput//登录用输入框,有明文用户名,和密文密码输入二个输入框
  UIAlertViewStyleSecureTextInput和UIAlertViewStylePlainTextInput
                                          可以通过textFieldIndex为0来获取输入框对象。

  UIAlertViewStyleLoginAndPasswordInput可以通过textFieldIndex为0和1分别
                                             获取用户名输入框对象和密码输入框对象。
  UIAlertView *alertView = [[UIAlertView alloc] initWithTitle:@"提示"
                 message:@"这是一警告框" delegate:self cancelButtonTitle:@"取消"
                                otherButtonTitles:@"确定", @"按钮一", @"按钮二", nil];

    //设置样式风格,用用户名和密码模式
    [alertView setAlertViewStyle:UIAlertViewStyleLoginAndPasswordInput];

    //手动取消对话框操作
    [alertView dismissWithClickedButtonIndex:0 animated:YES];
     //获取对应的输入文本框
    UITextField *text1 = [alert textFieldAtIndex:0];
    UITextField *text2 = [alert textFieldAtIndex:1];
    //设置文本框的键盘类型
    text1.keyboardType = UIKeyboardTypeNumberPad;
    text2.keyboardType = UIKeyboardTypeNumbersAndPunctuation;

    [alertView show];
    [alertView release];
- (void)alertView:(UIAlertView *)alertView clickedButtonAtIndex:
                                                      (NSInteger)buttonIndex {
    //判断用户点击了那个按钮, 根据索引来判断, 可在此添加不同索引下的响应事件,
  NSString *str = [[NSString alloc] initWithFormat:@"第%ld个按钮", (long)buttonIndex];
  NSLog(@"%@", str);
}
- (void)willPresentAlertView:(UIAlertView *)alertView {
    //在开始动画和展示视图之前
    for (UIView *view in alertView.subviews) {
        if ([view isKindOfClass:[UILabel class]]) {

               UILabel  *label  = (UILabel *)view;
            label.textAlignment = NSTextAlignmentCenter;
        }
    }
}
- (void)alertView:(UIAlertView *)alertView
                                  didDismissWithButtonIndex:(NSInteger)buttonIndex {
    //这个方法在动画结束和视图隐藏之后调用
  }
 - (void)alertView:(UIAlertView *)alertView willDismissWithButtonIndex:
                                                             (NSInteger)buttonIndex {
    //这个方法在动画开始和视图隐藏之前调用
   }
2.UIActionSheet
Action Sheet: [操作表(实现警告框的重要的类)]就像Windows中的 “确定-取消”对话框一样,用于强制用户进行选择。当用户将要进行的操作具有一定危险时,常常使用Action Sheet对用户进行危险提示,这样,用户有机会进行取消操作。
Alert相当于Windows中的Messagebox,跟Action Sheet也是类似的。
不同的是,Alert可以只有一个选择项,而Action Sheet却至少要两个选项。
代码如下:再点击button时的触发的action方法
- (void)buttonPressed:(id)sender {
UIActionSheet *actionSheet = [[UIActionSheet alloc]
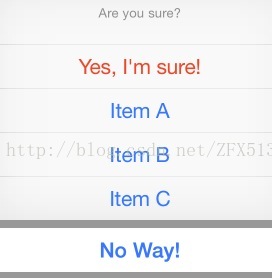
initWithTitle:@"Are you sure?"
delegate:self
cancelButtonTitle:@"No Way!"
destructiveButtonTitle:@"Yes, I'm sure!"
otherButtonTitles:nil];
actionSheet.actionSheetStyle = UIActionSheetStyleBlackTranslucent;
[actionSheet addButtonWithTitle:@"Item A"];
[actionSheet addButtonWithTitle:@"Item B"];
[actionSheet addButtonWithTitle:@"Item C"];
[actionSheet showInView:self.view];
}
注: 最后一个参数要是nil
[actionSheet showInView:self.view]
这条语句用来显示Action Sheet,准确的说,这条语句是给这个Action Sheet设置Parent,而这个Parent必须是一个View,并且是当前正在显示的View。
注:看到上效果图上那个红色的按钮没?那是ActionSheet支持的一种所谓的销毁按钮,对某户的某个动作起到警示作用.
比如永久性删除一条消息或者日志。如果你指定了一个销毁按钮他就会以红色高亮显示.
与导航栏类似,操作表单也支持三种风格 :
UIActionSheetStyleDefault //默认风格:灰色背景上显示白色文字
UIActionSheetStyleBlackTranslucent //透明黑色背景,白色文字
UIActionSheetStyleBlackOpaque //纯黑背景,白色文字
②实现代理方法(UIActionSheetDelegate)
//根据点击按钮的索引处理点击事件,处理相应操作
-(void)actionSheet:(UIActionSheet *)actionSheet clickedButtonAtIndex:
                                                           (NSInteger)buttonIndex{
   NSLog(@"%d",buttonIndex);
    if(buttonIndex == actionSheet.cancelButtonIndex){
        return;
    }
    switch(buttonIndex){
        case 0:{
            NSLog(@"Item ASelected");
            break;
        }
        case 1:{
            NSLog(@"Item B Selected");
            break;
        }
       case 2:{
            NSLog(@"Item C Selected");
           break;
       }
    }
}
//ActionSheet已经消失时
- (void)actionSheet:(UIActionSheet *)actionSheet
didDismissWithButtonIndex:(NSInteger)buttonIndex {
     // 在点击取消按钮时执行
     if (buttonIndex != [actionSheet cancelButtonIndex]) {

        UIAlertView *alert = [[UIAlertView alloc]
                              initWithTitle:@"Something was done"
                              message:@"You can breathe easy, everything went OK."
                              delegate:self
                              cancelButtonTitle:@"Prew!"
                              otherButtonTitles: nil];
        [alert show];
    }
}上述方法就是我们轻触了Action Sheet之后将会执行的代码。由于之前我们将Action Sheet的delegate设成self,因而这个方法将会被调用,这个方法的参数buttonIndex表示用户所轻触的按钮的编号,按钮编号是从上到下,从0开始的,例如,"Yes, I'm sure!"这个按钮的编号是0,因为它是第一个确定按钮,取消按钮是显示在最下边的。取消按钮的编号,可以通过[actionSheet cancelButtonIndex]直接获得。
③UIAlertController(iOS8新特性)
IOS8中,UIActiconSheet已被废弃,同时基于UIActionSheet自定义的也将无效果。
Apple将UIActionSheet和UIAlertView整合成一个接口UIAlertController。
创建对象有两种方式
1.UIAlertControllerStyleAlert 类型
2.UIAlertControllerStyleActionSheet 类型
比较:
1.前者弹框形式, 后者下拉框形式
2.前者可添加多个textField输入框, 后者不可以
3.前者的输入框拥有textField的所有属性, 可以根据不同的需求设置弹框以及键盘等的格式
第一种方式代码如下:
 UIAlertController *alertController =
               [UIAlertController alertControllerWithTitle:@"标题"
                     message:@"常规样式" preferredStyle:UIAlertControllerStyleAlert];

 [alertController addTextFieldWithConfigurationHandler:^(UITextField *textField) {
        textField.placeholder = @"Password";
        textField.secureTextEntry = YES;
    }];


  //添加输入框
 [alertController addTextFieldWithConfigurationHandler:^(UITextField *textField) {
        textField.placeholder = @"登陆";
 }];//可以在block之中对textField进行相关的操作
 [alertController addTextFieldWithConfigurationHandler:^(UITextField *textField) {
        textField.placeholder = @"请输入密码";
        textField.secureTextEntry = YES;//输入框密文显示格式
 }];

  //添加其他按钮
  UIAlertAction *actionA = [UIAlertAction actionWithTitle:@"取消"
                  style:UIAlertActionStyleCancel handler:^(UIAlertAction *action) {
         //对应每个按钮处理事件操作
         NSLog(@"点击了取消");
  }];//可以在对应的action的block中处理相应的事件, 无需使用代理方式
  UIAlertAction *actionB = [UIAlertAction actionWithTitle:@"确定"
             style:UIAlertActionStyleDestructive handler:^(UIAlertAction *action) {
        NSLog(@"点击了确定");
  }];
  UIAlertAction *actionC = [UIAlertAction actionWithTitle:@"按钮一"
             style:UIAlertActionStyleDestructive handler:^(UIAlertAction *action) {
        NSLog(@"点击了按钮一");
  }];

    /**
     *  UIAlertAction对象的 style的三种样式:
        // 默认的格式
        1.UIAlertActionStyleDefault
        // 取消操作. 该种格式只能由一个UIAlertAction的对象使用, 不能超过两个
        UIAlertActionStyleCancel
        //警告样式, 按钮颜色为红色, 提醒用户这样做可能会改变或者删除某些数据
        UIAlertActionStyleDestructive
     */
    //添加action
    [alertController addAction:actionA];//为alertController添加action
    [alertController addAction:actionB];
    [alertController addAction:actionC];

    //方法


    [self presentViewController:alertController animated:YES completion:nil];
注:1. 虽然 UIAlertController 是 UIAlertView 以及 UIActionSheet 的升级版本, 更加灵活多变, 操作更加简单, 但原先的 UIAlertView 和 UIActionSheet 类仍可以在iOS8只工作的很好, 目前仍然可以使用.
2.虽然 UIAlertController 可以灵活的添加 textField 的个数以及根据需求来设置其属性, 但是不能认为可以用 UIAlertController 就可以完成用户名的注册等操作, 用户名的注册以及登录等操作还是要用ViewController来完成的, 毕竟 UIAlertController 不是用来这方面的"专家"


 被折叠的 条评论
为什么被折叠?
被折叠的 条评论
为什么被折叠?
 到【灌水乐园】发言


