


作者博客地址:http://blog.jamesdbloom.com/
转载地址:http://blog.jamesdbloom.com/JavaCodeToByteCode_PartOne.html
Understanding how Java code is compiled into byte code and executed on a Java Virtual Machine (JVM) is critical because it helps you understand what is happening as your program executes. This understanding not only ensures that language features make logical sense but also that it is possible to understand the trade offs and side effects when making certain discussions.
This article explains how Java code is compiled into byte code and executed on the JVM. To understand the internal architecture in the JVM and different memory areas used during byte code execution see my previous article on JVM Internals.
This article is split into three parts, with each part being subdivided into sections. It is possible to read each section in isolation however the concepts will generally build up so it is easiest to read the sections. Each section will cover different Java code structures and explain how these are compiled and executed as byte code, as follows:
- Part 1 - Basic Programming Concepts
- variables
- local variables
- fields (
class
variables) - constant fields (
class
constants) -
static
variables
- conditionals
- loops
- variables
- Part 2 - Object Orientation And Safety (next article)
-
try
-catch-finally - synchronized
- method invocation
- new (objects and arrays)
-
- Part 3 - Metaprogramming (future article)
- generics
- annotations
- reflection
This article includes many code example and shows the corresponding typical byte code that is generated. The numbers that precede each instruction (or opcode) in the byte code indicates the byte position. For example an instruction such a 1:iconst_1 is only one byte in length, as there is no operand, so the following byte code would be at 2. An instruction such as 1:bipush5 would take two bytes, one byte for the opcode bipush and one byte for the operand 5. In this case the following byte code would be at 3 as the operand occupied the byte at position 2.
Variables
Local Variables
The Java Virtual Machine (JVM) has a stack based architecture. When each method is executed including the initial main method a frame is created on the stack which has a set of local variables. The array of local variables contains all the variables used during the execution of the method, including a reference to this, all method parameters, and other locally defined variables. For class methods (i.e. static methods) the method parameters start from zero, however, for instance methods the zero slot is reserved for this.
A local variable can be:
- boolean
- byte
- char
- long
- short
- int
- float
- double
- reference
- returnAddress
All types take a single slot in the local variable array except long and double which both take two consecutive slots because these types are double width (64-bit instead of 32-bit).
When a new variable is created the operand stack is used to store the value of the new variable. The value of the new variable is then stored into the local variables array in the correct slot. If the variable is not a primitive value then the local variable slot only stores a reference. The reference points to an the object stored in the heap.
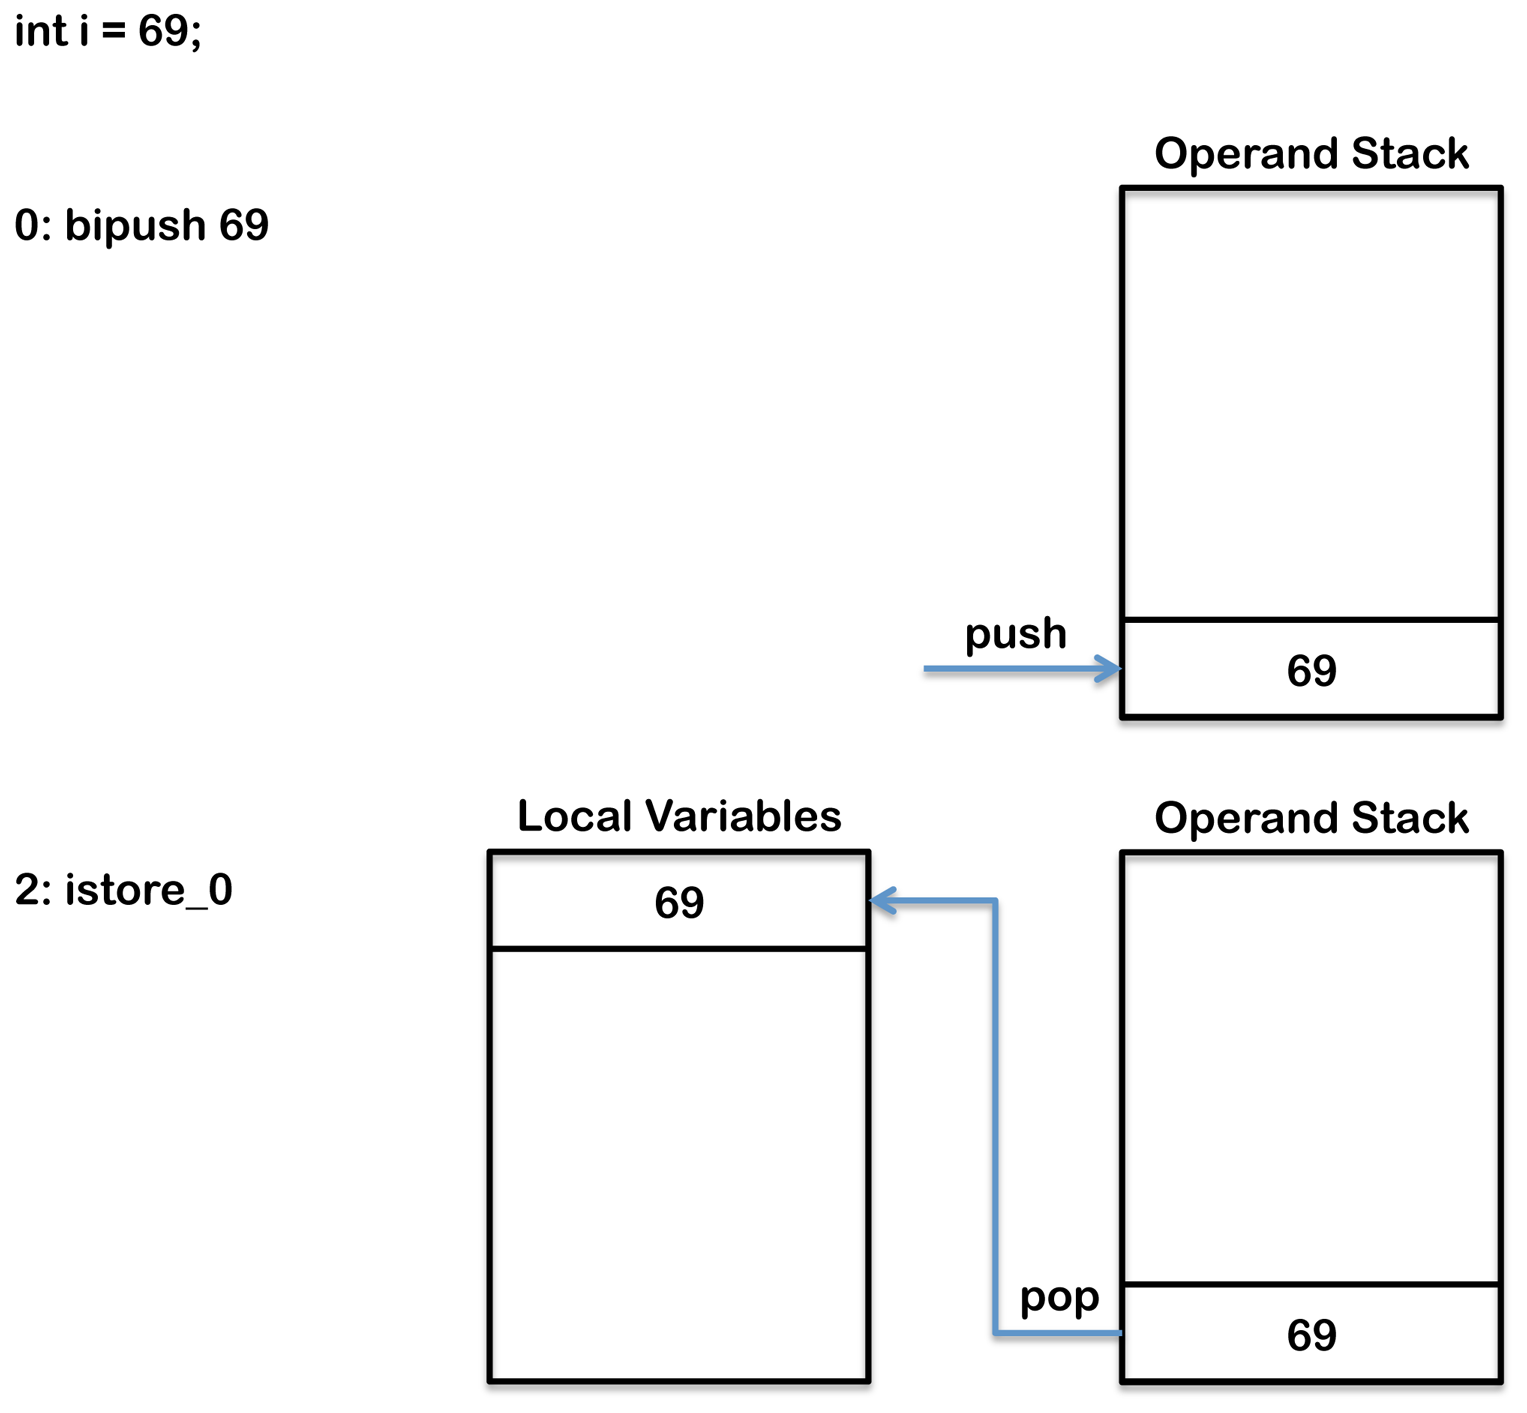
For example:
int i = 5;
Is compile to:
0: bipush      5
2: istore_0
In memory when this is executed the following happens:
The class file also contains a local variable table for each method, if this code was included in a method you would get the following entry in the local variable table for that method in the class file.
LocalVariableTable:
        Start  Length  Slot  Name   Signature
          0      1      1     i         I
Fields (Class Variables)
A field (or class variable) is stored on the heap as part of a class instance (or object). Information about the field is added into the field_info array in the class file as shown below.
ClassFile {
    u4			magic;
    u2			minor_version;
    u2			major_version;
    u2			constant_pool_count;
    cp_info		contant_pool[constant_pool_count – 1];
    u2			access_flags;
    u2			this_class;
    u2			super_class;
    u2			interfaces_count;
    u2			interfaces[interfaces_count];
    u2			fields_count;
    field_info		fields[fields_count];
    u2			methods_count;
    method_info		methods[methods_count];
    u2			attributes_count;
    attribute_info	attributes[attributes_count];
}
In addition if the variable is initialized the byte code to do the initialization is added into the constructor.
When the following java code is compiled:
public class SimpleClass {

    public int simpleField = 100;

}
An extra section appears when you run javap demonstrating the field added to the field_info array:
public int simpleField;
    Signature: I
    flags: ACC_PUBLIC
The byte code for the initialization is added into the constructor (shown in bold), as follows:
public SimpleClass();
  Signature: ()V
  flags: ACC_PUBLIC
  Code:
    stack=2, locals=1, args_size=1
       0: aload_0
       1: invokespecial #1                  // Method java/lang/Object."<init>":()V
       4: aload_0
       5: bipush        100
       7: putfield      #2                  // Field simpleField:I
      10: return
In memory when this is executed the following happens:
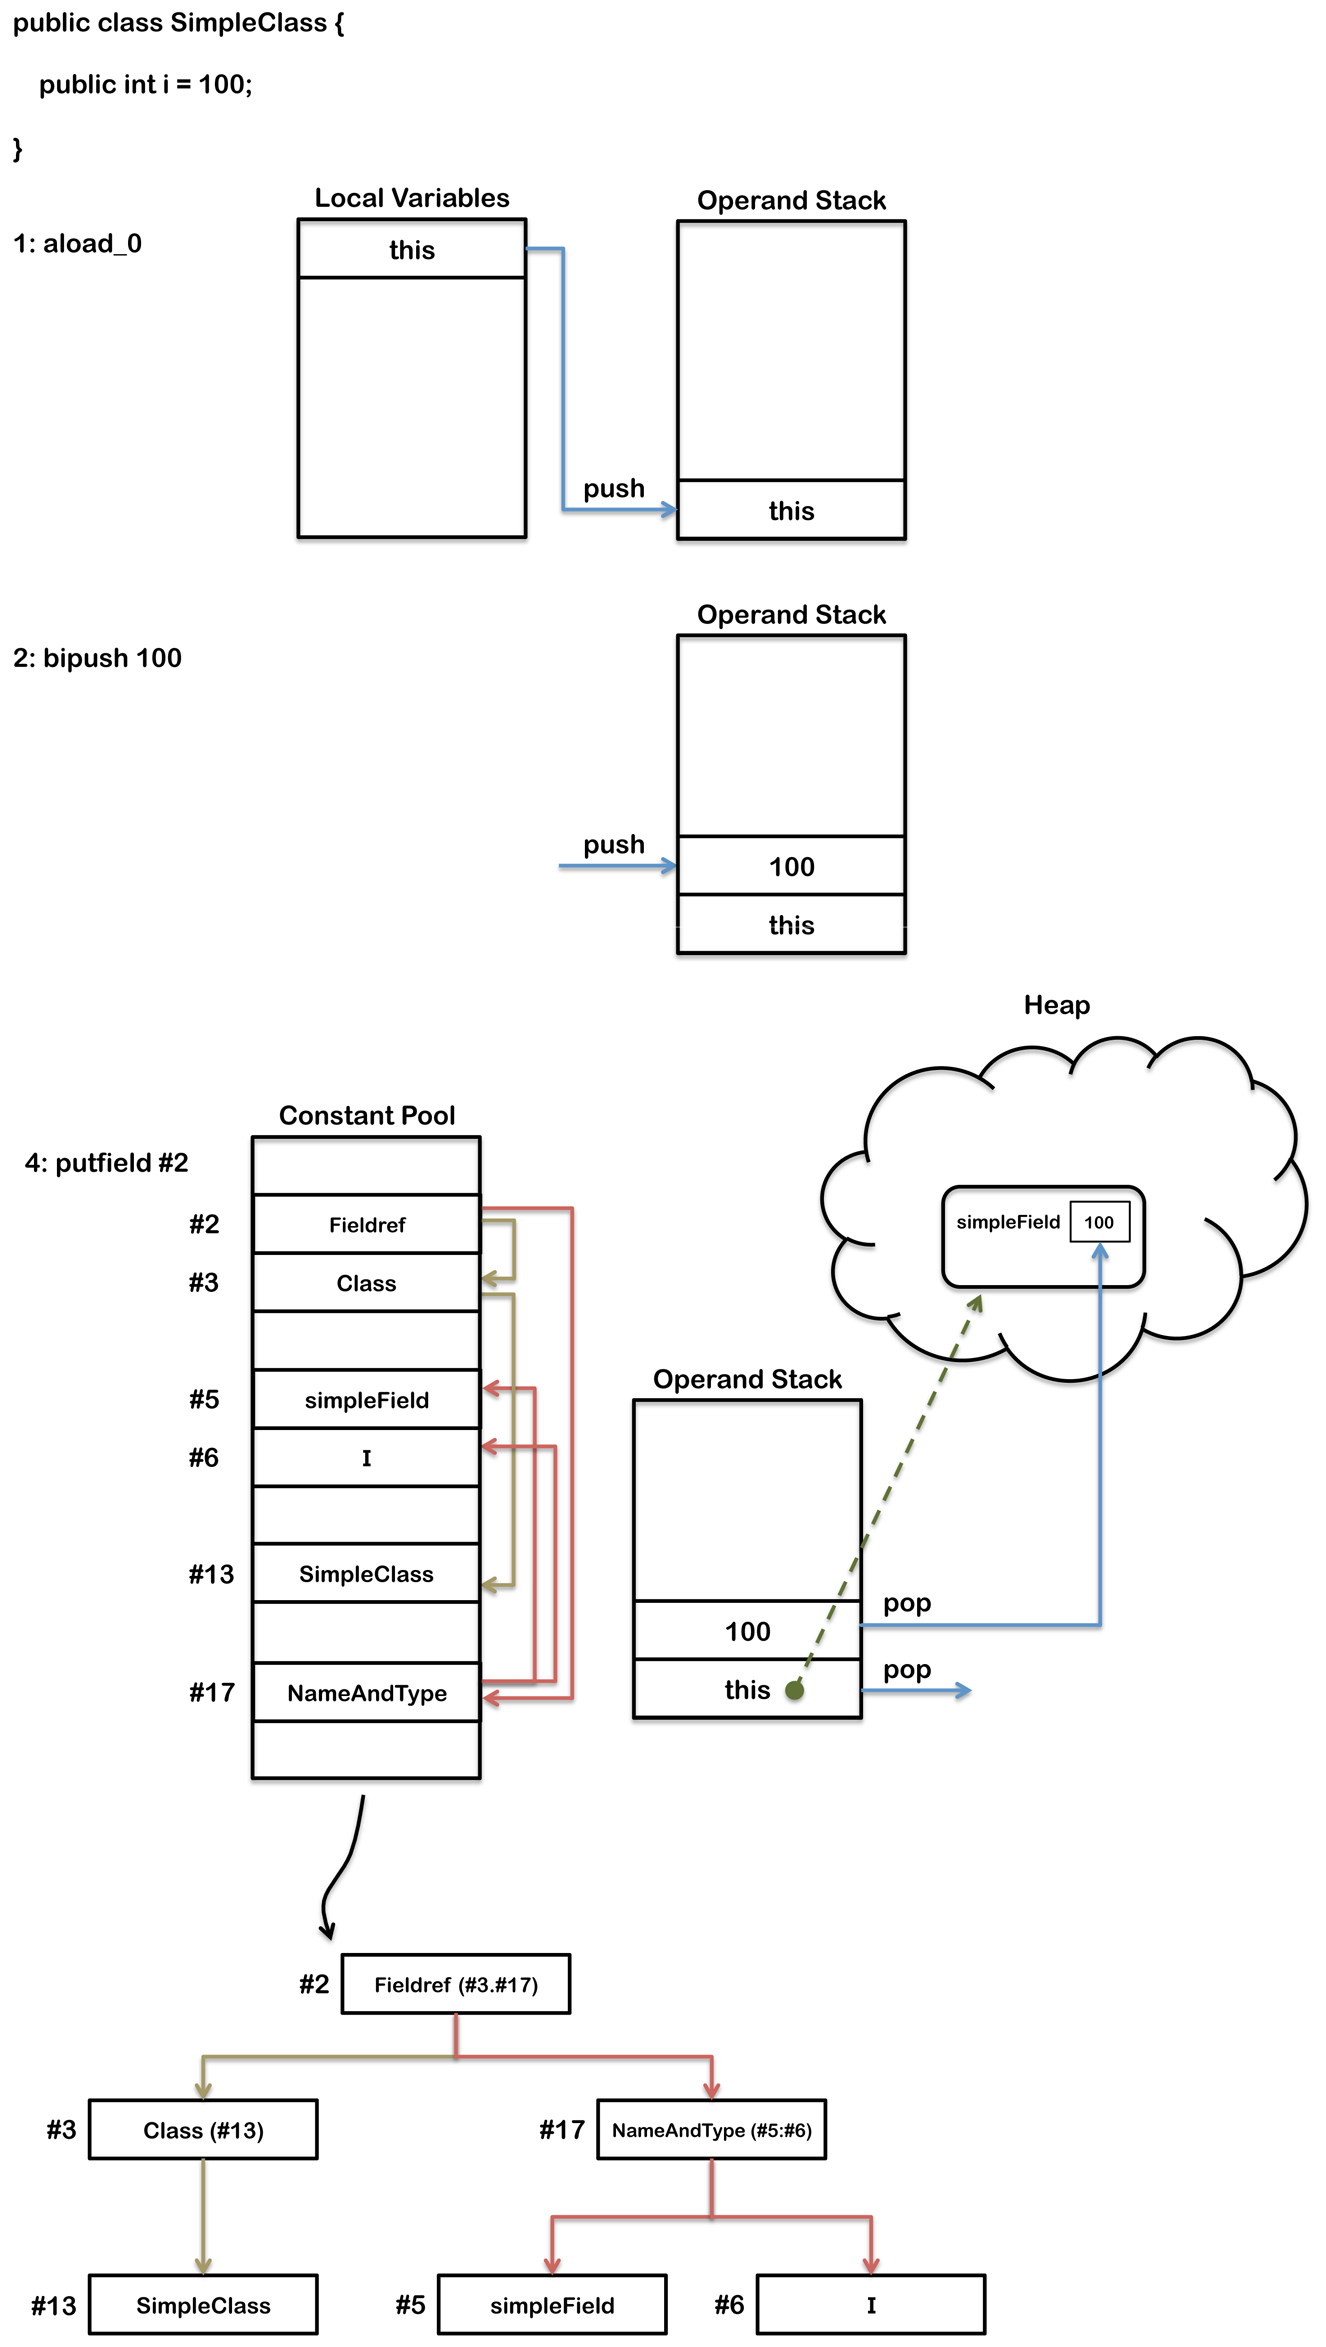
The putfield opcode has a single operand that referencing the second position in the constant pool. The JVM maintains a per-type constant pool, a run time data structure that is similar to a symbol table although it contains more data. Byte codes in Java require data, often this data is too large to store directly in the byte codes, instead it is stored in the constant pool and the byte code contains a reference to the constant pool. When a class file is created it has a section for the constant pool as follows:
Constant pool:
   #1 = Methodref          #4.#16         //  java/lang/Object."<init>":()V
   #2 = Fieldref           #3.#17         //  SimpleClass.simpleField:I
   #3 = Class              #13            //  SimpleClass
   #4 = Class              #19            //  java/lang/Object
   #5 = Utf8               simpleField
   #6 = Utf8               I
   #7 = Utf8               <init>
   #8 = Utf8               ()V
   #9 = Utf8               Code
  #10 = Utf8               LineNumberTable
  #11 = Utf8               LocalVariableTable
  #12 = Utf8               this
  #13 = Utf8               SimpleClass
  #14 = Utf8               SourceFile
  #15 = Utf8               SimpleClass.java
  #16 = NameAndType        #7:#8          //  "<init>":()V
  #17 = NameAndType        #5:#6          //  simpleField:I
  #18 = Utf8               LSimpleClass;
  #19 = Utf8               java/lang/Object
Constants Fields (Class Constants)
A constant field with the final modifier is flagged as ACC_FINAL in the class file.
For example:
public class SimpleClass {

    public final int simpleField = 100;

}
The field description is augmented with ACC_FINAL:
public static final int simpleField = 100;
    Signature: I
    flags: ACC_PUBLIC, ACC_FINAL
    ConstantValue: int 100
The initialization in the constructor is however unaffected:
4: aload_0
5: bipush        100
7: putfield      #2                  // Field simpleField:I
Static Variables
A static class variable with the static modifier is flagged as ACC_STATIC in the class file as follows:
public static int simpleField;
    Signature: I
    flags: ACC_PUBLIC, ACC_STATIC
The byte code for initialization of static variables is not found in the instance constructor <init>. Instead static fields are initialized as part of the class constructor <cinit> using the putstatic operand instead of putfield operand.
static {};
  Signature: ()V
  flags: ACC_STATIC
  Code:
    stack=1, locals=0, args_size=0
       0: bipush         100
       2: putstatic      #2                  // Field simpleField:I
       5: return
Conditionals
Conditional flow control, such as, if-else statements and switch statements work by using an instruction that compares two values and branches to another byte code.
Loops including for-loops and while-loops work in a similar way except that they typically also include a goto instructions that causes the byte code to loop. do-while-loops do not require any goto instruction because their conditional branch is at the end of the byte code. For more detail on loops see the loops section.
Some opcodes can compare two integers or two references and then preform a branch in a single instruction. Comparisons between other types such as doubles, longs or floats is a two-step process. First the comparison is performed and 1, 0 or -1 is pushed onto the operand stack. Next a branch is performed based on whether the value on the operand stack is greater, less-than or equal to zero.
First the if-else statement will be explained as an example and then the different types of instructions used for branching will be covered in more detail.
if-else
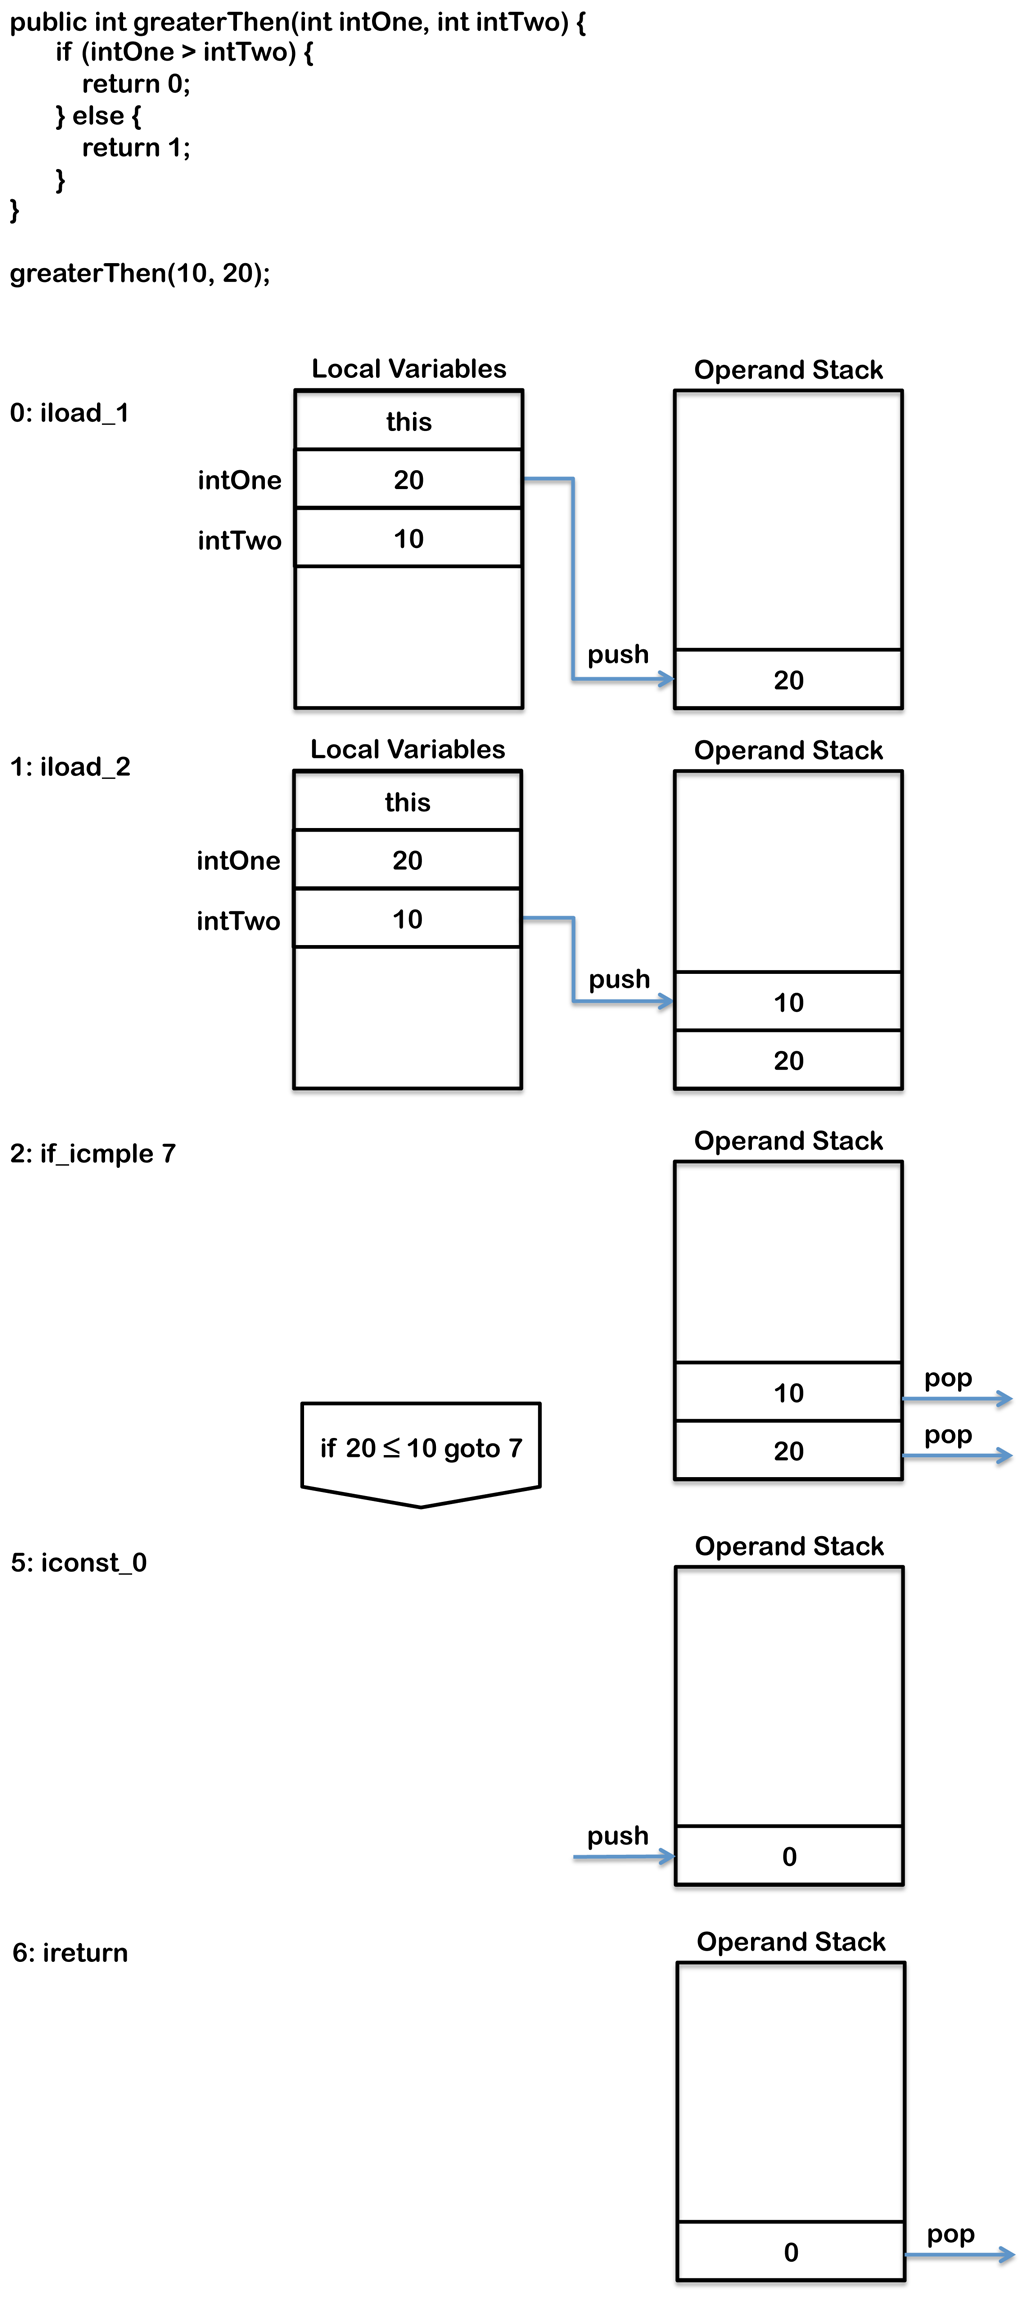
The following code example shows a simple if-else comparing two integer parameters.
public int greaterThen(int intOne, int intTwo) {
    if (intOne > intTwo) {
        return 0;
    } else {
        return 1;
    }
}
This method results in the following byte code:
0: iload_1
1: iload_2
2: if_icmple     7
5: iconst_0
6: ireturn
7: iconst_1
8: ireturn
First the two parameters are loaded onto the operand stack using iload_1 and iload_2. if_icmplethen compares the top two values on the operand stack. This operand branches to byte code 7 if intOne is less then or equal to intTwo. Notice this is the exact opposite of the test in the if condition in the Java code because if the byte code test is successful execution branches to the else-block where as in the Java code if the test is successful the execution enters the if-block. In other words if_icmple is testing if the if condition is not true and jumping over the if-block. The body of the if-block is byte code 5 and 6, the body of the else-block is byte code 7 and 8.
The following code example shows a slightly more complex example which requires a two-step comparison.
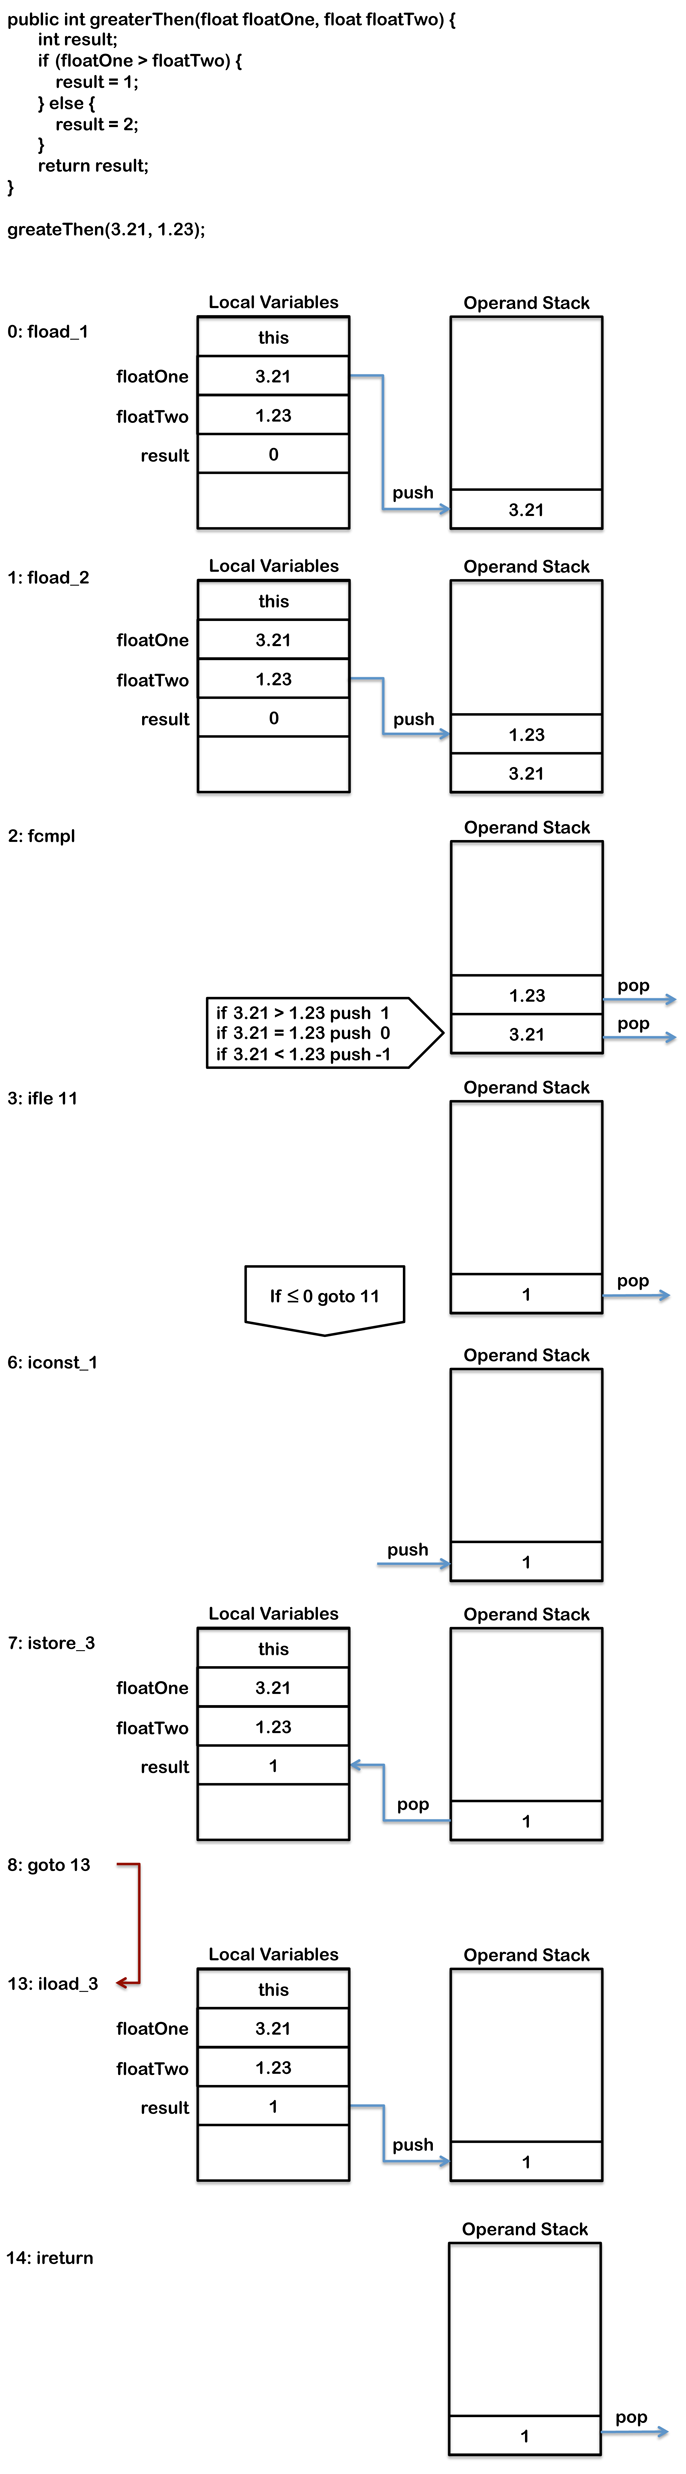
public int greaterThen(float floatOne, float floatTwo) {
    int result;
    if (floatOne > floatTwo) {
        result = 1;
    } else {
        result = 2;
    }
    return result;
}
This method results in the following byte code:
 0: fload_1
 1: fload_2
 2: fcmpl
 3: ifle          11
 6: iconst_1
 7: istore_3
 8: goto          13
11: iconst_2
12: istore_3
13: iload_3
14: ireturn
In this example first the two parameters values are pushed onto the operand stack using fload_1 and fload_2. This example is different from the previous example because of the two-step comparison. fcmpl is first used to compare floatOne and floatTwo and push the result onto the operand stack as follows:
- floatOne > floatTwo –> 1
- floatOne = floatTwo –> 0
- floatOne < floatTwo –> -1
- floatOne or floatTwo = NaN –> 1
Next ifle is used to branch to byte code 11 if the result from fcmpl is <= 0.
This example is also different from the previous example in that there is only a single return statement at the end of the method as a result a goto is required at the end of the if-block to prevent the else-block from also being executed. The goto branches to byte code 13 where iload_3 is then used to push the result stored in the third local variable slot to the top of the operand stack so that it can be returned by the return instruction.
As well as comparing numeric values there are comparison opcodes for reference equality i.e. ==, for comparison to null i.e. ==null and !=null and for testing an object's type i.e. instanceof.
switch
The type of a Java switch expression must be char, byte, short, int, Character, Byte, Short, Integer, String or an enum type. To support switch statements the JVM uses two special instructions called tableswitch and lookupswitch which both only work with integer values. The use of only integers values is not a problem because char, byte, short and enum types can all be internally promoted to int. Support for String was also added in Java 7 which will be covered below.tableswitch is typically a faster opcode however it also typically takes more memory. tableswitchworks by listing all potential case values between the minimum and maximum case values. The minimum and maximum values are also provided so that the JVM can immediately jump to the default-block if the switch variable is not in the range of listed case values. Values for casestatement that are not provided in the Java code are also listed, but point to the default-block, to ensure all values between the minimum and maximum are provided. For example take the following switch statement:
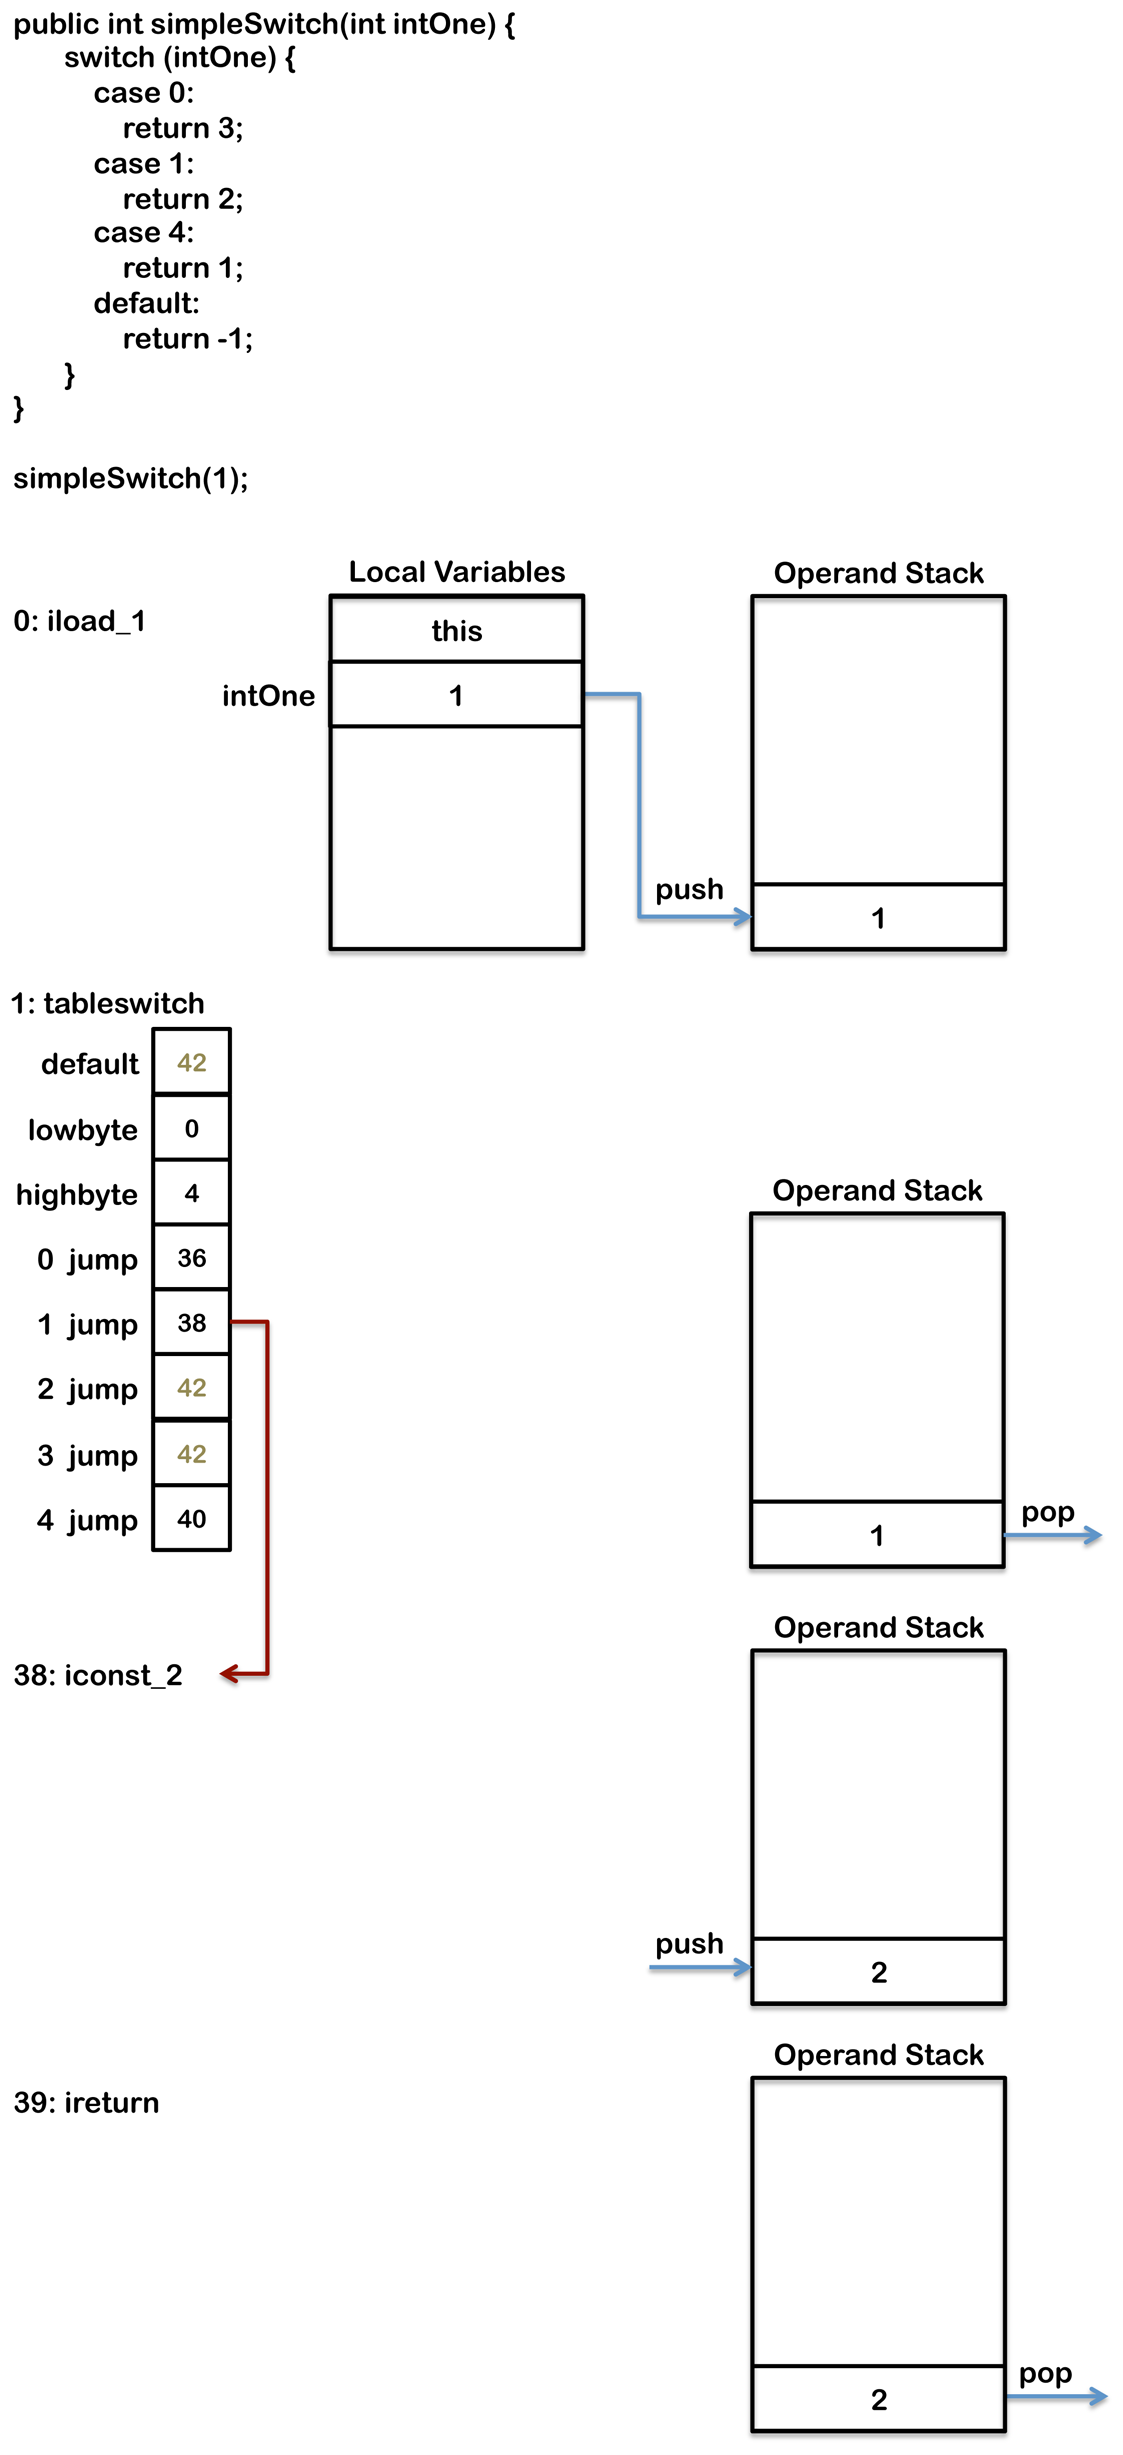
public int simpleSwitch(int intOne) {
    switch (intOne) {
        case 0:
            return 3;
        case 1:
            return 2;
        case 4:
            return 1;
        default:
            return -1;
    }
}
This produces the following byte code:
 0: iload_1
 1: tableswitch   {
         default: 42
             min: 0
             max: 4
               0: 36
               1: 38
               2: 42
               3: 42
               4: 40
    }
36: iconst_3
37: ireturn
38: iconst_2
39: ireturn
40: iconst_1
41: ireturn
42: iconst_m1
43: ireturn
The tableswitch instruction has values for 0, 1 and 4 to match the case statement provided in the code which each point to the byte code for their prospective code block. The tableswitch instruction also has values for 2 and 3, as these are not provided as case statements in the Java code they both point to the default code block. When the instruction is executed the value at the top of the operand stack is checked to see if it is between the minimum and maximum. If the value is not between the minimum and maximum execution jumps to the default branch, which is byte code 42 in the above example. To ensure the default branch value can be found in the tableswitch instruction it is always the first byte (after any required padding for alignment). If the value is between the minimum and maximum it is used to index into the tableswitch and find the correct byte code to branch to, for example for value 1 above the execution would branch to byte code 38. The following diagram shows how this byte code would be executed:
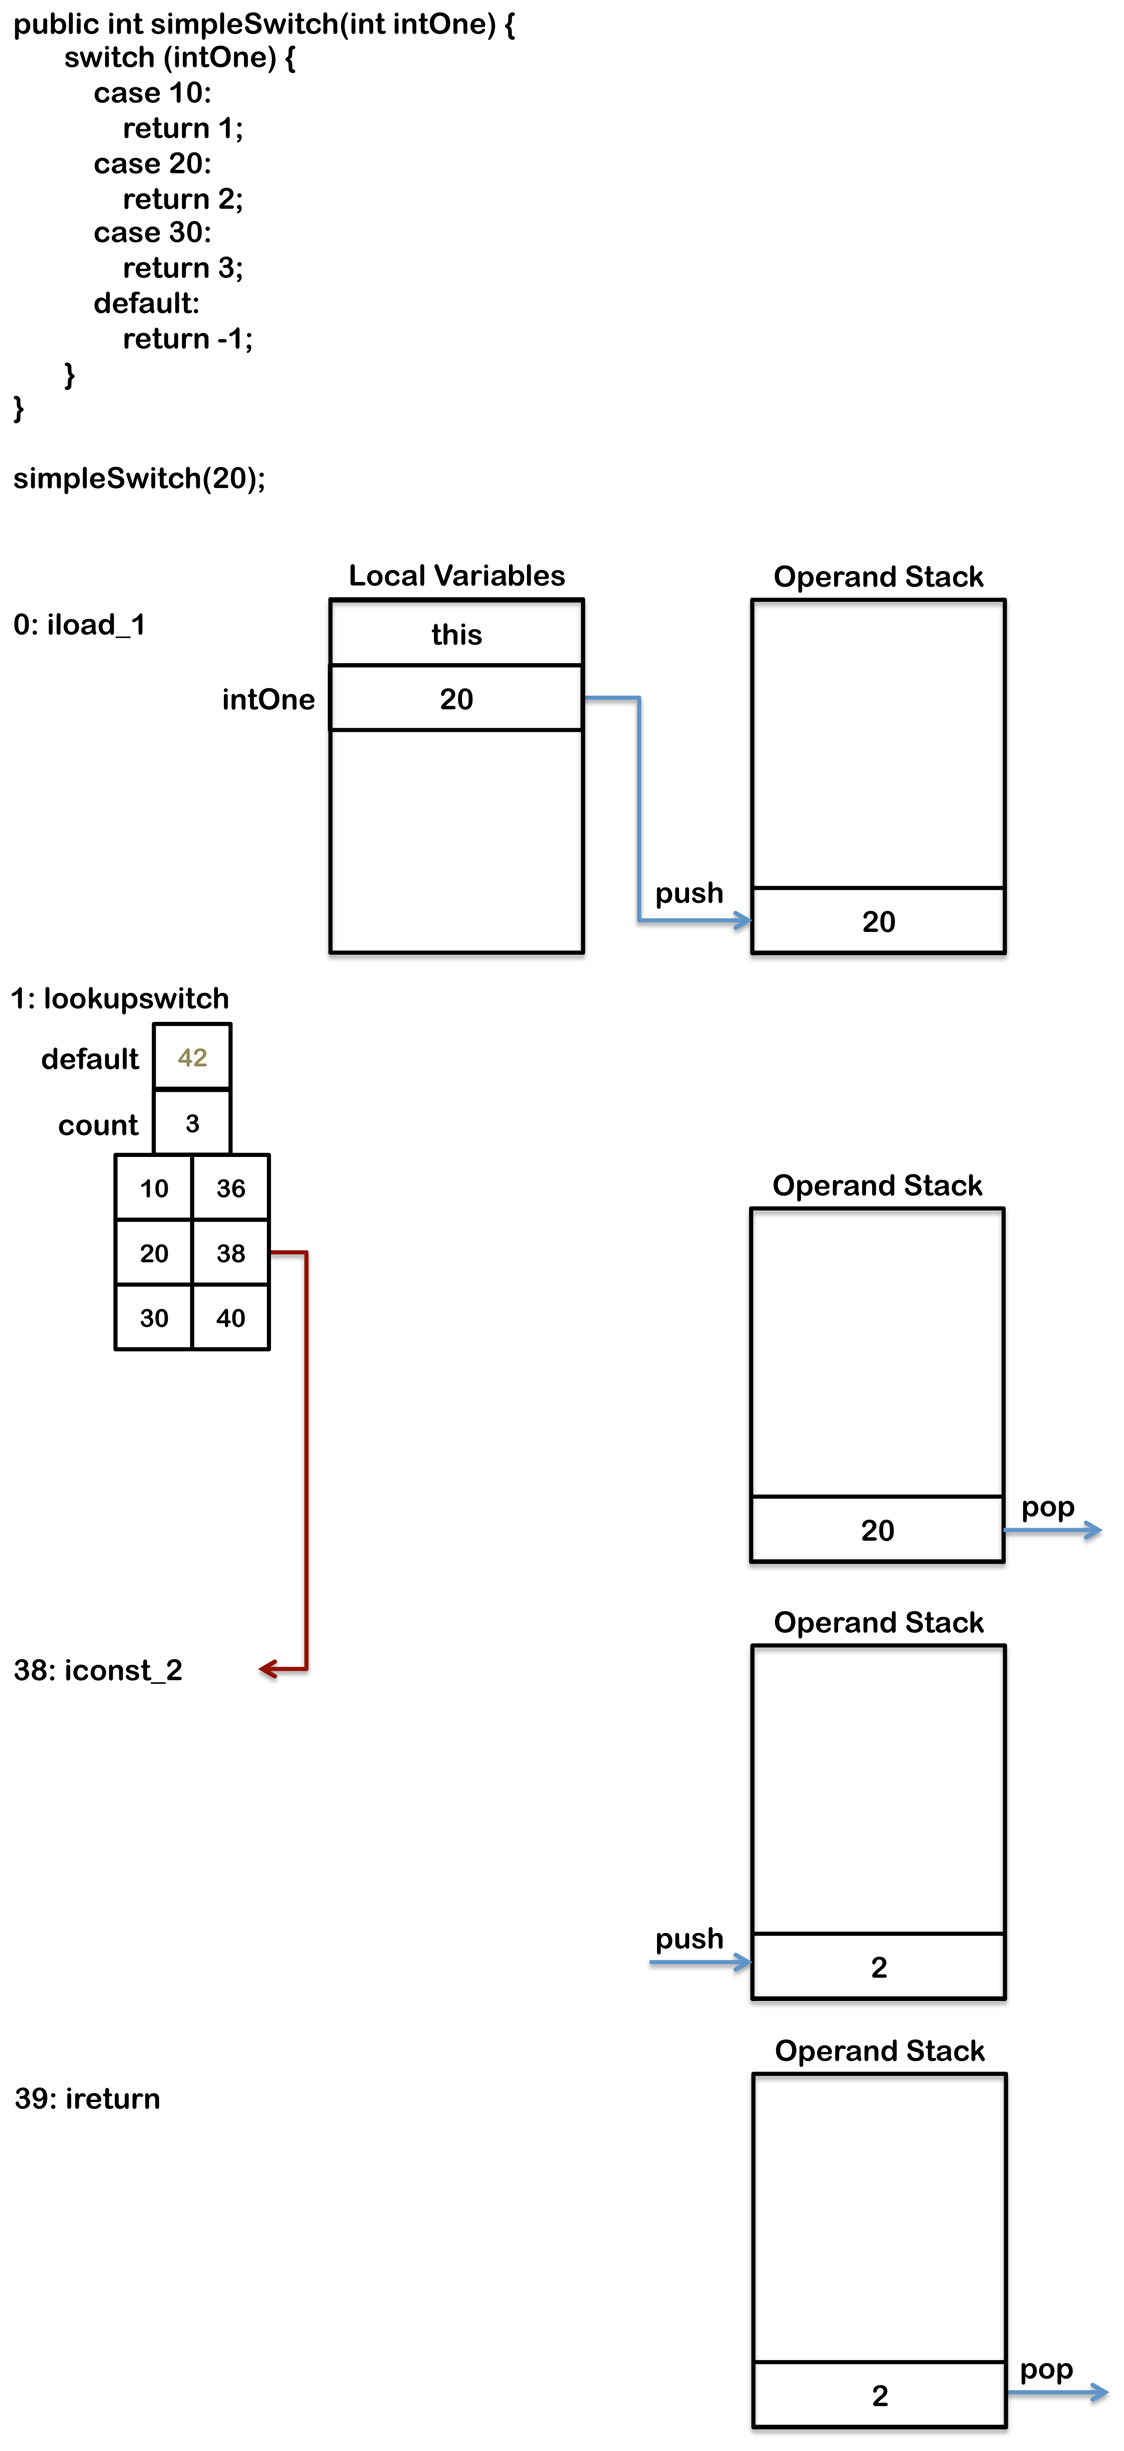
If the values in the case statement were too far apart (i.e. too sparse) this approach would not be sensible, as it would take too much memory. Instead when the cases of the switch are sparse a lookupswitch instruction is used. A lookupswitch instruction lists the byte code to branch to for each case statement but it does not list all possible values. When executing the lookupswitch the value at the top of the operand stack is compared against each value in the lookupswitch to determine the correct branch address. With a lookupswitch the JVM therefore searches (looks up) the correct match in a list of matches this is a slower operation then for the tableswitch where the JVM just indexes the correct value immediately. When a select statement is compiled the compiler must trade off memory efficiency with performance to decide which opcode to use for the select statement. For the following code the compiler produces a lookupswitch:
public int simpleSwitch(int intOne) {
    switch (intOne) {
        case 10:
            return 1;
        case 20:
            return 2;
        case 30:
            return 3;
        default:
            return -1;
    }
}
This produces the following byte code:
 0: iload_1
 1: lookupswitch  {
         default: 42
           count: 3
              10: 36
              20: 38
              30: 40
    }
36: iconst_1
37: ireturn
38: iconst_2
39: ireturn
40: iconst_3
41: ireturn
42: iconst_m1
43: ireturn
To ensure efficient search algorithms (more efficient then linear search) the number of matches is provided and the matches are sorted. The following diagram shows how this would be executed:
String switch
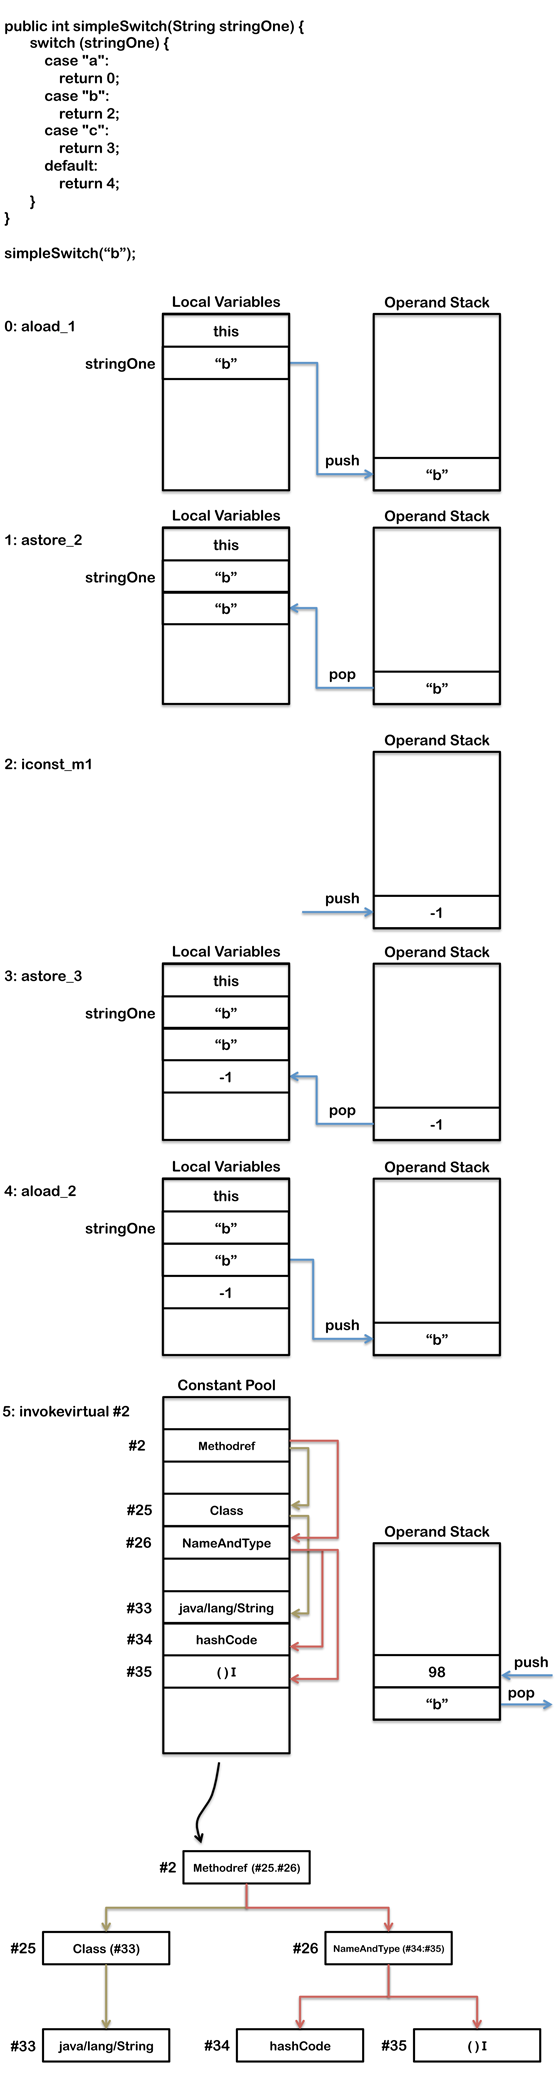
In Java 7 the switch statement added support for the String type. Although the existing opcodes for switches only support int no new opcodes where added. Instead a switch for the String type is done in two stages. First there the hashcode is compared between the top of the operand stack and the value for each case statement. This is done using either a lookupswitch or tableswitch (depending on the sparcity of the hashcode values). This causes a branch to byte code that calls String.equals() to perform an exact match. A tableswitch instruction is then used on the result of the String.equals() to branch to the code for the correct case statement.
public int simpleSwitch(String stringOne) {
    switch (stringOne) {
        case "a":
            return 0;
        case "b":
            return 2;
        case "c":
            return 3;
        default:
            return 4;
    }
}
This String switch statement will produce the following byte code:
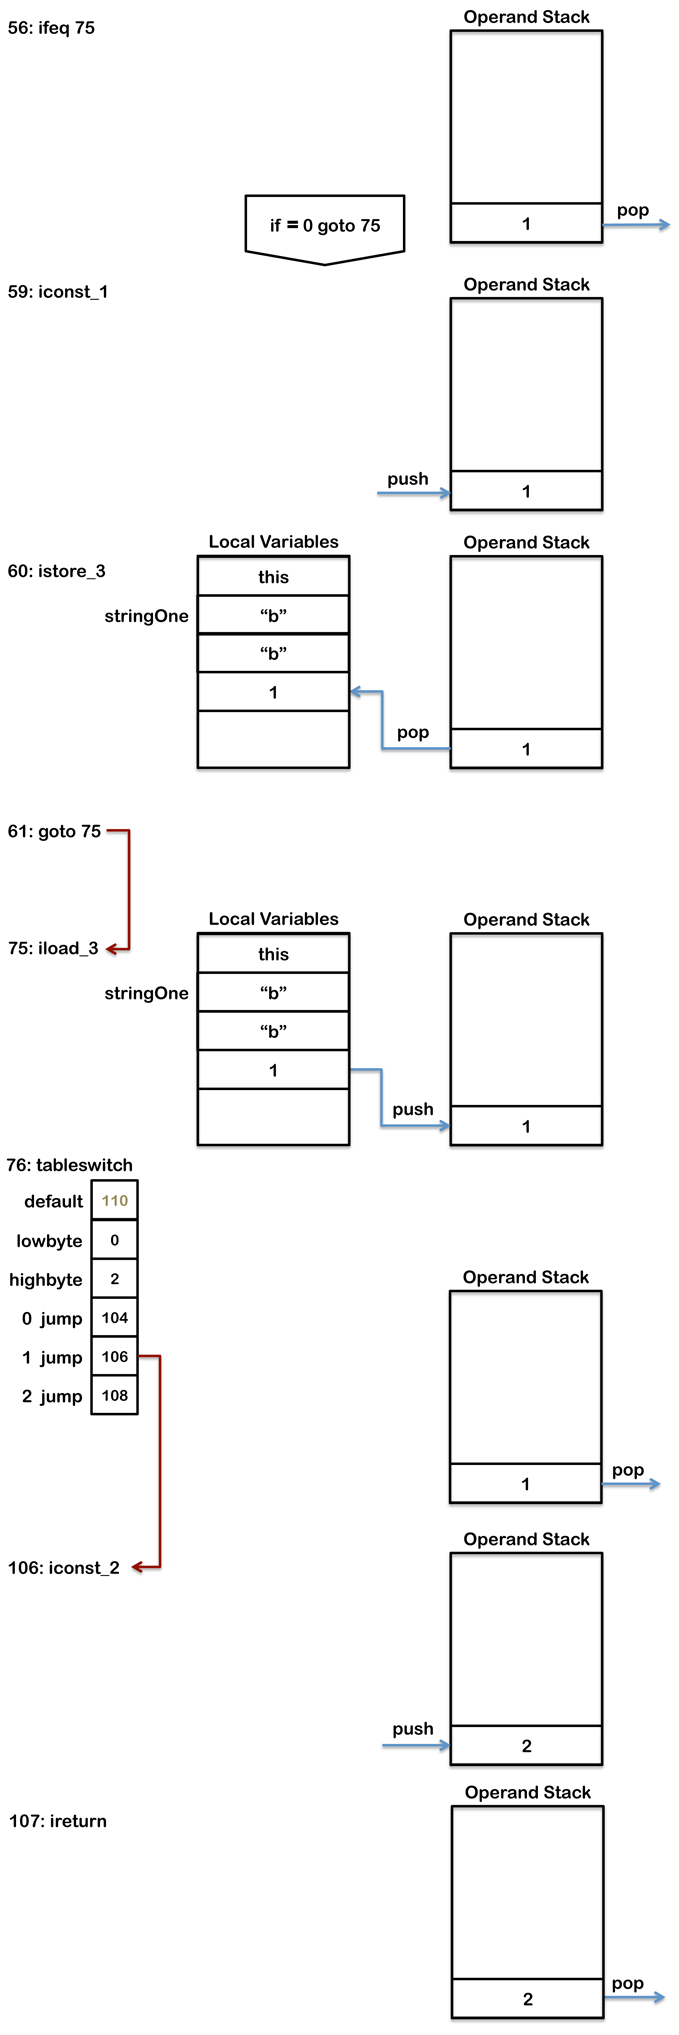
 0: aload_1
 1: astore_2
 2: iconst_m1
 3: istore_3
 4: aload_2
 5: invokevirtual #2                  // Method java/lang/String.hashCode:()I
 8: tableswitch   {
         default: 75
             min: 97
             max: 99
              97: 36
              98: 50
              99: 64
       }
36: aload_2
37: ldc           #3                  // String a
39: invokevirtual #4                  // Method java/lang/String.equals:(Ljava/lang/Object;)Z
42: ifeq          75
45: iconst_0
46: istore_3
47: goto          75
50: aload_2
51: ldc           #5                  // String b
53: invokevirtual #4                  // Method java/lang/String.equals:(Ljava/lang/Object;)Z
56: ifeq          75
59: iconst_1
60: istore_3
61: goto          75
64: aload_2
65: ldc           #6                  // String c
67: invokevirtual #4                  // Method java/lang/String.equals:(Ljava/lang/Object;)Z
70: ifeq          75
73: iconst_2
74: istore_3
75: iload_3
76: tableswitch   {
         default: 110
             min: 0
             max: 2
               0: 104
               1: 106
               2: 108
       }
104: iconst_0
105: ireturn
106: iconst_2
107: ireturn
108: iconst_3
109: ireturn
110: iconst_4
111: ireturn
The class containing this byte code also contains the following constant pool values references by this byte code. See the section on run time constant pool in the JVM Internals article for more detail about constant pools.
Constant pool:
  #2 = Methodref          #25.#26        //  java/lang/String.hashCode:()I
  #3 = String             #27            //  a
  #4 = Methodref          #25.#28        //  java/lang/String.equals:(Ljava/lang/Object;)Z
  #5 = String             #29            //  b
  #6 = String             #30            //  c

 #25 = Class              #33            //  java/lang/String
 #26 = NameAndType        #34:#35        //  hashCode:()I
 #27 = Utf8               a
 #28 = NameAndType        #36:#37        //  equals:(Ljava/lang/Object;)Z
 #29 = Utf8               b
 #30 = Utf8               c

 #33 = Utf8               java/lang/String
 #34 = Utf8               hashCode
 #35 = Utf8               ()I
 #36 = Utf8               equals
 #37 = Utf8               (Ljava/lang/Object;)Z
Notice the amount of byte code required to perform this switch including two tableswitchinstructions and several invokevirtual instructions used to call String.equal(). See the section on method invocation in the next article for more detail on invokevirtual. The following diagram shows how this would be executed for the input “b”.

If the hashcode values for the different cases matched, such as for the strings “FB” and “Ea” which both have a hashcode of 28. This is handled by slightly altering the flow of equals methods as below. Notice how byte code 34: ifeg 42 goes to another invocation of String.equals() instead of the lookupswitch opcode as in the previous example which had no colliding hashcode values.
public int simpleSwitch(String stringOne) {
    switch (stringOne) {
        case "FB":
            return 0;
        case "Ea":
            return 2;
        default:
            return 4;
    }
}
This generates the following byte code:
 0: aload_1
 1: astore_2
 2: iconst_m1
 3: istore_3
 4: aload_2
 5: invokevirtual #2                  // Method java/lang/String.hashCode:()I
 8: lookupswitch  {
         default: 53
           count: 1
            2236: 28
    }
28: aload_2
29: ldc           #3                  // String Ea
31: invokevirtual #4                  // Method java/lang/String.equals:(Ljava/lang/Object;)Z
34: ifeq          42
37: iconst_1
38: istore_3
39: goto          53
42: aload_2
43: ldc           #5                  // String FB
45: invokevirtual #4                  // Method java/lang/String.equals:(Ljava/lang/Object;)Z
48: ifeq          53
51: iconst_0
52: istore_3
53: iload_3
54: lookupswitch  {
         default: 84
           count: 2
               0: 80
               1: 82
    }
80: iconst_0
81: ireturn
82: iconst_2
83: ireturn
84: iconst_4
85: ireturn
Loops
Conditional flow control, such as, if-else statements and switch statements work by using an instruction that compares two values and branches to another byte code. For more detail on conditionals see the conditionals section.
Loops including for-loops and while-loops work in a similar way except that they typically also include a goto instructions that causes the byte code to loop. do-while-loops do not require any goto instruction because their conditional branch is at the end of the byte code.
Some opcodes can compare two integers or two references and then preform a branch in a single instruction. Comparisons between other types such as doubles, longs or floats is a two-step process. First the comparison is performed and 1, 0 or -1 is pushed onto the operand stack. Next a branch is performed based on whether the value on the operand stack is greater, less-than or equal to zero. For more detail on the different types of instructions used for branching see above.
while-loop
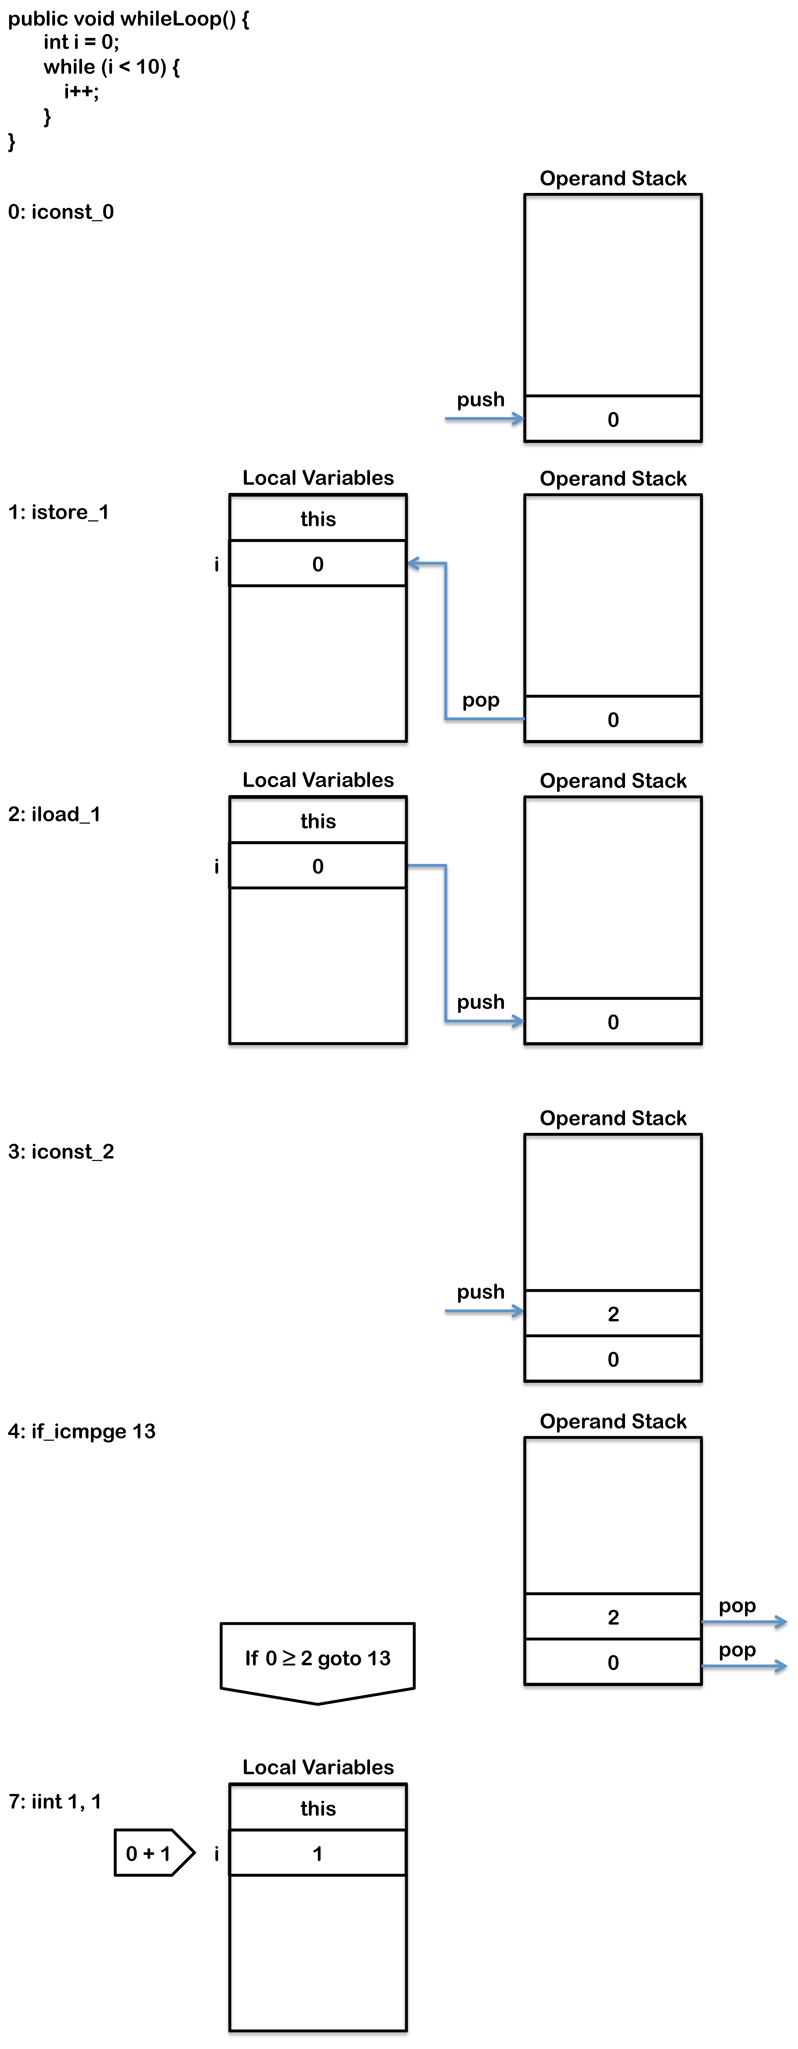
while-loops consist of a conditional branch instructions such as if_icmpge or if_icmplt (as described above) and a goto statement. The conditional instruction branches the execution to the instruction immediately after the loop and therefore terminates the loop if the condition is not met. The final instruction in the loop is a goto that branches the byte code back to the beginning of the loop ensuring the byte code keeps looping until the conditional branch is met, as follows:
public void whileLoop() {
    int i = 0;
    while (i < 2) {
        i++;
    }
}
Is compiled to:
 0: iconst_0
 1: istore_1
 2: iload_1
 3: iconst_2
 4: if_icmpge     13
 7: iinc          1, 1
10: goto          2
13: return
The if_icmpge instruction tests if the local variable in position 1 (i.e. i) is equal or greater then 10 if it is then the instruction jumps to byte code 14 finishing the loop. The goto instruction keeps the byte code looping until the if_icmpge condition is met at which point the execution branches to the return instruction immediately after the end of the loop. The iinc instruction is one of the few instruction that updates a local variable directly without having to load or store values in the operand stack. In this example the iinc instruction increases the first local variable (i.e. i) by 1.

for-loop
for-loops and while-loops use an identical pattern in byte code. This is not surprising because all while-loops can be re-written easily as an identical for-loop. The simple while-loop above could for example be re-written as a for-loop that produces the exactly identical byte-code as follows:
public void forLoop() {
    for(int i = 0; i < 2; i++) {

    }
}
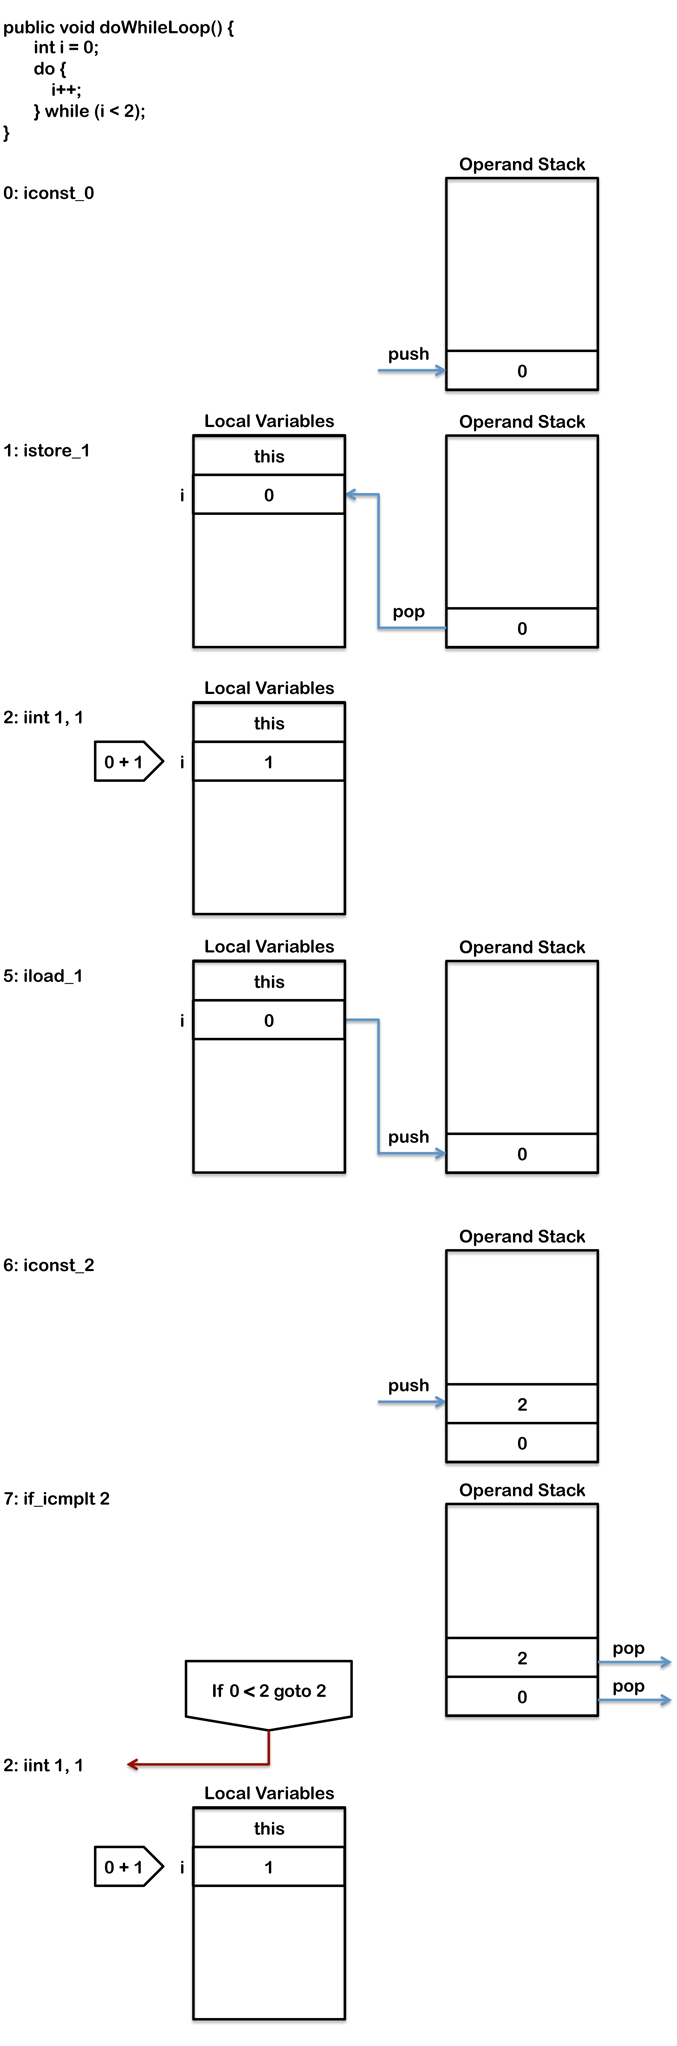
do-while-loop
do-while-loops are also very similar to for-loops and while-loops except that they do not require the goto instruction as the conditional branch is the last instruction and is be used to loop back to the beginning.
public void doWhileLoop() {
    int i = 0;
    do {
        i++;
    } while (i < 2);
}
Results in the following byte code:
 0: iconst_0
 1: istore_1
 2: iinc          1, 1
 5: iload_1
 6: iconst_2
 7: if_icmplt     2
10: return

More Articles
The next two articles will cover the following topics:
- Part 2 - Object Orientation And Safety (next article)
-
try
-catch-finally - synchronized
- method calls (and parameters)
- new (objects and arrays)
-
- Part 3 - Metaprogramming (future article)
- generics
- annotations
- reflection
For more detail on the internal architecture in the JVM and different memory areas used during byte code execution see my previous article on JVM Internals
转载地址:http://blog.jamesdbloom.com/JavaCodeToByteCode_PartOne.html


 829
829


 被折叠的 条评论
为什么被折叠?
被折叠的 条评论
为什么被折叠?
 到【灌水乐园】发言


