


QT的MVC(View/Delegate)模型十分强大,可以利用各种控件来对表格的输入进行限制,不过我以前一直没有过,这几天研究了一下,写个小例子,希望大家喜欢。
如果看不懂这个例子,请先看QT的自带例子: http://qt-project.org/doc/qt-4.8/itemviews-spinboxdelegate.html
思路:
1:为每一列定义委托:
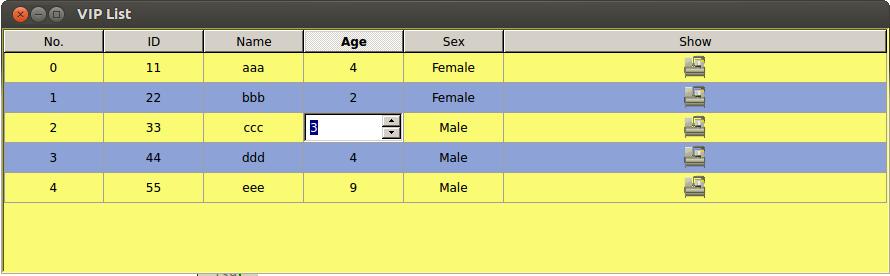
A:第一列是编号列,使用只读委托,令该列的单元格是只读的
B:第三列是ID列,只能输入1-12个数字,利用QLineEdit委托和正则表达式对输入进行限制
C:第四年龄列,利用QSpinBox委托进行输入限制,只能输入1-100之间的数字
D:第五列是性别列,利用QComboBox委托对输入进行限制,该列的单元格只能输入Male或Female
E:第六列是头像列,在该列的单元格中央放置一张头像
2:定义代理类,把所有单元格中的字符居中显示。
如果看不懂这个例子,请先看QT的自带例子: http://qt-project.org/doc/qt-4.8/itemviews-spinboxdelegate.html
思路:
1:为每一列定义委托:
A:第一列是编号列,使用只读委托,令该列的单元格是只读的
B:第三列是ID列,只能输入1-12个数字,利用QLineEdit委托和正则表达式对输入进行限制
C:第四年龄列,利用QSpinBox委托进行输入限制,只能输入1-100之间的数字
D:第五列是性别列,利用QComboBox委托对输入进行限制,该列的单元格只能输入Male或Female
E:第六列是头像列,在该列的单元格中央放置一张头像
2:定义代理类,把所有单元格中的字符居中显示。
3:利用QSS,将表格的背景色弄成黄蓝相间。
截图:
源代码:
tool.h
#ifndef TOOL_H
#define TOOL_H
#include <QtGui>

//编号列,只读委托
//这个方法我还真想不到,呵呵
class  ReadOnlyDelegate :  public  QItemDelegate
{
    Q_OBJECT
public :
    ReadOnlyDelegate(QObject *parent = 0): QItemDelegate(parent) { }
    QWidget *createEditor(QWidget*parent,  const QStyleOptionViewItem &option,
         const  QModelIndex &index)  const
    {
         return  NULL;
    }
};

//ID列,只能输入1-12个数字
//利用QLineEdit委托和正则表达式对输入进行限制
class  UserIDDelegate :  public  QItemDelegate
{
    Q_OBJECT
public :
    UserIDDelegate(QObject *parent = 0): QItemDelegate(parent) { }
    QWidget *createEditor(QWidget *parent,  const QStyleOptionViewItem &option,
         const  QModelIndex &index)  const
    {
        QLineEdit *editor =  new  QLineEdit(parent);
        QRegExp regExp( "[0-9]{0,10}" );
        editor->setValidator( new  QRegExpValidator(regExp, parent));
         return  editor;
    }
     void  setEditorData(QWidget *editor,  const  QModelIndex &index)  const
    {
        QString text = index.model()->data(index, Qt::EditRole).toString();
        QLineEdit *lineEdit =  static_cast <QLineEdit*>(editor);
        lineEdit->setText(text);
    }
     void  setModelData(QWidget *editor, QAbstractItemModel *model,
         const  QModelIndex &index)  const
    {
        QLineEdit *lineEdit =  static_cast <QLineEdit*>(editor);
        QString text = lineEdit->text();
        model->setData(index, text, Qt::EditRole);
    }
     void  updateEditorGeometry(QWidget *editor,
         const  QStyleOptionViewItem &option,  const  QModelIndex &index) const
    {
        editor->setGeometry(option.rect);
    }
};

//年龄列,利用QSpinBox委托进行输入限制,只能输入1-100之间的数字
class  AgeDelegate :  public  QItemDelegate
{
    Q_OBJECT
public :
    AgeDelegate(QObject *parent = 0): QItemDelegate(parent) { }
    QWidget *createEditor(QWidget *parent,  const QStyleOptionViewItem &option,
         const  QModelIndex &index)  const
    {
        QSpinBox *editor =  new  QSpinBox(parent);
        editor->setMinimum(1);
        editor->setMaximum(100);
         return  editor;
    }
     void  setEditorData(QWidget *editor,  const  QModelIndex &index)  const
    {
         int  value = index.model()->data(index, Qt::EditRole).toInt();
        QSpinBox *spinBox =  static_cast <QSpinBox*>(editor);
        spinBox->setValue(value);
    }
     void  setModelData(QWidget *editor, QAbstractItemModel *model,
         const  QModelIndex &index)  const
    {
        QSpinBox *spinBox =  static_cast <QSpinBox*>(editor);
        spinBox->interpretText();
         int  value = spinBox->value();
        model->setData(index, value, Qt::EditRole);
    }
     void  updateEditorGeometry(QWidget *editor,
         const  QStyleOptionViewItem &option,  const  QModelIndex &index) const
    {
        editor->setGeometry(option.rect);
    }
};

//性别列,利用QComboBox委托对输入进行限制
//这一列的单元格只能输入Male或Female
class  SexDelegate :  public  QItemDelegate
{
    Q_OBJECT
public :
    SexDelegate(QObject *parent = 0): QItemDelegate(parent) { }
    QWidget *createEditor(QWidget *parent,  const QStyleOptionViewItem &option,
         const  QModelIndex &index)  const
    {
        QComboBox *editor =  new  QComboBox(parent);
        editor->addItem( "Female" );
        editor->addItem( "Male" );
         return  editor;
    }
     void  setEditorData(QWidget *editor,  const  QModelIndex &index)  const
    {
        QString text = index.model()->data(index, Qt::EditRole).toString();
        QComboBox *comboBox =  static_cast <QComboBox*>(editor);
         int  tindex = comboBox->findText(text);
        comboBox->setCurrentIndex(tindex);
    }
     void  setModelData(QWidget *editor, QAbstractItemModel *model,
         const  QModelIndex &index)  const
    {
        QComboBox *comboBox =  static_cast <QComboBox*>(editor);
        QString text = comboBox->currentText();
        model->setData(index, text, Qt::EditRole);
    }
     void  updateEditorGeometry(QWidget *editor,
         const  QStyleOptionViewItem &option,  const  QModelIndex &index) const
    {
        editor->setGeometry(option.rect);
    }
};

//头像列,只是在单元格中央放一张小图而已
class  IconDelegate :  public  QItemDelegate
{
    Q_OBJECT
public :
    IconDelegate(QObject *parent = 0): QItemDelegate(parent) { }
     void  paint(QPainter *painter,  const  QStyleOptionViewItem &option,
         const  QModelIndex & index )  const
    {
         //show.bmp是在工程目录中的一张图片(其实就是QQ的图标啦,呵呵)
        QPixmap pixmap = QPixmap( "/temp/lengshuiji.png" ).scaled(24, 24);
        qApp->style()->drawItemPixmap(painter, option.rect,  Qt::AlignCenter, QPixmap(pixmap));
    }
};

//代理类,把所有单元格中的字符居中显示
class  VIPModel :  public  QStandardItemModel
{
    Q_OBJECT
public :
    VIPModel(QObject *parent=NULL) : QStandardItemModel(parent) { }
    VIPModel( int  row,  int  column, QObject *parent=NULL)
        : QStandardItemModel(row, column, parent) { }
    QVariant data( const  QModelIndex &index,  int  role = Qt::DisplayRole) const
    {
         if ( Qt::TextAlignmentRole == role )
             return  Qt::AlignCenter;
         return  QStandardItemModel::data(index, role);
    }

};


#endif // TOOL_H
main.cpp
#include <QtGui/QApplication>
#include "tool.h"


int  main( int  argc,  char  *argv[])
{
    QApplication app(argc, argv);

    VIPModel *model =  new  VIPModel(5, 5);
    QTableView *tableView =  new  QTableView;

     //把表格的背景调成黄蓝相间
     //这种方法是在网上看到的,用起来还真方便啊
    tableView->setAlternatingRowColors( true );
    tableView->setStyleSheet( "QTableView{background-color: rgb(250, 250, 115);"
         "alternate-background-color: rgb(141, 163, 215);}" );

    tableView->setWindowTitle( "VIP List" );
    tableView->resize(700, 400);
    tableView->setModel(model);
    QStringList headerList;
    headerList <<  "No."  <<  "ID"  <<  "Name"  <<  "Age"  <<  "Sex"  <<  "Show" ;
    model->setHorizontalHeaderLabels(headerList);
    tableView->verticalHeader()->setVisible( false );
    tableView->horizontalHeader()->setStretchLastSection( true );

     //为每一列加载委托
    ReadOnlyDelegate readOnlyDelegate;
    tableView->setItemDelegateForColumn(0, &readOnlyDelegate);
    UserIDDelegate userIDDelegate;
    tableView->setItemDelegateForColumn(1, &userIDDelegate);
    AgeDelegate spinBoxDelegate;
    tableView->setItemDelegateForColumn(3, &spinBoxDelegate);
    SexDelegate comboBoxDelegate;
    tableView->setItemDelegateForColumn(4, &comboBoxDelegate);
    IconDelegate iconDelegate;
    tableView->setItemDelegateForColumn(5, &iconDelegate);

     for ( int  i=0; i<10; i++)
    {
        QModelIndex index = model->index(i, 0, QModelIndex());
        model->setData(index, i);
    }

    tableView->show();
     return  app.exec();
}
转载自:http://blog.csdn.net/lhchen922/article/details/38367719


 391
391

 被折叠的 条评论
为什么被折叠?
被折叠的 条评论
为什么被折叠?
 到【灌水乐园】发言


