


Java网络编程的几组API
大家都知道Java目前网络编程的API主要有以下三种:
- BIO
- NIO
- AIO
在2002年2月13日,JDK1.4推出以前,Java网络编程的API只有BIO(即:同步阻塞式IO)方式。因此当时需要处理高并发请求的服务器,主流还是采用C/C++方式。
在JDK1.4之后,推出了NIO API(非阻塞IO)。从此基于Java的网络服务才开始正式流行起来。AIO是异步非阻塞IO,它的推出则是到了2011年7月8日,JDK1.7正式发布的时候。
对于BIO、NIO、AIO的基本概念相信大家都不陌生,他们各自的特点也比较明显。本文目的主要是梳理这三组Java网络编程API的基本用法,以便大家对他们的编程有一个基本的掌握。
BIO编程
BIO又叫同步阻塞式IO,是Java一开始就提供的网络编程能力。它的特点是网络连接的数据通信是同步阻塞式,当网络服务端需要同时处理多个客户端请求时,为了不阻塞往往需要开多个线程进行处理。
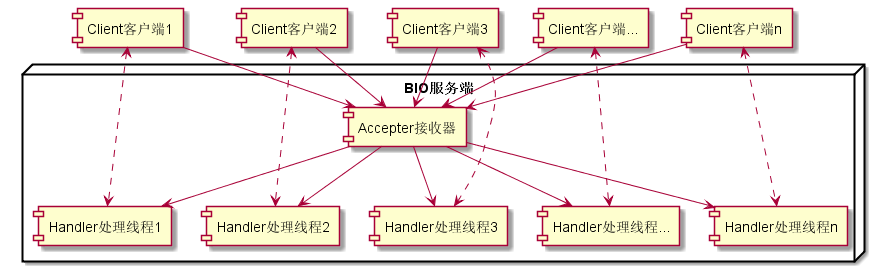
这样的问题是,如果服务端同时需要处理的客户端请求很多,那就需要创建成千上万个线程。而创建线程对操作系统的开支是比较大的,当客户端增加时,服务器的性能下降很快。
BIO服务端
BIO服务端代码主要分为两部分:
- 监听端口接受连接
- 开启新线程处理请求
首先我们来看监听端口部分:
public class BioServer {

    private static boolean stop = false;
    public static void main(String[] args) {
        stop = false;
        int port = 8080;
        ServerSocket serverSocket = null;

        try {
            serverSocket = new ServerSocket(port);
            System.out.println("BioServer is started in port: " + port);
            Socket socket = null;

            while(!stop) {

                socket = serverSocket.accept();
                System.out.println("socket is accepted: " + socket.toString());

                new Thread(new BioServerHandler(socket)).start();

                System.out.println("started a new Thread to handle request, so we can listen others.");
            }
        } catch (IOException e) {
            e.printStackTrace();
        }
    }
}这里我们注意到,当接收到连接后,我们通过新启动线程,然后运行处理请求的代码块BioServerHandler。这部分代码则是处理请求的具体代码(这里我只贴出核心部分):
public class BioServerHandler implements Runnable{

    private Socket socket;
    public BioServerHandler(Socket socket) {
        this.socket = socket;
    }

    @Override
    public void run() {

        BufferedReader in = null;
        PrintWriter out = null;

        ...

         in = new BufferedReader(new InputStreamReader(socket.getInputStream()));
            out = new PrintWriter(socket.getOutputStream(), true);

            while(true) {
                System.out.println("Handler is running...");
                String requestStr = in.readLine();
                if(requestStr == null) {
                    break;
                }
                System.out.println("request String is : " + requestStr);
                String respondStr = "time".equalsIgnoreCase(requestStr) ? new Date(System.currentTimeMillis()).toString() : "wrong request!";

                out.println(respondStr);
            }

        ...
    }
}
请求处理这端,从socket中取出InputStream流和OutputStream流,读写操作是通过这两个流的操作实现的。需要注意的是,代码中我们并没有处理链接断开的情况。实际开发中,链接断开或者需要断开时,应该将InputStream、OutputStream流和Socket都正常关闭。
BIO客户端
用BIO API实现客户端代码只需要链接服务端,然后正常读写数据就可以了。因为客户端只对应一个服务端。
public class BioClient {

    public static void main(String[] args) {
        int port = 8080;
        Socket socket = null;
        BufferedReader in = null;
        PrintWriter out = null;

        try {
            socket = new Socket("127.0.0.1", port);
            in = new BufferedReader(new InputStreamReader(socket.getInputStream()));
            out = new PrintWriter(socket.getOutputStream(), true);

            while(true) {
                Scanner scanner = new Scanner(System.in);
                String command = scanner.next();
                if(command != null && command.equalsIgnoreCase("bye")) {
                    break;
                }
                out.println(command);

                String respond = in.readLine();
                System.out.println("respond: " + respond);
            }

        } catch (IOException e) {
            e.printStackTrace();
            //关闭资源...
        }
    }
}
BIO服务端的改良
之前我们讨论过,基于BIO服务端的最大问题是每个客户端需要服务端单独创建一个线程进行请求处理,线程数过大耗费系统资源。于是有一种改良模型被创造了出来。它将服务端处理请求的代码块视为一个个任务,将这些任务交由线程池来取出和处理。
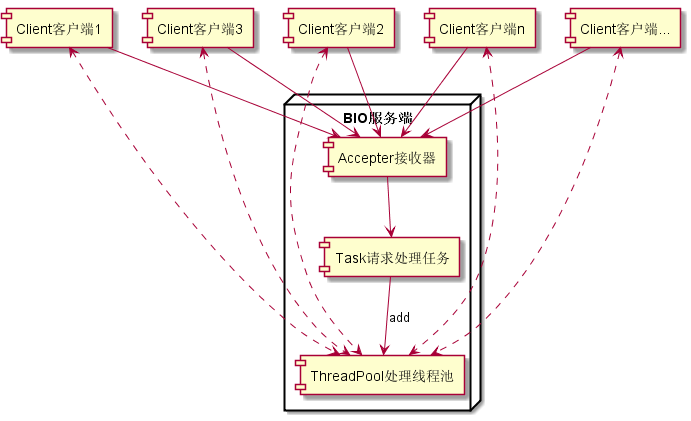
这样的模型,可以使线程数量与客户端数量不是1:1的关系,可以大量节约线程资源。此处我们给出此模型的服务端实现代码:
public class FakeNioBioServer {

    private static ExecutorService executorService = new ThreadPoolExecutor(Runtime.getRuntime().availableProcessors(),
            100,120L, TimeUnit.SECONDS,new ArrayBlockingQueue<Runnable>(1000));

    public static void main(String[] args) {

        int port = 8080;
        ServerSocket serverSocket = null;

        try {
            serverSocket = new ServerSocket(port);
            System.out.println("serverSocket is listening port " + port);

            Socket socket = null;
            while(true) {
                socket = serverSocket.accept();
                System.out.println("serverSocket is accepted: " + socket.toString());
                executorService.execute(new BioServerHandler(socket));
            }
        } catch (IOException e) {
            e.printStackTrace();
        }
    }
}
这个模型也存在弊端,就是由于网络IO是阻塞的,当线程池中正在处理的任务被阻塞时,没法进行后续网络请求的处理。而当前任务的阻塞可能是网络不好等特殊情况。
NIO编程
JDK1.4之后,Java支持了NIO网络编程API。NIO可以理解为非阻塞IO,他是相对于BIO的阻塞式IO来说的。NIO为什么可以实现非阻塞式IO,这和操作系统提供的IO功能相关。
应用程序通过调用操作系统的select,可以获取到当前多个就绪的IO文件句柄(fd)。然后按顺序进行读写操作就好了。这样,就允许NIO的应用服务端仅通过一个线程就能处理多个并发请求。对系统资源的消耗大大减少。
NIO的几个基础概念类
与BIO仅操作Socket、ServerSocket和InputStream、OutputStream简单的几个类不同,NIO多出来一些基本的概念原理,并由此多出来一些类。下面我们首先就这几个概念和类做说明。
Channel管道
首先你可以理解Channel为NIO网络通信的管道,类似于BIO中的Socket。在NIO网络编程中,我们用得多的是ServerSocketChannel和SocketChannel。服务端连接请求的接收,网络数据的发送和接收都是通过这个类。
在概念上,Channel管道不同于InputStream和OutputStream流。简而言之,流是单向的,只能输入或者输出;而管道则是双向的,读写数据都是通过同一个介质进行。
Selector选择器
它是Java NIO编程的基础,它的作用是将需要使用的Channel注册在其上,然后当多个Channel上发生连接、读、写等事件并处于就绪状态时,Selector就能将这些Channel全部筛选出来,进行后续的应用层IO操作。
目前在Linux下JDK使用epoll基于事件驱动的系统调用实现select,因此它不受最大连接句柄限制(1024/2048)。
SelectionKey
Selector选择器通过select系统调用筛选,返回的是SelectionKey的集合。就绪的Channel全都封装在SelectionKey对象中。通过SelectionKey可以获取到就绪的Channel,并且知道这个Channel是读就绪、写就绪还是连接就绪等。
另外,当不再操作此channel的时候,也需要SelectionKey的cancel调用,将其在Selector上注销。
Buffer缓冲区
前面说过,NIO网络编程的读写数据都是通过Channel管道作为介质。而Channel管道接收或者发送的数据,都必须先存放在Buffer中。
Buffer的实现是一个数组,除此之外,它还提供了对数组结构化访问和维护的信息。例如limit、position等。我们常用的Buffer实例是ByteBuffer。除此之外,Java的基本类型几乎都有对应的Buffer实现。
NIO服务端
了解Java NIO网络编程的基本概念和类之后,我们就首先来实现一个基本的NIO 服务端。NIO服务端主要有三个步骤:
- 初始化,端口开启监听
- 循环筛选出需要处理的SelectionKey
- 处理SelectionKey
下面主要贴核心代码。首先是初始化,绑定端口监听:
try {
            selector = Selector.open();

            serverSocketChannel = ServerSocketChannel.open();
            serverSocketChannel.configureBlocking(false);
            serverSocketChannel.socket().bind(new InetSocketAddress(port),1024);

            serverSocketChannel.register(selector, SelectionKey.OP_ACCEPT);

            System.out.println("The NioServer is linstening in port "+ port);

        } catch (IOException e) {
            e.printStackTrace();
            System.exit(1);     //出错退出程序
}这里首先是初始化Selector和ServerSocketChannel,将ServerSocketChannel置为非阻塞模式。然后绑定端口,最后将ServerSocketChannel注册到Selector上,并关注SelectionKey.OP_ACCEPT事件(客户端连接事件)。
然后是循环筛选出需要处理的SelectionKey:
while(!stop) {
    SelectionKey key = null;
    try {
        selector.select();
        Set<SelectionKey> selectionKeys = selector.selectedKeys();
        Iterator<SelectionKey> iterator = selectionKeys.iterator();

        while(iterator.hasNext()) {
            key = iterator.next();
            iterator.remove();
            handleSelectionKey(key);
        }
    } catch (IOException e) {
        e.printStackTrace();

        if(key!=null) {
            key.cancel();
            if(key.channel()!=null) {
                try {
                    key.channel().close();
                } catch (IOException e1) {
                    e1.printStackTrace();
                }
            }
        }
    }
}首先需要注意,如果没有任何事件就绪,selector.select()是阻塞的,因此循环中我们不需要额外添加阻塞代码。另外,当出现异常时,SelectionKey需要注销,并且与之对应的channel需要关闭。
我们看到select出来的SelectionKey通过iterater遍历,最后交给了handleSelectionKey()进行处理。下面我们来看看如何处理SelectionKey。
private void handleSelectionKey(SelectionKey key) throws IOException {

        if(key.isValid()) {

            //处理客户端连接
            if(key.isAcceptable()) {
                ServerSocketChannel serverSocketChannel = (ServerSocketChannel) key.channel();
                SocketChannel socketChannel = serverSocketChannel.accept();
                socketChannel.configureBlocking(false);
                //接受连接,然后把接受的连接通道注册到selector
                socketChannel.register(selector, SelectionKey.OP_READ);

                System.out.println("Received a connection: " + socketChannel.getRemoteAddress().toString());
            }

            //处理客户端传来数据
            if(key.isReadable()) {
                SocketChannel socketChannel = (SocketChannel) key.channel();
                ByteBuffer readBuffer = ByteBuffer.allocate(1024);

                int readCount = socketChannel.read(readBuffer);
                if(readCount > 0) {

                    readBuffer.flip();
                    byte[] bytes = new byte[readBuffer.remaining()];
                    readBuffer.get(bytes);

                    String requestContent = new String(bytes);
                    System.out.println("Server received: " + requestContent);

                    String respondStr = "time".equalsIgnoreCase(requestContent) ? new Date(System.currentTimeMillis()).toString() : "wrong request!";

                    System.out.println("We will write: " + respondStr);

                    ByteBuffer writeBuffer = ByteBuffer.allocate(1024);
                    writeBuffer.put(respondStr.getBytes());
                    writeBuffer.flip();
                    socketChannel.write(writeBuffer);

                    System.out.println("We have writed: " + respondStr);

                } else if(readCount < 0) {

                    System.out.println("we will close this channel.");

                    key.cancel();
                    socketChannel.close();
                }
            }
        } else {
            key.cancel();
            if(key.channel() != null) {
                key.channel().close();
            }
        }
}这里主要对SelectionKey的isAcceptable和isReadable分别进行了处理。isAcceptable的时候接受连接,然后获取到SocketChannel,设置为非阻塞方式,然后注册到Selector上,并关注SelectionKey.OP_READ事件。
当SelectionKey为isReadable时,则从SocketChannel中读出数据,进行相应处理之后,调用SocketChannel的write方法,将响应信息发送给客户端。
NIO客户端
NIO的客户端实现与服务端的实现类似,不同的是服务端需要处理的是端口接收到监听,而客户端是主动连接服务端。
同样的,首先是初始化Selector和SocketChannel:
try {
        selector = Selector.open();
        socketChannel = SocketChannel.open();
        socketChannel.configureBlocking(false);

    } catch (IOException e) {
        e.printStackTrace();
}然后调用socketChannel连接服务器:
if(socketChannel.connect(new InetSocketAddress(ip, port))) {

    System.out.println("Connect succeed! " + socketChannel.getRemoteAddress().toString());

    socketChannel.register(selector, SelectionKey.OP_READ);
    doWrite(socketChannel);

} else {
    socketChannel.register(selector, SelectionKey.OP_CONNECT);
}这里注意,由于是异步连接,所以这里socketChannel.connect可能直接连接成功,也可能不会立即返回连接结果。所以,如果直接返回true,表示客户端已经连接上,就可以直接发请求指令,然后注册读操作到Selector;而如果返回false,则需要将连接事件注册到Selector上,等待后续处理。
所以接下来就是循环筛选准备就绪的SelectionKey了:
while(!stop) {
    SelectionKey selectionKey = null;
    try {
        selector.select();
        Set<SelectionKey> SelectionKeys = selector.selectedKeys();

        Iterator<SelectionKey> iterator = SelectionKeys.iterator();

        while(iterator.hasNext()) {
            selectionKey = iterator.next();
            iterator.remove();

            handleSelectionKey(selectionKey);
        }
    } catch (IOException e) {
        e.printStackTrace();
        if(selectionKey!=null) {
            selectionKey.cancel();
            if(selectionKey.channel()!=null) {
                try {
                    selectionKey.channel().close();
                } catch (IOException e1) {
                    e1.printStackTrace();
                }
            }
        }
    }
}
可以看出这部分代码与服务端的实现几乎完全一致。接下来就是处理就绪事件的代码了:
private void handleSelectionKey(SelectionKey key) throws IOException {

    if(!key.isValid()) {
        return;
    }

    SocketChannel socketChannel = (SocketChannel) key.channel();
    if(key.isConnectable()) {
        if(socketChannel.finishConnect()) {
            socketChannel.register(selector, SelectionKey.OP_READ);
            doWrite(socketChannel);
        } else {
            System.out.println("Connect server failed");
            System.exit(1);
        }
    }

    if(key.isReadable()) {
        ByteBuffer readBuffer = ByteBuffer.allocate(1024);
        int count = socketChannel.read(readBuffer);
        if(count > 0) {
            readBuffer.flip();
            byte[] bytes = new byte[readBuffer.remaining()];
            readBuffer.get(bytes);

            String respond = new String(bytes);
            System.out.println("respond: " + respond);

            //再次等待命令输入
            doWrite(socketChannel);

        } else if(count < 0) {
            key.cancel();;
            socketChannel.close();
        }
    }
}这里我们看到,对于之前调用socketChannel.connect没有直接连接成功的,我们会在这里通过selectionKey.isConnectable筛选出来进行处理。而接收服务器返回的数据,和服务端几乎完全相同。
到此,NIO网络编程的基本流程梳理完毕。我们注意到,NIO编程在代码量上会多一些,实现逻辑也会稍显复杂。但是他能在一个线程中处理高并发的请求,在处理高并发的可靠性上还是有优势的。
AIO编程
JDK1.7发布的一个重要特性,就是支持了AIO网络编程API,有人称之为NIO 2.0。大家都说AIO是真正的异步非阻塞IO,因为在实现上它不再需要Selector来筛选就绪的通道,而是在通道就绪后,直接以事件驱动的方式主动推送给应用。
而实时上同样以Linux系统为平台,NIO和AIO的操作系统级实现都是基于epoll的,所以实际效率上并没有本质区别。这也是为什么Netty NIO框架至今仍以NIO为基础,而迟迟未上AIO的原因。
但是在直接调用JDK原生API接口进行网络编程的情况下,AIO网络编程和之前的NIO网络编程还是有很大差别。
AIO服务端
同样的,我们以之前的简单服务端功能为例,看看如何使用AIO接口来实现。
首先同样的,服务端需要先完成必要的初始化,然后绑定监听端口:
try {
    asynchronousServerSocketChannel = AsynchronousServerSocketChannel.open();
    asynchronousServerSocketChannel.bind(new InetSocketAddress(port));

    System.out.println("server is linstening in port: " + port);

} catch (IOException e) {
    e.printStackTrace();
}这里需要注意的是,我们调用的类叫做AsynchronousServerSocketChannel,这是JDK1.7才开始支持的AIO API新提供的类。在open完成初始化后,直接bind到端口上。
在这之后就直接等待连接客户端就行了:
//接受连接
asynchronousServerSocketChannel.accept(this, new AioAcceptCompletionHandler());

//阻塞线程,防止退出
countDownLatch = new CountDownLatch(1);
try {
    countDownLatch.await();
} catch (InterruptedException e) {
    e.printStackTrace();
}
由于不需要循环去select就绪的channel,而是事件驱动,所以accept的时候注册了一个事件回调的Handler。而之后,为了防止程序退出,则将线程挂起。
下面我们来看一下回调处理AioAcceptCompletionHandler的实现代码。
public class AioAcceptCompletionHandler implements CompletionHandler<AsynchronousSocketChannel, AioRealServerRunnable> {

    @Override
    public void completed(AsynchronousSocketChannel result, AioRealServerRunnable attachment) {

        try {
            System.out.println("连接成功! " + result.getRemoteAddress().toString());
        } catch (IOException e) {
            e.printStackTrace();
        }

        //再次注册监听事件
        attachment.asynchronousServerSocketChannel.accept(attachment, this);

        //连接后,读取请求数据
        ByteBuffer readBuffer = ByteBuffer.allocate(1024);
        result.read(readBuffer, readBuffer, new AioReadCompletionHandler(result));
    }

    @Override
    public void failed(Throwable exc, AioRealServerRunnable attachment) {
        exc.printStackTrace();
        attachment.countDownLatch.countDown();
    }
}这里需要注意的两个地方:一是连接成功后,asynchronousServerSocketChannel需要再次注册监听事件。要不然其他客户端再访问时就不能连接了。二是连接完成后,获取请求内容需要调用AsynchronousSocketChannel的read方法,并同样采用Handler回调机制处理。(处处体现了异步)
下面我们再来看AioReadCompletionHandler 的实现:
public class AioReadCompletionHandler implements CompletionHandler<Integer, ByteBuffer> {

    private AsynchronousSocketChannel asynchronousSocketChannel;

    public AioReadCompletionHandler(AsynchronousSocketChannel socketChannel) {
        asynchronousSocketChannel = socketChannel;
    }

    @Override
    public void completed(Integer result, ByteBuffer attachment) {

        //读取底层传来的网络数据
        attachment.flip();
        byte[] requestBytes = new byte[attachment.remaining()];
        attachment.get(requestBytes);
        String request = new String(requestBytes);

        System.out.println("received request: " + request);

        //确认要返回的数据
        String respond = request.equalsIgnoreCase("time") ? new Date(System.currentTimeMillis()).toString() : "Wrong Request!";
        doWrite(respond);

        //再次注册读消息
        attachment.clear();
        asynchronousSocketChannel.read(attachment, attachment, this);
    }

    @Override
    public void failed(Throwable exc, ByteBuffer attachment) {
        exc.printStackTrace();
        //读取失败则关闭这个channel
        try {
            asynchronousSocketChannel.close();
        } catch (IOException e) {
            e.printStackTrace();
        }
    }

    private void doWrite(String respond) {
        byte[] bytes = respond.getBytes();
        ByteBuffer writeBuffer = ByteBuffer.allocate(bytes.length);
        writeBuffer.put(bytes);

        writeBuffer.flip();
        asynchronousSocketChannel.write(writeBuffer, writeBuffer, new CompletionHandler<Integer, ByteBuffer>() {
            @Override
            public void completed(Integer result, ByteBuffer attachment) {
                if(attachment.hasRemaining()) {
                    asynchronousSocketChannel.write(attachment, attachment, this);
                }
            }

            @Override
            public void failed(Throwable exc, ByteBuffer attachment) {
                exc.printStackTrace();
                try {
                    asynchronousSocketChannel.close();
                } catch (IOException e) {
                    e.printStackTrace();
                }
            }
        });
    }
}这里同样需要注意,读完之后要重新注册读操作回调。要不然该客户端再次发消息就接收不到了。另外服务端向客户端写数据需要调用asynchronousSocketChannel.write方法,并且在回调中处理缓冲区数据没有一次性发送完毕的剩余数据。
AIO客户端
通过AIO服务端的实现,大体感觉是相对NIO而言,AIO API的封装要完备一些,而给开发者的概念也少很多。理解起来和实现起来,相对容易。下面我们来看AIO的客户端如何实现,而这个会相对更简单。
首先也是初始化之后,开始连接服务器:
try {
    asynchronousSocketChannel = AsynchronousSocketChannel.open();
} catch (IOException e) {
    e.printStackTrace();
}

final CountDownLatch countDownLatch = new CountDownLatch(1);

asynchronousSocketChannel.connect(new InetSocketAddress(ipAddress, port),
        asynchronousSocketChannel,
        new CompletionHandler<Void, AsynchronousSocketChannel>() {
            @Override
            public void completed(Void result, AsynchronousSocketChannel attachment) {
                //此方法是打印调用堆栈信息
                //Thread.currentThread().dumpStack();
                doRequests(attachment);
            }

            @Override
            public void failed(Throwable exc, AsynchronousSocketChannel attachment) {
                exc.printStackTrace();
                try {
                    attachment.close();
                    countDownLatch.countDown();
                } catch (IOException e) {
                    e.printStackTrace();
                }
            }
        });

try {
    countDownLatch.await();
} catch (InterruptedException e) {
    e.printStackTrace();
}这里直接把回调的Handler写在了一起,因为逻辑相对简单。在连接成功后,调用doRequests方法发送请求。
private void doRequests(AsynchronousSocketChannel socketChannel) {

    //获取命令行输入
    Scanner scanner = new Scanner(System.in);
    String request = scanner.next();

    //缓冲区装入数据
    ByteBuffer writeBuffer = ByteBuffer.allocate(request.getBytes().length);
    writeBuffer.put(request.getBytes());
    writeBuffer.flip();

    //写数据
    socketChannel.write(writeBuffer, writeBuffer, new CompletionHandler<Integer, ByteBuffer>() {
        @Override
        public void completed(Integer result, ByteBuffer attachment) {
            if(attachment.hasRemaining()) {
                asynchronousSocketChannel.write(attachment, attachment, this);
            } else {
                //写数据完毕,需要读取服务器返回结果
                ByteBuffer readBuffer = ByteBuffer.allocate(1024);
                asynchronousSocketChannel.read(readBuffer, readBuffer, new CompletionHandler<Integer, ByteBuffer>() {
                    @Override
                    public void completed(Integer result, ByteBuffer attachment) {
                        attachment.flip();
                        byte[] bytes = new byte[attachment.remaining()];
                        attachment.get(bytes);

                        String respond = new String(bytes);
                        System.out.println("received: " + respond);

                        //开始下一次请求命令
                        doRequests(asynchronousSocketChannel);
                    }

                    @Override
                    public void failed(Throwable exc, ByteBuffer attachment) {
                        exc.printStackTrace();
                        try {
                            asynchronousSocketChannel.close();
                        } catch (IOException e) {
                            e.printStackTrace();
                        }
                    }
                });
            }
        }

        @Override
        public void failed(Throwable exc, ByteBuffer attachment) {
            exc.printStackTrace();
            try {
                asynchronousSocketChannel.close();
            } catch (IOException e) {
                e.printStackTrace();
            }
        }
    });
}
这里的读写操作与服务端的API调用相同,所以不做详细说明了。
至此AIO网络编程的基本流程梳理完毕,我们可以看到AIO相比NIO概念更好,API封装个人感觉更容易理解,使用起来比较方便。
总结
通过对JDK提供的三套网络编程API的编程流程梳理,对比BIO、NIO和AIO三种网络IO编程的各自特点。
总的来说,BIO同步阻塞式的网络编程,编程流程相对最为简单,但是需要自己处理大量线程调配的问题,并且不能满足高并发的服务器需求,所以生产环境中使用越来越不是最好的选择。
而NIO和AIO,对于Linux服务器而言,底层都是通过epoll实现,所以效率差别应该不大。而原生NIO API编程,概念相对较多,处理流程的时序也比较混乱,所以基于NIO原生API来开发大型项目,可能维护成本和稳定性能方向需要格外注意。
而AIO作为JDK1.7新有的特性,API封装相对好些,开发者使用的思路会比较清晰。另外Linux底层通过epoll实现,并发性能也相对不用担心。而需要担心的是,你的服务器运行环境是否可以很顺畅地使用JDK1.7?总之原生API开发高并发的服务端首选AIO。
当然,你还有另外的选择,例如已经广泛用于商业大型项目的NIO框架Netty。他虽然是采用NIO API实现的框架,但是前面说过目前NIO、AIO其实在Linux下底层实现都是相同的。而Netty已经广泛应用于大型商业甚至是通信业的项目中,可靠性得到了很好的保证。


 1967
1967

 被折叠的 条评论
为什么被折叠?
被折叠的 条评论
为什么被折叠?
 到【灌水乐园】发言


