


1. Fragment概述
概述:
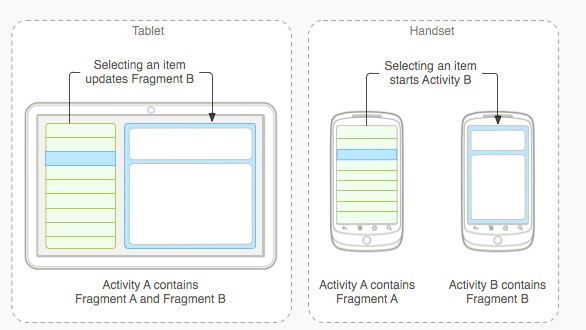
Fragment是从Android v3.0版本开始引入,其翻译为:碎片。
其产生是为解决屏幕尺寸大小不一的问题,比如你使用4.42开发了一个应用,那么这个怎么在屏幕不同的2.23和5.0上使用呢,重新开发?当然不是,这时候fragment就可以很好的应用了
目的及应用场景:
2. Fragment 的创建
要使用Fragment,可以通过继承Fragment类来创建你的Fragment,在该类中去重写父类定义好的方法,以便加载你的Fragment UI、初始化Fragment相关变量、控制Fragment和Activity的交互等等,从而完成定义Fragment的功能。
在大多数情况下需要给你的Fragment制定一个UI,但是,也可以为Activity创建一个没有UI,只提供后台行为的Fragment。
Fragment的创建灵活,通常常用两种方式:
1 通过xml标签。
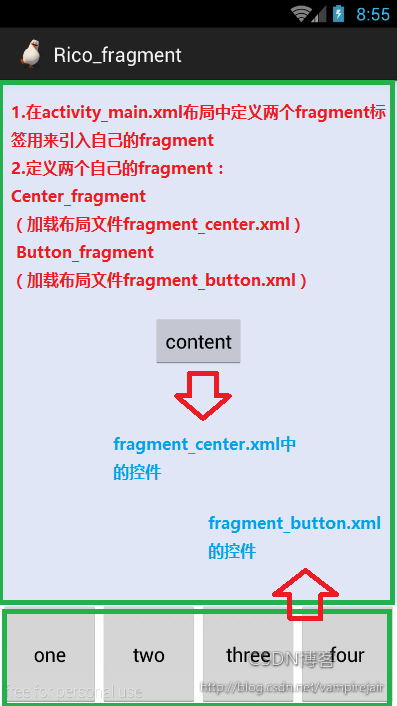
main_activity.xml
<LinearLayout xmlns:android="http://schemas.android.com/apk/res/android"
    xmlns:tools="http://schemas.android.com/tools"
    android:layout_width="match_parent"
    android:layout_height="match_parent"
    android:orientation="vertical" >

    <fragment
        android:id="@+id/center_fragment"
        android:name="com.example.rico_fragment.Center_fragment"
        android:layout_width="match_parent"
        android:layout_height="0dp"
        android:layout_weight="5" />


    <fragment
        android:id="@+id/button_fragment"
        android:name="com.example.rico_fragment.Button_fragment"
        android:layout_width="match_parent"
        android:layout_height="0dp"
        android:layout_weight="1" />

</LinearLayout>
/**
* Project Name:Rico_fragment
* File Name:Center_fragment.java
* Package Name:com.example.rico_fragment
*/
package com.example.rico_fragment;
import android.app.Fragment;
import android.os.Bundle;
import android.view.LayoutInflater;
import android.view.View;
import android.view.ViewGroup;
public class Button_fragment extends Fragment {
@Override
public View onCreateView(LayoutInflater inflater, ViewGroup container,
Bundle savedInstanceState) {
//
View view = inflater
.inflate(R.layout.fragment_button, container, false);
return view;
}
}
<?xml version="1.0" encoding="utf-8"?>
<LinearLayout xmlns:android="http://schemas.android.com/apk/res/android"
    android:layout_width="match_parent"
    android:layout_height="match_parent"
    android:orientation="horizontal" >

    <Button
        android:layout_width="match_parent"
        android:layout_height="match_parent"
        android:layout_weight="1"
        android:text="one" />

    <Button
        android:layout_width="match_parent"
        android:layout_height="match_parent"
        android:layout_weight="1"
        android:text="two" />

    <Button
        android:layout_width="match_parent"
        android:layout_height="match_parent"
        android:layout_weight="1"
        android:text="three" />

    <Button
        android:layout_width="match_parent"
        android:layout_height="match_parent"
        android:layout_weight="1"
        android:text="four" />

</LinearLayout>
2 通过相关Java代码动态创建,得到的效果图和上面的是一样的。
<LinearLayout xmlns:android="http://schemas.android.com/apk/res/android"
    xmlns:tools="http://schemas.android.com/tools"
    android:layout_width="match_parent"
    android:layout_height="match_parent"
    android:orientation="vertical" >

    <!-- 使用两个view元素来占位 -->

    <FrameLayout
        android:id="@+id/layout_center"
        android:layout_width="match_parent"
        android:layout_height="0dp"
        android:layout_weight="5" >
    </FrameLayout>

    <FrameLayout
        android:id="@+id/layout_bottom"
        android:layout_width="match_parent"
        android:layout_height="0dp"
        android:layout_weight="1" >
    </FrameLayout>

    <!--
         <fragment
        android:id="@+id/center_fragment"
        android:name="com.example.rico_fragment.Center_fragment"
        android:layout_width="match_parent"
        android:layout_height="0dp"
        android:layout_weight="5" />

    <fragment
        android:id="@+id/button_fragment"
        android:name="com.example.rico_fragment.Button_fragment"
        android:layout_width="match_parent"
        android:layout_height="0dp"
        android:layout_weight="1" />
    -->

</LinearLayout>
package com.example.rico_fragment;
import android.app.Activity;
import android.app.FragmentManager;
import android.app.FragmentTransaction;
import android.os.Bundle;
public class MainActivity extends Activity {
@Override
protected void onCreate(Bundle savedInstanceState) {
super.onCreate(savedInstanceState);
setContentView(R.layout.activity_main);
/**
* 使用java代码动态加载fragment需要涉及两个操作对象
* FragmentManager fragment管理器
* FragmentTransaction
*
*/
FragmentManager fragmentManager = getFragmentManager();// 声明一个引用变量
FragmentTransaction fragmentTransaction = fragmentManager
.beginTransaction();
fragmentTransaction
.add(R.id.layout_center, new Center_fragment());
fragmentTransaction
.add(R.id.layout_bottom, new Button_fragment());
fragmentTransaction.commit();// 提交一下
}
}


 被折叠的 条评论
为什么被折叠?
被折叠的 条评论
为什么被折叠?
 到【灌水乐园】发言


