Android
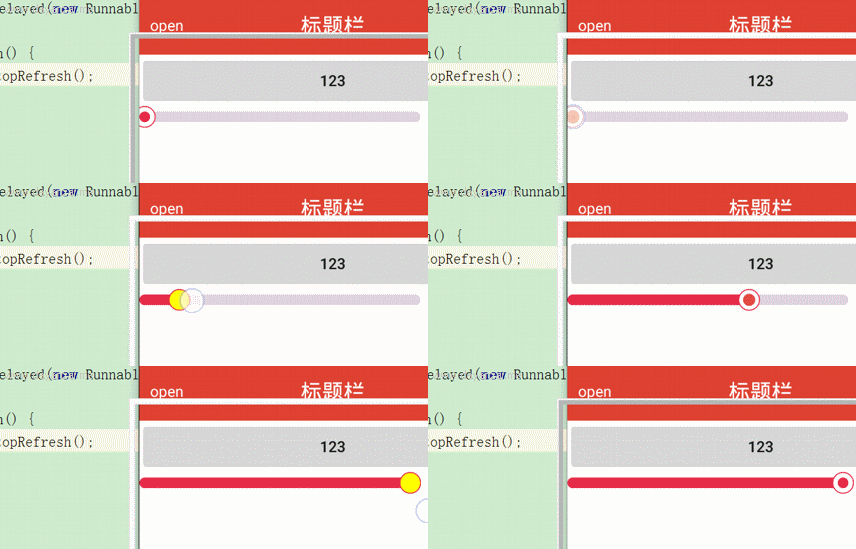
有个群友有个自定义的控件写不出(效果如下),本着救苦救难,就帮他一把,顺便开源出去。
其实这个效果我们去重写SeekBar并不好实现,但是通过自定义View还是很好实现的,下面说下思路。我们先画目标(DST)圆角矩形,在其上覆盖源(SRC)圆角矩形,再画两个圆(一个空心,一个实心),步骤就是这么的简单,关键在于位置的计算。

设计图
然后是实现后的效果图

效果图
首先定义如下
    private final int COLOR_RED = 0xFFE32F4F;//源的颜色,红
    private final int COLOR_GREY = 0xFFDDD3DB;//目标的颜色,灰
    private RectF mRectFBg;//目标Rect
    private RectF mRectFSrc;//源Rect
    private Paint mPaint;//画笔
    private int RADIUS_BIG;//空心的外圆半径
    private int RADIUS_SMALL;//实心的内圆半径
    private float progress;//进度
    private float downAndUpProgress;//按压后的动画进度
    private ProgressAnimation animation;//进度动画
    private DownAnimation downAnimation;//按 动画
    private UpAnimation upAnimation;//放 动画
    private ArgbEvaluator argbEvaluator;//计算颜色渐变值
    private boolean isAnimatinEnd = true;//进度动画是否结束
    private float lastX;//上一次触摸的横坐标
    private float lastY;//上一次触摸的纵坐标
初始化
    public ProgressLine1(Context context) {
        super(context);
        init();
    }

    public ProgressLine1(Context context, AttributeSet attrs) {
        super(context, attrs);
        init();
    }

    private void init() {
        mPaint = new Paint(Paint.ANTI_ALIAS_FLAG | Paint.DITHER_FLAG);
        downAnimation = new DownAnimation();
        downAnimation.setDuration(800);
        downAnimation.setInterpolator(new DecelerateInterpolator());
        upAnimation = new UpAnimation();
        upAnimation.setDuration(800);
        upAnimation.setInterpolator(new BounceInterpolator());
        argbEvaluator = new ArgbEvaluator();
    }
在onMeasure()方法中
  @Override
    protected void onMeasure(int widthMeasureSpec, int heightMeasureSpec) {
        super.onMeasure(widthMeasureSpec, heightMeasureSpec);
        /*
         * 拿到测量好的控件宽高
         */
        int measuredHeight = getMeasuredHeight();
        int measuredWidth = getMeasuredWidth();
        if (mRectFBg == null) {
            RADIUS_BIG = (int) (10 * getResources().getDisplayMetrics().density + 0.5f);//拿到外圆的半径
            RADIUS_SMALL = RADIUS_BIG >> 1;//内圆的半径为外圆的1/2
            //left=0,top=measuredHeight/4,right=measuredWidth - (RADIUS_BIG - RADIUS_SMALL),bottom=top=measuredHeight*3/4
            mRectFBg = new RectF(0, measuredHeight >> 2, measuredWidth - (RADIUS_BIG - RADIUS_SMALL), measuredHeight - (measuredHeight >> 2));
            mRectFSrc = new RectF(mRectFBg);
            mRectFSrc.right = 0;//源的right设置为0
        }
    }
在onDraw()方法中
@Override
    protected void onDraw(Canvas canvas) {
        super.onDraw(canvas);
        mPaint.setStyle(Paint.Style.FILL);//设置为实心
        mPaint.setStrokeWidth(1);//画笔的宽度,这个有个坑,strokeWidth [1,+∞],意思就是strokeWidth最小为+1,不管你设置的有多小
        mPaint.setColor(COLOR_GREY);
        canvas.drawRoundRect(mRectFBg, 20, 20, mPaint);//画一个目标灰色的圆角矩形
        mPaint.setColor(COLOR_RED);//重置为红色
        mRectFSrc.right += RADIUS_SMALL * 2;//此处+2倍的RADIUS_SMALL是为了让[图-1]mRectFSrc.right从的实线位置到虚线位置
        canvas.drawRoundRect(mRectFSrc, 20, 20, mPaint);//画一个目标红色的圆角矩形
        mRectFSrc.right -= RADIUS_SMALL * 2;//然后再恢复回来
        mPaint.setColor(0xFFFFFFFF);//重置为白色
        canvas.drawCircle(mRectFSrc.right + RADIUS_SMALL, getHeight() >> 1, RADIUS_BIG - RADIUS_BIG / 20, mPaint);//覆盖掉源的圆角矩形超出的部分
         int color = (int) argbEvaluator.evaluate(downAndUpProgress, COLOR_RED, Color.YELLOW);
        mPaint.setColor(color);
        canvas.drawCircle(mRectFSrc.right + RADIUS_SMALL, getHeight() >> 1, RADIUS_SMALL + RADIUS_SMALL * downAndUpProgress, mPaint);//内圆
        mPaint.setColor(COLOR_RED);
        mPaint.setStyle(Paint.Style.STROKE);
        mPaint.setStrokeWidth(RADIUS_BIG / 10);
        canvas.drawCircle(mRectFSrc.right + RADIUS_SMALL, getHeight() >> 1, RADIUS_BIG - RADIUS_BIG / 20, mPaint);//外圆
    }
图-1
设置进度
public void setProgress(float progress) {
        this.progress = progress;
        /*
         * 增加了一个动画效果
         */
       if (animation == null) {
            animation = new ProgressAnimation();
            animation.setDuration(3000);
            animation.setInterpolator(new AccelerateDecelerateInterpolator());
            animation.setAnimationListener(new Animation.AnimationListener() {
                @Override
                public void onAnimationStart(Animation animation) {
                    isAnimatinEnd = false;
                }

                @Override
                public void onAnimationEnd(Animation animation) {
                    isAnimatinEnd = true;
                }

                @Override
                public void onAnimationRepeat(Animation animation) {

                }
            });
        }
        startAnimation(animation);
    }
动画
   private class ProgressAnimation extends Animation {
        @Override
        protected void applyTransformation(float interpolatedTime, Transformation t) {
            mRectFSrc.right = (mRectFBg.right - RADIUS_SMALL * 2) * interpolatedTime * progress;
            invalidate();
        }
    }

    private class DownAnimation extends Animation {
        @Override
        protected void applyTransformation(float interpolatedTime, Transformation t) {
            downAndUpProgress = interpolatedTime;
            invalidate();
        }
    }

    private class UpAnimation extends Animation {
        @Override
        protected void applyTransformation(float interpolatedTime, Transformation t) {
            downAndUpProgress = 1 - interpolatedTime;
            invalidate();
        }
    }
再让它随手指动起来吧
 @Override
    public boolean onTouchEvent(MotionEvent event) {
        boolean onTouch = false;
        float x = event.getX();
        float y = event.getY();
        switch (event.getAction()) {
            case MotionEvent.ACTION_DOWN:
                if (isInRound(x, y) && isAnimatinEnd) {
                    onTouch = true;
                    startAnimation(downAnimation);
                    getParent().requestDisallowInterceptTouchEvent(true);
                }
                break;
            case MotionEvent.ACTION_MOVE:
                float dx = x - lastX;
                float dy = y - lastY;
                mRectFSrc.right += dx;
                if (mRectFSrc.right < 0) {
                    mRectFSrc.right = 0;
                } else if (mRectFSrc.right > (mRectFBg.right - RADIUS_SMALL * 2)) {
                    mRectFSrc.right = (mRectFBg.right - RADIUS_SMALL * 2);
                }
                invalidate();
                onTouch = true;
                break;
            case MotionEvent.ACTION_UP:
                startAnimation(upAnimation);
                break;
        }
        lastX = x;
        lastY = y;
        return onTouch;
    }

    private boolean isInRound(float x, float y) {
        return Math.sqrt(Math.pow(x - (mRectFSrc.right + RADIUS_SMALL), 2) + Math.pow(y - (getHeight() >> 1), 2)) < RADIUS_BIG;
    }
完成了! 后续的会再加解释的,现在没时间了
version 1.0 2016年6月2日14:35:19
下载地址:http://download.csdn.net/detail/zhangxiaofan_/9538995
version 2.0 2016年6月3日13:50:49
下载地址:http://download.csdn.net/detail/zhangxiaofan_/9540118


 1万+
1万+


 被折叠的 条评论
为什么被折叠?


