


1、SpringMVC
1.1、什么是MVC?
- MVC是模型(Model)、视图(View)、控制器(Controller)的简写,是一种软件设计规范
- 它是将业务逻辑、数据、显示分离的方法来组织代码
- MVC不是一种设计模式,而是一个架构模式,是Spring Framework的一部分,是基于Java实现MVC的轻量级Web框架
- 它对控制器中的功能包装、简化、扩展践行工厂模式,功能架构在工厂之上
1.2、MVC架构
模型:即业务模型,负责完成业务中的数据通信处理,对应项目中的 Service和Dao
视图:渲染数据,生成页面,对应项目中的JSP
控制器:直接对接请求,控制MVC流程,调度模型,选择视图,对应项目中的Servlet
1.3、MVC的优点
MVC是现下软件开发中的最流行的代码结构形态,它不仅提高了代码的复用率和项目的扩展性,而且大大减低了项目的维护成本
人们根据负责的不同逻辑,将项目中的代码分成 M V C 3个层次
层次内部职责单一,层次之间耦合度低
符合低耦合、高内聚的设计理念,也实际有利于项目的长期维护
2、helloSpringMvc
- 新建一个Moudel,添加web的支持!
- 确定导入了SpringMvc的依赖
- 配置web.xml,注册DispatcherServlet
2.1、导入依赖
<dependency>
    <groupId>org.springframework</groupId>
    <artifactId>spring-webmvc</artifactId>
    <version>5.3.8</version>
</dependency>
2.2、配置核心(前端)控制器
作为一个MVC框架,首先要解决的是:如何能够收到请求!
所以MVC框架大都会设计一款前端控制器,选型在Servlet 或 Filter两者之一,在框架最前沿率先工作,接收所有请求
此控制器在接收到请求后,还会负责SpringMvc的核心调度管理工作,所以既是前端又是核心
<?xml version="1.0" encoding="UTF-8"?>
<web-app xmlns="http://xmlns.jcp.org/xml/ns/javaee"
         xmlns:xsi="http://www.w3.org/2001/XMLSchema-instance"
         xsi:schemaLocation="http://xmlns.jcp.org/xml/ns/javaee http://xmlns.jcp.org/xml/ns/javaee/web-app_4_0.xsd"
         version="4.0">
    <!--
	    Spring前端控制器(核心控制器)
	    1、前端,接收所有请求
	    2、启动springmvc的工厂    springmvc-servlet.xml
	    3、springmvc的调度工作
	-->
    <!--1、注册DispatcherServlet-->
    <servlet>
        <servlet-name>springmvc</servlet-name>
        <servlet-class>org.springframework.web.servlet.DispatcherServlet</servlet-class>
        <!--局部参数:声明配置文件位置,关联springmvc的配置文件【servlet-name】springmvc-servlet.xml-->
        <init-param>
            <param-name>contextConfigLocation</param-name>
            <param-value>classpath:springmvc-servlet.xml</param-value>
        </init-param>
        <!--启动级别 数字越小,启动越早-->
        <load-on-startup>1</load-on-startup>
    </servlet>

    <!-- /  匹配所有的请求:(不包括jsp页面)-->
    <!-- /* 匹配所有的请求:(包括jsp页面)-->
    <!--所有请求都会被springmvc拦截-->
    <servlet-mapping>
        <servlet-name>springmvc</servlet-name>
        <url-pattern>/</url-pattern>
    </servlet-mapping>
</web-app>
2.3、SpringMVC配置文件
<?xml version="1.0" encoding="UTF-8"?>
<beans xmlns="http://www.springframework.org/schema/beans"
       xmlns:xsi="http://www.w3.org/2001/XMLSchema-instance"
       xsi:schemaLocation="http://www.springframework.org/schema/beans
                           http://www.springframework.org/schema/beans/spring-beans.xsd">

    <!--SpringMvc核心三要素-->
    <!--处理器映射器-->
    <bean class="org.springframework.web.servlet.handler.BeanNameUrlHandlerMapping"/>
    <!--处理器适配器-->
    <bean class="org.springframework.web.servlet.mvc.SimpleControllerHandlerAdapter"/>

    <!--视图解析器:其他模板引擎 Thymeleaf FreeMarker-->
    <bean id="internalResourceViewResolver" class="org.springframework.web.servlet.view.InternalResourceViewResolver">
        <!--前缀-->
        <property name="prefix" value="/WEB-INF/jsp/"/>
        <!--后缀-->
        <property name="suffix" value=".jsp"/>
    </bean>

    <!--BeanNameUrlHandlerMapping:bean-->
    <bean id="/hello" class="com.zhang.controller.helloController"/>
</beans>
2.4、编写业务Controller
package com.zhang.controller;

import org.springframework.web.servlet.ModelAndView;
import org.springframework.web.servlet.mvc.Controller;

import javax.servlet.http.HttpServletRequest;
import javax.servlet.http.HttpServletResponse;

public class HelloController implements Controller {
    public ModelAndView handleRequest(HttpServletRequest httpServletRequest, HttpServletResponse httpServletResponse) throws Exception {
        //模型和视图  ModelAndView
        ModelAndView mv = new ModelAndView();
        //业务逻辑代码
        String result = "helloSpringMvc";
        //封装对象,放在ModelAndView中! Model
        mv.addObject("msg", result);
        //封装要跳转的视图,放在ModelAndView中!
        mv.setViewName("hello");        //拼接展示给用户的页面    /WEB-INF/jsp/[hello].jsp        []中为拼接的视图名称
        return mv;
    }
}
将自己编写的类交由SpirngIOC容器,注册bean!
<!--HandlerMapping-->      <!--HandlerAdapter-->
<bean id="/hello" class="com.zhang.controller.HelloController"/>
编写要跳转的jsp页面,显示ModelAndView存放的数据,用户看到的页面!
<%@ page contentType="text/html;charset=UTF-8" language="java" %>
<html>
    <head>
        <title>helloSpringMvc</title>
    </head>
    <body>
        ${msg}
    </body>
</html>
注:访问可能会出现404!
- 查看控制台输出,是否缺少jar包
- 如何jar包存在,显示无法输出,在Idea项目发布中,添加lib依赖
缺点:一个控制器只有一个方法,如果多个方法则需定义多个Controller,定义的方式比较繁琐
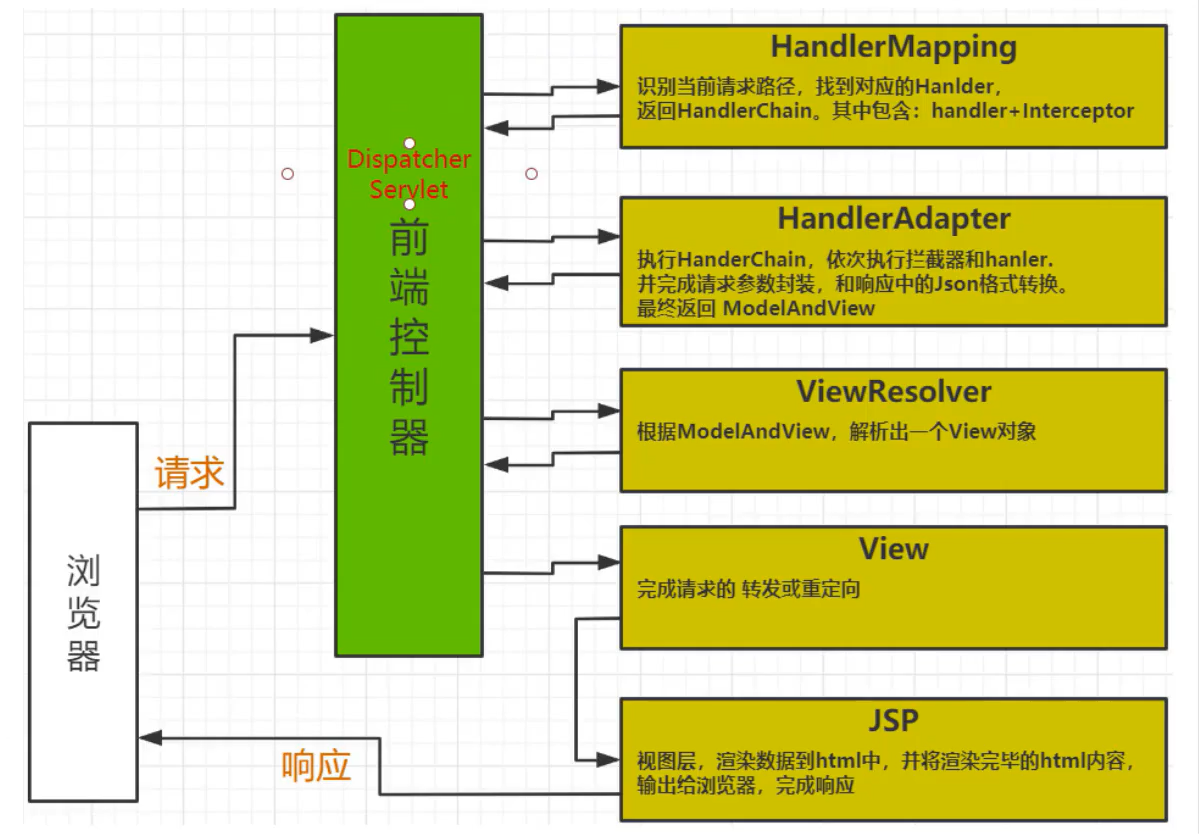
2.5、SpringMVC执行原理

- 客户端(浏览器)发送请求,直接请求到 DispatcherServlet
- DispatcherServlet 根据请求信息调用 HandlerMapping,解析请求对应的 Handler
- 解析到对应的 Handler(也就是我们平常说的 Controller 控制器)后,开始由HandlerAdapter 适配器处理
- HandlerAdapter 会根据 Handler 来调用真正的处理器开处理请求,并处理相应的业务逻辑
- 处理器处理完业务后,会返回一个 ModelAndView 对象,Model 是返回的数据对象,View 是个逻辑上的 View
- ViewResolver 会根据逻辑 View 查找实际的 View
- DispaterServlet 把返回的 Model 传给 View(视图渲染)
- 把 View 返回给请求者(浏览器)
3、注解实现
3.1、配置web.xml
由于Maven可能存在资源过滤问题,添加如下代码即可
<!--在build中配置resources,来防止我们资源导出失败的问题-->
<build>
    <resources>
        <resource>
            <directory>src/main/resources</directory>
            <includes>
                <include>**/*.properties</include>
                <include>**/*.xml</include>
            </includes>
            <filtering>false</filtering>
        </resource>
        <resource>
            <directory>src/main/java</directory>
            <includes>
                <include>**/*.properties</include>
                <include>**/*.xml</include>
            </includes>
            <filtering>false</filtering>
        </resource>
    </resources>
</build>
<?xml version="1.0" encoding="UTF-8"?>
<web-app xmlns="http://xmlns.jcp.org/xml/ns/javaee"
         xmlns:xsi="http://www.w3.org/2001/XMLSchema-instance"
         xsi:schemaLocation="http://xmlns.jcp.org/xml/ns/javaee http://xmlns.jcp.org/xml/ns/javaee/web-app_4_0.xsd"
         version="4.0">
    <!--1.注册DispatcherServlet-->
    <servlet>
        <servlet-name>springmvc</servlet-name>
        <servlet-class>org.springframework.web.servlet.DispatcherServlet</servlet-class>
        <!--局部参数:声明配置文件位置,关联springmvc的配置文件【servlet-name】springmvc-servlet.xml-->
        <init-param>
            <param-name>contextConfigLocation</param-name>
            <param-value>classpath*:springmvc-servlet.xml</param-value>
        </init-param>
        <!--启动级别:1 数字越小,启动越早-->
        <load-on-startup>1</load-on-startup>
    </servlet>

    <!--所有请求都会被springmvc拦截-->
    <servlet-mapping>
        <servlet-name>springmvc</servlet-name>
        <url-pattern>/</url-pattern>
    </servlet-mapping>
</web-app>
注:
- 注意web.xml版本问题,要最新版!
- 注册DispatcherServlet
- 关联SpringMVC配置文件
- 启动级别为1
- 映射路径为 / ,不要用/*,可能会报404
3.2、SpringMVC配置文件
- 让IOC的注解生效
- 静态资源过滤:HTML、CSS、JS、图片……
- MVC的注解驱动
- 配置视图解析器
在resource目录下添加springmvc-servlet.xm|配置文件,配置的形式与Spring容器配置基本类似。为了支持基于注解的IOC,设置了自动扫描包的功能,具体配置信息如下:
<?xml version="1.0" encoding="UTF-8"?>
<beans xmlns="http://www.springframework.org/schema/beans"
       xmlns:xsi="http://www.w3.org/2001/XMLSchema-instance"
       xmlns:context="http://www.springframework.org/schema/context"
       xmlns:mvc="http://www.springframework.org/schema/mvc"
       xsi:schemaLocation="http://www.springframework.org/schema/beans
                           http://www.springframework.org/schema/beans/spring-beans.xsd
                           http://www.springframework.org/schema/context
                           https://www.springframework.org/schema/context/spring-context.xsd
                           http://www.springframework.org/schema/mvc
                           https://www.springframework.org/schema/mvc/spring-mvc.xsd">

    <!--自动扫描包:让指定包下的注解生效,由IOC容器统一管理!-->
    <context:component-scan base-package="com.zhang.controller"/>
    <!--使SpringMVC不处理静态资源  .css .js .mp3-->
    <mvc:default-servlet-handler/>
    <!-- 支持mvc注解驱动
        在spring中一般使用@RequestMapping注解来完成映射关系
        要想使@RequestMapping注解生效
        必须向上下文中注册DefaultAnnotationHandlerMapping
        和一个AnnotationMethodHandlerAdapter实例
        这两个实例分别在类级别和方法级别处理
        而annotation-driven配置会自动帮助我们完成上述两个实例的注入
    -->
    <mvc:annotation-driven/>

    <!--视图解析器-->
    <bean id="internalResourceViewResolver" class="org.springframework.web.servlet.view.InternalResourceViewResolver">
        <!--前缀-->
        <property name="prefix" value="/WEB-INF/jsp/"/>
        <!--后缀-->
        <property name="suffix" value=".jsp"/>
    </bean>
</beans>
我们之所以把所有视图放在/WEB-INF/目录下,是因为这样可以保证视图安全,这个目录下的文件,客户端不能直接访问!
3.3、编写业务Controller
package com.zhang.controller;

import org.springframework.stereotype.Controller;
import org.springframework.ui.Model;
import org.springframework.web.bind.annotation.RequestMapping;

@Controller
@RequestMapping("/HelloController")		//用于映射url到控制器类或一个特定的处理程序方法
public class HelloController {
    //真实访问地址:项目名/HelloController/hello
    @RequestMapping("/hello")
    public String hello(Model model) {
        //封装数据,向模型添加属性msg与值,可以在JSP页面取出并渲染
        model.addAttribute("msg", "Hello,SpringMVCAnnotation!");
        return "hello";     //会被视图解析器处理,返回视图   /WEB-INF/jsp/hello.jsp
    }
}
- @Controller是为了让Spring IOC容器初始化时自动扫描到
- @RequestMapping是为了映射请求路径,这里因为类与方法上都有映射所以访问时应该是/HelloController/hello
- 方法中声明的Model类型的参数是为了把Action中的数据带到视图中
- 方法返回的结果是视图的名称hello,加上配置文件中的前后缀变成/WEB-INF/jsp/hello.jsp
3.3.1、创建视图层
在WEB-INF/jsp目录中创建hello.jsp,视图可以直接取出并展示从Controller带回的信息,可以通过EL表达式取出Model中存放的值、或者对象
<%@ page contentType="text/html;charset=UTF-8" language="java" %>
<html>
    <head>
        <title>SpringMVC</title>
    </head>
    <body>
        ${msg}
    </body>
</html>
小结:
使用springMVC必须配置的三大件:
处理器映射器、处理器适配器、视图解析器
通常,我们只需要手动配置视图解析器,而处理器映射器和处理器适配器只需要开启注解驱动就ok了,从而省去了部分xml配置
4、接收请求参数
通过控制器中方法的形参接收请求参数
4.1、基本类型参数
请求参数和方法的形参 同名即可
SpringMVC默认可以识别的日期字符串格式为:YYYY/MM/dd HH:mmm:ss
通过@DateTimeFormat可以修改默认日期格式
//id name gender birthday
//http://localhost:8080/param/test1?id=1&name=xiaozhang&gender=true&birthday=2020-06-06 13:13:20
//@RequestParam 	//如果请求参数和属性名不一致,可使用@RequestParam进行参数匹配
@RequestMapping("/test1")
public String testParam1(Integer id, @RequestParam("username") String name, Boolean gender, @DateTimeFormat(pattern = "yyyy-MM-dd HH:mm:ss") Date birthday) {
    System.out.println("test1");
    System.out.println("id:" + id + " name:" + name + " gender:" + gender + " birthday:" + birthday);       //打印请求参数
    return "hello";     //跳转视图
}
4.2、实体收参(建议)
请求的参数和实体的属性同名即可
package com.zhang.pojo;

import java.util.Date;

public class User {
    private Integer id;
    private String name;
    private Boolean gender;
    private Date birthday;

    //toString
    //get/set..
}
//http://localhost:8080/param/test2?id=1&name=xiaozhang&gender=true&birthday=2020/06/06 13:13:20
@RequestMapping("/test2")
public String testParam2(User user) {
    System.out.println("test2");
    System.out.println(user);
    return "hello";
}
4.3、数组收参
package com.zhang.pojo;

import java.util.Arrays;
import java.util.Date;

public class User {
    private Integer id;
    private String name;
    private Boolean gender;
    private Date birthday;
    private String[] hobby;

    //toString
    //get/set...
}
//http://localhost:8080/param/test3?id=2&name=xiaozhao&gender=true&birthday=2002/2/5 12:13:20&hobby=basketball&hobby=playGame
@RequestMapping("/test3")
//public String testParam3(String[] hobby){
public String testParam3(User user) {
    System.out.println("test3");
    System.out.println(user);
    return "hello";
}
4.4、集合收参(了解)
package com.zhang.pojo;

import java.util.List;

public class UserList {
    private List<User> users;
	//toString
    //get/set...
}
//http://localhost:8080/param/test4?users[0].id=1&users[0].name=liming&users[0].gender=true&users[1].id=2&users[1].name=xiaoZhao&users[1].gender=false
@RequestMapping("/test4")
public String testParam4(UserList userList) {
    System.out.println("test4");
    for (User user : userList.getUsers()) {
        System.out.println(user);
    }
    return "hello";
}
4.5、路径参数
//{id}定义名为id的路径;    【/test5/{id}】的匹配能力和【/test5/*】等价
//http://localhost:8080/param/test5/66  {id}匹配值为66
//http://localhost:8080/param/test5/100  {id}匹配值为100
@RequestMapping("/test5/{id}")
public String testParam5(@PathVariable("id") Integer id) {
    System.out.println("test5");
    System.out.println("id:" + id);
    return "hello";
}

//http://localhost:8080/param/test6/66/aoe  {id}匹配值为66,{name}匹配值为aoe
//http://localhost:8080/param/test6/100/adc  {id}匹配值为100,{name}匹配值为adc
@RequestMapping("/test6/{id}/{name}")
public String testParam6(@PathVariable Integer id, @PathVariable("name") String names) {      //传递的参数和形参相同可以省略其注解值,反之需要添加注解与值匹配
    System.out.println("test6");
    System.out.println("id:" + id + " name:" + names);
    return "hello";
}
4.6、modelMap
@GetMapping("/t3")
public String test3(ModelMap mp, @RequestParam("username") String name) {
    //1.接收前端参数
    System.out.println("接收前端参数为:" + name);
    //2.将返回结果发送给前端  Model
    mp.addAttribute("msg", name);
    return "hello";
}
- Model 只有几个方法只适合用于储存数据,更容易理解;
- ModelMap 继承了LinkedMap ,除了实现了自身的一些方法,同样还有继承LinkedMap的独有方法和特性;
- ModelAndView可以在储存数据的同时,可以进行设置返回的逻辑视图,进行控制展示层的跳转。
4.7、中文乱码
首先,页面中字符集统一
JSP:<%@ page contentType="text/html;charset=UTF-8" language="java" %>
HTML:<meta charset="UTF-8">
其次,tomcat中字符集设置,对get请求中,中文参数乱码有效
Tomcat配置:
<Connector port="8080" protocol="HTTP/1.1"
           connectionTimeout="20000"
           redirectPort="8443"
           URLEncoding="utf-8"/>
最后,设置springMvc给我们提供的filter,对post请求中,中文参数乱码有效
<!--此过滤器会进行:request.setCharacterEncoding("utf-8")-->
<filter>
    <filter-name>filter-encoding</filter-name>
    <filter-class>org.springframework.web.filter.CharacterEncodingFilter</filter-class>
    <init-param>
        <param-name>encoding</param-name>
        <param-value>utf-8</param-value>
    </init-param>
</filter>
<filter-mapping>
    <filter-name>filter-encoding</filter-name>
    <url-pattern>/*</url-pattern>
</filter-mapping>
5、跳转
5.1、ModelAndView
设置ModelAndView对象,根据view的名称,和视图解析器跳到指定的页面
页面:{视图解析器前缀} + viewName + {视图解析器后缀}
<!--视图解析器-->
<bean id="internalResourceViewResolver" class="org.springframework.web.servlet.view.InternalResourceViewResolver">
    <!--前缀-->
    <property name="prefix" value="/WEB-INF/jsp/"/>
    <!--后缀-->
    <property name="suffix" value=".jsp"/>
</bean>
跳转关键字 forward redirect
5.2、转发
@RequestMapping("/forward1")
public String testForward1(Model model) {
    model.addAttribute("msg", "testForward1");
    return "hello";     //转发
    //return "forward:/WEB-INF/jsp/hello.jsp";
}

@RequestMapping("/forward2")
public String testForward2(Model model) {
    System.out.println("testForward2");
    //return "forward:/jump/forward1";     //方法之间转发
    return "forward:forward1";      //相对路径
}
5.3、重定向
@RequestMapping("/redirect1")
public String testRedirect1(Model model) {
    System.out.println("testRedirect1");
    return "redirect:/WEB-INF/jsp/hello.jsp";      //重定向hello.jsp
}

@RequestMapping("/redirect2")
public String testRedirect2(Model model) {
    System.out.println("testRedirect2");
    return "redirect:redirect1";      //本类跳转 相对路径
    //return "redirect:/jump/redirect1";      //跨类跳转 绝对路径
}
5.4、跳转细节
在增、删、改之后,为了防止请求重复提交,重定向跳转
在查询之后,可以做转发跳转
6、传值
C得到数据后,跳转到V,并向V传递数据。进而V中可以渲染数据,让用户看到含有数据的页面!
转发跳转: Request作用域
重定向跳转:Session作用域
6.1、Request和Session
//形参中,可获得request和session对象
@RequestMapping("/test1")
public String test1(HttpServletRequest req, HttpSession session) {
    System.out.println("test1");
    req.setAttribute("name", "小赵");
    session.setAttribute("age", "20");
    return "data";
}
<!--jsp使用EL表达式取值即可-->
姓名:${requestScope.name}
<hr/>
年龄:${sessionScope.age}
6.2、Model
//model中的数据,会在v视图渲染之前,将数据复制一份给request
@RequestMapping("/test2")
public String test2(Model model) {
    model.addAttribute("gender", true);
    return "data";
}
<!--jsp使用EL表达式取值即可-->
性别:${requestScope.gender}
6.3、ModelAndView
//ModelAndView可以集中管理,跳转和数据
@RequestMapping("/test4")
public ModelAndView test4() {           //返回值类型为ModelAndView
    //创建ModelAndView对象
    ModelAndView mv = new ModelAndView();
    mv.addObject("phone", "15569998215");       //封装数据
    mv.setViewName("hello");     //设置跳转视图名称
    return mv;
}
<!--jsp使用EL表达式取值即可-->
电话:${requestScope.phone}
6.4、@SessionAttributes
@SessionAttributes(value = {“city”, “street”}) model中的city和street会存入到session中
SessionStatus移除session
@RequestMapping("/test2")
public String test2(Model model) {
    model.addAttribute("city", "北京");   //存入session
    model.addAttribute("street", "长安街");    存入session
    return "data";
}

@RequestMapping("/test3")
public String test3(SessionStatus status) {
    status.setComplete();       //清除所有通过SessionAttributes存入session值
    return "data";
}
7、JSON处理
7.1、什么是JSON?
- JSON(JavaScript Object Notation, JS对象标记)是一种轻量级的数据交换格式,目前使用非常广泛
- 采用完全独立于编程语言的文本格式来存储和表示数据。
- 简洁和清晰的层次结构使得JSON成为理想的数据交换语言。
- 易于人阅读和编写,同时也易于计算机解析和生成,并有效地提升网络传输效率。
在JavaScript语言中,一切都是对象。因此,任何JavaScript 支持的类型都可以通过JSON来表示,例如字符串、数字、对象、数组等。看看他的要求和语法格式:
- 对象表示为键值对,数据由逗号分隔
- 花括号保存对象
- 方括号保存数组
JSON键值对是用来保存JavaScript对象的一种方式,和JavaScript对象的写法也大同小异,键/值对组合中的键名写在前面并用双引号" "包裹,使用冒号:分隔,然后紧接着值
{"name":"xiaozhang"}
{"age":"19"}
{"gender":"male"}
<script>
    let obj ={};	//JS对象
    let obj1={width:100,height:200}	//JS对象
    let obj2={'width':100,'height':100}	//JS对象
    {name: '小张', age: 19, gender: 'male'}	//JS对象
    let json={"name":"小张","age":19,"gender":"male"}	//json字符串
    let arrJson[{"id":1,"name":"小张","age":19},{"id":2,"name":"小林","age":20},{"id":3,"name":"小鹿","age":18}]		//数组json字符串
</script>
7.2、JSON和JavaScript对象互转
要实现从JSON字符串转换为JavaScript对象,使用JSON.parse()方法
<script>
    let obj = JSON.parse("name":"小张","age":19,"gender":"male");
    //解析结果为:name: '小张', age: 19, gender: 'male'}
</script>
要实现从JavaScript对象转换为JSON字符串,使用JSON.stringify()方法:
<script>
    let obj = JSON.stringify(name: '小张', age: 19, gender: 'male');
    //解析结果为:"name":"小张","age":19,"gender":"male"
</script>
7.3、导入依赖
SpringMVC默认的Json解决方案选择是Jackson,所以只需要导入jackson的jar,即可使用
<!--Jackson-->
<dependency>
    <groupId>com.fasterxml.jackson.core</groupId>
    <artifactId>jackson-databind</artifactId>
    <version>2.12.4</version>
</dependency>
7.4、使用@ResponseBody
@Controller
@RequestMapping("/json")
public class JsonController {
    @RequestMapping("/test1")
    @ResponseBody       //将handler的返回值,转换为json(jackson),并将json响应到服务器
    public User json1() {
        System.out.println("test1");
        User user = new User(1, "小张", 19);      //创建一个对象
        return user;
    }


    @RequestMapping("/test2")
    public @ResponseBody
        List<User> json2() {       //@ResponseBody还可以用在Handler的返回值上
        System.out.println("test2");
        User u1 = new User(1, "小张", 19);
        User u2 = new User(2, "小林", 20);
        User u3 = new User(3, "小鹿", 18);
        List<User> users = Arrays.asList(u1, u2, u3);
        return users;
    }


    //如果返回值已经是字符串,则不需要转json,直接将字符串响应给客户端
    @RequestMapping(value = "/test4", produces = "text/html;charset=utf-8")     //produces  防止中文乱码!
    @ResponseBody
    public String json4() {
        System.out.println("test4");
        return "你好!";
    }
}
produces这种防止中文乱码的方式比较麻烦,如果项目中有很多请求则每个请求都要添加,在这里可以通过Spring配置统一指定,这样就不用每次都去处理了!
可以在springmvc配置文件上添加一段消息StringHttpMessageConverter转换配置!
<!-- 处理请求返回json字符串的乱码问题 -->
<mvc:annotation-driven>
    <mvc:message-converters register-defaults="true">
        <!-- 启动Spring MVC的注解功能,完成请求和注解POJO的映射 注解请求映射
            默认是ISO-88859-1,避免乱码这里设置为UTF-8 -->
        <bean class="org.springframework.http.converter.StringHttpMessageConverter">
            <property name="supportedMediaTypes" value="text/html;charset=UTF-8" />
        </bean>
        <!-- 启动JSON格式的配置,自动将格式转换成JSON格式,不需要其他类 -->
        <bean id="jacksonMessageConverter" class="org.springframework.http.converter.json.MappingJackson2HttpMessageConverter">
            <property name="supportedMediaTypes" value="application/json;charset=UTF-8" />
        </bean>
    </mvc:message-converters>
</mvc:annotation-driven>
7.5、使用@RestController
Controller类加上@RestControlle,等价于在类中的每个方法上都加了@ResponseBody
//@Controller
@RequestMapping("/json")
public class JsonController {
    @RequestMapping("/test1")
    public User json1() {
        System.out.println("test1");
        User user = new User(1, "小张", 19);      //创建一个对象
        return user;
    }


    @RequestMapping("/test2")
    public List<User> json2() {
        System.out.println("test2");
        User u1 = new User(1, "小张", 19);
        User u2 = new User(2, "小林", 20);
        User u3 = new User(3, "小鹿", 18);
        List<User> users = Arrays.asList(u1, u2, u3);
        return users;
    }
}
7.6、使用@RequestBody
使用@ResponseBody,接收Json参数
7.6.1、定义Handler
package com.zhang.pojo;

import lombok.AllArgsConstructor;
import lombok.Data;
import lombok.NoArgsConstructor;
import lombok.ToString;

//需要导入lombok依赖
@Data
@AllArgsConstructor
@NoArgsConstructor
@ToString
public class User {
    private Integer id;
    private String name;
    private Integer age;
}


@RequestMapping("/users")
public String addUser(@RequestBody User user) {     //@RequestBody将请求体中的Json数据转换为java对象
    System.out.println("Post user:" + user);
    return "ok";
}
7.6.2、使用Ajax发送json
<script>
    function send_json() {
    //ajax,json
    let user = {id: 2, name: '小鹿', age: 19};
    let userJson = JSON.stringify(user);
    $.ajax({
        url: "${pageContext.request.contextPath}/json/users",
        type: "post",
        data: userJson,
        contentType: "application/json",
        success: function (ret) {
            alert(ret)
        }
    })
}
</script>
7.7、JackSon常用注解
7.7.1、日期格式化
@JsonFormat(pattern = “yyyy-MM-dd HH:mm:ss”, timezone = “GMT+8”)
public class User {
    private Integer id;
    private String name;
    @JsonFormat(pattern = "yyyy-MM-dd HH:mm:ss", timezone = "GMT+8")
    private Date birthday;
    //get/set
}
7.7.2、属性名修改
@JsonProperty(“uId”)
public class User {
    @JsonProperty("uId")        //不在使用原属性名,而是使用"uId"
    private Integer id;
    @JsonInclude(JsonInclude.Include.NON_NULL)      //若name=="null",忽略此属性
    private String name;
    //get/set
}
//输出的json:{"hobby":["football","basketball"],"uId":1}
7.7.3、属性名忽略
@JsonIgnore
public class User {
    private Integer id;
    private String name;
    @JsonFormat(pattern = "yyyy-MM-dd HH:mm:ss", timezone = "GMT+8")
    private Date birthday;
    @JsonIgnore
    private Integer age;		//生成json时,忽略此属性
    //get/set
}
7.7.4、null和empty属性排除
Jackson默认会输出null值的属性,如果不需要,可以排除
@JsonInclude(JsonInclude.Include.NON_NULL) //null值,属性不输出
@JsonInclude(JsonInclude.Include.NON_EMPTY) //emtpy属性不输出,(空串、长度为0的数组、集合,null值)
public class User {
    private Integer id;
    @JsonInclude(JsonInclude.Include.NON_NULL)      //若name=="null",忽略此属性
    private String name;
    @JsonFormat(pattern = "yyyy-MM-dd HH:mm:ss", timezone = "GMT+8")
    private Date birthday;
    @JsonIgnore
    private Integer age;
    @JsonInclude(JsonInclude.Include.NON_EMPTY)     //若hobby长度为0或者=="null",忽略此属性
    private String[] hobby;
    //get/set
}
7.7.5、自定义序列化
@JsonSerialize(using = MySerializer.class) //在输出此属性时,使用MySerializer定义的格式输出
public class User {
    private String[] hobby;

    @JsonSerialize(using = MySerializer.class)      //在输出此属性时,使用MySerializer定义的格式输出
    private Double salary = 10000.186;
    //get/set
}

//输出json格式:"hobby":["football","basketball"],"salary":10000.19,
编写MySerializer类
public class MySerializer extends JsonSerializer<Double> {
    //value就是Double salary的值
    public void serialize(Double value, JsonGenerator gen, SerializerProvider serializers) throws IOException {
        //将Double salary的值四舍五入
        String number = BigDecimal.valueOf(value).setScale(2, BigDecimal.ROUND_HALF_UP).toString();
        //输出  四舍五入后的值
        gen.writeNumber(number);
    }
}
8、FastJson
8.1、导入依赖
<!--FastJson-->
<dependency>
    <groupId>com.alibaba</groupId>
    <artifactId>fastjson</artifactId>
    <version>1.2.76</version>
</dependency>
如果不想使用Jackson,也可以安装其他的Json处理方案:FastJson
fastjson.jar是阿里开发的一款专门用于Java开发的包,可以方便的实现json对象与JavaBean对象的转换
8.2、安装FastJson
<mvc:annotation-driven>
    <!--安装FastJson,转换器-->
    <mvc:message-converters>
        <bean class="com.alibaba.fastjson.support.spring.FastJsonHttpMessageConverter">
            <!--声明转换类型:json-->
            <property name="supportedMediaTypes">
                <list>
                    <value>application/json;charset=UTF-8</value>
                </list>
            </property>
        </bean>
    </mvc:message-converters>
</mvc:annotation-driven>
@ResponseBody、@RequestBody@、@RestController使用方法不变
8.3、常用注解
日期格式化:@JSONField(format = “yyyy/MM/dd HH:mm:ss”)
属性名修改:@JSONField(name = “username”, serialzeFeatures = SerializerFeature.WriteNullStringAsEmpty)
忽略属性:@JSONField(serialize = false)
包含null值:
- @JSONField(name = “username”, serialzeFeatures = SerializerFeature.WriteNullStringAsEmpty) null的字符会输出" "
- @JSONField(name = “username”, serialzeFeatures = SerializerFeature.WriteNullStringAsEmpty) 默认会忽略所有null值,有此注解会输出null
自定义序列化:@JSONField(serializeUsing = MySerializerTwo.class)
public class Person implements Serializable {
    @JSONField(serialize = false)
    private Integer id;
    @JSONField(name = "username", serialzeFeatures = SerializerFeature.WriteNullStringAsEmpty)
    private String name;
    @JSONField(format = "yyyy/MM/dd HH:mm:ss")
    private Date birthday;
    @JSONField(serialzeFeatures = SerializerFeature.WriteMapNullValue)
    private String city;

    @JSONField(serializeUsing = MySerializerTwo.class)
    private Double salary = 6500.00;
}
9、拦截器
作用:抽取handler中的冗余功能,
9.1、定义拦截器
SpringMVC中的拦截器有三个抽象方法:
- preHandle:控制器方法执行之前执行preHandle(),其boolean类型的返回值表示是否拦截或放行,返回true为放行,即调用控制器方法;返回false表示拦截,即不调用控制器方法
- postHandle:控制器方法执行之后执行postHandle()
- afterComplation:处理完视图和模型数据,渲染视图完毕之后执行afterComplation()
执行顺序:preHandle—>postHandle—>afterCompletion
package com.zhang.interceptor;

import org.springframework.web.servlet.HandlerInterceptor;
import org.springframework.web.servlet.ModelAndView;

import javax.servlet.http.HttpServletRequest;
import javax.servlet.http.HttpServletResponse;
import javax.servlet.http.HttpSession;

/**
 * @author Mr Zhang
 * @create:2021-08-03 8:58
 */
public class MyInterceptor implements HandlerInterceptor {
    //主要逻辑:在Handler之前执行,抽取handler中冗余的代码
    @Override
    public boolean preHandle(HttpServletRequest request, HttpServletResponse response, Object handler) throws Exception {
        //判断登录状态
        HttpSession session = request.getSession();
        if (session.getAttribute("state") != null) {
            return true;        //放行,后续的拦截器或handler将执行
        }
        //中断请求之前,响应请求
        response.sendRedirect("/login.jsp");
        return false;   //中断这个请求,不在执行后续的Handler
    }

    //在Handler之后执行,响应之前执行
    @Override
    public void postHandle(HttpServletRequest request, HttpServletResponse response, Object handler, ModelAndView modelAndView) throws Exception {
        System.out.println("post Handle!");
    }

    //在视图渲染完毕执行,执行:资源回收
    @Override
    public void afterCompletion(HttpServletRequest request, HttpServletResponse response, Object handler, Exception ex) throws Exception {
        System.out.println("after Completion!");
    }
}
9.2、配置拦截路径
<!--拦截器:在mvc配置文件中配置-->
<mvc:interceptors>
    <mvc:interceptor>
        <!--<mvc:mapping path="/inter/t1"/>
            <mvc:mapping path="/inter/t2"/>-->
        <mvc:mapping path="/inter/t*"/>     <!--t开头-->
        <mvc:mapping path="/inter/**"/>     <!--任意多级路径-->
        <mvc:exclude-mapping path="/inter/login"/>      <!--排除(不拦截此路径)-->
        <bean class="com.zhang.interceptor.MyInterceptor"/>     <!---拦截器类-->
    </mvc:interceptor>
</mvc:interceptors>
- 拦截器是springMvc特有的,只有使用了springMvc框架的项目才能使用
- 拦截器之后拦截访问的控制器方法,如果访问的是jsp、html、js、image是不会进行拦截的
- 过滤器和拦截器的区别:拦截器是AOP思想的具体应用
10、文件上传
10.1、导入依赖
<!--commons io-->
<dependency>
    <groupId>commons-io</groupId>
    <artifactId>commons-io</artifactId>
    <version>2.4</version>
</dependency>
<!--commons fileUpload-->
<dependency>
    <groupId>commons-fileupload</groupId>
    <artifactId>commons-fileupload</artifactId>
    <version>1.4</version>
    <!--防止出现不同jar包,排除-->
    <exclusions>
        <exclusion>
            <groupId>javax.servlet</groupId>
            <artifactId>servlet-api</artifactId>
        </exclusion>
    </exclusions>
</dependency>
10.2、编写前端表单页面
<%@ page contentType="text/html;charset=UTF-8" language="java" %>
<html>
    <head>
        <title>fileUpload</title>
    </head>
    <body>
        <form action="${pageContext.request.contextPath}/file/upload" enctype="multipart/form-data" method="post">
            file:<input type="file" name="source">
            <input type="submit" value="upload">
        </form>
    </body>
</html>
10.3、文件上传解析器
<!--文件上传解析器配置-->
<!--id必须是:multipartResolver,否则找不到!-->
<bean id="multipartResolver" class="org.springframework.web.multipart.commons.CommonsMultipartResolver">
    <!--请求的编码格式:必须和jsp的pageEncoding属性一致!以便正确的读取表单的数据,默认为ISO8859-1-->
    <property name="defaultEncoding" value="utf-8"/>
    <!--上传文件大小上限,单位为字节(10485760=10M),超出会抛出MaxUploadSizeExceededException,可以使用异常解析器捕获!-->
    <property name="maxUploadSize" value="10485760"/>
    <property name="maxInMemorySize" value="40960"/>
</bean>
10.4、Handler
package com.zhang.controller;

import org.apache.commons.io.FilenameUtils;
import org.springframework.stereotype.Controller;
import org.springframework.web.bind.annotation.RequestMapping;
import org.springframework.web.multipart.MultipartFile;

import javax.servlet.http.HttpServletRequest;
import java.io.File;
import java.io.IOException;
import java.util.UUID;

@Controller
@RequestMapping("/file")
public class UploadController {
    @RequestMapping("/upload")
    public String FileUpload(MultipartFile source, HttpServletRequest request) throws IOException {
        System.out.println("FileUpload执行了!");
        //获取上传的原始文件名称
        String fileName = source.getOriginalFilename();
        //生成唯一文件名
        String uniqueFileName = UUID.randomUUID().toString();
        //获取文件后缀  扩展名    commons.io包下
        String ext = FilenameUtils.getExtension(fileName);      //png  jpg  js  js java class
        System.out.println("文件后缀名:" + ext);
        String uniqueFileNameEntirely = uniqueFileName + "." + ext;     //xxx.xxx
        //获取上传的文件类型
        String contentType = source.getContentType();
        System.out.println("文件名称:" + fileName);
        System.out.println("文件类型:" + contentType);

        //保存文件
        //获得upload_file的磁盘路径==> 需要在webapp目录下创建一个目录 ”upload_file夹", (且此目录初始不要为空,否则编译时被忽略)
        String realPath = request.getServletContext().getRealPath("/upload");
        System.out.println("上传文件保存地址:" + realPath);
        source.transferTo(new File(realPath, uniqueFileNameEntirely));
        return "file";
    }

    @RequestMapping("/uploadError")
    public String skip() {
        //跳转到文件上传失败页面
        return "uploadError";
    }
}
10.5、处理文件大小上限问题
10.5.1、编写异常拦截器
package com.zhang.interceptor;

import org.apache.commons.fileupload.servlet.ServletRequestContext;
import org.springframework.web.servlet.HandlerInterceptor;

import javax.servlet.http.HttpServletRequest;
import javax.servlet.http.HttpServletResponse;

/**
 * @author Mr Zhang
 * @create:2021-08-09 18:38
 */
public class MyFileUploadInterceptor implements HandlerInterceptor {
    private Long maxFileUploadSize;

    public Long getMaxFileUploadSize() {
        return maxFileUploadSize;
    }

    public void setMaxFileUploadSize(Long maxFileUploadSize) {
        this.maxFileUploadSize = maxFileUploadSize;
    }

    @Override
    public boolean preHandle(HttpServletRequest request, HttpServletResponse response, Object handler) throws Exception {
        //判断上传文件大小     1048576(1M)
        ServletRequestContext servletRequestContext = new ServletRequestContext(request);
        //当前请求上传的文件大小  字节(byte)
        long FileSize = servletRequestContext.contentLength();
        if (FileSize > maxFileUploadSize) {
            response.sendRedirect("/file/uploadError");
            return false;
            //throw new MaxUploadSizeExceededException(maxFileUploadSize);
        }
        return true;        //放行
    }
}
10.5.2、在mvc配置文件中配置
<!--拦截器配置-->
<mvc:interceptors>
    <mvc:interceptor>
        <mvc:mapping path="/file/upload"/>
        <bean class="com.zhang.interceptor.MyFileUploadInterceptor">
            <!--ioc属性注入值-->
            <property name="maxFileUploadSize" value="1048576"/>
        </bean>
    </mvc:interceptor>
</mvc:interceptors>
11、文件下载
11.1、定义超链接
<a class="beauty" href="${pageContext.request.contextPath}/file/download?name=jquery-3.5.1.js">Download</a>
11.2、Handler
package com.zhang.controller;

import org.apache.commons.io.IOUtils;
import org.springframework.stereotype.Controller;
import org.springframework.web.bind.annotation.RequestMapping;

import javax.servlet.http.HttpServletRequest;
import javax.servlet.http.HttpServletResponse;
import java.io.FileInputStream;
import java.io.IOException;

@Controller
@RequestMapping("/file")
public class DownloadController {
    @RequestMapping("/download")
    public void downloadFile(String name, HttpServletRequest request, HttpServletResponse response) throws IOException {
        //获取要下载文件绝对路径(文件夹)
        String realPath = request.getServletContext().getRealPath("/upload");
        //文件下载完整路径(文件夹下的文件名称)
        String filePath = realPath + "\\" + name;
        System.out.println("realPath:" + realPath);
        System.out.println("filePath:" + filePath);
        //设置响应头,告知浏览器,要以附件的形式保存内容,  filename=浏览器显示的下载文件名
        response.setHeader("content-disposition", "attachment;filename=" + name);
        //读取目标文件,响应给客户端   commons.io包下提供
        IOUtils.copy(new FileInputStream(filePath), response.getOutputStream());
        //上一步,已经是响应了,所以此Handler直接是void
    }
}
12、验证码
作用:屏障,防止暴力破解
12.1、导入依赖
<!--Kaptcha-->
<dependency>
    <groupId>com.github.penggle</groupId>
    <artifactId>kaptcha</artifactId>
    <version>2.3.2</version>
</dependency>
12.2、声明验证码组件
<!--验证码servlet-->
<servlet>
    <servlet-name>cap</servlet-name>
    <servlet-class>com.google.code.kaptcha.servlet.KaptchaServlet</servlet-class>
    <init-param>
        <!--验证码图片是否需要边框-->
        <param-name>kaptcha.border</param-name>
        <param-value>no</param-value>
    </init-param>
    <init-param>
        <!--验证码字符需要几位-->
        <param-name>kaptcha.textproducer.char.length</param-name>
        <param-value>4</param-value>
    </init-param>
    <init-param>
        <!--生成验证码字符的可能性-->
        <param-name>kaptcha.textproducer.char.string</param-name>
        <param-value>abcdefghijkmnopqrstuvwxyzABCDEFGHIJKMNOPQRSTUVWXYZ0123456789</param-value>
    </init-param>
    <init-param>
        <!--验证码底部颜色-->
        <param-name>kaptcha.background.clear.to</param-name>
        <param-value>211,229,237</param-value>
    </init-param>
    <init-param>
        <!--将验证码存放到session中  session.setAttribute("captcha","验证码")-->
        <param-name>kaptcha.session.key</param-name>
        <param-value>captcha</param-value>
    </init-param>
</servlet>
<servlet-mapping>
    <servlet-name>cap</servlet-name>
    <url-pattern>/captcha</url-pattern>
</servlet-mapping>
12.3、Page(jsp页面)
<%@ page contentType="text/html;charset=UTF-8" language="java" %>
<html>
    <head>
        <title>captcha</title>
    </head>
    <body>
        <form action="${pageContext.request.contextPath}/send/captcha" method="post">
            <img id="cap" src="${pageContext.request.contextPath}/captcha" style="width: 100px;"/>
            <a href="" οnclick="refresh()">看不清,换一张</a>
            <p>验证码:<input type="text" name="captcha"></p>
            <p><input type="submit"></p>
        </form>

        <script>
            function refresh() {
                let img = document.getElementById("cap");
                img.src = "${pageContext.request.contextPath}/captcha?" + new Date().getTime();     //赋值(刷新验证码)
            }
        </script>
    </body>
</html>
12.4、Handler
package com.zhang.controller;

import org.springframework.stereotype.Controller;
import org.springframework.web.bind.annotation.RequestMapping;

import javax.servlet.http.HttpSession;

@Controller
@RequestMapping("/send")
public class CaptchaController {
    @RequestMapping("/captcha")
    public String getCaptcha(String captcha, HttpSession session) {
        //对比
        String realCap = (String) session.getAttribute("captcha");
        if (realCap.equalsIgnoreCase(captcha)) {
            return "success";
        }
        return "error";
    }
}
13、Rest设计
13.1、开发风格
是一种开发风格,遵从此风格开发软件,符合REST风格,则为Restful
两个核心要求:
- 每个资源都有统一的标识符(URL)
- 不同的行为,使用对应的http-method
| 操作 | 传统方式 | REST风格 |
|---|---|---|
| 查询操作 | getUserById?id=1 | user/1–>get请求方式 |
| 保存操作 | saveUser | user–>post请求方式 |
| 删除操作 | deleteUser?id=1 | user/1–>delete请求方式 |
| 更新操作 | updateUser | user–>put请求方式 |
13.2、优点
- 轻量,直接基于http,不再需要任何别的诸如消息协议。get/post/put/delete为CRUD操作
- 面向资源,一目了然,具有自解释性。
- 看URL就知道要什么,看http-method就知道要做什么
13.3、使用
13.3.1、定义Rest风格的Controller
@GetMapper(“/users”)
等价与
@RequestMapper(value=“/users”,method=RequestMethod.GET)
@RestController
public class MyRestController {
    //查询所有用户
    @GetMapping("/users")
    public List<User> queryUsers() {
        System.out.println("query Users with get");
        User u1 = new User(1, "小林", 22);
        User u2 = new User(2, "小梦", 20);
        return Arrays.asList(u1, u2);
    }

    //根据id查询用户
    @GetMapping("/users/{id}")
    public User queryById(@PathVariable Integer id) {       //@PathVariable注解,让方法参数的值对应绑定到一个URL模板变量上
        System.out.println("query one user with get:" + id);
        return new User(1, "小林", 22);
    }

    //根据id删除一个用户
    @DeleteMapping("/users/{id}")
    public String deleteUserById(@PathVariable Integer id) {
        System.out.println("delete one user with delete:" + id);
        return "ok";
    }

    //添加一个用户
    @PostMapping("/users")
    public String addUser(@RequestBody User user) {
        System.out.println("add user with post:" + user);
        return "ok";
    }

    //修改(更新)一个用户
    @PutMapping("/users")
    public String updateUser(@RequestBody User user) {
        System.out.println("update one user with put:" + user);
        return "ok";
    }
}
13.3.2、Ajax请求
<input type="button" value="queryAll" οnclick="queryAll();">
<input type="button" value="queryOneUser" οnclick="queryOneUser();">
<input type="button" value="addUser" οnclick="addUser();">
<input type="button" value="updateUser" οnclick="updateUser();">
<input type="button" value="deleteUser" οnclick="deleteUser();">

<script type="text/javascript">
    function queryAll() {
        $.ajax({
            url: "${pageContext.request.contextPath}/users",
            type: "get",
            success: function (ret) {
                console.log("查询所有用户:");
                console.log(ret);
            }
        });
    }

    function queryOneUser() {
        $.ajax({
            url: "${pageContext.request.contextPath}/users/100",
            type: "get",
            success: function (ret) {
                console.log("查询单个用户:" + ret);
                console.log(ret);
            }
        });
    }

    function addUser() {
        let user = {name: "晓明", age: 20};
        $.ajax({
            url: "${pageContext.request.contextPath}/users",        //请求地址
            data: JSON.stringify(user),     //参数(转换为json格式)
            contentType: "application/json",        //参数类型
            type: "post",
            success: function (ret) {
                console.log("添加一个用户:");
                console.log(ret);
            }
        });
    }

    function updateUser() {
        let user = {id: 1, name: "小友", age: 25};
        $.ajax({
            url: "${pageContext.request.contextPath}/users",        //请求地址
            data: JSON.stringify(user),     //参数
            contentType: "application/json",        //参数类型
            type: "put",
            success: function (ret) {
                console.log("修改一个用户:");
                console.log(ret);
            }
        });
    }

    function deleteUser() {
        $.ajax({
            url: "${pageContext.request.contextPath}/users/200",        //请求地址
            type: "delete",
            success: function (ret) {
                console.log("删除用户:");
                console.log(ret);
            }
        });
    }
</script>


 57万+
57万+


 被折叠的 条评论
为什么被折叠?
被折叠的 条评论
为什么被折叠?
 到【灌水乐园】发言


