


 本文详细介绍如何在SpringBoot项目中整合SiteMesh框架,实现Web页面布局与装饰,包括依赖导入、配置类编写、控制器定义及模板创建步骤。
一、sitemesh介绍
sitemesh是一种装饰器,是由一个基于Web页面布局、装饰及与现存Web应用整合的框架,类似于模板页的概念,可以整合页面输出。
二、springboot 整合
整合过程其实比较简单
1、导入依赖
<dependency>
            <groupId>org.sitemesh</groupId>
            <artifactId>sitemesh</artifactId>
            <version>3.0.1</version>
        </dependency>
2、写配置
这里采用配置类的形式编写
先创建一个类 WebSiteMeshFilter 继承自 ConfigurableSiteMeshFilter
代码及详细说明如下:
import org.sitemesh.builder.SiteMeshFilterBuilder;
import org.sitemesh.config.ConfigurableSiteMeshFilter;

public class WebSiteMeshFilter extends ConfigurableSiteMeshFilter {
    /**
     * 需要装饰的访问路径
     */
    private String contentPath="/testhello";
    /**
     * 装饰页面的路径
     */
    private String decoratorPath="/layouts";

    /**
     * 不需要装饰的路径
     */
    private String excludedPaths="*,js,*.css,*.jpg";
    @Override
    protected void applyCustomConfiguration(SiteMeshFilterBuilder builder){
        if(contentPath==null){
            return;
        }
        String[] contentPaths=contentPath.split(",");
        //添加装饰路径
        for (String path : contentPaths) {
            builder.addDecoratorPath(path, decoratorPath);
        }

        if (excludedPaths == null) {
            return;
        }
        String[] paths = excludedPaths.split(",");
        //添加不需要装饰的路径
        for (String path : paths) {
            builder.addExcludedPath(path);
        }
        //这里是添加自定义标签类
        builder.addTagRuleBundle(new ScriptTagRuleBundle());
    }
}
注意代码的最后一行,这里是添加了一个自定义标签,因为默认标签太少,如果在模板中想要实现内容页面中定义的自定义标签,可以通过这里添加,那么我们实现 ScriptTagRuleBundle这个自定义类
import org.sitemesh.SiteMeshContext;
import org.sitemesh.content.ContentProperty;
import org.sitemesh.content.tagrules.TagRuleBundle;
import org.sitemesh.content.tagrules.html.ExportTagToContentRule;
import org.sitemesh.tagprocessor.State;

public class ScriptTagRuleBundle implements TagRuleBundle {
    @Override
    public void install(State state, ContentProperty contentProperty, SiteMeshContext siteMeshContext) {
        state.addRule("myheader",
                new ExportTagToContentRule(siteMeshContext,contentProperty.getChild("myheader"), false));
    }

    @Override
    public void cleanUp(State state, ContentProperty contentProperty, SiteMeshContext siteMeshContext) {

    }
}
接下来,需要将sitemesh作为bean来声明,就是需要配置
import org.springframework.boot.web.servlet.FilterRegistrationBean;
import org.springframework.context.annotation.Bean;
import org.springframework.context.annotation.Configuration;
import org.springframework.web.servlet.config.annotation.ResourceHandlerRegistry;
import org.springframework.web.servlet.config.annotation.WebMvcConfigurer;

@Configuration
public class WebConfig implements WebMvcConfigurer {
    /**
     * 装饰器
     *
     * @return 2016年8月27日下午12:37:20
     */
    @Bean
    public FilterRegistrationBean siteMeshFilter() {
        FilterRegistrationBean fitler = new FilterRegistrationBean();
        WebSiteMeshFilter siteMeshFilter = new WebSiteMeshFilter();
        fitler.setFilter(siteMeshFilter);
        return fitler;
    }


    //这个方法是用来配置静态资源的
    @Override
    public void addResourceHandlers(ResourceHandlerRegistry registry){

        registry.addResourceHandler("/static/**").addResourceLocations("classpath:/static/");
    }
}
上面代码是一个典型配置类,实现了WebMvcConfigurer 的原因是我们这里需要配置下不需要 装饰的内容还包括静态内容,比如我们放置在 static目录下的所有文件。
3、定义controller
可以看到,定义的模板的路径是/layouts 所以需要配置controller对应这个路径,映射到 下一步定义的模板文件上。
@RequestMapping("/layouts")
public String layouts( ){
    return "/layouts/default";
}
4、定义模板
我们在templates目录下创建目录layouts,并声明装饰页面,装饰页面我们同样用 freemarker来实现,就叫 default.ftl。这里可以看到,其实sitemesh只是一个配置的装饰类,没有规定具体页面格式,可以结合freemarker来实现。
<!DOCTYPE html>

<html xmlns="http://www.w3.org/1999/xhtml" xmlns:th="http://www.thymeleaf.org" xmlns:sec="http://www.thymeleaf.org/thymeleaf-extras-springsecurity3">

<head>

    <title>装饰器页面</title>

</head>

<body>
 <h1>这是装饰页面头部分</h1>
<div id="content">

    <sitemesh:write property='body' />

</div>
 <h1>这是装饰页面foot部分</h1>
</body>
<sitemesh:write property='body' />

<sitemesh:write property='myheader' />
</html>
这里只是简单的定义了头和尾,中间将会导入被装饰页面的 body标签,如果想导入被装饰页面的 myheader,只需要写上
<sitemesh:write property=”myheader“ />
即可,这里我们输出了两遍 body,一遍myheader。
回到内容页面,就是之前定义的 hello.ftl,我们这里这样定义:
<!DOCTYPE html>

<html lang="en">

<body>
<h1>Hello ${name}</h1>
</body>


看看这里会不会输出 其他

<myheader>
    看看这里会不会输出 myheader
</myheader>
</html>
看下结果:
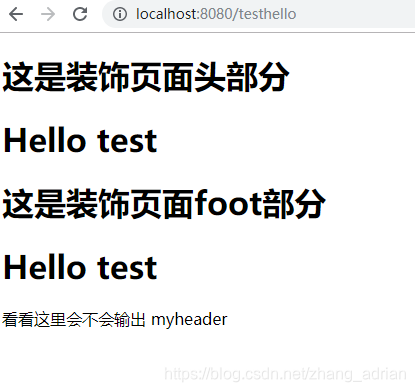
可以看到,按照我们定义的装饰格式输出了内容。 而内容页中的
看看这里会不会输出 其他 ,这部分没有输出。


 43万+
43万+

 被折叠的 条评论
为什么被折叠?
被折叠的 条评论
为什么被折叠?
 到【灌水乐园】发言


