


一.创建Swift 项目,第一章说过。不在赘述
二.创建一个视图控制器类,如图
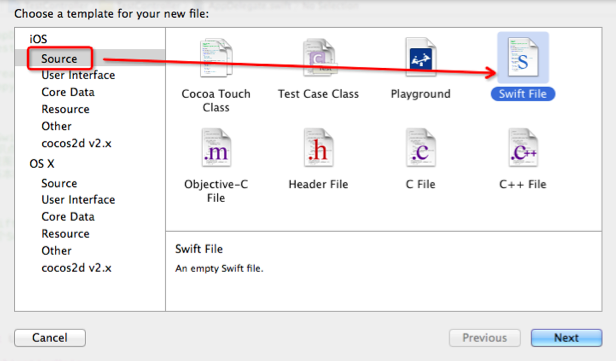
起个名字即可
在创建的类中写如下代码(有注释)
//
// TestContcoller.swift
// TestController
//
// Created by zhangbiao on 14-6-10.
// Copyright (c) 2014年 理想. All rights reserved.
//
//倒入Foundation 库
import Foundation
//到入 UIKit
import UIKit
//声明一个类 类名为 TestContcoller 继承UIViewController
class TestController:UIViewController
{
//viewDidLoad 关于viewDidLoad 同oc 中的功能一样
//override 表示从类继承过来的
override func viewDidLoad()
{
// 显示的调用父类函数 super 表示父类
super.viewDidLoad();
// -----------------简单的UI控件 UILabel-----------------------
// (1)创建一个rect 对象
let rect=CGRect(x:20 ,y:100,width:280, height:40);
// (2)创建一个UILabel 参数是一个rect对象
//var label=UILabel(frame:rect);
// 也可以将(1)(2) 合成 一下
var label=UILabel(frame:CGRect(x:20, y:100 ,width:280, height:40))
//设置label内容
label.text="理 想";
//设置label字体颜色
label.textColor=UIColor.blueColor();
//将label 添加到当前视图上
self.view.addSubview(label);
//---------------------简单的UI控件 UIButton--------------------
// 创建一个UIButton 并且设计frame
var but=UIButton(frame:CGRect(x:20 ,y:150 ,width:200,height:40));
//设置UIButton 的标题
/*func setTitle(title: String!, forState state: UIControlState)
函数:设置but的名字
参数说明:
(1)提一个参数是but 的名字
(2)第二个参数是这个表示在按钮那种状态下是这个名字
说明 .Normal 等价于 UIControlState.Normal
*/
// 给按钮起一个名字 ,这个按钮在Normal在这个状态下是这个名字
but.setTitle("按钮",forState:.Normal);
//but 添加事件
/*func addTarget(target: AnyObject!, action: Selector, forControlEvents controlEvents: UIControlEvents)
函数:
给but 添加事件
(1)第一个参数是target值, 告诉事件响应的方法在那个对象中
(2)第二个参数是 action 是SEL 写方法名即可
(3)第三个参数 事件类型 ,响应那种事件
*/
// 给but 添加一个TouchUpInside 类型的事件 ,时间显示的方法为butClick: 这个方法是在self 的对象中
but.addTarget(self,action:"butClick:",forControlEvents:.TouchUpInside);
//将but添加到视图上
but.backgroundColor=UIColor.redColor();
//将but加入视图
self.view.addSubview(but);
}
// 按钮的事件
/*
func butClick(sender:UIButton)
func 声明函数关键字 butClick函数名 sender 可以理解为调用者but :UIButton 为调用者类型
*/
func butClick(sender:UIButton)
{
//
println("\(sender) 的 TouchUpInside 事件");
}
}
视图控制器创建完成
在AppDelegate.swift类中写如下代码
*/
import UIKit
@UIApplicationMain
class AppDelegate: UIResponder, UIApplicationDelegate {
var window: UIWindow?
func application(application: UIApplication, didFinishLaunchingWithOptions launchOptions: NSDictionary?) -> Bool {
self.window = UIWindow(frame: UIScreen.mainScreen().bounds)
// Override point for customization after application launch.
self.window!.backgroundColor = UIColor.whiteColor()
self.window!.makeKeyAndVisible()
// 以上不在重复,上一篇说过
//创建一个试图控器
let test_vc=TestController();
// 设置 self.window根视图控制器
self.window!.rootViewController = test_vc;
return true
}
func applicationWillResignActive(application: UIApplication) {
// Sent when the application is about to move from active to inactive state. This can occur for certain types of temporary interruptions (such as an incoming phone call or SMS message) or when the user quits the application and it begins the transition to the background state.
// Use this method to pause ongoing tasks, disable timers, and throttle down OpenGL ES frame rates. Games should use this method to pause the game.
}
func applicationDidEnterBackground(application: UIApplication) {
// Use this method to release shared resources, save user data, invalidate timers, and store enough application state information to restore your application to its current state in case it is terminated later.
// If your application supports background execution, this method is called instead of applicationWillTerminate: when the user quits.
}
func applicationWillEnterForeground(application: UIApplication) {
// Called as part of the transition from the background to the inactive state; here you can undo many of the changes made on entering the background.
}
func applicationDidBecomeActive(application: UIApplication) {
// Restart any tasks that were paused (or not yet started) while the application was inactive. If the application was previously in the background, optionally refresh the user interface.
}
func applicationWillTerminate(application: UIApplication) {
// Called when the application is about to terminate. Save data if appropriate. See also applicationDidEnterBackground:.
}
}


 3845
3845

 被折叠的 条评论
为什么被折叠?
被折叠的 条评论
为什么被折叠?
 到【灌水乐园】发言


