


记录:286
场景:基于Maven和IntelliJ IDEA搭建多模块微服务项目(工程)。使用Maven的pom.xml组织管理工程下的所有模块、管理依赖的Jar包和Jar包版本、管理打包方式等。Spring Boot、Spring Cloud、Spring Cloud Alibaba、Apache Maven的各版本文档、源码、下载地址等。IntelliJ IDEA、JDK各版本官网下载地址。
一、名词
以下名词摘自官网,使用原版英文,翻译之后感觉变味了。
Spring Boot: Spring Boot makes it easy to create stand-alone, production-grade Spring based Applications that you can "just run".
Spring Cloud: Spring Cloud provides tools for developers to quickly build some of the common patterns in distributed systems .
Spring Cloud Alibaba: Spring Cloud Alibaba provides a one-stop solution for distributed application development。
Apache Maven:Apache Maven is a software project management and comprehension tool. Based on the concept of a project object model (POM), Maven can manage a project's build, reporting and documentation from a central piece of information.
JDK: Java Development Kit.
Spring Framework: The Spring Framework provides a comprehensive programming and configuration model for modern Java-based enterprise applications - on any kind of deployment platform.
二、版本
基于Spring Boot、Spring Cloud、Spring Cloud Alibaba的微服务开发,组件众多。因此,在创建项目伊始,就应当考虑版本的管理。以Spring Boot的版本升级发布为基础,Spring Cloud的版本升级发布,会匹配Spring Boot升级发布的版本。Spring Cloud Alibaba版本升级发布,会匹配Spring Boot和Spring Cloud的版本升级发布的版本。
1.本例使用的版本
本例使用版本如下:
Spring Boot 2.6.3
Spring Cloud 2021.0.1
Spring Cloud Alibaba 2021.0.1.0
Apache Maven 3.6.3
IntelliJ IDEA 2021.2.3
JDK 1.8
Spring Framework 5.3.15
2.版本查看
版本查看主要在官网入口和GitHub的版本发布列表中。
2.1 Spring官网
Spring官网:https://spring.io/
Spring官网主入口,全量信息概览,按需点击需求的模块即可。
Spring makes Java simple.
Spring makes Java modern.
Spring makes Java productive.
Spring makes Java reactive.
Spring makes Java cloud-ready.
2.2 GitHub官网
GitHub官网:https://github.com/
GitHub官网主入口,著名的代码资源库。
2.3 Spring Boot
(1)Spring官网的Spring Boot入口
在此页面可以查看Spring Boot的最新版本,以及官网发布的变更信息。
https://spring.io/projects/spring-boot(2)Spring Boot在GitHub的入口
在Spring Boot的主页面,点击右侧的GitHub图标,可进入GitHub官网中的Spring Boot项目。可查看历史发布版本、每个版本更新的内容、源码。
#Spring Boot在GitHub的入口
https://github.com/spring-projects/spring-boot
#Spring Boot在GitHub中版本发布入口
https://github.com/spring-projects/spring-boot/releases
(3)Spring Boot的官网文档入口
Spring Boot的在官网中,历史版本文档信息入口。
#Spring Boot的官网文档入口
https://docs.spring.io/spring-boot/docs/
2.4 Spring Cloud
(1)Spring官网的Spring Cloud入口
在此页面可以查看Spring Cloud的最新版本,以及官网发布的变更信息。
https://spring.io/projects/spring-cloud(2)Spring Cloud在GitHub的入口
在Spring Cloud的主页面,点击右侧的GitHub图标,可进入GitHub官网中的Spring Cloud项目。可查看历史发布版本、每个版本更新的内容、源码。
#Spring Cloud在GitHub中各个组件入口
https://github.com/spring-cloud
#Spring Cloud在GitHub中版本发布代码入口
https://github.com/spring-cloud/spring-cloud-release
#Spring Cloud在GitHub中版本发布入口
https://github.com/spring-cloud/spring-cloud-release/tags
(3)Spring Cloud的官网文档入口
Spring Cloud的在官网中历史版本文档信息入口。
#Spring Cloud的官网文档入口
https://docs.spring.io/spring-cloud/docs/
2.5 Spring Cloud Alibaba
(1)Spring官网的Spring Cloud Alibaba入口
在此页面可以查看Spring Cloud Alibaba的最新版本,以及官网发布的变更信息。
https://spring.io/projects/spring-cloud-alibaba(2)Spring Cloud Alibaba在GitHub的入口
在Spring Cloud Alibaba的主页面,点击右侧的GitHub图标,可进入GitHub官网中的Spring Cloud Alibaba项目。可查看历史发布版本、每个版本更新的内容、源码。
#Spring Cloud Alibaba在GitHub中各个组件入口
https://github.com/alibaba/spring-cloud-alibaba
#Spring Cloud Alibaba在GitHub中版本发布代码入口
https://github.com/alibaba/spring-cloud-alibaba/releases
(3)Spring Cloud Alibaba的官网文档入口
Spring Cloud Alibaba的在官网中历史版本文档信息入口。
#Spring Cloud Alibaba的官网文档入口
https://spring.io/projects/spring-cloud-alibaba#learn
(4)升级指南
在Spring Cloud Alibaba的GitHub的Releass记录的标签:2021.0.1.0。
https://github.com/alibaba/spring-cloud-alibaba/releases提供了:2021.0.1.0 升级指南,清楚表述,Spring Cloud Alibaba和Spring Cloud的版本之间的对应关系。
从 2021.0.1.0 开始,SCA 版本将会对应 Spring Cloud 版本, 前三位为 Spring Cloud 版本,最后一位为扩展版本2021.0.1.0 升级指南文档地址:
https://github.com/alibaba/spring-cloud-alibaba/blob/2021.x/spring-cloud-alibaba-docs/src/main/asciidoc-zh/sca-upgrade-guide.adoc2.6 Apache Maven
(1)Apache Maven官网入口
Apache Maven官网入口可以查看Maven全量概览信息。
#Apache Maven官网
https://maven.apache.org/
(2)Apache Maven在GitHub的入口
Apache Maven在GitHub的入口,可以查看源码。
#Apache Maven在GitHub入口
https://github.com/apache/maven/
(3)Apache Maven历史版本下载
Apache Maven历史版本下载。
#Apache项目的下载地址
https://dlcdn.apache.org
#ApacheMaven项目的下载地址
https://dlcdn.apache.org/maven/
2.7 mvnrepository
(1)mvnrepository官网地址
在mvnrepository官网,提供各种Jar包版本。
#mvnrepository地址
https://mvnrepository.com/
(2)关键字搜索找依赖
例如,要找spring-cloud-dependencies依赖,在官网输入框输入关键字,点击Search按钮。在结果清单中找到需求的Jar包的依赖版本,再拷贝相关依赖的工程的pom.xml文件中。
<dependency>
    <groupId>org.springframework.cloud</groupId>
    <artifactId>spring-cloud-dependencies</artifactId>
    <version>2021.0.1</version>
    <type>pom</type>
    <scope>import</scope>
</dependency>
2.8 IntelliJ IDEA
(1)IntelliJ IDEA官网入口
IntelliJ IDEA:Capable and Ergonomic IDE for JVM.
#官网主入口
https://www.jetbrains.com
#idea主入口
https://www.jetbrains.com/idea/
(2)IntelliJ IDEA历史版本下载
IntelliJ IDEA历史版本下载地址。
#历史版本下载地址
https://www.jetbrains.com/idea/download/other.html
2.9 JDK
JDK: Java Development Kit.
(1)Java 官网入口
#Java的官网地址
https://www.oracle.com/java/
(2)JDK历史版本下载
#JDK历史版本下载
https://www.oracle.com/java/technologies/downloads
#JDK 1.8 官网下载地址
https://www.oracle.com/java/technologies/downloads/#java8
2.10 Spring Framework
(1)Spring官网的Spring Framework入口
在此页面可以查看Spring Framework的最新版本,以及官网发布的变更信息。
https://spring.io/projects/spring-framework(2)Spring Framework在GitHub的入口
在Spring Framework的主页面,点击右侧的GitHub图标,可进入GitHub官网中的Spring Framework项目。可查看历史发布版本、每个版本更新的内容、源码。
#Spring Framework在GitHub的入口
https://github.com/spring-projects/spring-framework
#Spring Framework在GitHub中版本发布入口
https://github.com/spring-projects/spring-framework/releases
(3)Spring Framework的官网文档入口
Spring Framework的在官网中,历史版本文档信息入口。
#Spring Framework的官网文档入口
https://docs.spring.io/spring-framework/docs/
三、基础环境
基于Maven和IntelliJ IDEA搭建多模块微服务项目(工程)。如下基础环境必备。
1.配置JDK
下载JDK 1.8及其以上版本,在计算机安装并配置环境变量。
本例在Windows 10 64位操作系统,安装和配置环境变量。安装JDK,图形化界面直接下一步,直到安装完成。本例配置情况如下。
#1.安装目录
D:\Program Files\Java\jdk1.8.0_181
#2.本例在用户环境变量中配置,(本例没有在系统变量中配置)
#2.1新增JAVA_HOME
变量: JAVA_HOME
值: D:\Program Files\Java\jdk1.8.0_181
#2.1新增CLASSPATH
变量: CLASSPATH
值: .;%JAVA_HOME%\lib\dt.jar;%JAVA_HOME%\lib\tools.jar
#3.在Path中配置
变: Path
值: %JAVA_HOME%\bin
%JAVA_HOME%\jre\bin
2.配置Apache Maven
2.1 配置本地Maven
本例Apache Maven是免安装版本,直接配置即可。
安装目录:D:\aServ\apache-maven-3.6.3-idea\conf
(1)修改settings.xml
配置文件settings.xml全路径
D:\aServ\apache-maven-3.6.3-idea\conf\settings.xmlsettings.xml主要修改配置远程仓库地址和本地仓库目录,本例把settings.xml注释语句去掉后,如下。
<?xml version="1.0" encoding="UTF-8"?>
<settings xmlns="http://maven.apache.org/SETTINGS/1.0.0"
          xmlns:xsi="http://www.w3.org/2001/XMLSchema-instance"
          xsi:schemaLocation="http://maven.apache.org/SETTINGS/1.0.0 http://maven.apache.org/xsd/settings-1.0.0.xsd">
  <!--定义以本地目录2022-3-13-->
  <localRepository>D:\aServ\maven-idea-3.6.3\repository</localRepository>
  <pluginGroups>
  </pluginGroups>
  <proxies>
  </proxies>
  <servers>
  </servers>
  <mirrors>
	<!-- 2022-3-13 添加镜像-->
	<mirror>
        <id>nexus-aliyun</id>
		<mirrorOf>*</mirrorOf>
		<name>Nexus aliyun</name>
        <url>https://maven.aliyun.com/repository/public</url>
    </mirror>
  </mirrors>
  <profiles>
  </profiles>
</settings>
(2)配置本地仓库目录
本例把maven的应用目录和仓库目录分开放,即settings.xml的localRepository标签配置的目录。因此需要新建仓库目录,同时把settings.xml复制一份到仓库根目录,如下。
#1.仓库目录
D:\aServ\maven-idea-3.6.3\repository
#2.settings.xml路径
D:\aServ\maven-idea-3.6.3\settings.xml
2.2 Maven的镜像配置
在2.1配置本地Maven中settings.xml的mirrors标签中配置的是公网仓库地址,是阿里云提供的地址。mirrors中添加入下mirror节点均可使用。
#1.使用国外镜像仓库,下载速度慢
<mirror>
  <id>Central</id>
  <url>http://repo1.maven.org/maven2</url>
  <mirrorOf>central</mirrorOf>
</mirror>
#2.使用国内镜像仓库,下载速度快,由阿里云提供的
<mirror>
  <id>nexus-aliyun</id>
  <mirrorOf>*</mirrorOf>
  <name>Nexus aliyun</name>
  <url>https://maven.aliyun.com/repository/public</url>
</mirror>
阿里云仓库信息可以查阅地址。
#阿里云Maven
https://developer.aliyun.com/mvn/guide
3.配置IntelliJ IDEA
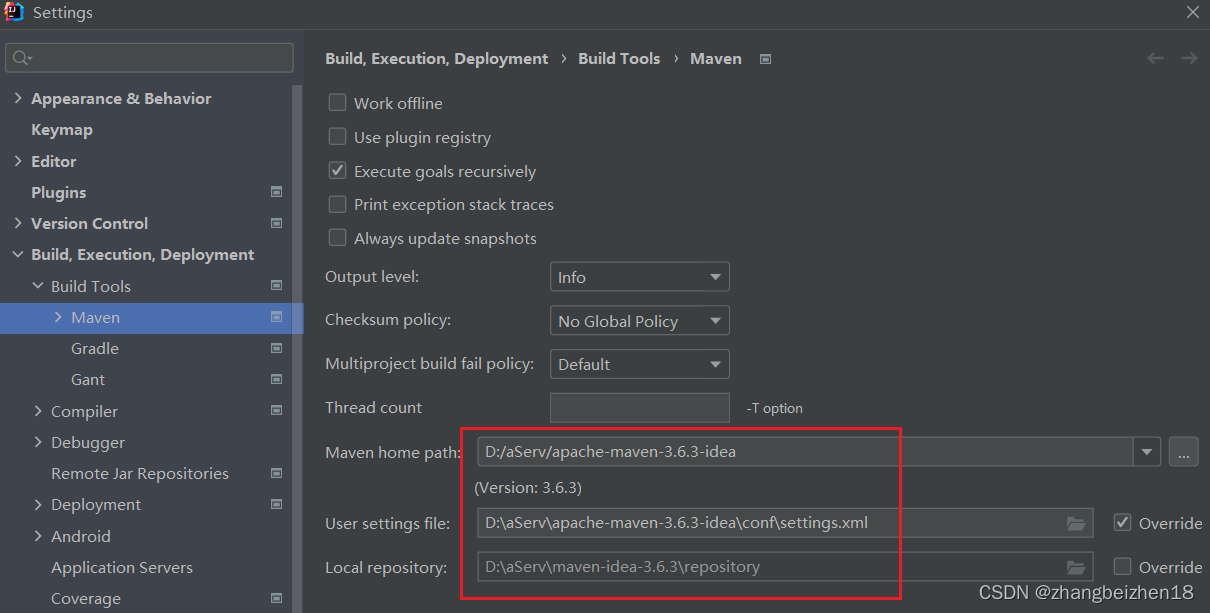
安装IntelliJ IDEA,启动IDEA,配置Maven。
菜单依次:
File->Settings->Build,Execution,Deployment->Build Tools->Maven
Settings的Maven配置窗口。
四、案例场景一
本例实现基于Maven和IntelliJ IDEA搭建多模块微服务项目(工程)。
第一层级工程,只管理第二层级工程。
第二层级工程,管理第三层级工程。
以此类推,使用pom.xml中的modules和module标签管理维护关系。
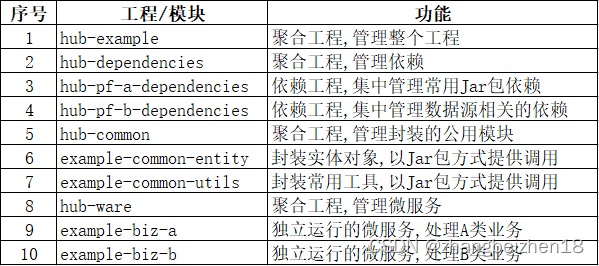
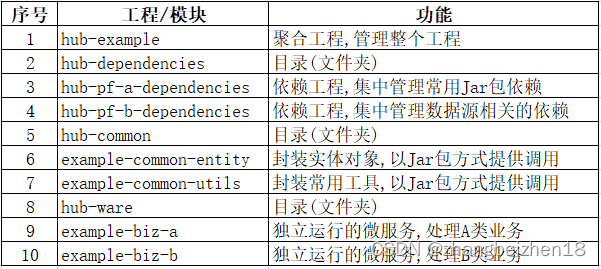
1.规划微服务
规划微服务如表格。
2.创建hub-example
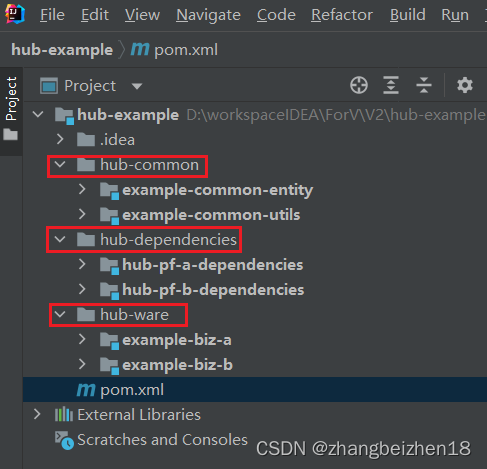
hub-example,是顶级工程,是一个聚合工程,用来管理工程所有模块。在hub-example中的src目录不写代码,可以删除。在pom.xml中打包方式配置为pom。
2.1 创建Maven工程
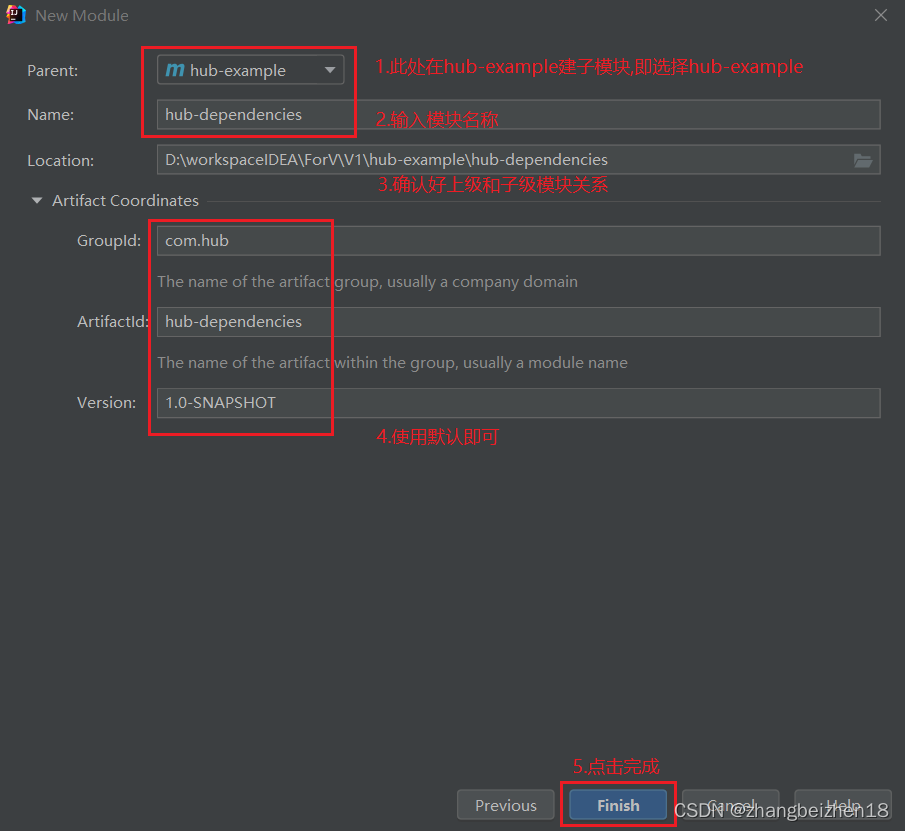
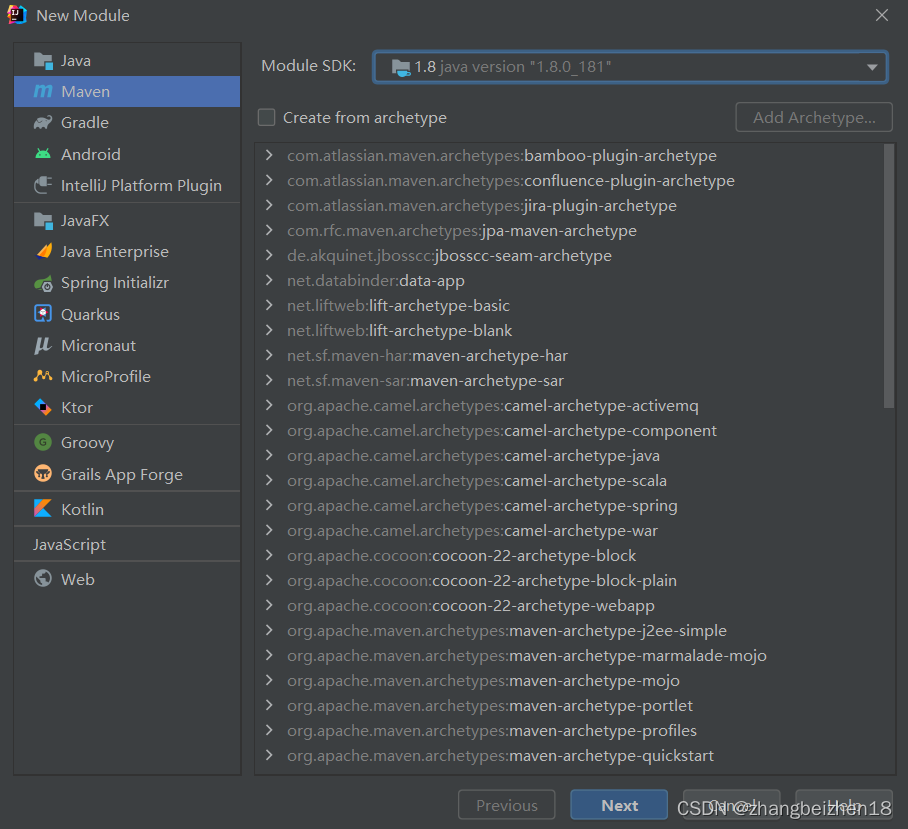
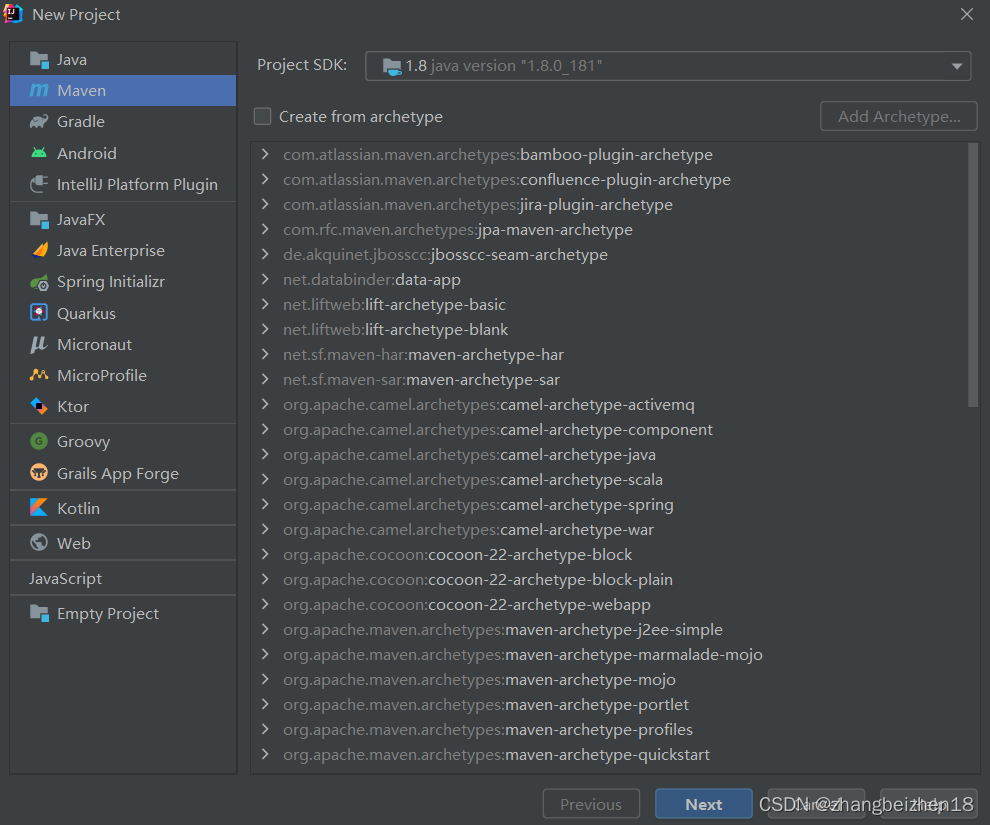
运行IDEA,依次选择菜单File->New->Project进入New Project对话框,如下配置。

2.2 配置工程信息
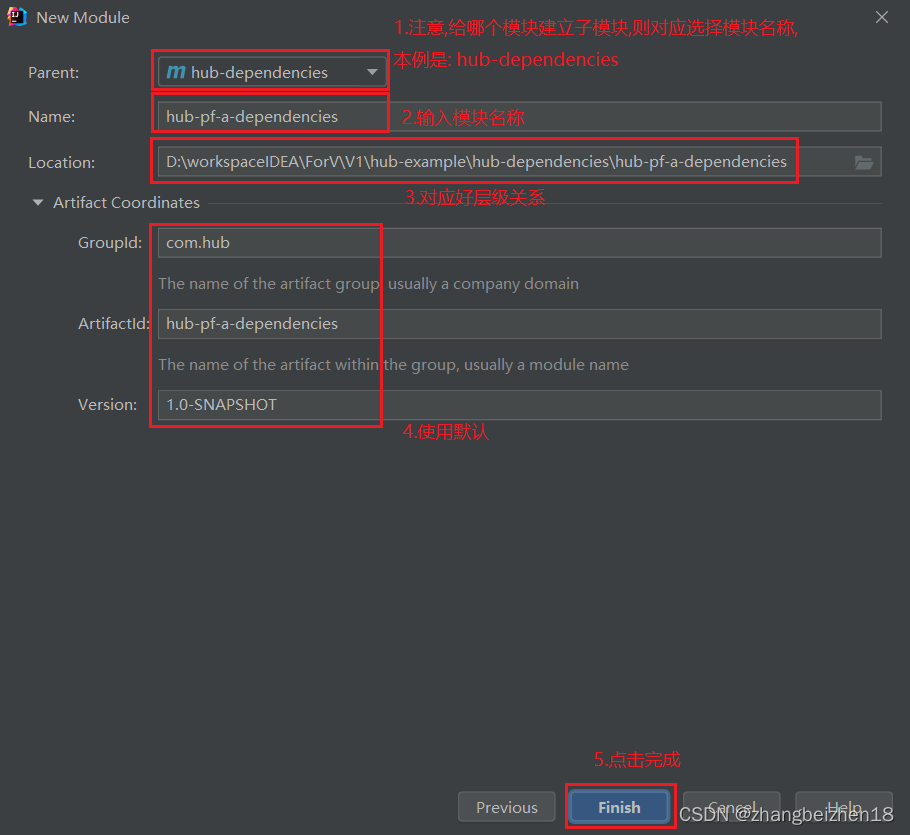
hub-example工程配置信息。

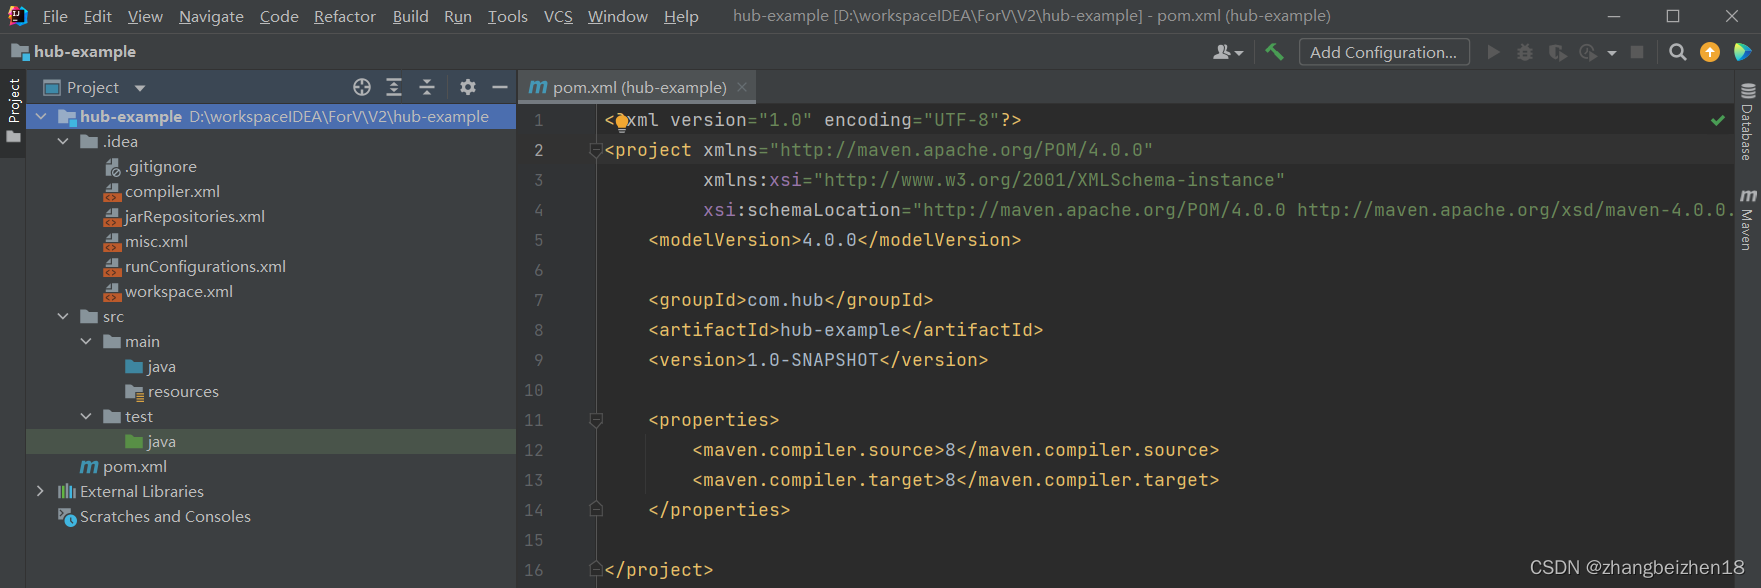
2.3 创建完成
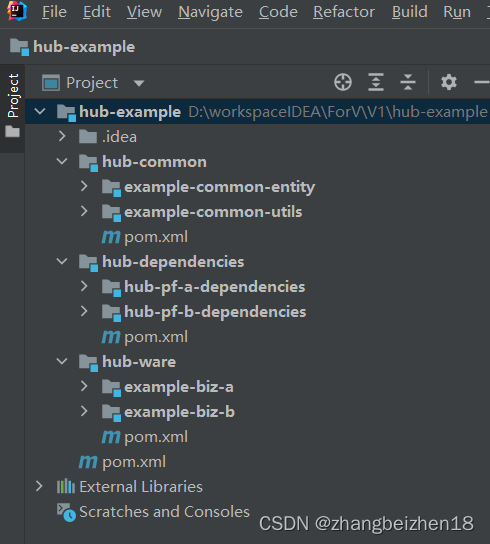
项目创建完成如图,项目初始列表,pom.xml初始化文件

3.配置hub-example的pom.xml
配置hub-example的pom.xml,包括以下几点内容,细节在pom.xml查看。
(1)配置打包方式。
(2)配置核心依赖。
(3)配置版本管理。
(4)配置打包插件。
(5)配置yml文件读取pom文件的标签值。
<?xml version="1.0" encoding="UTF-8"?>
<project xmlns="http://maven.apache.org/POM/4.0.0"
         xmlns:xsi="http://www.w3.org/2001/XMLSchema-instance"
         xsi:schemaLocation="http://maven.apache.org/POM/4.0.0 http://maven.apache.org/xsd/maven-4.0.0.xsd">
    <modelVersion>4.0.0</modelVersion>

    <groupId>com.hub</groupId>
    <artifactId>hub-example</artifactId>
    <version>1.0-SNAPSHOT</version>
    <!--聚合工程,打包方式:pom-->
    <packaging>pom</packaging>
    <!-- 版本管理 -->
    <properties>
        <maven.compiler.source>8</maven.compiler.source>
        <maven.compiler.target>8</maven.compiler.target>
        <project.build.sourceEncoding>UTF-8</project.build.sourceEncoding>
        <java.version>1.8</java.version>
        <spring.boot.version>2.6.3</spring.boot.version>
        <spring.cloud.version>2021.0.1</spring.cloud.version>
        <spring.cloud.alibaba.version>2021.0.1.0</spring.cloud.alibaba.version>
        <!-- 统一管理hub-example的版本,在子模块直接使用此版本即可-->
        <hub.example.version>1.0-SNAPSHOT</hub.example.version>
        <spring.boot.maven.plugin.version>2.6.3</spring.boot.maven.plugin.version>
        <mysql.version>8.0.23</mysql.version>
        <druid.version>1.2.5</druid.version>
        <mybatis.version>2.2.0</mybatis.version>
        <lombok.version>1.18.18</lombok.version>
        <fastjson.version>1.2.83</fastjson.version>
        <hutool.version>5.7.22</hutool.version>
        <commons.lang3.version>3.12.0</commons.lang3.version>
        <commons.io.version>2.11.0</commons.io.version>
    </properties>
    <!-- 核心依赖   -->
    <dependencyManagement>
        <dependencies>
            <dependency>
                <groupId>org.springframework.boot</groupId>
                <artifactId>spring-boot-dependencies</artifactId>
                <version>${spring.boot.version}</version>
                <type>pom</type>
                <scope>import</scope>
            </dependency>
            <dependency>
                <groupId>org.springframework.cloud</groupId>
                <artifactId>spring-cloud-dependencies</artifactId>
                <version>${spring.cloud.version}</version>
                <type>pom</type>
                <scope>import</scope>
            </dependency>
            <dependency>
                <groupId>com.alibaba.cloud</groupId>
                <artifactId>spring-cloud-alibaba-dependencies</artifactId>
                <version>${spring.cloud.alibaba.version}</version>
                <type>pom</type>
                <scope>import</scope>
            </dependency>
        </dependencies>
    </dependencyManagement>
    <build>
        <!-- yml文件读取pom文件的标签值 -->
        <resources>
            <resource>
                <directory>src/main/resources</directory>
                <filtering>true</filtering>
            </resource>
        </resources>
        <plugins>
            <!-- 配置打包插件 -->
            <plugin>
                <groupId>org.springframework.boot</groupId>
                <artifactId>spring-boot-maven-plugin</artifactId>
                <version>${spring.boot.maven.plugin.version}</version>
                <configuration>
                    <fork>true</fork>
                    <addResources>true</addResources>
                </configuration>
            </plugin>
        </plugins>
    </build>
    <profiles>
        <profile>
            <!-- yml配置文件环境切换: dev/test/prod -->
            <id>env</id>
            <properties>
                <profiles.active>dev</profiles.active>
            </properties>
            <activation>
                <activeByDefault>true</activeByDefault>
            </activation>
        </profile>
    </profiles>
</project>
4.hub-example添加模块
hub-example添加的模块也是聚合工程,主要包括:
(1)hub-dependencies,集中管理依赖。聚合工程,不写代码,可以删除src目录。其子模块作用,在pom.xml文件引入常用的依赖。项目中其它工程只要引用hub-dependencies的子模块就行。
(2)hub-common,管理封装的通用模块。聚合工程,不写代码,可以删除src目录。封装的通用代码放在这个模块的子模块中,给每个需要的工程引用。减少重复代码,提供代码可复用度。
(3)hub-ware,管理独立运行的微服。每个业务规划一个微服务。
以hub-dependencies添加子模块为例,归纳以下步骤。
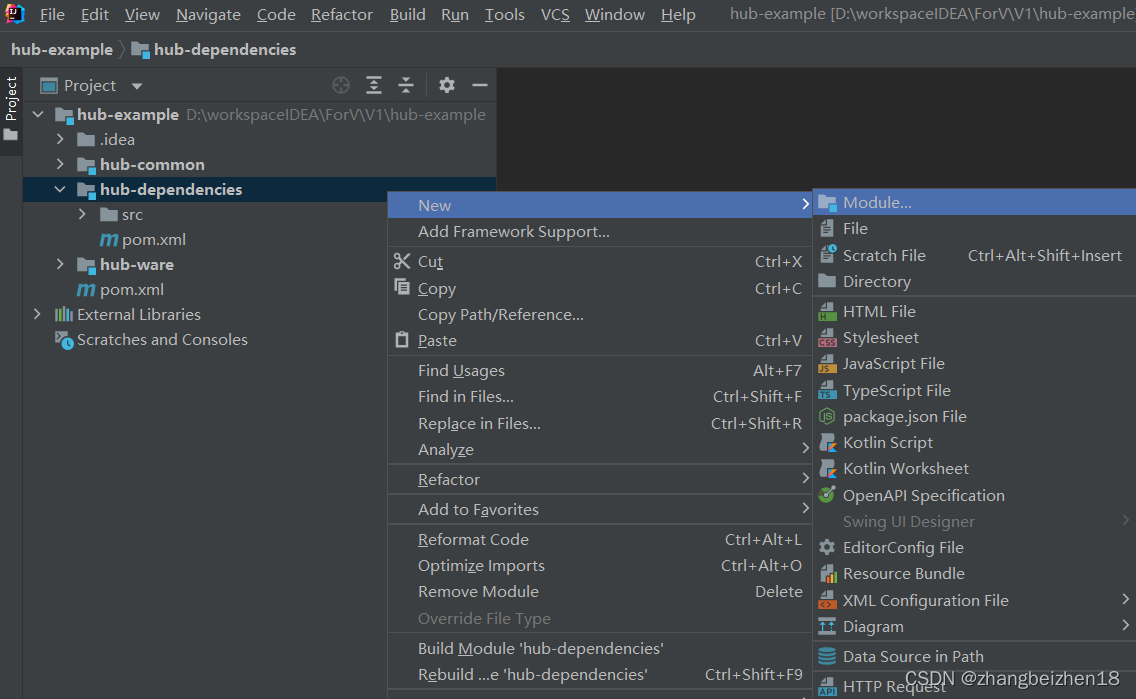
4.1 新建Module
选中hub-example,右键,依次选择:New->Module,进入模块配置对话框。

4.2 配置Module版本和方式
选择Maven方式、选择JDK版本。

4.3 配置Module基础信息
配置hub-dependencies基础信息。
4.4 添加剩余模块
按照以上步骤,添加完成hub-common、hub-ware。
4.5 hub-example的pom.xml文件
hub-example的pom.xml文件中新增了<modules>标签即如下。即hub-example管理以下包含的模块。
<modules>
  <module>hub-dependencies</module>
  <module>hub-common</module>
  <module>hub-ware</module>
</modules>
5.hub-dependencies添加模块
hub-dependencies添加hub-pf-a-dependencies和hub-pf-b-dependencies模块。
5.1 新建Module
选中hub-dependencies,右键,依次选择:New->Module,进入模块配置对话框。
5.2 配置Module版本和方式
选择Maven方式、选择JDK版本。
5.3 配置Module基础信息
配置hub-pf-a-dependencies基础信息。
5.4 添加剩余模块
按照以上步骤,添加完成hub-pf-b-dependencies。
5.5 hub-dependencies工程的pom.xml
添加模块后,hub-dependencies工程的pom.xml。
<?xml version="1.0" encoding="UTF-8"?>
<project xmlns="http://maven.apache.org/POM/4.0.0"
       xmlns:xsi="http://www.w3.org/2001/XMLSchema-instance"
       xsi:schemaLocation="http://maven.apache.org/POM/4.0.0 http://maven.apache.org/xsd/maven-4.0.0.xsd">
  <parent>
      <artifactId>hub-example</artifactId>
      <groupId>com.hub</groupId>
      <version>1.0-SNAPSHOT</version>
  </parent>
  <modelVersion>4.0.0</modelVersion>
  <artifactId>hub-dependencies</artifactId>
  <packaging>pom</packaging>
  <modules>
      <module>hub-pf-a-dependencies</module>
      <module>hub-pf-b-dependencies</module>
  </modules>
  <properties>
      <maven.compiler.source>8</maven.compiler.source>
      <maven.compiler.target>8</maven.compiler.target>
  </properties>
</project>
6.hub-common添加模块
根据5.hub-dependencies添加模块的步骤:
给hub-common添加example-common-entity和example-common-utils模块。
6.1 hub-common工程的pom.xml
添加模块后,hub-common工程的pom.xml。
<?xml version="1.0" encoding="UTF-8"?>
<project xmlns="http://maven.apache.org/POM/4.0.0"
       xmlns:xsi="http://www.w3.org/2001/XMLSchema-instance"
       xsi:schemaLocation="http://maven.apache.org/POM/4.0.0 http://maven.apache.org/xsd/maven-4.0.0.xsd">
  <parent>
      <artifactId>hub-example</artifactId>
      <groupId>com.hub</groupId>
      <version>1.0-SNAPSHOT</version>
  </parent>
  <modelVersion>4.0.0</modelVersion>
  <artifactId>hub-dependencies</artifactId>
  <packaging>pom</packaging>
  <modules>
      <module>hub-pf-a-dependencies</module>
      <module>hub-pf-b-dependencies</module>
  </modules>
  <properties>
      <maven.compiler.source>8</maven.compiler.source>
      <maven.compiler.target>8</maven.compiler.target>
  </properties>
</project>
7.hub-ware添加模块
根据5.hub-dependencies添加模块的步骤:
给hub-ware添加example-biz-a和example-biz-b模块。
7.1 hub-ware工程的pom.xml
添加模块后,hub-ware工程的pom.xml。
<?xml version="1.0" encoding="UTF-8"?>
<project xmlns="http://maven.apache.org/POM/4.0.0"
       xmlns:xsi="http://www.w3.org/2001/XMLSchema-instance"
       xsi:schemaLocation="http://maven.apache.org/POM/4.0.0 http://maven.apache.org/xsd/maven-4.0.0.xsd">
  <parent>
      <artifactId>hub-example</artifactId>
      <groupId>com.hub</groupId>
      <version>1.0-SNAPSHOT</version>
  </parent>
  <modelVersion>4.0.0</modelVersion>
  <artifactId>hub-ware</artifactId>
  <packaging>pom</packaging>
  <modules>
      <module>example-biz-a</module>
      <module>example-biz-b</module>
  </modules>
  <properties>
      <maven.compiler.source>8</maven.compiler.source>
      <maven.compiler.target>8</maven.compiler.target>
  </properties>
</project>
8.hub-example工程列表
创建工程和添加子模块后,工程hub-example工程列表。每个工程上一级和下一级都是通过pom.xml来维护管理关系。
9.hub-dependencies的子模块添加依赖
为hub-dependencies模块的子模块hub-pf-a-dependencies和hub-pf-b-dependencies模块添加依赖。
9.1 hub-pf-a-dependencies依赖
hub-pf-a-dependencies依赖,主要是基础Jar包。
<?xml version="1.0" encoding="UTF-8"?>
<project xmlns="http://maven.apache.org/POM/4.0.0"
       xmlns:xsi="http://www.w3.org/2001/XMLSchema-instance"
       xsi:schemaLocation="http://maven.apache.org/POM/4.0.0 http://maven.apache.org/xsd/maven-4.0.0.xsd">
  <parent>
      <artifactId>hub-dependencies</artifactId>
      <groupId>com.hub</groupId>
      <version>1.0-SNAPSHOT</version>
  </parent>
  <modelVersion>4.0.0</modelVersion>
  <artifactId>hub-pf-a-dependencies</artifactId>
  <properties>
      <maven.compiler.source>8</maven.compiler.source>
      <maven.compiler.target>8</maven.compiler.target>
  </properties>
  <dependencies>
   <!--基础工具-->
   <dependency>
       <groupId>org.projectlombok</groupId>
       <artifactId>lombok</artifactId>
       <version>${lombok.version}</version>
   </dependency>
   <dependency>
       <groupId>com.alibaba</groupId>
       <artifactId>fastjson</artifactId>
       <version>${fastjson.version}</version>
   </dependency>
   <dependency>
       <groupId>org.apache.commons</groupId>
       <artifactId>commons-lang3</artifactId>
       <version>${commons.lang3.version}</version>
   </dependency>
   <dependency>
       <groupId>commons-io</groupId>
       <artifactId>commons-io</artifactId>
       <version>${commons.io.version}</version>
   </dependency>
   <dependency>
       <groupId>cn.hutool</groupId>
       <artifactId>hutool-all</artifactId>
       <version>${hutool.version}</version>
   </dependency>
  </dependencies>
</project>
9.2 hub-pf-b-dependencies依赖
hub-pf-a-dependencies依赖,主要是操作数据库的Jar包。
<?xml version="1.0" encoding="UTF-8"?>
<project xmlns="http://maven.apache.org/POM/4.0.0"
       xmlns:xsi="http://www.w3.org/2001/XMLSchema-instance"
       xsi:schemaLocation="http://maven.apache.org/POM/4.0.0 http://maven.apache.org/xsd/maven-4.0.0.xsd">
  <parent>
      <artifactId>hub-dependencies</artifactId>
      <groupId>com.hub</groupId>
      <version>1.0-SNAPSHOT</version>
  </parent>
  <modelVersion>4.0.0</modelVersion>
  <artifactId>hub-pf-b-dependencies</artifactId>
  <properties>
      <maven.compiler.source>8</maven.compiler.source>
      <maven.compiler.target>8</maven.compiler.target>
  </properties>
  <dependencies>
      <!--数据库操作-->
      <dependency>
          <groupId>mysql</groupId>
          <artifactId>mysql-connector-java</artifactId>
          <version>${mysql.version}</version>
      </dependency>
      <dependency>
          <groupId>com.alibaba</groupId>
          <artifactId>druid-spring-boot-starter</artifactId>
          <version>${druid.version}</version>
      </dependency>
      <dependency>
          <groupId>com.baomidou</groupId>
          <artifactId>mybatis-plus-boot-starter</artifactId>
          <version>${mybatis.plus.version}</version>
      </dependency>
  </dependencies>
</project>
10.hub-common的子模块添加依赖
为hub-common模块的子模块example-common-entity和example-common-utils模块添加依赖。
<?xml version="1.0" encoding="UTF-8"?>
<project xmlns="http://maven.apache.org/POM/4.0.0"
       xmlns:xsi="http://www.w3.org/2001/XMLSchema-instance"
       xsi:schemaLocation="http://maven.apache.org/POM/4.0.0 http://maven.apache.org/xsd/maven-4.0.0.xsd">
  <parent>
      <artifactId>hub-common</artifactId>
      <groupId>com.hub</groupId>
      <version>1.0-SNAPSHOT</version>
  </parent>
  <modelVersion>4.0.0</modelVersion>
  <artifactId>example-common-utils</artifactId>
  <properties>
      <maven.compiler.source>8</maven.compiler.source>
      <maven.compiler.target>8</maven.compiler.target>
  </properties>
  <dependencies>
      <dependency>
          <groupId>com.hub</groupId>
          <artifactId>hub-pf-a-dependencies</artifactId>
          <version>${hub.example.version}</version>
      </dependency>
  </dependencies>
</project>
11.hub-ware添加依赖
为hub-ware模块的子模块example-biz-a模块添加依赖。
11.1 example-biz-a依赖
example-biz-a需求:基础依赖、数据库操作依赖、springboot依赖。
注意:spring-boot、spring-cloud、spring-cloud-alibaba,在hub-example中已经引入顶级依赖。在子工程中使用其模块,可以不需要加版本号。
<?xml version="1.0" encoding="UTF-8"?>
<project xmlns="http://maven.apache.org/POM/4.0.0"
       xmlns:xsi="http://www.w3.org/2001/XMLSchema-instance"
       xsi:schemaLocation="http://maven.apache.org/POM/4.0.0 http://maven.apache.org/xsd/maven-4.0.0.xsd">
  <parent>
      <artifactId>hub-ware</artifactId>
      <groupId>com.hub</groupId>
      <version>1.0-SNAPSHOT</version>
  </parent>
  <modelVersion>4.0.0</modelVersion>
  <artifactId>example-biz-a</artifactId>
  <properties>
      <maven.compiler.source>8</maven.compiler.source>
      <maven.compiler.target>8</maven.compiler.target>
  </properties>
  <dependencies>
      <dependency>
          <groupId>org.springframework.boot</groupId>
          <artifactId>spring-boot</artifactId>
      </dependency>
      <dependency>
          <groupId>org.springframework.boot</groupId>
          <artifactId>spring-boot-starter-web</artifactId>
      </dependency>
      <dependency>
          <groupId>com.hub</groupId>
          <artifactId>hub-pf-a-dependencies</artifactId>
          <version>${hub.example.version}</version>
      </dependency>
      <dependency>
          <groupId>com.hub</groupId>
          <artifactId>hub-pf-b-dependencies</artifactId>
          <version>${hub.example.version}</version>
      </dependency>
  </dependencies>
</project>
11.2 example-biz-a打包成可执行Jar包
example-biz-a打包成可执行Jar包,则在pom.xml中添加配置。
<packaging>jar</packaging>
<build>
 <plugins>
   <plugin>
    <groupId>org.springframework.boot</groupId>
    <artifactId>spring-boot-maven-plugin</artifactId>
    <version>${spring.boot.maven.plugin.version}</version>
    <configuration>
        <fork>true</fork>
        <addResources>true</addResources>
    </configuration>
    <executions>
      <execution>
          <!-- 把依赖包打包到可执行的jar包中-->
          <goals>
              <goal>repackage</goal>
          </goals>
      </execution>
    </executions>
   </plugin>
 </plugins>
</build>
五、案例场景二
本例实现基于Maven和IntelliJ IDEA搭建多模块微服务项目(工程)。
1.规划微服务
规划微服务如表格。
2.创建hub-example
hub-example,是顶级工程,是一个聚合工程,用来管理工程所有模块。在hub-example中的src目录不写代码,可以删除。在pom.xml中打包方式配置为pom。
2.1 创建Maven工程
运行IDEA,依次选择菜单File->New->Project进入New Project对话框,如下配置。
2.2 配置工程信息
配置工程信息。

2.3 创建完成
项目创建完成如图,项目初始列表,pom.xml初始化文件
3.配置hub-example的pom.xml
配置hub-example的pom.xml,包括以下几点内容,细节在pom.xml查看。
(1)配置打包方式。
(2)配置核心依赖。
(3)配置版本管理。
(4)配置打包插件。
(5)配置yml文件读取pom文件的标签值。
<?xml version="1.0" encoding="UTF-8"?>
<project xmlns="http://maven.apache.org/POM/4.0.0"
         xmlns:xsi="http://www.w3.org/2001/XMLSchema-instance"
         xsi:schemaLocation="http://maven.apache.org/POM/4.0.0 http://maven.apache.org/xsd/maven-4.0.0.xsd">
    <modelVersion>4.0.0</modelVersion>

    <groupId>com.hub</groupId>
    <artifactId>hub-example</artifactId>
    <version>1.0-SNAPSHOT</version>
    <!--聚合工程,打包方式:pom-->
    <packaging>pom</packaging>
    <!-- 版本管理 -->
    <properties>
        <maven.compiler.source>8</maven.compiler.source>
        <maven.compiler.target>8</maven.compiler.target>
        <project.build.sourceEncoding>UTF-8</project.build.sourceEncoding>
        <java.version>1.8</java.version>
        <spring.boot.version>2.6.3</spring.boot.version>
        <spring.cloud.version>2021.0.1</spring.cloud.version>
        <spring.cloud.alibaba.version>2021.0.1.0</spring.cloud.alibaba.version>
        <!-- 统一管理hub-example的版本,在子模块直接使用此版本即可-->
        <hub.example.version>1.0-SNAPSHOT</hub.example.version>
        <spring.boot.maven.plugin.version>2.6.3</spring.boot.maven.plugin.version>
        <mysql.version>8.0.23</mysql.version>
        <druid.version>1.2.5</druid.version>
        <mybatis.version>2.2.0</mybatis.version>
        <lombok.version>1.18.18</lombok.version>
        <fastjson.version>1.2.83</fastjson.version>
        <hutool.version>5.7.22</hutool.version>
        <commons.lang3.version>3.12.0</commons.lang3.version>
        <commons.io.version>2.11.0</commons.io.version>
    </properties>
    <!-- 核心依赖   -->
    <dependencyManagement>
        <dependencies>
            <dependency>
                <groupId>org.springframework.boot</groupId>
                <artifactId>spring-boot-dependencies</artifactId>
                <version>${spring.boot.version}</version>
                <type>pom</type>
                <scope>import</scope>
            </dependency>
            <dependency>
                <groupId>org.springframework.cloud</groupId>
                <artifactId>spring-cloud-dependencies</artifactId>
                <version>${spring.cloud.version}</version>
                <type>pom</type>
                <scope>import</scope>
            </dependency>
            <dependency>
                <groupId>com.alibaba.cloud</groupId>
                <artifactId>spring-cloud-alibaba-dependencies</artifactId>
                <version>${spring.cloud.alibaba.version}</version>
                <type>pom</type>
                <scope>import</scope>
            </dependency>
        </dependencies>
    </dependencyManagement>
    <build>
        <!-- yml文件读取pom文件的标签值 -->
        <resources>
            <resource>
                <directory>src/main/resources</directory>
                <filtering>true</filtering>
            </resource>
        </resources>
        <plugins>
            <!-- 配置打包插件 -->
            <plugin>
                <groupId>org.springframework.boot</groupId>
                <artifactId>spring-boot-maven-plugin</artifactId>
                <version>${spring.boot.maven.plugin.version}</version>
                <configuration>
                    <fork>true</fork>
                    <addResources>true</addResources>
                </configuration>
            </plugin>
        </plugins>
    </build>
    <profiles>
        <profile>
            <!-- yml配置文件环境切换: dev/test/prod -->
            <id>env</id>
            <properties>
                <profiles.active>dev</profiles.active>
            </properties>
            <activation>
                <activeByDefault>true</activeByDefault>
            </activation>
        </profile>
    </profiles>
</project>
4.创建hub-example管理模块的目录
在hub-example下添加目录来管理模块。
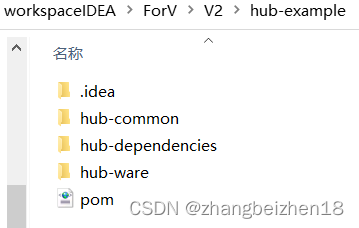
在D:\workspaceIDEA\ForV\V2\hub-example目录中创建文件夹。
5.hub-example添加子模块
5.1创建目录
在hub-example工程目录下新建hub-dependencies目录,用来管理模块。
即在D:\workspaceIDEA\ForV\V2\hub-example新建hub-dependencies文件夹。
5.2配置Module版本和方式
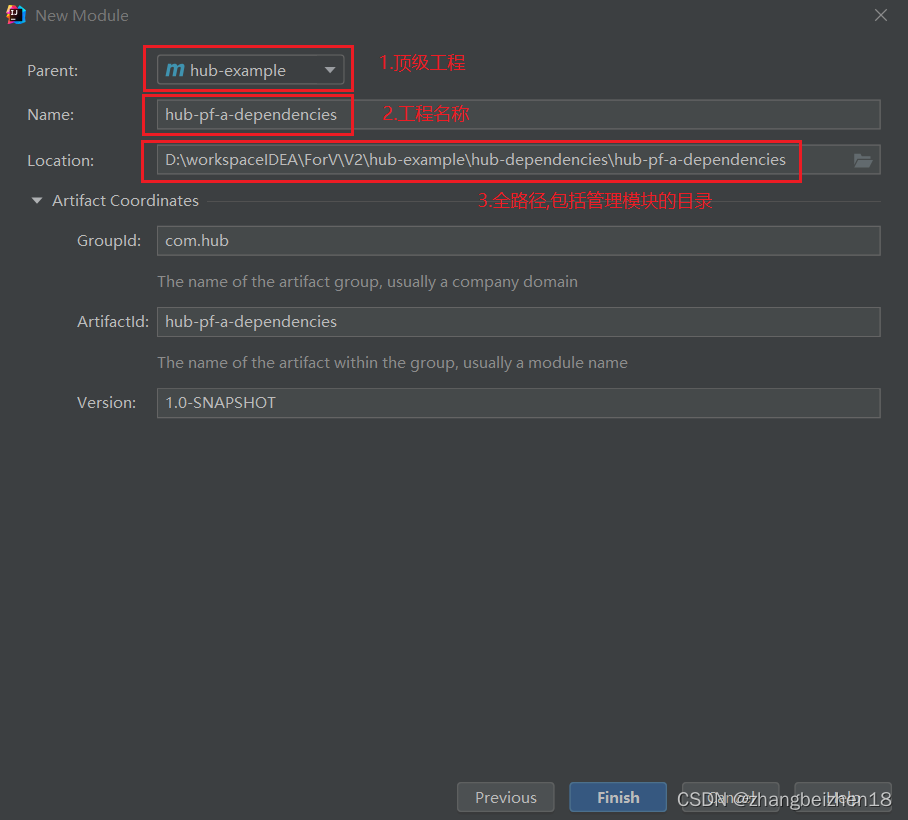
在hub-example工程下的hub-dependencies目录创建hub-pf-a-dependencies模块。
选中hub-example,右键,依次选择:New->Module,进入模块配置对话框。

5.3配置Module基础信息
配置hub-dependencies基础信息。
5.4添加剩余模块
在hub-example工程下的hub-dependencies目录,创建hub-pf-b-dependencies模块。
在hub-example工程下的hub-common目录,创建example-common-entity模块。
在hub-example工程下的hub-common目录,创建example-common-utils模块。
在hub-example工程下的hub-ware目录,创建example-biz-a模块。
在hub-example工程下的hub-ware目录,创建example-biz-b模块。
5.5 hub-example的pom文件变化
hub-example的pom.xml文件中新增了<modules>标签即如下。即hub-example管理以下包含的模块。
<modules>
  <module>hub-dependencies/hub-pf-a-dependencies</module>
  <module>hub-dependencies/hub-pf-b-dependencies</module>
  <module>hub-common/example-common-entity</module>
  <module>hub-common/example-common-utils</module>
  <module>hub-ware/example-biz-a</module>
  <module>hub-ware/example-biz-b</module>
</modules>
5.6 hub-example工程列表
hub-example工程列表和案例场景一不一样。
在场景一:hub-common是聚合工程,有pom.xml文件。
在场景二:hub-common是普通目录,没有pom.xml文件。
6.hub-example添加依赖
场景一和场景二添加依赖方式一样。
6.1 hub-pf-a-dependencies依赖
hub-pf-a-dependencies依赖,主要是基础Jar包。
<?xml version="1.0" encoding="UTF-8"?>
<project xmlns="http://maven.apache.org/POM/4.0.0"
       xmlns:xsi="http://www.w3.org/2001/XMLSchema-instance"
       xsi:schemaLocation="http://maven.apache.org/POM/4.0.0 http://maven.apache.org/xsd/maven-4.0.0.xsd">
  <parent>
      <artifactId>hub-dependencies</artifactId>
      <groupId>com.hub</groupId>
      <version>1.0-SNAPSHOT</version>
  </parent>
  <modelVersion>4.0.0</modelVersion>
  <artifactId>hub-pf-a-dependencies</artifactId>
  <properties>
      <maven.compiler.source>8</maven.compiler.source>
      <maven.compiler.target>8</maven.compiler.target>
  </properties>
  <dependencies>
   <!--基础工具-->
   <dependency>
       <groupId>org.projectlombok</groupId>
       <artifactId>lombok</artifactId>
       <version>${lombok.version}</version>
   </dependency>
   <dependency>
       <groupId>com.alibaba</groupId>
       <artifactId>fastjson</artifactId>
       <version>${fastjson.version}</version>
   </dependency>
   <dependency>
       <groupId>org.apache.commons</groupId>
       <artifactId>commons-lang3</artifactId>
       <version>${commons.lang3.version}</version>
   </dependency>
   <dependency>
       <groupId>commons-io</groupId>
       <artifactId>commons-io</artifactId>
       <version>${commons.io.version}</version>
   </dependency>
   <dependency>
       <groupId>cn.hutool</groupId>
       <artifactId>hutool-all</artifactId>
       <version>${hutool.version}</version>
   </dependency>
  </dependencies>
</project>
6.2 hub-pf-b-dependencies依赖
hub-pf-a-dependencies依赖,主要是操作数据库的Jar包。
<?xml version="1.0" encoding="UTF-8"?>
<project xmlns="http://maven.apache.org/POM/4.0.0"
       xmlns:xsi="http://www.w3.org/2001/XMLSchema-instance"
       xsi:schemaLocation="http://maven.apache.org/POM/4.0.0 http://maven.apache.org/xsd/maven-4.0.0.xsd">
  <parent>
      <artifactId>hub-dependencies</artifactId>
      <groupId>com.hub</groupId>
      <version>1.0-SNAPSHOT</version>
  </parent>
  <modelVersion>4.0.0</modelVersion>
  <artifactId>hub-pf-b-dependencies</artifactId>
  <properties>
      <maven.compiler.source>8</maven.compiler.source>
      <maven.compiler.target>8</maven.compiler.target>
  </properties>
  <dependencies>
      <!--数据库操作-->
      <dependency>
          <groupId>mysql</groupId>
          <artifactId>mysql-connector-java</artifactId>
          <version>${mysql.version}</version>
      </dependency>
      <dependency>
          <groupId>com.alibaba</groupId>
          <artifactId>druid-spring-boot-starter</artifactId>
          <version>${druid.version}</version>
      </dependency>
      <dependency>
          <groupId>com.baomidou</groupId>
          <artifactId>mybatis-plus-boot-starter</artifactId>
          <version>${mybatis.plus.version}</version>
      </dependency>
  </dependencies>
</project>
6.3 example-common-utils添加依赖
example-common-utils模块添加依赖hub-pf-a-dependencies。
<?xml version="1.0" encoding="UTF-8"?>
<project xmlns="http://maven.apache.org/POM/4.0.0"
       xmlns:xsi="http://www.w3.org/2001/XMLSchema-instance"
       xsi:schemaLocation="http://maven.apache.org/POM/4.0.0 http://maven.apache.org/xsd/maven-4.0.0.xsd">
  <parent>
      <artifactId>hub-common</artifactId>
      <groupId>com.hub</groupId>
      <version>1.0-SNAPSHOT</version>
  </parent>
  <modelVersion>4.0.0</modelVersion>
  <artifactId>example-common-utils</artifactId>
  <properties>
      <maven.compiler.source>8</maven.compiler.source>
      <maven.compiler.target>8</maven.compiler.target>
  </properties>
  <dependencies>
      <dependency>
          <groupId>com.hub</groupId>
          <artifactId>hub-pf-a-dependencies</artifactId>
          <version>${hub.example.version}</version>
      </dependency>
  </dependencies>
</project>
6.4 example-biz-a依赖
example-biz-a需求:基础依赖、数据库操作依赖、springboot依赖。
注意:spring-boot、spring-cloud、spring-cloud-alibaba,在hub-example中已经引入顶级依赖。在子工程中使用其模块,可以不需要加版本号。
<?xml version="1.0" encoding="UTF-8"?>
<project xmlns="http://maven.apache.org/POM/4.0.0"
       xmlns:xsi="http://www.w3.org/2001/XMLSchema-instance"
       xsi:schemaLocation="http://maven.apache.org/POM/4.0.0 http://maven.apache.org/xsd/maven-4.0.0.xsd">
  <parent>
      <artifactId>hub-ware</artifactId>
      <groupId>com.hub</groupId>
      <version>1.0-SNAPSHOT</version>
  </parent>
  <modelVersion>4.0.0</modelVersion>
  <artifactId>example-biz-a</artifactId>
  <properties>
      <maven.compiler.source>8</maven.compiler.source>
      <maven.compiler.target>8</maven.compiler.target>
  </properties>
  <dependencies>
      <dependency>
          <groupId>org.springframework.boot</groupId>
          <artifactId>spring-boot</artifactId>
      </dependency>
      <dependency>
          <groupId>org.springframework.boot</groupId>
          <artifactId>spring-boot-starter-web</artifactId>
      </dependency>
      <dependency>
          <groupId>com.hub</groupId>
          <artifactId>hub-pf-a-dependencies</artifactId>
          <version>${hub.example.version}</version>
      </dependency>
      <dependency>
          <groupId>com.hub</groupId>
          <artifactId>hub-pf-b-dependencies</artifactId>
          <version>${hub.example.version}</version>
      </dependency>
  </dependencies>
</project>
6.5 example-biz-a打包成可执行Jar包
example-biz-a打包成可执行Jar包,则在pom.xml中添加配置。
<packaging>jar</packaging>
<build>
 <plugins>
   <plugin>
    <groupId>org.springframework.boot</groupId>
    <artifactId>spring-boot-maven-plugin</artifactId>
    <version>${spring.boot.maven.plugin.version}</version>
    <configuration>
        <fork>true</fork>
        <addResources>true</addResources>
    </configuration>
    <executions>
      <execution>
          <!-- 把依赖包打包到可执行的jar包中-->
          <goals>
              <goal>repackage</goal>
          </goals>
      </execution>
    </executions>
   </plugin>
 </plugins>
</build>
六、打包
本例是Jar包方式打包,即生成的可执行文件时Jar包。
如需生成War包,需修改启动类。具体细节,可以查阅如下博文。
#SpringBoot使用外置Tomcat启动(取消内置Tomcat)
https://blog.csdn.net/zhangbeizhen18/article/details/124875498
1.一键全部打包
选择hub-example,展开LifeCycle,打包使用package,点击即可。清除使用clean,点击即可。
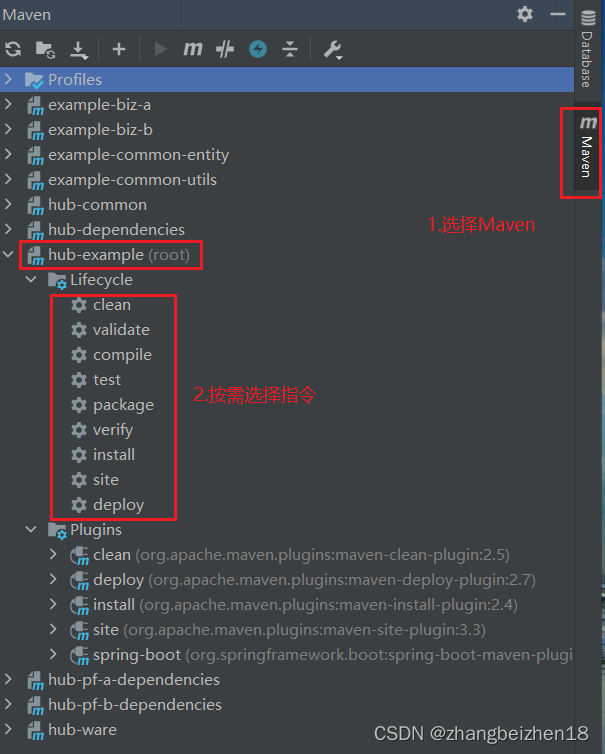
2.选择指定项目打包
选择指定工程,展开LifeCycle,打包使用package,点击即可。清除使用clean,点击即可。
按需选择指令即可。
3.打包Jar包目录
打包Jar包目录,默认在每个工程的target目录下。
七、IDEA技巧
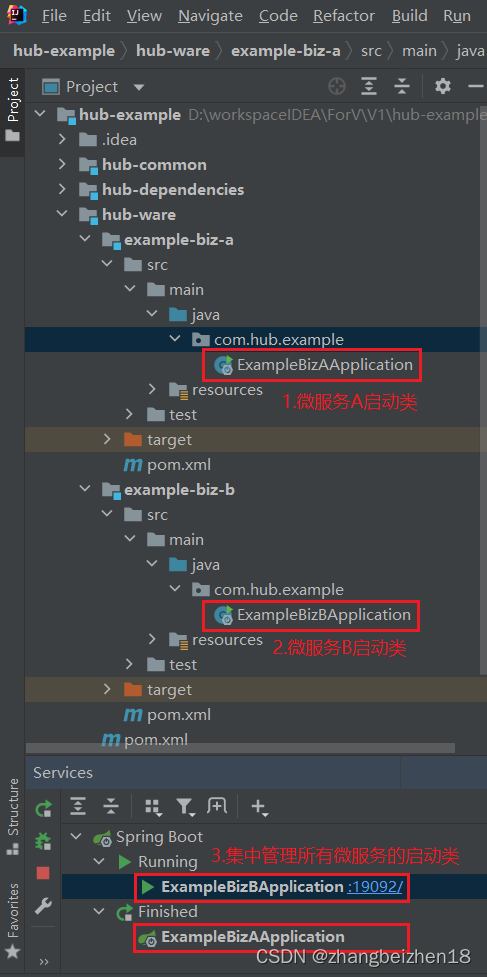
1.设置RunDashboard
基于Maven和IntelliJ IDEA搭建多模块微服务项目(工程),会有很多微应用同时启动。可以配置RunDashboard,便于管理微服务启动或者关闭,文件位置如下。
# 本例工程名是hub-example
hub-example/.idea/workspace.xml
IDEA新建项目在workspace.xml添加RunDashboard配置。
在workspace.xml的<project></project>标签中添加如下:
<component name="RunDashboard">
 <option name="configurationTypes">
   <set>
     <option value="SpringBootApplicationConfigurationType" />
   </set>
 </option>
</component>
效果:
以上,感谢。
2022年7月16日


 5677
5677


 被折叠的 条评论
为什么被折叠?
被折叠的 条评论
为什么被折叠?
 到【灌水乐园】发言


