


本文介绍Spring集成RMI
RMI分服务端和客户端,RMI是同步阻塞的,客户端需等服务器被调用代码运行结束后才能继续。
一、服务器:
1、远程接口接口(被访问的)RMITestService.java
import java.rmi.RemoteException;
public interface RMITestService {
RMIBean getRMIBean(long id) throws RemoteException;
}
2、远程接口实现类:RMITestServiceImpl.java
import java.rmi.RemoteException;
@Service
public class RMITestServiceImpl implements RMITestService{
@Override
public RMIBean getRMIBean(long id) throws RemoteException {
RMIBean bean = new RMIBean();
bean.setId(id);
bean.setMsg("获取到了RMIBean");
System.out.println("client connected");
return bean;
}
}
3、RMIBean需要Serializable
import java.io.Serializable;
public class RMIBean implements Serializable{
private String msg;
private long id;
public String getMsg() {
return msg;
}
public void setMsg(String msg) {
this.msg = msg;
}
public long getId() {
return id;
}
public void setId(long id) {
this.id = id;
}
}
4、Spring发布RMITestService接口(本文使用javaconfig):
import org.springframework.context.annotation.Bean;
import org.springframework.remoting.rmi.RmiServiceExporter;
@Configuration
public class RMIConfig {
@Bean
public RmiServiceExporter rmiExporter(RMITestService rmiTestService){
RmiServiceExporter rmiServiceExporter = new RmiServiceExporter();
rmiServiceExporter.setService(rmiTestService);//注入接口服务,注意RMITestService 已经有@Service
//所以可以自动注入,也可以在配置类中声明@Bean
rmiServiceExporter.setServiceName("RMITestService");//配置发布接口名称
rmiServiceExporter.setServiceInterface(RMITestService.class);//配置发布接口类
rmiServiceExporter.setRegistryPort(1499);//自定义端口
return rmiServiceExporter;
}
}
二、客户端
1、客户端需要定义与远程服务器发布的同样接口RMITestService.java无需实现
import com.springapp.mvc.RMIServer.bean.RMIBean;
public interface RMITestService {
RMIBean getRMIBean(long id);
}
2、RMIBean.java(需要注意的是RMIBean需要Serializable,另外类的包名与服务端也需要一致)
import java.io.Serializable;
public class RMIBean implements Serializable{
private String msg;
private long id;
public String getMsg() {
return msg;
}
public void setMsg(String msg) {
this.msg = msg;
}
public long getId() {
return id;
}
public void setId(long id) {
this.id = id;
}
}
3、装配RMI服务(javaconfig)RMIConfig.java
import org.springframework.context.annotation.Bean;
import org.springframework.context.annotation.Configuration;
import org.springframework.remoting.rmi.RmiProxyFactoryBean;
@Configuration
public class RMIConfig {
@Bean
public RmiProxyFactoryBean rmiTestService(){
RmiProxyFactoryBean rmiProxyFactoryBean = new RmiProxyFactoryBean();
rmiProxyFactoryBean.setServiceUrl("rmi://localhost:1499/RMITestService");//远程服务器地址以及服务接口
rmiProxyFactoryBean.setServiceInterface(RMITestService.class);
rmiProxyFactoryBean.setLookupStubOnStartup(false);//预查找远程对象 默认为true,若为true服务器未启动客户端启动则会出错
rmiProxyFactoryBean.setRefreshStubOnConnectFailure(true);//这个属性是表示是否连接出错时自动重连
return rmiProxyFactoryBean;
}
}
4、调用RMITestService
RMIController.java
import org.springframework.beans.factory.annotation.Autowired;
import org.springframework.web.bind.annotation.RequestMapping;
import org.springframework.web.bind.annotation.RestController;
@RestController
public class RMIController {
@Autowired
private RMITestService rmiTestService;
@RequestMapping("/rmi")
public RMIBean watch() throws Throwable {
return rmiTestService.getRMIBean(888);
}
}
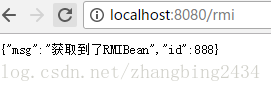
范围客户端controller后得到如下结果
若有疑问欢迎沟通。(当然不会马上回复)


 430
430


 被折叠的 条评论
为什么被折叠?
被折叠的 条评论
为什么被折叠?
 到【灌水乐园】发言


