


在这里简单介绍一下如果使用注解。使用注解时,对DispatcherServlet的配置没有影响,还是要在web.xml中完成。
1. 在com.test.Controller包中创建一个HelloControll.java的Controller,然后在applicationContext.xml中开启自动扫描。
<context:component-scan base-package="com.test.controller"/>
在base-package中指定要扫描的路径
2. 另外,要开启@RequestMapping注解映射,需要在applicationContext.xml配置文件中定义RequestMappingHandlerMapping(类定义前)和
RequestMappingHandlerAdapter(方法定义前)两个bean组件
<!--定义支持@RequestMapping注解的HandlerMapping组件-->
<bean class="org.springframework.web.servlet.mvc.method.annotation.RequestMappingHandlerMapping"></bean>
<bean class="org.springframework.web.servlet.mvc.method.annotation.RequestMappingHandlerAdapter"></bean>

3. 常用的注解
Controller是控制器,推荐使用@Controller注解
DAO使用@Repository注解
Service组件使用@Service注解
还有没有办法明确归属到某个组件的可以使用@Component注解
在控制器的类名上添加@Controller注解,表示控制器交给了SpringMVC管理
在方法名上添加@RequestMapping("/hello")来映射要访问的路径

4. @RequestMapping注解,既可以加载方法名上,也可以加在类名上
@Controller
@RequestMapping("/mvc")
public class HelloController {
@RequestMapping("/hello")//可以不用写.from,会匹配web.xml中url-pattern设置的后缀名
public String execute(){
return "hello";
}
}
那么访问的地址就变成了http://localhost:8080/mvc/hello.from

5. 上面的配置HandlerMapping的过程有些复杂,从Spring3.2版本开始,可以使用下面XML配置简化RequestMappingHandlerMapping和RequestMappingHandlerAdapter的定义
<mvc:annotation-driver/>
就这么一句话就可以啦。
如果在添加了 <mvc:annotation-driver/>后报错,需要在头部将其命名空间和约束引入
<?xml version="1.0" encoding="UTF-8"?>
<beans xmlns="http://www.springframework.org/schema/beans"
xmlns:xsi="http://www.w3.org/2001/XMLSchema-instance" xmlns:utils="http://www.springframework.org/schema/util"
xmlns:context="http://www.springframework.org/schema/context"
xmlns:mvc="http://www.springframework.org/schema/mvc"
xsi:schemaLocation="http://www.springframework.org/schema/beans
http://www.springframework.org/schema/beans/spring-beans.xsd
http://www.springframework.org/schema/util
http://www.springframework.org/schema/util/spring-util.xsd
http://www.springframework.org/schema/context
http://www.springframework.org/schema/context/spring-context.xsd
http://www.springframework.org/schema/mvc
http://www.springframework.org/schema/mvc/spring-mvc.xsd">

6. 接收请求参数
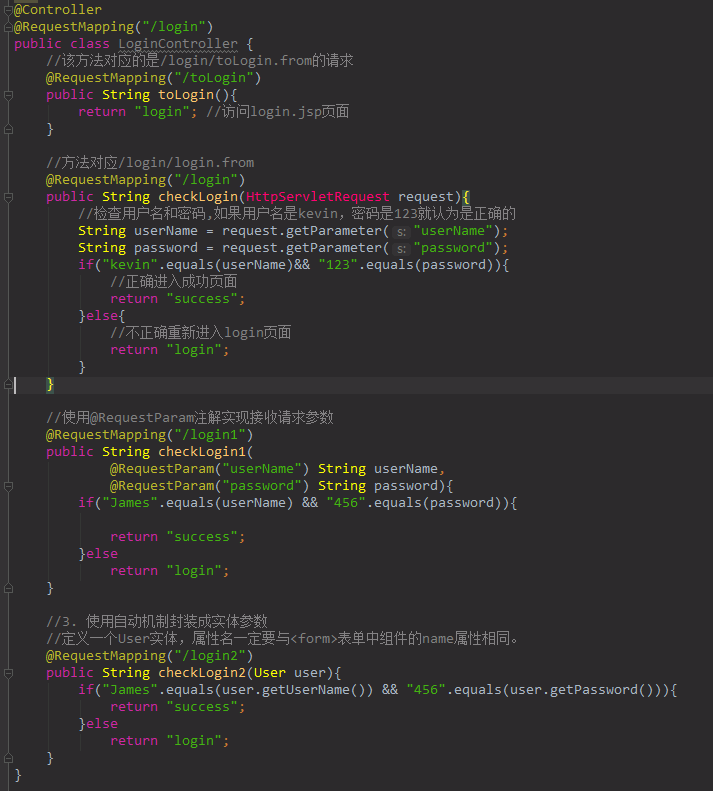
有以下三种方式
1. 使用getParameter方法接收
2. 获取参数还可以使用@RequestParam注解来实现
3. 使用自动机制封装成实体参数
今天就先介绍这些。


 265
265


 被折叠的 条评论
为什么被折叠?
被折叠的 条评论
为什么被折叠?
 到【灌水乐园】发言


