


这是第三篇。讲解如何整合JSP
3. Spring Boot整合JSP
前两篇文章的学生的例子,发现网页上只能看到数据,没有图形界面(缺视图),作为展示肯定不行。怎么办?就需要单独建一个 web 工程,因为 纯maven工程 没有web工程的组件。
1、pom.xml依赖文件中导入相关依赖

<parent>
    <groupId>org.springframework.boot</groupId>
    <artifactId>spring-boot-starter-parent</artifactId>
    <version>3.0.2</version>
</parent>

<dependencies>
    <!--web-->
    <dependency>
        <groupId>org.springframework.boot</groupId>
        <artifactId>spring-boot-starter-web</artifactId>
    </dependency>

    <!--整合JSP,既然是整合JSP,肯定把整合JSP的依赖加进来,不加无法整合-->
    <dependency>
        <groupId>org.springframework.boot</groupId>
        <artifactId>spring-boot-starter-tomcat</artifactId>
    </dependency>
    <dependency>
        <groupId>org.apache.tomcat.embed</groupId>
        <artifactId>tomcat-embed-jasper</artifactId>
    </dependency>

    <!-- JSTL -->
    <dependency>
        <groupId>jstl</groupId>
        <artifactId>jstl</artifactId>
        <version>1.2</version>
    </dependency>

    <dependency>
        <groupId>org.projectlombok</groupId>
        <artifactId>lombok</artifactId>
    </dependency>
</dependencies>
2、创建配置文件 application.yml (记得在main文件夹中创建 java、resources文件)
# 配置内嵌的tomcat端口,不配就是默认的8080
server:
  port: 8181

# 配视图解析器
spring:
  mvc:
    view:
      prefix: /
      suffix: .jsp
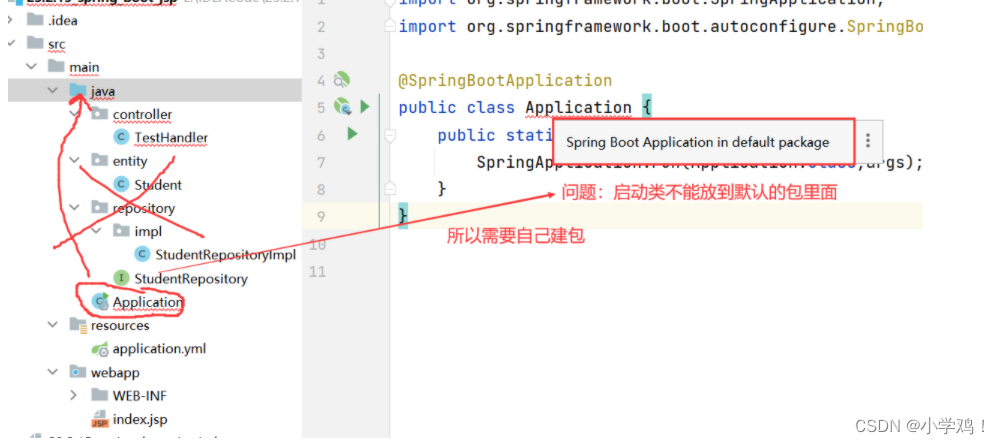
3、创建启动类,注意启动类放置的位置,否者会报错。
4、创建Handler
@Controller //这里数据、视图都要,所以是Controller
@RequestMapping("/display")
public class TestHandler {

    @Autowired
    private StudentRepository studentRepository;

    //主页展示
    @GetMapping("/index")
    public ModelAndView index(){
        ModelAndView modelAndView = new ModelAndView();
        modelAndView.setViewName("index"); //来到index.jsp
        modelAndView.addObject("list",studentRepository.findAll());
        return modelAndView;
    }

    //通过id查找
    @GetMapping("/findById/{id}")
    public ModelAndView findBy(@PathVariable("id") long id){
        ModelAndView modelAndView = new ModelAndView();
        modelAndView.setViewName("update"); //查到学生信息后来到修改页面
        modelAndView.addObject("student",studentRepository.findById(id));
        return modelAndView;
    }

    //删除 正常情况下是DeleteMapping,但在index.jsp中是使用
    //超链接进行删除的,所以是GetMapping
    @GetMapping("/deleteById/{id}")
    public String delete(@PathVariable("id") long id){
        studentRepository.deleteById(id);
        return "redirect:/display/index"; //删除后重定向到展示页面

    }

    //添加
    @PostMapping("/add")
    public String add(Student student){
        studentRepository.saveOrUpdate(student);
        return "redirect:/display/index"; //添加后重定向到展示页面
    }

    //修改
    @PostMapping("/update")
    public String update(Student student){
        studentRepository.saveOrUpdate(student);
        return "redirect:/hello/index"; //修改后重定向到展示页面
    }
}
5、写 jsp 页面
<!--index.jsp-->

<%@ page contentType="text/html;charset=UTF-8" language="java" %>
<%@ page isELIgnored="false" %>
<%@ taglib prefix="c" uri="http://java.sun.com/jsp/jstl/core" %>
<html>
    <head>
        <title>主页学生信息展示</title>
    </head>
    <body>
        <h1>学生信息</h1>
        <table>
            <tr>
                <th>学生编号</th>
                <th>学生姓名</th>
                <th>学生年龄</th>
                <th>操作</th>
            </tr>
            <c:forEach items="${list}" var="student">
                <tr>
                    <td>${student.id}</td>
                    <td>${student.name}</td>
                    <td>${student.age}</td>
                    <td>
                        <a href="/display/findById/${student.id}">修改</a> <!--修改首先要查出来,而且修改需要页面-->
                        <a href="/display/deleteById/${student.id}">删除</a>
                    </td>
                </tr>
            </c:forEach>
        </table>
 <%--添加:要给个页面--%>
        <a href="/add.jsp">添加学生</a>
    </body>
</html>
<!--add.jsp-->

<%@ page contentType="text/html;charset=UTF-8" language="java" %>
<html>
    <head>
        <title>添加学生信息</title>
    </head>
    <body>
        <form action="/display/add" method="post">
            学生编号:<input type="text" name="id"/><br/>
            学生姓名:<input type="text" name="name"/><br/>
            学生年龄:<input type="text" name="age"/><br/>
            <input type="submit" value="添加"/>
        </form>
    </body>
</html>
<!--update.jsp-->
<%@ page contentType="text/html;charset=UTF-8" language="java" %>
<html>
    <head>
        <title>修改学生信息</title>
    </head>
    <body>
        <form action="/display/update" method="post">
            学生编号:<input type="text" name="id" value="${student.id}" readonly/><br/>
            学生姓名:<input type="text" name="name" value="${student.name}"/><br/>
            学生年龄:<input type="text" name="age" value="${student.age}"/><br/>
            <input type="submit" value="确认修改"/>
        </form>
    </body>
</html>
后续更精彩


 437
437


 被折叠的 条评论
为什么被折叠?
被折叠的 条评论
为什么被折叠?
 到【灌水乐园】发言


