


目录
一、概述
PXE(Preboot eXecution Environment)预启动执行环境是Intel公司提出的一种使用网络接口启动计算机的机制,能够代替本地数据存储设备(光盘、硬盘、USB设备)进行安装操作系统。目前,PXE启动已成为一种固件标准,大部分服务器BIOS都支持PXE启动,特别适合大规模集群批量、自动化、无人值守方式安装操作系统。
二、PXE启动过程
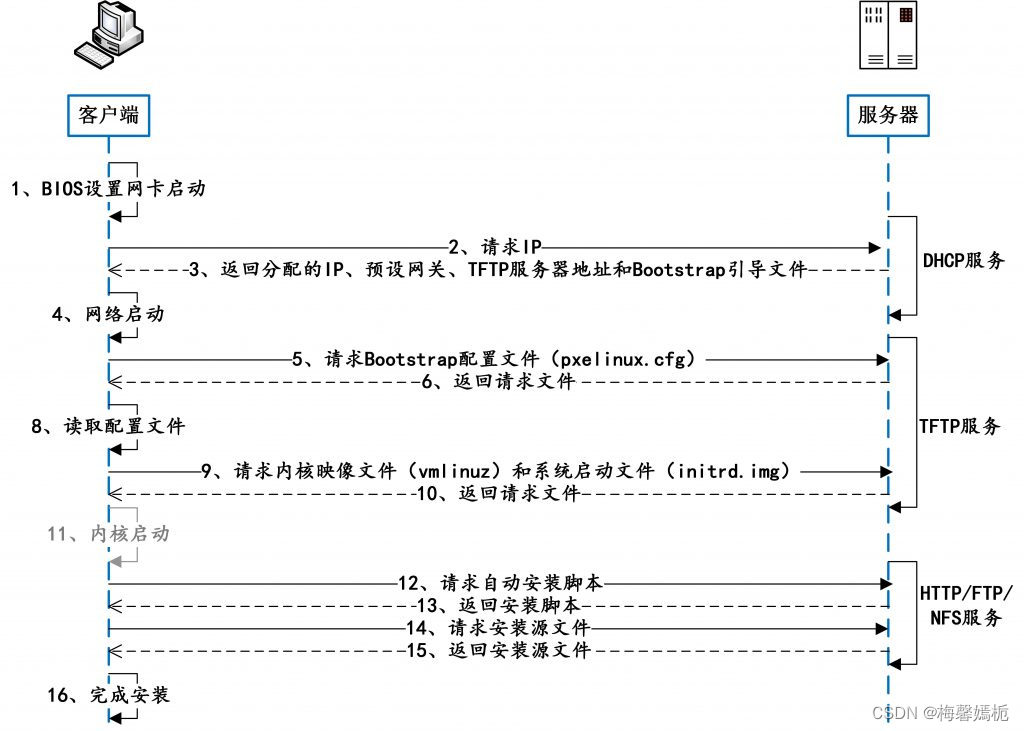
PXE工作基于Client/Server 的网络模式,安装操作系统的启动过程如下:客户端(未安装操作系统的计算机)设置BIOS开启网卡启动,然后会要求DHCP服务器分配 IP 地址,DHCP服务器处理返回分配的IP地址外,还返回预设网关、TFTP服务器地址及引导程序Bootstrap(该文件应该是一种由PXE启动规范规定的固定格式的可执行文件,类似于开机启动项的源码文件,Linux系统中为pxelinux.0),并由此支持来自网络的操作系统的启动过程,然后,终端通过 TFTP(trivial file transfer protocol)或MTFTP (multicast trivial file transfer protocol)协议下载Bootstrap的配置文件(pxelinux.cfg/default),客户端读取收到的读配置文件,根据其中内容,再次请求TFTP传送内核映像文件(vmlinuz)和系统启动文件(initrd.img)。完成后开始启动内核,内核程序读取Bootstrap的配置文件,通过网络获取操作系统自动安装脚本,并通过网络服务(NFS/FTP/HTTP)获得系统所需安装文件,按照自动安装脚本的配置进行安装。
假设服务器端同时提供DHCP、TFTP和安装源下载服务,那么PXE启动过程如如所示:
三、PXE安装CentOS 7.3系统
首先配置好服务器端,假设该服务器IP为192.168.2.22,安装DHCP、TFTP和HTTP服务。过程如下:
Shell
| 1 | # yum install -y httpd tftp-server dhcp |
安装syslinux system-config-kickstart,用户获取pxelinux.0引导程序和操作系统配置文件
Shell
| 1 | # yum install -y syslinux system-config-kickstart |
配置DHCP服务
Shell
| 1 2 3 4 5 6 7 8 9 10 11 | vim /etc/dhcp/dhcpd.conf ## 修改主机名和DNS配置 option domain-name "localhost"; option domain-name-servers 8.8.8.8; ## 配置DHCP子网范围及TFTP、引导程序文件信息 subnet 192.168.2.0 netmask 255.255.255.0 { range 192.168.2.151 192.168.2.180; option routers 192.168.2.2; next-server 192.168.2.22; #TFTP服务器IP filename "pxelinux.0"; } |
配置TFTP服务
| 1 2 3 4 5 6 7 8 9 10 11 12 13 14 | vim /etc/xinetd.d/tftp service tftp { socket_type = dgram protocol = udp wait = yes user = root server = /usr/sbin/in.tftpd server_args = -s /var/lib/tftpboot disable = no per_source = 11 cps = 100 2 flags = IPv4 } |
配置Apache服务提供安装源文件的HTTP下载服务
| 1 | cd /etc/httpd/conf.d/ |
## 移除并备份conf文件,目的不显示测试页面
| 1 2 3 | mv autoindex.conf autoindex.conf.bak mv userdir.conf userdir.conf.bak mv welcome.conf welcome.conf.bak |
安装源文件文件准备,需要将系统安装盘挂载到Apache根目录
| 1 2 | mkdir /var/www/html/centos mount -o loop CentOS-7-x86_64-DVD-1611.iso /var/www/html/centos/ |
准备操作系统安装选项配置文件ks.cfg,拷贝到Apache根目录,
说明:kickstart配置文件保存操作系统时的当前系统配置,包括时区、安装位置、系统分区等信息,操作系统安装成功后会自动保存ks文件:/root/anaconda-ks.cfg. 可以直接把这个文件放在http或tftp服务器下。只需将安装源从cdrom修改为安装源文件HTTP下载连接即可即可,这里提供一份CentOS 7.3的ks文件,注意不同版本的操作系统的ks文件可能不同,详情请参考这里。
Shell
| 1 2 3 4 5 6 7 8 9 10 11 12 13 14 15 16 17 18 19 20 21 22 23 24 25 26 27 28 29 30 31 32 33 34 35 36 37 38 39 40 41 42 43 44 45 46 47 48 49 50 51 52 53 54 55 56 57 58 59 60 61 62 63 64 65 66 67 68 69 70 71 72 73 74 75 76 77 78 79 80 81 82 | vim /var/www/html/ks.cfg #version=DEVEL # System authorization information auth --enableshadow --passalgo=sha512 # Use Http installation media url --url="http://192.168.2.22/centos" # Use graphical install graphical # Run the Setup Agent on first boot firstboot --enable ignoredisk --only-use=sda # Keyboard layouts keyboard --vckeymap=us --xlayouts='us' # System language lang en_US.UTF-8 # Network information 这里有三块网卡, network --bootproto=dhcp --device=ens33 --onboot=off --ipv6=auto --no-activate network --bootproto=dhcp --device=ens34 --onboot=off --ipv6=auto network --bootproto=dhcp --device=ens35 --onboot=off --ipv6=auto network --hostname=localhost.localdomain # Root password rootpw --iscrypted $6$IatLRXgg/JY41dsl$2PwvA5K8Y01WTYvWt1zRtvT.w2s7cLql2lLpiKIGR1qmUa.NLfliOuTOPUKL3UrKQbrQQAf2jRLy6jB5RNOFo. # System services services --disabled="chronyd" # System timezone timezone Asia/Shanghai --isUtc --nontp user --name=cloud --password=$6$02HZRDMOmXAA9/rc$8/.TIYzaaZSSn..O8brLNi.lvhUBTHZD29275kPpKr6gjT8VmobQZNqMTmz8NQP2agyLmC4a0umabyzUse..L/ --iscrypted --gecos="cloud" # X Window System configuration information xconfig --startxonboot # System bootloader configuration bootloader --append=" crashkernel=auto" --location=mbr --boot-drive=sda autopart --type=lvm # Partition clearing information clearpart --none --initlabel %packages @^developer-workstation-environment @base @core @debugging @desktop-debugging @dial-up @directory-client @fonts @gnome-apps @gnome-desktop @guest-desktop-agents @input-methods @internet-applications @internet-browser @java-platform @multimedia @network-file-system-client @performance @perl-runtime @print-client @ruby-runtime @virtualization-client @virtualization-hypervisor @virtualization-tools @web-server @x11 kexec-tools %end %addon com_redhat_kdump --enable --reserve-mb='auto' %end %anaconda pwpolicy root --minlen=6 --minquality=50 --notstrict --nochanges --notempty pwpolicy user --minlen=6 --minquality=50 --notstrict --nochanges --notempty pwpolicy luks --minlen=6 --minquality=50 --notstrict --nochanges --notempty %end |
给ks.cfg文件增加访问权限,并测试是否可以访问
| 1 | chmod 777 /var/www/html/ks.cfg |
浏览器访问http://192.168.2.22/ks.cfg
查看目录结构
| 1 2 3 4 5 6 7 8 9 10 11 12 13 14 15 16 17 18 19 20 | # tree -aL 2 /var/www/html/ /var/www/html/ ├── centos │ ├── CentOS_BuildTag │ ├── .discinfo │ ├── EFI │ ├── EULA │ ├── GPL │ ├── images │ ├── isolinux │ ├── LiveOS │ ├── Packages │ ├── repodata │ ├── RPM-GPG-KEY-CentOS-7 │ ├── RPM-GPG-KEY-CentOS-Testing-7 │ ├── TRANS.TBL │ └── .treeinfo └── ks.cfg 7 directories, 9 files |
准备Bootstrap引导程序(pxelinux.0)、引导配置文件(pxelinux.cfg/default)、内核映像文件(vmlinuz)和系统启动文件(initrd.img)等等
| 1 2 3 4 5 | cp /usr/share/syslinux/pxelinux.0 /var/lib/tftpboot/ mkdir /var/lib/tftpboot/pxelinux.cfg cp /var/www/html/centos/isolinux/isolinux.cfg /var/lib/tftpboot/pxelinux.cfg/default cp /var/www/html/centos/images/pxeboot/{vmlinuz,initrd.img} /var/lib/tftpboot/ cp /var/www/html/centos/isolinux/{vesamenu.c32,boot.msg,splash.png} /var/lib/tftpboot/ |
查看文档结构
| 1 2 3 4 5 6 7 8 9 10 11 12 13 | # tree /var/lib/tftpboot/ /var/lib/tftpboot/ ├── boot.msg ├── initrd.img ├── ks.cfg ├── pxelinux.0 ├── pxelinux.cfg │ └── default ├── splash.png ├── vesamenu.c32 └── vmlinuz 1 directory, 8 files |
修改引导配置文件,将安装选项中的 “inst.stage2=hd:LABEL=CentOS\x207\x20x86_64”改为“inst.ks=http://192.168.2.22/ks.cfg”
Vim
| 1 2 3 4 5 6 7 8 9 10 11 12 13 14 15 16 17 18 19 20 21 22 23 24 25 26 27 28 29 30 31 32 33 34 35 36 37 38 39 40 41 42 43 44 45 46 47 48 49 50 51 52 53 54 55 56 57 58 59 60 61 62 63 64 65 66 67 68 69 70 71 72 73 74 75 76 77 78 79 80 81 82 83 84 85 86 87 88 89 90 91 92 93 94 95 96 97 98 99 100 101 102 103 104 105 106 107 108 109 110 111 112 113 114 115 116 117 118 119 120 121 | vim /var/lib/tftpboot/pxelinux.cfg/default default vesamenu.c32 timeout 600 display boot.msg # Clear the screen when exiting the menu, instead of leaving the menu displayed. # For vesamenu, this means the graphical background is still displayed without # the menu itself for as long as the screen remains in graphics mode. menu clear menu background splash.png menu title CentOS Linux 7 menu vshift 8 menu rows 18 menu margin 8 #menu hidden menu helpmsgrow 15 menu tabmsgrow 13 # Border Area menu color border * #00000000 #00000000 none # Selected item menu color sel 0 #ffffffff #00000000 none # Title bar menu color title 0 #ff7ba3d0 #00000000 none # Press [Tab] message menu color tabmsg 0 #ff3a6496 #00000000 none # Unselected menu item menu color unsel 0 #84b8ffff #00000000 none # Selected hotkey menu color hotsel 0 #84b8ffff #00000000 none # Unselected hotkey menu color hotkey 0 #ffffffff #00000000 none # Help text menu color help 0 #ffffffff #00000000 none # A scrollbar of some type? Not sure. menu color scrollbar 0 #ffffffff #ff355594 none # Timeout msg menu color timeout 0 #ffffffff #00000000 none menu color timeout_msg 0 #ffffffff #00000000 none # Command prompt text menu color cmdmark 0 #84b8ffff #00000000 none menu color cmdline 0 #ffffffff #00000000 none # Do not display the actual menu unless the user presses a key. All that is displayed is a timeout message. menu tabmsg Press Tab for full configuration options on menu items. menu separator # insert an empty line menu separator # insert an empty line label linux menu label ^Install CentOS Linux 7 kernel vmlinuz menu default append initrd=initrd.img <strong>inst.ks=http://192.168.2.22/ks.cfg</strong> quiet label check menu label Test this ^media & install CentOS Linux 7 kernel vmlinuz append initrd=initrd.img inst.stage2=hd:LABEL=CentOS\x207\x20x86_64 rd.live.check quiet menu separator # insert an empty line # utilities submenu menu begin ^Troubleshooting menu title Troubleshooting label vesa menu indent count 5 menu label Install CentOS Linux 7 in ^basic graphics mode text help Try this option out if you're having trouble installing CentOS Linux 7. endtext kernel vmlinuz append initrd=initrd.img inst.ks=http://192.168.2.22/ks.cfg nomodeset quiet label rescue menu indent count 5 menu label ^Rescue a CentOS Linux system text help If the system will not boot, this lets you access files and edit config files to try to get it booting again. endtext kernel vmlinuz append initrd=initrd.img inst.stage2=hd:LABEL=CentOS\x207\x20x86_64 inst.ks=http://192.168.2.22/ks.cfg nomodeset rescue quiet label memtest menu label Run a ^memory test text help If your system is having issues, a problem with your system's memory may be the cause. Use this utility to see if the memory is working correctly. endtext kernel memtest menu separator # insert an empty line label local menu label Boot from ^local drive localboot 0xffff menu separator # insert an empty line menu separator # insert an empty line label returntomain menu label Return to ^main menu menu exit menu end |
配置完成后,关闭防火墙服务,并启动服务器上的各项服务。
| 1 2 3 4 5 6 7 8 9 10 11 12 13 14 15 16 17 | systemctl stop firewalld.service systemctl disable firewalld.service systemctl start httpd.service systemctl status httpd.service systemctl enable httpd.service systemctl start dhcpd.service systemctl status dhcpd.service systemctl enable dhcpd.service systemctl start xinetd.service systemctl status xinetd.service systemctl enable xinetd.service systemctl start tftp.socket systemctl status tftp.socket systemctl enable tftp.socket systemctl start tftp.service systemctl status tftp.service systemctl enable tftp.service |
测试安装:
查看服务端口是否正常 tcp-80、udp-67、udp-69
| 1 2 | ss -tilnp ss -uilnp |
或
| 1 2 | netstat -nat netstat -nau |
查看dhcp地址分配情况
| 1 | cat /var/lib/dhcpd/dhcpd.leases |
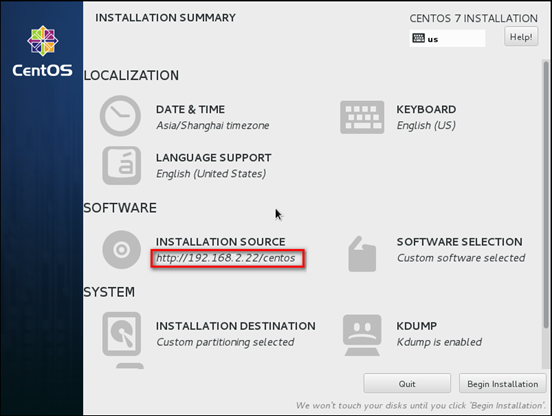
如果自动安装成功,会发现安装位置改为网络安装位置,如下:
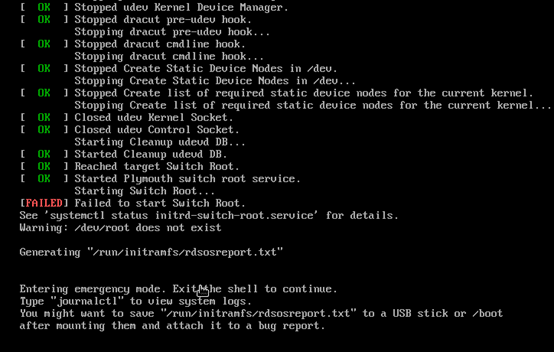
如果安装过程出现“/dev/root does not exist”不存在的错误,请检查pxelinux.cfg/default中引导位置是否修改。
参考引文:
PXE自动安装CentOS7详解_51CTO博客_centos7 安装nacos
第 8 章 使用 Anaconda 安装 Red Hat Enterprise Linux 7 | Red Hat Customer Portal


 2878
2878


 被折叠的 条评论
为什么被折叠?
被折叠的 条评论
为什么被折叠?
 到【灌水乐园】发言


