


 本文详细介绍了SSH原理,包括公钥加密和私钥解密,并提供了SSH免密登录到服务器的步骤,涉及生成密钥、复制公钥和使用expect脚本批量部署。

一、ssh原理简单介绍
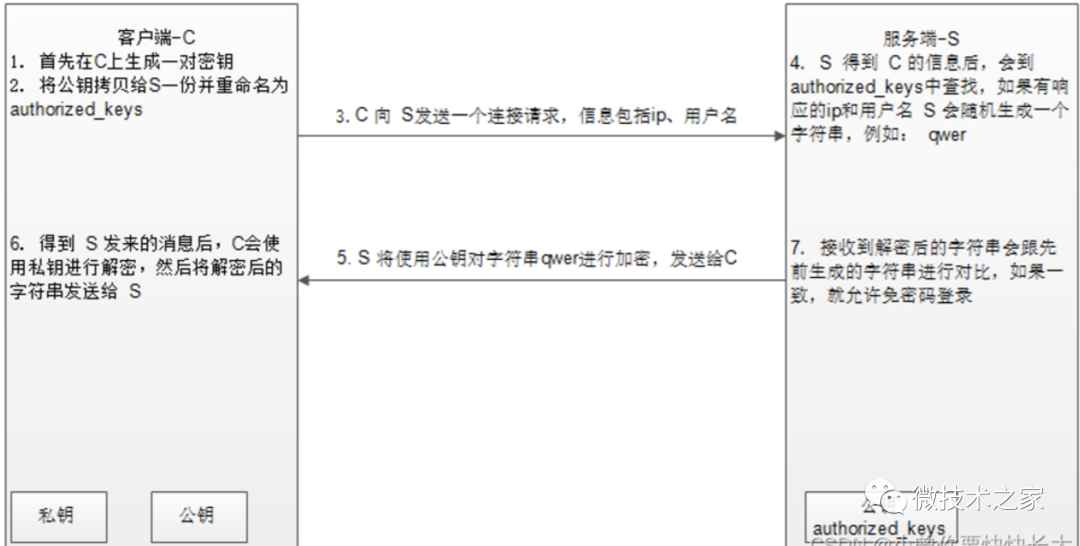
客户端生成一对公钥和私钥,并将自己的公钥发送到服务器上
其中公钥用来加密,私钥用来解密。
二、ssh免密登入实现步骤详解
我这就以服务器controller和客户端compute来做为例子
2.1、首先在controller上输入ssh-keygen -t rsa
一直敲回车就行,默认会在~/.ssh目录下生成密钥(id_rsa和id_rsa.pub),如果.ssh目录不存在,则会自动创建。
ssh-keygen -t rsa[root@controller ~]# ssh-keygen -t rsa
Generating public/private rsa key pair.
Enter file in which to save the key (/root/.ssh/id_rsa):
Created directory '/root/.ssh'.
Enter passphrase (empty for no passphrase):
Enter same passphrase again:
Your identification has been saved in /root/.ssh/id_rsa.
Your public key has been saved in /root/.ssh/id_rsa.pub.
The key fingerprint is:
ff:98:6c:fd:f4:75:c9:a7:34:ea:97:56:7e:1d:f8:95 root@controller
The key's randomart image is:
+--[ RSA 2048]----+
| |
| |
| |
| |
| S . .|
| . ..E+|
| .. =*B|
| ..+.++=B|
| .+.++o o|
+-----------------+其中第一个回车Enter file in which to save the key (/root/.ssh/id_rsa): 表示密钥存放的路径
第二个回车Enter passphrase (empty for no passphrase): 配置密码保护密钥,回车为不配置
第三个回车Enter same passphrase again: 确认第二步的密码
2.2、接下来便是要把公钥传到compute上面
这里用到了ssh-copy-id 命令,命令的作用是把本地主机的公钥复制到远程主机的authorized_keys文件上
命令格式为:ssh-copy-id root@compute_ip
ssh-copy-id root@10.0.0.31[root@compute ~]# ssh-copy-id root@10.0.0.31
The authenticity of host '10.0.0.31 (10.0.0.31)' can't be established.
ECDSA key fingerprint is df:b0:ea:90:20:ea:fc:5d:cc:cf:94:63:59:6a:17:97.
Are you sure you want to continue connecting (yes/no)? yes
/usr/bin/ssh-copy-id: INFO: attempting to log in with the new key(s), to filter out any that are already installed
/usr/bin/ssh-copy-id: INFO: 1 key(s) remain to be installed -- if you are prompted now it is to install the new keys
root@10.0.0.31's password:
Number of key(s) added: 1
Now try logging into the machine, with: "ssh 'root@10.0.0.31'"
and check to make sure that only the key(s) you wanted were added
第一次连接会提示是否要继续连接
Are you sure you want to continue connecting (yes/no)?输入yes即可
root@10.0.0.31's password:接着便是输入root用户的密码
查看compute节点上是否生成了authorized_keys
[root@compute ~]# ls .ssh
authorized_keys
2.3这样就完成了单方向的免密登入(controller登入compute),双向即在另一台节点上执行同样的操作就行了。
[root@controller .ssh]# ssh root@10.0.0.31
Last login: Sun Mar 13 21:34:18 2022 from 10.0.0.11
[root@compute ~]#
三、ssh免密登入脚本实现
#!/bin/bash
#---------------设置ssh免密登入---------------#
HOST_IP_NODE=10.0.0.31
HOST_PASS_NODE=0000
#安装expect软件包
yum install expect -y
expect << EOF
set timeout 5
spawn ssh-keygen -t rsa
expect "id_rsa):"
send "\r"
expect "passphrase):"
send "\r"
expect "again:"
send "\r"
expect eof
EOF
expect << EOF
set timeout 5
spawn ssh-copy-id root@$HOST_IP_NODE
expect "(yes/no)?"
send "yes\r"
expect "password:"
send "$HOST_PASS_NODE\r"
expect eof
EOF
四、脚本实现免密登入多台设备
#!/bin/bash
#---------------设置ssh免密登入对台设备---------------#
#设置要登入的节点ip地址
HOST_IP_NODE=(ip1 ip2 ip3 ... ipn)
HOST_PASS_NODE=(ps1 ps2 ps3 ... psn)
#安装expect软件包
yum install expect -y
expect << EOF
set timeout 5
spawn ssh-keygen -t rsa
expect "id_rsa):"
send "\r"
expect "passphrase):"
send "\r"
expect "again:"
send "\r"
expect eof
EOF

copy-id(){
expect << EOF
set timeout 5
spawn ssh-copy-id root@$1
expect "(yes/no)?"
send "yes\r"
expect "password:"
send "$2\r"
expect eof
EOF
}

#循环遍历
num=${#HOST_IP_NODE[*]}
fun(){
    for i in 0 1 ... $num
      do
        copy-id root@${HOST_IP_NODE[i]} ${HOST_PASS_NODE[i]}
      done
}


 1979
1979

 被折叠的 条评论
为什么被折叠?
被折叠的 条评论
为什么被折叠?
 到【灌水乐园】发言


