


不想使用系统的titlebar也不想一个一个的画,那么可以使用自定义的方式,而且便于重复使用。
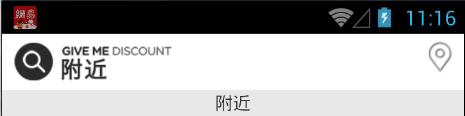
效果:
首先,在res/values目录下新建一个attrs.xml文件:
<?xml version="1.0" encoding="utf-8"?>
<resources>
    <declare-styleable name="MyTitleBar">
        <attr name="title_left_img" format="reference"/>
        <attr name="title_right_img" format="reference"/>
    </declare-styleable>
</resources>
package com.zhangli.betterlife.myView;

import android.content.Context;
import android.content.res.TypedArray;
import android.util.AttributeSet;
import android.view.View;
import android.widget.ImageView;
import android.widget.RelativeLayout;

import com.zhangli.betterlife.R;

public class MyTitleBar extends RelativeLayout  {
    private int  left_img, right_img;

    public MyTitleBar(Context context) {
        super(context);
    }
    public MyTitleBar(Context context, AttributeSet attrs) {
        super(context, attrs);
        initView(attrs, 0);
    }

    public MyTitleBar(Context context, AttributeSet attrs, int defStyleAttr) {
        super(context, attrs, defStyleAttr);
        initView(attrs, defStyleAttr);
    }

    public void initView(AttributeSet attrs, int defStyleAttr) {
        final TypedArray a=getContext().obtainStyledAttributes(attrs,R.styleable.MyTitleBar,defStyleAttr,0);
        left_img=a.getResourceId(R.styleable.MyTitleBar_title_left_img,0);
        right_img=a.getResourceId(R.styleable.MyTitleBar_title_right_img,0);
        a.recycle();

        View v = View.inflate(getContext(),R.layout.mytitlebar_layout, this);
        if (left_img != 0) {
            ImageView left = (ImageView) v.findViewById(R.id.title_left_img);
            left.setImageResource(left_img);

        }
        if (right_img != 0) {
            ImageView right = (ImageView) v.findViewById(R.id.title_right_img);
            right.setImageResource(right_img);
        }
    }
}
这时,只需要在layout布局中引用即可:
    <com.zhangli.betterlife.myView.MyTitleBar
        android:id="@+id/near_title_img"
        android:layout_width="wrap_content"
        android:layout_height="wrap_content"
        app:title_left_img="@drawable/near_logo"
app:title_right_img="@drawable/tab_near"/><RelativeLayout
...
xmlns:app="http://schemas.android.com/apk/res-auto"
...>mytitlrbar_layout:
<?xml version="1.0" encoding="utf-8"?>
<RelativeLayout xmlns:android="http://schemas.android.com/apk/res/android"
                android:layout_width="match_parent"
                android:layout_height="wrap_content"
                android:padding="5dp"
                android:background="@color/white">

    <ImageView
        android:id="@+id/title_left_img"
        android:layout_width="wrap_content"
        android:layout_height="wrap_content"
        android:layout_alignParentLeft="true"/>

    <ImageView
        android:id="@+id/title_right_img"
        android:layout_width="wrap_content"
        android:layout_height="wrap_content"
        android:layout_alignParentRight="true"/>

</RelativeLayout>


 1909
1909


 被折叠的 条评论
为什么被折叠?
被折叠的 条评论
为什么被折叠?
 到【灌水乐园】发言


